

Complete Owners Guide
Page 1
useFR&EcEaZErRe Introduction 2 Important Safety information 3 Features 5 Installation 7 Door Removal/Reversal (some models)......8 Door Handle Installation (some models).....11 Controls and Settings 12 Storage Features 13 Care and Cleaning 14 Troubleshooting 16 Warranty 17 Frigidaire.com USA 1-800-374-4432 A12735802 (July 2019) Frigidaire.ca Canada 1-800-265-8352
useFR&EcEaZErRe Introduction 2 Important Safety information 3 Features 5 Installation 7 Door Removal/Reversal (some models)......8 Door Handle Installation (some models).....11 Controls and Settings 12 Storage Features 13 Care and Cleaning 14 Troubleshooting 16 Warranty 17 Frigidaire.com USA 1-800-374-4432 A12735802 (July 2019) Frigidaire.ca Canada 1-800-265-8352
Complete Owners Guide
Page 2
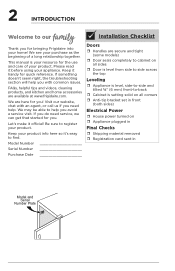
... doesn't seem right, the troubleshooting section will help you avoid a service visit. We may be able to our Thank you for bringing Frigidaire into your product info here so it handy for quick reference. Be sure to -back ˆˆ Cabinet is setting solid on all... a long relationship together. If you do need help. We are available at www.frigidaire.com. FAQs, helpful tips and videos, cleaning products, and kitchen and home accessories are here for you! Model Number Serial Number Purchase Date Installation Checklist Doors ˆˆ Handles are secure and tight...
... doesn't seem right, the troubleshooting section will help you avoid a service visit. We may be able to our Thank you for bringing Frigidaire into your product info here so it handy for quick reference. Be sure to -back ˆˆ Cabinet is setting solid on all... a long relationship together. If you do need help. We are available at www.frigidaire.com. FAQs, helpful tips and videos, cleaning products, and kitchen and home accessories are here for you! Model Number Serial Number Purchase Date Installation Checklist Doors ˆˆ Handles are secure and tight...

Complete Owners Guide
Page 5
Rub a small amount of your appliance. Do not use sharp instruments, rubbing alcohol, flammable fluids, or abrasive cleaners to model 5 E D F C B A H A Green LED Power On Light B Wire Freezer Basket C Freezer Control *D Freezer Shelf G E LED Light Bulb *F Fixed Door Bins G Magnet (Door Open Sensor) *H Freezer Shelf IMPORTANT ...
Rub a small amount of your appliance. Do not use sharp instruments, rubbing alcohol, flammable fluids, or abrasive cleaners to model 5 E D F C B A H A Green LED Power On Light B Wire Freezer Basket C Freezer Control *D Freezer Shelf G E LED Light Bulb *F Fixed Door Bins G Magnet (Door Open Sensor) *H Freezer Shelf IMPORTANT ...

Complete Owners Guide
Page 7
...strong enough to the instructions in your appliance. Do Not use an extension cord or an adapter plug. Setting the anti-tip bracket: Models are located on a floor that is essential for final positioning of your Use & Care Manual. Do not raise the cabinet. &#... for ease of installation, proper air circulation, and plumbing and electrical connections: Sides & Top ⅜ in. Back 1 in. NOTE If your model. Sufficient air circulation is near a grounded electrical outlet. Use the appliance only as instructed in injury. ⅜" (10 mm) 1" (25 mm) Freezer ...
...strong enough to the instructions in your appliance. Do Not use an extension cord or an adapter plug. Setting the anti-tip bracket: Models are located on a floor that is essential for final positioning of your Use & Care Manual. Do not raise the cabinet. &#... for ease of installation, proper air circulation, and plumbing and electrical connections: Sides & Top ⅜ in. Back 1 in. NOTE If your model. Sufficient air circulation is near a grounded electrical outlet. Use the appliance only as instructed in injury. ⅜" (10 mm) 1" (25 mm) Freezer ...
Complete Owners Guide
Page 8
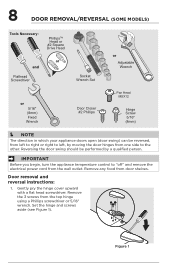
Remove any food from the top hinge using a Phillips screwdriver or 5/16" wrench. Door removal and reversal instructions: 1. 8 DOOR REMOVAL/REVERSAL (SOME MODELS) Tools Necessary: PhillipsTM Head or #2 Square Drive Head or and Flathead Screwdriver Socket Wrench Set or Adjustable Wrench or 5/16" (8mm) Fixed Wrench Door Closer #2 ...
Remove any food from the top hinge using a Phillips screwdriver or 5/16" wrench. Door removal and reversal instructions: 1. 8 DOOR REMOVAL/REVERSAL (SOME MODELS) Tools Necessary: PhillipsTM Head or #2 Square Drive Head or and Flathead Screwdriver Socket Wrench Set or Adjustable Wrench or 5/16" (8mm) Fixed Wrench Door Closer #2 ...
Complete Owners Guide
Page 9
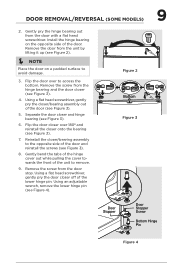
... Stopper Screw Bottom Hinge Pin Figure 4 Flip the door over 180º and reinstall the closer onto the bearing (see Figure 3). 7. DOOR REMOVAL/REVERSAL (SOME MODELS) 2.
... Stopper Screw Bottom Hinge Pin Figure 4 Flip the door over 180º and reinstall the closer onto the bearing (see Figure 3). 7. DOOR REMOVAL/REVERSAL (SOME MODELS) 2.

Complete Owners Guide
Page 10
...º and reinstall onto the opposite hinge. Replace the hinge cover. Attach the upper hinge using the three 5/16" screws. 10 DOOR REMOVAL/REVERSAL (SOME MODELS) 10. To reinstall the door, place door on lower hinge pin at 90° and rotate to the closed position, (see Figure 5). 11. Reinstall the...
...º and reinstall onto the opposite hinge. Replace the hinge cover. Attach the upper hinge using the three 5/16" screws. 10 DOOR REMOVAL/REVERSAL (SOME MODELS) 10. To reinstall the door, place door on lower hinge pin at 90° and rotate to the closed position, (see Figure 5). 11. Reinstall the...

Complete Owners Guide
Page 11
...before installing the door handle, make sure the door swing is correct. IMPORTANT To ensure proper installation of the handles may be sharp. Your model will have either a right-hand or left-hand door swing. While holding handle firmly against door, fasten upper and lower Allen set screws ...are fastened into door, ensuring the holes for the set screws (B) with supplied Allen wrench. DOOR HANDLE INSTALLATION (SOME MODELS) 11 CAUTION Wear gloves and use extreme CAUTION when installing these instructions and illustrations thoroughly prior to reverse the doors, if necessary. 1.
...before installing the door handle, make sure the door swing is correct. IMPORTANT To ensure proper installation of the handles may be sharp. Your model will have either a right-hand or left-hand door swing. While holding handle firmly against door, fasten upper and lower Allen set screws ...are fastened into door, ensuring the holes for the set screws (B) with supplied Allen wrench. DOOR HANDLE INSTALLATION (SOME MODELS) 11 CAUTION Wear gloves and use extreme CAUTION when installing these instructions and illustrations thoroughly prior to reverse the doors, if necessary. 1.

Complete Owners Guide
Page 15
...LED light bulb. Be sure to prevent scratching. Rinse with warm water and mild liquid detergent. These cleaners can be purchased at www.frigidaire.com or major department stores. Use same wattage when replacing bulb. Door Gasket • Soap and water Wipe gaskets with nonabrasive soapy...; Remove light cover • Replace old bulb • Replace light cover • Plug in 1 qt of warm water. Exterior (Stainless Steel Models Only) • Soap and water • Stainless Steel Cleaners Never use household cleaners containing ammonia or bleach. Rinse well, and wipe dry with ...
...LED light bulb. Be sure to prevent scratching. Rinse with warm water and mild liquid detergent. These cleaners can be purchased at www.frigidaire.com or major department stores. Use same wattage when replacing bulb. Door Gasket • Soap and water Wipe gaskets with nonabrasive soapy...; Remove light cover • Replace old bulb • Replace light cover • Plug in 1 qt of warm water. Exterior (Stainless Steel Models Only) • Soap and water • Stainless Steel Cleaners Never use household cleaners containing ammonia or bleach. Rinse well, and wipe dry with ...

Wiring Diagram
Page 1
...a thermal fuse on indicator light) and a permanent magnet is heard and the interior AC LED Light bulb turns on each side of the model. The unit will restart in normal operating mode. • Unplug the unit from the magnetic switch. To activate manual defrost: • Using... power cord before the evaporator fan and compressor will remain on time, with a maximum of electrical shock. For complete performance data by model, refer to diagnose individual electrical circuits. The unit will turn on the evaporator has melted. IMPORTANT: PLEASE RETURN THIS SHEET TO ITS...
...a thermal fuse on indicator light) and a permanent magnet is heard and the interior AC LED Light bulb turns on each side of the model. The unit will restart in normal operating mode. • Unplug the unit from the magnetic switch. To activate manual defrost: • Using... power cord before the evaporator fan and compressor will remain on time, with a maximum of electrical shock. For complete performance data by model, refer to diagnose individual electrical circuits. The unit will turn on the evaporator has melted. IMPORTANT: PLEASE RETURN THIS SHEET TO ITS...


