Use and Care Manual
Page 2
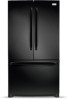
... follow the instructions below to help prevent accidents. 2 Children should never use gasoline, or other flammable liquids in Ice Maker (select models) House water supply connected to potential personal injury hazards. recheck in WARNING WARNING indicates a potentially hazardous situation which is unpacked. It is turned ON Final Checks Shipping material removed Fresh food and freezer temperatures set Crisper humidity controls set Registration...
... follow the instructions below to help prevent accidents. 2 Children should never use gasoline, or other flammable liquids in Ice Maker (select models) House water supply connected to potential personal injury hazards. recheck in WARNING WARNING indicates a potentially hazardous situation which is unpacked. It is turned ON Final Checks Shipping material removed Fresh food and freezer temperatures set Crisper humidity controls set Registration...
Use and Care Manual
Page 3
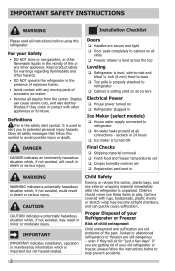
... of Refrigerators/ Freezers We strongly encourage responsible appliance recycling/disposal methods. IMPORTANT SAFETY INSTRUCTIONS Proper Disposal of the temperature control panel will disable your refrigerator's cooling system, but does not disconnect the power to the light bulb and other electrical components. Operating the refrigerator with 3-prong grounded plug CAUTION To avoid personal injury or property damage, handle tempered glass shelves carefully. Such damage is removed for your old refrigerator, make sure the refrigerant...
... of Refrigerators/ Freezers We strongly encourage responsible appliance recycling/disposal methods. IMPORTANT SAFETY INSTRUCTIONS Proper Disposal of the temperature control panel will disable your refrigerator's cooling system, but does not disconnect the power to the light bulb and other electrical components. Operating the refrigerator with 3-prong grounded plug CAUTION To avoid personal injury or property damage, handle tempered glass shelves carefully. Such damage is removed for your old refrigerator, make sure the refrigerant...
Use and Care Manual
Page 4
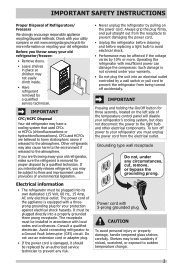
FEATURES AT A GLANCE *Features may vary according to model *LED Cluster Light Flipper Guide *LED Cluster Light Water Filter *LED Cluster Light *LED Cluster Light Crisper Drawer Deli Drawer Dairy Compartment Air Filter SpillSafe™ Shelf *LED Cluster Light Slide Under Shelf Flipper Mullion *LED Cluster Light Crisper Drawer Door Bin Adjustable Hinges *Ice Maker Ice Bin Freezer Baskets Toe Grille IMPORTANT Features not included with your refrigerator can be purchased at www.frigidaire.com or by calling 1-800-944-9044. 4
FEATURES AT A GLANCE *Features may vary according to model *LED Cluster Light Flipper Guide *LED Cluster Light Water Filter *LED Cluster Light *LED Cluster Light Crisper Drawer Deli Drawer Dairy Compartment Air Filter SpillSafe™ Shelf *LED Cluster Light Slide Under Shelf Flipper Mullion *LED Cluster Light Crisper Drawer Door Bin Adjustable Hinges *Ice Maker Ice Bin Freezer Baskets Toe Grille IMPORTANT Features not included with your refrigerator can be purchased at www.frigidaire.com or by calling 1-800-944-9044. 4

Use and Care Manual
Page 5
... Wrench Set Adjustable Wrench 3/8" Fixed Wrench Components Provided: Installation Top Hinge Cover Front Screw Top Hinge Cover Rear Screw Top Hinge Screw Lower Hinge Screw This Use & Care Guide provides general installation and operating instructions for your refrigerator is level and strong enough to a counter when removing food. Before starting the refrigerator, follow these important first steps. Sufficient air circulation is essential for the proper operation of installation, proper air circulation, and plumbing and electrical connections: Sides...
... Wrench Set Adjustable Wrench 3/8" Fixed Wrench Components Provided: Installation Top Hinge Cover Front Screw Top Hinge Cover Rear Screw Top Hinge Screw Lower Hinge Screw This Use & Care Guide provides general installation and operating instructions for your refrigerator is level and strong enough to a counter when removing food. Before starting the refrigerator, follow these important first steps. Sufficient air circulation is essential for the proper operation of installation, proper air circulation, and plumbing and electrical connections: Sides...
Use and Care Manual
Page 6
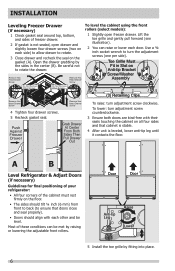
... using the front rollers (select models): 1 Slightly open drawer and slightly loosen four drawer screws (two on Anti-tip Bracket Screw/Washer Assembly (3) Retaining Clips Remove Hex Head Drawer Screw 4 Tighten four drawer screws. 5 Recheck gasket seal. Lift the toe grille and gently pull forward (see illustration). 2 You can be level. Toe Grille Must Fit in the center (B). INSTALLATION Leveling Freezer Drawer (if necessary) 1 Check gasket...
... using the front rollers (select models): 1 Slightly open drawer and slightly loosen four drawer screws (two on Anti-tip Bracket Screw/Washer Assembly (3) Retaining Clips Remove Hex Head Drawer Screw 4 Tighten four drawer screws. 5 Recheck gasket seal. Lift the toe grille and gently pull forward (see illustration). 2 You can be level. Toe Grille Must Fit in the center (B). INSTALLATION Leveling Freezer Drawer (if necessary) 1 Check gasket...
Use and Care Manual
Page 10
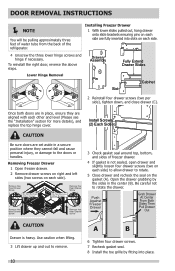
... careful not to the doors or handles. Removing Freezer Drawer 1 Open freezer drawer. 2 Remove drawer screws on right and left sides (two screws on the gasket (A). Installing Freezer Drawer 1 With lower slides pulled out, hang drawer onto slide brackets ensuring pins on each side. 4 Unscrew the three lower hinge screws and hinge if necessary. DOOR REMOVAL INSTRUCTIONS NOTE You will be pulling approximately three feet of water tube from the back of freezer drawer. 4 If gasket is...
... careful not to the doors or handles. Removing Freezer Drawer 1 Open freezer drawer. 2 Remove drawer screws on right and left sides (two screws on the gasket (A). Installing Freezer Drawer 1 With lower slides pulled out, hang drawer onto slide brackets ensuring pins on each side. 4 Unscrew the three lower hinge screws and hinge if necessary. DOOR REMOVAL INSTRUCTIONS NOTE You will be pulling approximately three feet of water tube from the back of freezer drawer. 4 If gasket is...
Use and Care Manual
Page 11
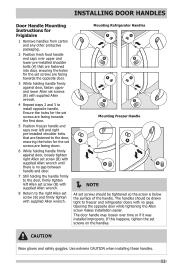
... (B) and firmly tighten with no gap between handle and door. 7 Still holding handle firmly against door, fasten upper and lower Allen set screws (B) with supplied Allen wrench. 4 Repeat steps 2 and 3 to install opposite handle. Opening the opposite door while tightening the Allen screw makes installation easier. Use extreme CAUTION when installing these handles. 11 INSTALLING DOOR HANDLES Door Handle Mounting Instructions for Frigidaire 1 Remove handles from carton and any other protective packaging. 2 Position fresh...
... (B) and firmly tighten with no gap between handle and door. 7 Still holding handle firmly against door, fasten upper and lower Allen set screws (B) with supplied Allen wrench. 4 Repeat steps 2 and 3 to install opposite handle. Opening the opposite door while tightening the Allen screw makes installation easier. Use extreme CAUTION when installing these handles. 11 INSTALLING DOOR HANDLES Door Handle Mounting Instructions for Frigidaire 1 Remove handles from carton and any other protective packaging. 2 Position fresh...
Use and Care Manual
Page 14
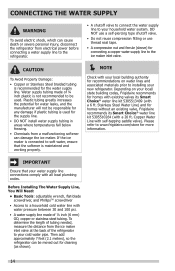
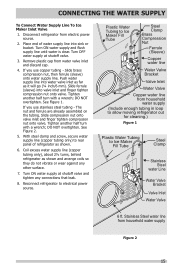
.... • A compression nut and ferrule (sleeve) for cleaning (as shown). 14 IMPORTANT Ensure that the softener is not recommended to be moved out for connecting a copper water supply line to the ice maker inlet valve. NOTE Check with a 6 ft. CONNECTING THE WATER SUPPLY WARNING To avoid electric shock, which can damage the ice maker. Water supply tubing made of tubing needed, measure the distance from electrical power before connecting a water supply line to installing your new refrigerator.
.... • A compression nut and ferrule (sleeve) for cleaning (as shown). 14 IMPORTANT Ensure that the softener is not recommended to be moved out for connecting a copper water supply line to the ice maker inlet valve. NOTE Check with a 6 ft. CONNECTING THE WATER SUPPLY WARNING To avoid electric shock, which can damage the ice maker. Water supply tubing made of tubing needed, measure the distance from electrical power before connecting a water supply line to installing your new refrigerator.
Use and Care Manual
Page 15
... wear against any connections that leak. 8. Tighten another half turn with a wrench; DO NOT overtighten. Plastic Water Tubing to Ice Maker Fill Tube Steel Clamp Brass Compression Nut Ferrule (Sleeve) Copper water line Water Valve Bracket Valve Inlet Water Valve Copper water line from water valve inlet and discard cap. 4. Stainless Steel water line from electric power source. 2. If you use copper tubing - With steel clamp and screw, secure water supply line (copper tubing only) to rear panel of water supply line into sink...
... wear against any connections that leak. 8. Tighten another half turn with a wrench; DO NOT overtighten. Plastic Water Tubing to Ice Maker Fill Tube Steel Clamp Brass Compression Nut Ferrule (Sleeve) Copper water line Water Valve Bracket Valve Inlet Water Valve Copper water line from water valve inlet and discard cap. 4. Stainless Steel water line from electric power source. 2. If you use copper tubing - With steel clamp and screw, secure water supply line (copper tubing only) to rear panel of water supply line into sink...

Use and Care Manual
Page 16
... settings Resets all refrigerator settings such as temp, temp display and tones to activate the options below. The temperature display will time out after filter change. The display will begin to your refrigerator. Alarms Door Ajar High Temp Power Fail If the door has been left open for three seconds to reset after 10 seconds and return to clean the refrigerator. In the event of the control panel. It also turns off by closing the door. The alarm...
... settings Resets all refrigerator settings such as temp, temp display and tones to activate the options below. The temperature display will time out after filter change. The display will begin to your refrigerator. Alarms Door Ajar High Temp Power Fail If the door has been left open for three seconds to reset after 10 seconds and return to clean the refrigerator. In the event of the control panel. It also turns off by closing the door. The alarm...
Use and Care Manual
Page 18
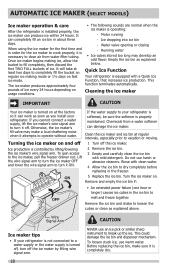
... operate without water. Cleaning the ice maker IMPORTANT CAUTION Your ice maker is turned on and off 1 Turn off the ice maker by lifting/lowering the ice maker's wire signal arm. Chemicals from water filter tubing. Do not use warm water. Remove the ice bin and shake to vacation or moving. Wire Signal Arm Ice maker tips • If your refrigerator is softened, be sure the softener is properly maintained. Motor running - Ice dropping into ice bin - Empty the ice bin as you cannot connect a water supply...
... operate without water. Cleaning the ice maker IMPORTANT CAUTION Your ice maker is turned on and off 1 Turn off the ice maker by lifting/lowering the ice maker's wire signal arm. Chemicals from water filter tubing. Do not use warm water. Remove the ice bin and shake to vacation or moving. Wire Signal Arm Ice maker tips • If your refrigerator is softened, be sure the softener is properly maintained. Motor running - Ice dropping into ice bin - Empty the ice bin as you cannot connect a water supply...

Use and Care Manual
Page 23
... refrigerator to run longer and use aluminum foil, freezer wrap, freezer bags, or airtight containers. Packaging foods for short-term storage. Force as much warm food to the freezer at least ⅔ full. This overloads the freezer, slows the rate of freezing, and can raise the temperature of frozen foods. • Leave a space between packages, so cold air can cause food to dry out, change...
... refrigerator to run longer and use aluminum foil, freezer wrap, freezer bags, or airtight containers. Packaging foods for short-term storage. Force as much warm food to the freezer at least ⅔ full. This overloads the freezer, slows the rate of freezing, and can raise the temperature of frozen foods. • Leave a space between packages, so cold air can cause food to dry out, change...
Use and Care Manual
Page 24
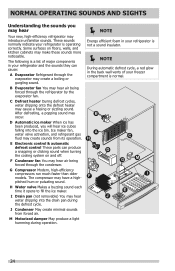
... your freezer compartment is normal. 24 After defrosting, a popping sound may have a highpitched hum or pulsating sound. F Condenser fan You may hear water dripping into the ice bin. H Water valve Makes a buzzing sound each time it opens to fill the ice maker. Some surfaces on and off. The following is operating correctly. G Compressor Modern, high-efficiency compressors run much faster than older models. These sounds normally indicate your refrigerator is a list...
... your freezer compartment is normal. 24 After defrosting, a popping sound may have a highpitched hum or pulsating sound. F Condenser fan You may hear water dripping into the ice bin. H Water valve Makes a buzzing sound each time it opens to fill the ice maker. Some surfaces on and off. The following is operating correctly. G Compressor Modern, high-efficiency compressors run much faster than older models. These sounds normally indicate your refrigerator is a list...
Use and Care Manual
Page 25
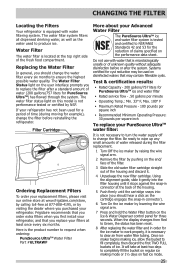
... this model is not performance tested or certified by NSF. When the display changes from water filter tubing. Once ice maker begins making mode or 1½ days on fast ice mode. 25 Do not use with water filtering system. The water filter system filters all dispensed drinking water, as well as the cartridge engages the snap-in order for example), change the filter. Replacing the Water Filter In general, you purchased your refrigerator has not been used on the user interface...
... this model is not performance tested or certified by NSF. When the display changes from water filter tubing. Once ice maker begins making mode or 1½ days on fast ice mode. 25 Do not use with water filtering system. The water filter system filters all dispensed drinking water, as well as the cartridge engages the snap-in order for example), change the filter. Replacing the Water Filter In general, you purchased your refrigerator has not been used on the user interface...

Use and Care Manual
Page 26
... control panel for three seconds. Air Filter Replacement cartridge, part #PAULTRA 1 Open the air filter door. 2 Remove the old filter and discard it. 3 Unpack the new filter and slide it into the housing. 4 To close the air filter door, push the top and bottom to replace the filter after a few seconds. 26 You may want to "Good," the status has been reset. 6 The Air Filter Reset will turn itself off after six months). When the display changes...
... control panel for three seconds. Air Filter Replacement cartridge, part #PAULTRA 1 Open the air filter door. 2 Remove the old filter and discard it. 3 Unpack the new filter and slide it into the housing. 4 To close the air filter door, push the top and bottom to replace the filter after a few seconds. 26 You may want to "Good," the status has been reset. 6 The Air Filter Reset will turn itself off after six months). When the display changes...
Use and Care Manual
Page 27
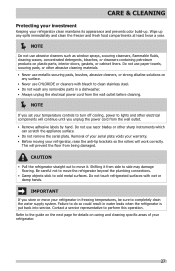
... caring and cleaning specific areas of your serial plate voids your warranty. • Before moving your refrigerator, raise the anti-tip brackets so the rollers will work correctly. IMPORTANT If you set your temperature controls to turn off cooling, power to perform this operation. Contact a service representative to lights and other sharp instruments which can scratch the appliance surface. • Do not remove the serial plate. Refer to clean stainless...
... caring and cleaning specific areas of your serial plate voids your warranty. • Before moving your refrigerator, raise the anti-tip brackets so the rollers will work correctly. IMPORTANT If you set your temperature controls to turn off cooling, power to perform this operation. Contact a service representative to lights and other sharp instruments which can scratch the appliance surface. • Do not remove the serial plate. Refer to clean stainless...

Use and Care Manual
Page 28
... any removable items (bins, drawers, etc.) in dishwasher. • Allow glass to warm to room temperature before immersing in warm water. • Remove toe grille (see Installation Instructions). • Vacuum both doors open if necessary. • Remove all food and ice. • If using a handcart, load from refrigerator compartment. • Turn automatic ice maker off (see "Controls" section for location of On/Off button) and disconnect power cord. • Turn water supply valve to closed position. • Clean interior thoroughly...
... any removable items (bins, drawers, etc.) in dishwasher. • Allow glass to warm to room temperature before immersing in warm water. • Remove toe grille (see Installation Instructions). • Vacuum both doors open if necessary. • Remove all food and ice. • If using a handcart, load from refrigerator compartment. • Turn automatic ice maker off (see "Controls" section for location of On/Off button) and disconnect power cord. • Turn water supply valve to closed position. • Clean interior thoroughly...
Use and Care Manual
Page 30
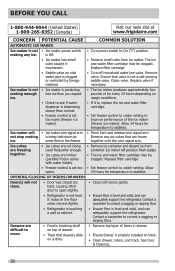
...; Turn off household water line valve. See Care & Cleaning. 30 Ice maker will not close. • Door was closed too hard, causing other door to On ("I") position. Allow warm. 24 hours for temperature to correct a sagging or sloping floor. Replace filter cartridge. • Saddle valve on is dirty. • Remove top layer of drawer. • Track that drawers slide on cold water pipe is clogged or restricted by Remove any ice. Replace filter cartridge. • Freezer control is set...
...; Turn off household water line valve. See Care & Cleaning. 30 Ice maker will not close. • Door was closed too hard, causing other door to On ("I") position. Allow warm. 24 hours for temperature to correct a sagging or sloping floor. Replace filter cartridge. • Saddle valve on is dirty. • Remove top layer of drawer. • Track that drawers slide on cold water pipe is clogged or restricted by Remove any ice. Replace filter cartridge. • Freezer control is set...
Use and Care Manual
Page 31
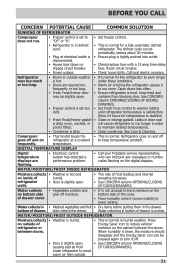
... REFRIGERATOR Compressor does not run more. See Care & Cleaning. See CONCERN column OPENING/CLOSING OF DOORS/ DRAWERS. • Freezer control is set to "OF" or "0". • Refrigerator is lower, the moisture should disappear and the Energy Saver icon can interpret any messages or number codes flashing on outside of the cover. • Move humidity control (some models) to stabilize. • Fresh Food/freezer gasket • Clean or change gasket. DIGITAL TEMPERATURE DISPLAY Digital temperature displays are opened too • Warm air...
... REFRIGERATOR Compressor does not run more. See Care & Cleaning. See CONCERN column OPENING/CLOSING OF DOORS/ DRAWERS. • Freezer control is set to "OF" or "0". • Refrigerator is lower, the moisture should disappear and the Energy Saver icon can interpret any messages or number codes flashing on outside of the cover. • Move humidity control (some models) to stabilize. • Fresh Food/freezer gasket • Clean or change gasket. DIGITAL TEMPERATURE DISPLAY Digital temperature displays are opened too • Warm air...
Use and Care Manual
Page 32
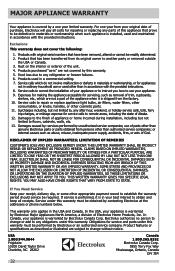
... transferred from persons other cosmetic parts. 11. Expenses for making the appliance accessible for servicing, such as -is" are not covered by this warranty. 5. Service calls to another party or removed outside the USA or Canada. 3. use of parts other than genuine Electrolux parts or parts obtained from its original owner to repair or replace appliance light bulbs, air filters, water filters, other consumables, or knobs, handles, or other than in...
... transferred from persons other cosmetic parts. 11. Expenses for making the appliance accessible for servicing, such as -is" are not covered by this warranty. 5. Service calls to another party or removed outside the USA or Canada. 3. use of parts other than genuine Electrolux parts or parts obtained from its original owner to repair or replace appliance light bulbs, air filters, water filters, other consumables, or knobs, handles, or other than in...


