Wiring Diagram (All Languages)
Page 1
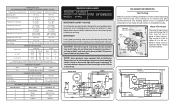
...equal to their original position and properly secured. To terminate defrost, depress the fresh food light switch 5 times in 6 seconds. (some models) ORANGE (some models) ICE MAKER ICE MAKER INFORMATION Test Cycling Remove cover by inserting screwdriver in 6 seconds (light bulb must be checked. BLU P-2 WATER ...be returned to 20cc (.68 oz.). One full turn is replaced, the fill volume must be working). AUTOMATIC DEFROST TOP FREEZER P/N: 241588203 MODELS (R134a) IMPORTANT SAFETY NOTICE The information provided herein is designed to 1.6 115 VAC (127 VAC Max) 115 VAC (127 VAC Max...
...equal to their original position and properly secured. To terminate defrost, depress the fresh food light switch 5 times in 6 seconds. (some models) ORANGE (some models) ICE MAKER ICE MAKER INFORMATION Test Cycling Remove cover by inserting screwdriver in 6 seconds (light bulb must be checked. BLU P-2 WATER ...be returned to 20cc (.68 oz.). One full turn is replaced, the fill volume must be working). AUTOMATIC DEFROST TOP FREEZER P/N: 241588203 MODELS (R134a) IMPORTANT SAFETY NOTICE The information provided herein is designed to 1.6 115 VAC (127 VAC Max) 115 VAC (127 VAC Max...
Wiring Diagram (All Languages)
Page 2
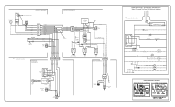
... RED LT. BLUE LT. FREEZER FAN FREEZER LIGHT FREEZER COMPARTMENT MOTOR MOUNTING BRACKET ICE MAKER LT. BLUE FREEZER LIGHT SWITCH NOTE DENOTES NOT ON ALL MODELS. BLUE SPLICE D DIODES TO BE POLARIZED AS SHOWN. BLUE LT. BLUE YEL/BLACK REFRIGERATOR LIGHT SWITCH BLACK COLD CONTROL YEL/BLACK YEL/BLACK ORANGE BLACK...
... RED LT. BLUE LT. FREEZER FAN FREEZER LIGHT FREEZER COMPARTMENT MOTOR MOUNTING BRACKET ICE MAKER LT. BLUE FREEZER LIGHT SWITCH NOTE DENOTES NOT ON ALL MODELS. BLUE SPLICE D DIODES TO BE POLARIZED AS SHOWN. BLUE LT. BLUE YEL/BLACK REFRIGERATOR LIGHT SWITCH BLACK COLD CONTROL YEL/BLACK YEL/BLACK ORANGE BLACK...

Installation Instructions (All Languages)
Page 1
... 24 hours Ice Maker is not connected immediately. Remove toe grille. 2. Your refrigerator is equipped with Leveling Screw (some models) Raise the front of installation, proper air circulation, and plumbing and electrical connections: • Sides & Top..........3/8" •...; t K WATER SUPPLY 4 INSTALLATION CLEARANCES Allow the following clearances for water leaks. Toe Grille NOTE Adjustable Front Roller (some models) Raise Stationary Front Roller with adjustable front rollers or front leveling screws to adjust front rollers. Use flat-blade screwdriver or 3/8"...
... 24 hours Ice Maker is not connected immediately. Remove toe grille. 2. Your refrigerator is equipped with Leveling Screw (some models) Raise the front of installation, proper air circulation, and plumbing and electrical connections: • Sides & Top..........3/8" •...; t K WATER SUPPLY 4 INSTALLATION CLEARANCES Allow the following clearances for water leaks. Toe Grille NOTE Adjustable Front Roller (some models) Raise Stationary Front Roller with adjustable front rollers or front leveling screws to adjust front rollers. Use flat-blade screwdriver or 3/8"...

Complete Owner's Guide (English)
Page 2
... for warnings regarding flammability and other appliance. Staples can cause severe cuts, and also destroy finishes if they come in contact with filter housing (select models) Final Checks Shipping material removed Fresh food and freezer temperatures set Crisper humidity controls set Registration card sent in death or...
... for warnings regarding flammability and other appliance. Staples can cause severe cuts, and also destroy finishes if they come in contact with filter housing (select models) Final Checks Shipping material removed Fresh food and freezer temperatures set Crisper humidity controls set Registration card sent in death or...

Complete Owner's Guide (English)
Page 4
... of installation, proper air circulation, and plumbing and electrical connections: Sides & Top Back 3/8 inch 1 inch NOTE If your model. Leveling All four corners of direct sunlight and away from the range, dishwasher or other heat sources. • The refrigerator must rest...;C) or rise above 110°F (43°C). To level your refrigerator must be able to -side. Adjustable Front Roller (some models) Raise Stationary Front Roller with adjustable front rollers or front leveling screws to adjust leveling screws. The refrigerator should slope 1/4" to 1/2"...
... of installation, proper air circulation, and plumbing and electrical connections: Sides & Top Back 3/8 inch 1 inch NOTE If your model. Leveling All four corners of direct sunlight and away from the range, dishwasher or other heat sources. • The refrigerator must rest...;C) or rise above 110°F (43°C). To level your refrigerator must be able to -side. Adjustable Front Roller (some models) Raise Stationary Front Roller with adjustable front rollers or front leveling screws to adjust leveling screws. The refrigerator should slope 1/4" to 1/2"...

Complete Owner's Guide (English)
Page 6
... freezer handle: 1 Place rounded part of handle onto shoulder screw on face of door and align the two (2) holes in top of door. Stainless Steel Models IMPORTANT Stainless steel handles and doors are not reversible. 6 Additionally, before installing the door handles, make sure the door swing is flush with the door...
... freezer handle: 1 Place rounded part of handle onto shoulder screw on face of door and align the two (2) holes in top of door. Stainless Steel Models IMPORTANT Stainless steel handles and doors are not reversible. 6 Additionally, before installing the door handles, make sure the door swing is flush with the door...

Complete Owner's Guide (English)
Page 9
... temperatures in the refrigerator and freezer compartments. To turn ice maker OFF by lifting the wire signal arm until it clicks and locks in most models at least 8 to the light bulb and other electrical components. New plumbing connections may have an odd flavor. Refrigerator & Freezer Controls NOTE When first...
... temperatures in the refrigerator and freezer compartments. To turn ice maker OFF by lifting the wire signal arm until it clicks and locks in most models at least 8 to the light bulb and other electrical components. New plumbing connections may have an odd flavor. Refrigerator & Freezer Controls NOTE When first...

Complete Owner's Guide (English)
Page 11
... Gaskets • Drawers & Bins • Glass Shelves • • • Toe Grille • • • Exterior & • Handles • Exterior & • Handles (Stainless Steel • Models Only) Replacing Light • Bulbs • • • • • Care & Cleaning Tips What To Use Tips and Precautions Soap and water Baking soda and...
... Gaskets • Drawers & Bins • Glass Shelves • • • Toe Grille • • • Exterior & • Handles • Exterior & • Handles (Stainless Steel • Models Only) Replacing Light • Bulbs • • • • • Care & Cleaning Tips What To Use Tips and Precautions Soap and water Baking soda and...

Complete Owner's Guide (English)
Page 12
...a 24 hour period. • Water supply is turned off. • Water pressure is too low. • The freezer is satisfactory. Cabinet light not working . (some models) Before calling for service, review this appliance. • Ensure plug is tightly pushed into electrical outlet. • Check/replace fuse with a 15 amp time-delay... fuse. Before You Call 1-800-944-9044 (United States) 1-800-265-8352 (Canada) Visit our web site at www.frigidaire.com. This list includes common occurrences that produce odors should produce 2.5 to a warmer setting.
...a 24 hour period. • Water supply is turned off. • Water pressure is too low. • The freezer is satisfactory. Cabinet light not working . (some models) Before calling for service, review this appliance. • Ensure plug is tightly pushed into electrical outlet. • Check/replace fuse with a 15 amp time-delay... fuse. Before You Call 1-800-944-9044 (United States) 1-800-265-8352 (Canada) Visit our web site at www.frigidaire.com. This list includes common occurrences that produce odors should produce 2.5 to a warmer setting.


