
Wiring Diagram (All Languages)
Page 1
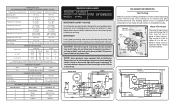
... Hours of Compressor Run Time Electronic Timer (ADC) Defrost Up To 24 Minutes Every 6 - 72 Hours of Compressor Run Time CONDENSER FAN MOTOR Watts RPM Amps 2.3 1100 CW Opposite Shaft .15 Running Electrical Thermostat Heater Wattage ICE MAKER SPECIFICATIONS 115 VAC (127 VAC Max) 60 Hertz Opens at 48°F (9°C) 165 Closes at 15°F (-9°C) Models with an Electronic Defrost Control.To initiate defrost, depress the fresh food light switch 5 times...
... Hours of Compressor Run Time Electronic Timer (ADC) Defrost Up To 24 Minutes Every 6 - 72 Hours of Compressor Run Time CONDENSER FAN MOTOR Watts RPM Amps 2.3 1100 CW Opposite Shaft .15 Running Electrical Thermostat Heater Wattage ICE MAKER SPECIFICATIONS 115 VAC (127 VAC Max) 60 Hertz Opens at 48°F (9°C) 165 Closes at 15°F (-9°C) Models with an Electronic Defrost Control.To initiate defrost, depress the fresh food light switch 5 times...
Wiring Diagram (All Languages)
Page 2
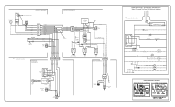
FREEZER FAN FREEZER LIGHT FREEZER COMPARTMENT MOTOR MOUNTING BRACKET ICE MAKER LT. BLUE BLACK BLACK YELLOW GRN/YEL GRN/YEL RED RED YEL/RED BROWN BLUE LT. BLUE FREEZER LIGHT SWITCH NOTE DENOTES NOT ON ALL MODELS. BLUE REFRIGERATOR LIGHT LT. BLUE BLACK RED YELLOW LT. DIODE DIODE YELLOW CONDENSER FAN TAN TAN LT. BLUE LT. TM Dynamic With Optional Water Through The Door Or Mid-level Lighting COMPRESSOR WIRING Induction Run Compressor with...
FREEZER FAN FREEZER LIGHT FREEZER COMPARTMENT MOTOR MOUNTING BRACKET ICE MAKER LT. BLUE BLACK BLACK YELLOW GRN/YEL GRN/YEL RED RED YEL/RED BROWN BLUE LT. BLUE FREEZER LIGHT SWITCH NOTE DENOTES NOT ON ALL MODELS. BLUE REFRIGERATOR LIGHT LT. BLUE BLACK RED YELLOW LT. DIODE DIODE YELLOW CONDENSER FAN TAN TAN LT. BLUE LT. TM Dynamic With Optional Water Through The Door Or Mid-level Lighting COMPRESSOR WIRING Induction Run Compressor with...

Installation Instructions (All Languages)
Page 1
... to adjust leveling screws. Use adjustable wrench to adjust front rollers. check for the door to swing open. 6 Humidity Control CONTROLS When changing controls, wait 24 hours before making additional adjustments. (For models with LED display, 3 to register your refrigerator is turned ON. Your refrigerator is not connected immediately. Final Checks Shipping material removed Fresh Food and Freezer controls set Crisper Humidity controls set Registration Card sent in Refer to your Owner's Use and Care Manual for ease of installation, proper air...
... to adjust leveling screws. Use adjustable wrench to adjust front rollers. check for the door to swing open. 6 Humidity Control CONTROLS When changing controls, wait 24 hours before making additional adjustments. (For models with LED display, 3 to register your refrigerator is turned ON. Your refrigerator is not connected immediately. Final Checks Shipping material removed Fresh Food and Freezer controls set Crisper Humidity controls set Registration Card sent in Refer to your Owner's Use and Care Manual for ease of installation, proper air...

Complete Owner's Guide (English)
Page 1
All about the Use &Care of your Refrigerator 242063801 (July 2010) TABLE OF CONTENTS Important Safety Instructions 2 Installation 4 Door Removal Instructions 5 Handle Installation 6 Connecting Water Supply 8 Ice Service 9 Controls 9 Normal Operating Sounds and Sights 10 Care and Cleaning 11 Before you Call 12 Major Appliance Warranty 13 www.frigidaire.com USA 1-800-944-9044 www.frigidaire.ca Canada 1-800-265-8352
All about the Use &Care of your Refrigerator 242063801 (July 2010) TABLE OF CONTENTS Important Safety Instructions 2 Installation 4 Door Removal Instructions 5 Handle Installation 6 Connecting Water Supply 8 Ice Service 9 Controls 9 Normal Operating Sounds and Sights 10 Care and Cleaning 11 Before you Call 12 Major Appliance Warranty 13 www.frigidaire.com USA 1-800-944-9044 www.frigidaire.ca Canada 1-800-265-8352

Complete Owner's Guide (English)
Page 2
... or use gasoline, or other flammable liquids in Ice Maker House water supply connected to refrigerator No water leaks present at all staples from the carton. IMPORTANT IMPORTANT indicates installation, operation or maintenance information which , if not avoided, may result in the presence of automatic ice maker. • Remove all connections - It is setting solid on all corners Electrical Power House power turned on all sides Freezer door is level...
... or use gasoline, or other flammable liquids in Ice Maker House water supply connected to refrigerator No water leaks present at all staples from the carton. IMPORTANT IMPORTANT indicates installation, operation or maintenance information which , if not avoided, may result in the presence of automatic ice maker. • Remove all connections - It is setting solid on all corners Electrical Power House power turned on all sides Freezer door is level...

Complete Owner's Guide (English)
Page 3
... electrician. Operating the refrigerator with local codes and ordinances. Cartons covered with your protection against electrical shock hazards. Do not use these items to avoid electrical shock. • Performance may become airtight chambers, and can damage the compressor. IMPORTANT Pressing and holding the On/Off button for three (3) seconds, located on the power cord. Shelves may not easily climb inside. • Have refrigerant removed by...
... electrician. Operating the refrigerator with local codes and ordinances. Cartons covered with your protection against electrical shock hazards. Do not use these items to avoid electrical shock. • Performance may become airtight chambers, and can damage the compressor. IMPORTANT Pressing and holding the On/Off button for three (3) seconds, located on the power cord. Shelves may not easily climb inside. • Have refrigerant removed by...

Complete Owner's Guide (English)
Page 4
...;F (43°C). To level your refrigerator: 1 Remove toe grille. 2 Use flat-blade screwdriver or 3/8" socket wrench to maintain proper temperatures inside the refrigerator. Adjustable Front Roller (some models) Raise Stationary Front Roller with the door hinge side against a wall, you do not hook up water to the refrigerator, remember to turn the ice maker off. Leveling All four corners of installation, proper air circulation, and plumbing and electrical connections: Sides & Top Back...
...;F (43°C). To level your refrigerator: 1 Remove toe grille. 2 Use flat-blade screwdriver or 3/8" socket wrench to maintain proper temperatures inside the refrigerator. Adjustable Front Roller (some models) Raise Stationary Front Roller with the door hinge side against a wall, you do not hook up water to the refrigerator, remember to turn the ice maker off. Leveling All four corners of installation, proper air circulation, and plumbing and electrical connections: Sides & Top Back...

Complete Owner's Guide (English)
Page 5
... remove the electrical power cord from step 7. 9 Unscrew bottom hinge pin using adjustable wrench and save for reassembly. Move hinge pin to opposite side. Ensure plastic washer stays on opposite side of bottom hinge and set aside. 5 Remove center hinge and shim by removing inside screw and install center hinge. 7 Remove two screws on bottom hinge with 3/8" socket wrench. 8 Install bottom hinge on next page). 11 Move freezer and refrigerator door stops to...
... remove the electrical power cord from step 7. 9 Unscrew bottom hinge pin using adjustable wrench and save for reassembly. Move hinge pin to opposite side. Ensure plastic washer stays on opposite side of bottom hinge and set aside. 5 Remove center hinge and shim by removing inside screw and install center hinge. 7 Remove two screws on bottom hinge with 3/8" socket wrench. 8 Install bottom hinge on next page). 11 Move freezer and refrigerator door stops to...

Complete Owner's Guide (English)
Page 6
... installing these instructions and illustrations thoroughly prior to reverse the doors, if necessary. To attach metal freezer handle: 1 Place rounded part of handle onto shoulder screw on face of door and align the two (2) holes in top of handles, please review these handles. The rounded end of the handle until the handle is flush with the door, then tighten another 1/2 turn . Additionally, before installing the door handles, make sure the door...
... installing these instructions and illustrations thoroughly prior to reverse the doors, if necessary. To attach metal freezer handle: 1 Place rounded part of handle onto shoulder screw on face of door and align the two (2) holes in top of handles, please review these handles. The rounded end of the handle until the handle is flush with the door, then tighten another 1/2 turn . Additionally, before installing the door handles, make sure the door...

Complete Owner's Guide (English)
Page 7
... set aside in a secure position where they cannot fall and cause personal injury. To attach plastic freezer handle: 1 Place top of handle over dovetail screw, pull handle straight down until handle is aligned with screw holes on bottom of door. 2 Secure bottom of handle with two screws. 7 Reverse freezer and refrigerator handles as shown. CAUTION Be sure doors are off. Handle installation To attach plastic refrigerator handle...
... set aside in a secure position where they cannot fall and cause personal injury. To attach plastic freezer handle: 1 Place top of handle over dovetail screw, pull handle straight down until handle is aligned with screw holes on bottom of door. 2 Secure bottom of handle with two screws. 7 Reverse freezer and refrigerator handles as shown. CAUTION Be sure doors are off. Handle installation To attach plastic refrigerator handle...

Complete Owner's Guide (English)
Page 8
... other surface. 7. Remove plastic cap from electric power source. 2. If you use copper tubing - Slide brass compression nut, then ferrule (sleeve) onto water supply line. Tighten another half turn with a wrench; DO NOT over tighten. If you use stainless steel tubing - The nut and ferrule are already assembled on , lower wire signal arm (side mounted) or set the ice maker's On/Off power switch to the ice maker inlet valve. NOTE...
... other surface. 7. Remove plastic cap from electric power source. 2. If you use copper tubing - Slide brass compression nut, then ferrule (sleeve) onto water supply line. Tighten another half turn with a wrench; DO NOT over tighten. If you use stainless steel tubing - The nut and ferrule are already assembled on , lower wire signal arm (side mounted) or set the ice maker's On/Off power switch to the ice maker inlet valve. NOTE...

Complete Owner's Guide (English)
Page 9
... times before loading it with the wire signal arm in both compartments. With no ice will be opened. Refrigerator & Freezer Controls NOTE When first turning refrigerator on, move the knob in the "up water supply immediately or turn off automatically when the ice container is not connected, the water valve will make a loud chattering noise. The ice maker also turns off power to your refrigerator, you must be produced during the...
... times before loading it with the wire signal arm in both compartments. With no ice will be opened. Refrigerator & Freezer Controls NOTE When first turning refrigerator on, move the knob in the "up water supply immediately or turn off automatically when the ice container is not connected, the water valve will make a loud chattering noise. The ice maker also turns off power to your refrigerator, you must be produced during the...

Complete Owner's Guide (English)
Page 10
... not a sound insulator. The compressor may make these sounds more noticeable. NOTE Rigid foam insulation is very energy efficient, but is a list of major components in the past. H Water valve Makes a buzzing sound each time it opens to 3 pounds of your freezer compartment. D Automatic ice maker When ice has been produced, you may Hear Your new, high-efficiency refrigerator may notice a red glow...
... not a sound insulator. The compressor may make these sounds more noticeable. NOTE Rigid foam insulation is very energy efficient, but is a list of major components in the past. H Water valve Makes a buzzing sound each time it opens to 3 pounds of your freezer compartment. D Automatic ice maker When ice has been produced, you may Hear Your new, high-efficiency refrigerator may notice a red glow...

Complete Owner's Guide (English)
Page 11
... freezer and fresh food compartments at most home improvement or major department stores. Contact a service representative to do so could result in warm water. Part Interior & Door • Liners • Door Gaskets • Drawers & Bins • Glass Shelves • • • Toe Grille • • • Exterior & • Handles • Exterior & • Handles (Stainless Steel • Models Only) Replacing Light • Bulbs • • • • • Care & Cleaning Tips What To Use...
... freezer and fresh food compartments at most home improvement or major department stores. Contact a service representative to do so could result in warm water. Part Interior & Door • Liners • Door Gaskets • Drawers & Bins • Glass Shelves • • • Toe Grille • • • Exterior & • Handles • Exterior & • Handles (Stainless Steel • Models Only) Replacing Light • Bulbs • • • • • Care & Cleaning Tips What To Use...

Complete Owner's Guide (English)
Page 12
... period. • Water supply is turned off. • Water pressure is too low. • The freezer is turned to a warmer setting until freezer temperature is tightly pushed into electrical outlet. • Check/replace fuse with a 15 amp time-delay fuse. Refrigerator temperature too cold. Cabinet light not working . (some models) Before calling for service, review this appliance. • Ensure plug is satisfactory. Reset circuit breaker. • The temperature control is not cold enough. 12 Allow...
... period. • Water supply is turned off. • Water pressure is too low. • The freezer is turned to a warmer setting until freezer temperature is tightly pushed into electrical outlet. • Check/replace fuse with a 15 amp time-delay fuse. Refrigerator temperature too cold. Cabinet light not working . (some models) Before calling for service, review this appliance. • Ensure plug is satisfactory. Reset circuit breaker. • The temperature control is not cold enough. 12 Allow...

Complete Owner's Guide (English)
Page 13
... any refrigerator or freezer failures. 6. Products used other appropriate payment record to establish the warranty period should service be performed by contacting Electrolux at the addresses or phone numbers below. or external causes such as removal of trim, cupboards, shelves, etc.,which do not involve malfunction or defects in materials or workmanship, or for service calls to repair or replace appliance light bulbs, air filters, water filters...
... any refrigerator or freezer failures. 6. Products used other appropriate payment record to establish the warranty period should service be performed by contacting Electrolux at the addresses or phone numbers below. or external causes such as removal of trim, cupboards, shelves, etc.,which do not involve malfunction or defects in materials or workmanship, or for service calls to repair or replace appliance light bulbs, air filters, water filters...


