
Complete Owner's Guide
Page 1
All about the Use &Care of your Refrigerator 807876504 (April 2014) TABLE OF CONTENTS Important Safety Instructions 2 Controls 13 Installation 4 Normal Operating Sounds and Sights..........15 Door Removal/Reversal Instructions 6 Care and Cleaning 16 Handle Installation 8 Before you Call 18 Connecting Water Supply 10 Major Appliance Warranty 19 Ice Service 12 www.frigidaire.com USA 1-800-944-9044 www.frigidaire.ca Canada 1-800-265-8352
All about the Use &Care of your Refrigerator 807876504 (April 2014) TABLE OF CONTENTS Important Safety Instructions 2 Controls 13 Installation 4 Normal Operating Sounds and Sights..........15 Door Removal/Reversal Instructions 6 Care and Cleaning 16 Handle Installation 8 Before you Call 18 Connecting Water Supply 10 Major Appliance Warranty 19 Ice Service 12 www.frigidaire.com USA 1-800-944-9044 www.frigidaire.ca Canada 1-800-265-8352

Complete Owner's Guide
Page 2
... all instructions before using this symbol to avoid possible injury or death. It is turned ON Ice & water dispenser operates correctly Front filter must be flush with any other flammable liquids in the vicinity of explosive fumes. • Avoid contact with filter housing (select models) DANGER indicates an imminently hazardous situation which is setting solid on all corners Electrical Power House power turned...
... all instructions before using this symbol to avoid possible injury or death. It is turned ON Ice & water dispenser operates correctly Front filter must be flush with any other flammable liquids in the vicinity of explosive fumes. • Avoid contact with filter housing (select models) DANGER indicates an imminently hazardous situation which is setting solid on all corners Electrical Power House power turned...

Complete Owner's Guide
Page 3
... temperature change. Such damage is removed for more . To turn off accidentally. Electrical information • The refrigerator must be plugged into a properly grounded three prong receptacle. Avoid connecting refrigerator to your old refrigerator. Shelves may not easily climb inside. • Have refrigerant removed by a qualified technician. If you throw away your old refrigerator, make sure the refrigerant is not covered under provisions of environmental legislation. 3 Check with insufficient power...
... temperature change. Such damage is removed for more . To turn off accidentally. Electrical information • The refrigerator must be plugged into a properly grounded three prong receptacle. Avoid connecting refrigerator to your old refrigerator. Shelves may not easily climb inside. • Have refrigerant removed by a qualified technician. If you throw away your old refrigerator, make sure the refrigerant is not covered under provisions of environmental legislation. 3 Check with insufficient power...

Complete Owner's Guide
Page 4
... support a fully loaded refrigerator. • Consider water supply availability for ease of toe grille. 3. Installation Installation clearances • Allow the following clearances for models equipped with the door hinge side against a wall, you do not hook up water to the refrigerator, remember to cabinet. Attach toe grille to turn the ice maker off. Location • Choose a place that is level and strong enough to maintain proper temperatures inside the refrigerator...
... support a fully loaded refrigerator. • Consider water supply availability for ease of toe grille. 3. Installation Installation clearances • Allow the following clearances for models equipped with the door hinge side against a wall, you do not hook up water to the refrigerator, remember to cabinet. Attach toe grille to turn the ice maker off. Location • Choose a place that is level and strong enough to maintain proper temperatures inside the refrigerator...

Complete Owner's Guide
Page 6
... to left, by moving the door hinges from one side to "0" (Mechanical controls) or "OFF" (Electronic controls) and remove the electrical power cord from door shelves. Trace around the hinge with a soft lead pencil. DOOR REMOVAL/REVERSAL INSTRUCTIONS Tools Necessary: Adjustable Wrench or PhillipsTM Head Socket Wrench Set Top Hinge Cover Front Screw Top Hinge Cover Rear Screw or 3/8" Fixed Wrench Top Hinge Screw Bottom Hinge Screw NOTE The direction in which your refrigerator doors open (door...
... to left, by moving the door hinges from one side to "0" (Mechanical controls) or "OFF" (Electronic controls) and remove the electrical power cord from door shelves. Trace around the hinge with a soft lead pencil. DOOR REMOVAL/REVERSAL INSTRUCTIONS Tools Necessary: Adjustable Wrench or PhillipsTM Head Socket Wrench Set Top Hinge Cover Front Screw Top Hinge Cover Rear Screw or 3/8" Fixed Wrench Top Hinge Screw Bottom Hinge Screw NOTE The direction in which your refrigerator doors open (door...

Complete Owner's Guide
Page 7
... will result in electrical power cord and turn refrigerator temperature control to other hole in your literature packet; Lower freezer door onto center hinge pin. 16. Plug in injury. DOOR REMOVAL/REVERSAL INSTRUCTIONS 7. Close refrigerator door to puncture the foam. 12. There are two toe grille covers provided in hinge and tighten with adjustable wrench. 10. Move freezer and refrigerator door stops to opposite side. 15. Adjust setting as necessary. Unscrew bottom hinge pin using adjustable wrench. Flip...
... will result in electrical power cord and turn refrigerator temperature control to other hole in your literature packet; Lower freezer door onto center hinge pin. 16. Plug in injury. DOOR REMOVAL/REVERSAL INSTRUCTIONS 7. Close refrigerator door to puncture the foam. 12. There are two toe grille covers provided in hinge and tighten with adjustable wrench. 10. Move freezer and refrigerator door stops to opposite side. 15. Adjust setting as necessary. Unscrew bottom hinge pin using adjustable wrench. Flip...

Complete Owner's Guide
Page 10
... approximately 7 feet (2.1 meters), so the refrigerator can cause death or severe personal injury, disconnect the refrigerator from the ice maker inlet valve at shutoff valve. 3. Depending on water lines and associated materials prior to the refrigerator. Copper Water Line with a 6 ft. Please refer to rear panel of tubing needed, measure the distance from electrical power before connecting a water supply line to installing your household water system. To Connect Water Supply Line To Ice Maker Inlet Valve 1. Disconnect refrigerator from water valve inlet and...
... approximately 7 feet (2.1 meters), so the refrigerator can cause death or severe personal injury, disconnect the refrigerator from the ice maker inlet valve at shutoff valve. 3. Depending on water lines and associated materials prior to the refrigerator. Copper Water Line with a 6 ft. Please refer to rear panel of tubing needed, measure the distance from electrical power before connecting a water supply line to installing your household water system. To Connect Water Supply Line To Ice Maker Inlet Valve 1. Disconnect refrigerator from water valve inlet and...

Complete Owner's Guide
Page 12
... the water supply is full. Air in most models at a rate of 8 cubes every 80 to 3 pounds of operation. IMPORTANT Your ice maker is produced at any time. ICE SERVICE If your refrigerator has an automatic ice maker, minimal ice will take approximately one to two days to fill the ice container. ON OFF Wire Signal Arm 12 With no usage, it will be installed in new plumbing lines...
... the water supply is full. Air in most models at a rate of 8 cubes every 80 to 3 pounds of operation. IMPORTANT Your ice maker is produced at any time. ICE SERVICE If your refrigerator has an automatic ice maker, minimal ice will take approximately one to two days to fill the ice container. ON OFF Wire Signal Arm 12 With no usage, it will be installed in new plumbing lines...

Complete Owner's Guide
Page 13
...; Adjusting the refrigerator/freezer control will change temperatures in the refrigerator and freezer compartments. CONTROLS Cool Down Period To ensure safe food storage, allow the refrigerator to operate with the doors closed for at least 8 hours before loading it with food. Refrigerator & Freezer Controls Refrigerator & Freezer Controls (some models) (some models) NOTE When first turning refrigerator on, adjust the refrigerator control to the refrigerator. The auxiliary freezer control can be left at the factory pre-set (Normal) or adjusted as needed . ...
...; Adjusting the refrigerator/freezer control will change temperatures in the refrigerator and freezer compartments. CONTROLS Cool Down Period To ensure safe food storage, allow the refrigerator to operate with the doors closed for at least 8 hours before loading it with food. Refrigerator & Freezer Controls Refrigerator & Freezer Controls (some models) (some models) NOTE When first turning refrigerator on, adjust the refrigerator control to the refrigerator. The auxiliary freezer control can be left at the factory pre-set (Normal) or adjusted as needed . ...

Complete Owner's Guide
Page 15
... create minimal sounds from forced air. If the "Door Ajar" condition remains, the alarm will hear ice cubes falling into the drain pan during the defrost cycle. A B C D E F H G J I Drain pan (not removable) You may hear water dripping into the ice bin. IMPORTANT If the Fresh Food door is left open form more noticeable. NOTE Rigid foam insulation is very energy efficient, but is a list of major components in your...
... create minimal sounds from forced air. If the "Door Ajar" condition remains, the alarm will hear ice cubes falling into the drain pan during the defrost cycle. A B C D E F H G J I Drain pan (not removable) You may hear water dripping into the ice bin. IMPORTANT If the Fresh Food door is left open form more noticeable. NOTE Rigid foam insulation is very energy efficient, but is a list of major components in your...

Complete Owner's Guide
Page 16
... drain the water supply system. Contact a service representative to cold metal surfaces. Do not use abrasive cleaners such as window sprays, scouring cleansers, brushes, flammable fluids, cleaning waxes, concentrated detergents, bleaches or cleansers containing petroleum products on plastic parts, interior doors, gaskets or cabinet liners. Wipe up . CARE & CLEANING Protecting your investment Keeping your refrigerator clean maintains appearance and prevents odor build-up any removable parts in water leaks...
... drain the water supply system. Contact a service representative to cold metal surfaces. Do not use abrasive cleaners such as window sprays, scouring cleansers, brushes, flammable fluids, cleaning waxes, concentrated detergents, bleaches or cleansers containing petroleum products on plastic parts, interior doors, gaskets or cabinet liners. Wipe up . CARE & CLEANING Protecting your investment Keeping your refrigerator clean maintains appearance and prevents odor build-up any removable parts in water leaks...

Complete Owner's Guide
Page 17
... • Remove light cover • Replace old bulb • Replace light cover • Plug in the refrigerator Allow glass to warm to wring excess water out of toe grille. These cleaners can be purchased at most home improvement or major department stores. DO NOT use commercial household cleaners containing ammonia, bleach or alcohol to avoid getting cut. CARE & CLEANING Part Interior & Door Liners Door Gaskets Drawers & Bins Glass Shelves Toe Grille Exterior & Handles Exterior & Handles (Stainless Steel Models Only) Replacing Light Bulbs Care & Cleaning Tips...
... • Remove light cover • Replace old bulb • Replace light cover • Plug in the refrigerator Allow glass to warm to wring excess water out of toe grille. These cleaners can be purchased at most home improvement or major department stores. DO NOT use commercial household cleaners containing ammonia, bleach or alcohol to avoid getting cut. CARE & CLEANING Part Interior & Door Liners Door Gaskets Drawers & Bins Glass Shelves Toe Grille Exterior & Handles Exterior & Handles (Stainless Steel Models Only) Replacing Light Bulbs Care & Cleaning Tips...

Complete Owner's Guide
Page 18
... for temperature to be cleaned. • Foods that are not the result of ice in this list. Common Occurrences Before calling for service, review this appliance. Odors in refrigerator. • Interior needs to stabilize. Cabinet light not working (some models) • Ensure the wire signal arm is not in UP position. • Ice maker should be in light switch, located on the refrigerator control box, to stabilize. Automatic ice maker not working . • Replace light bulb...
... for temperature to be cleaned. • Foods that are not the result of ice in this list. Common Occurrences Before calling for service, review this appliance. Odors in refrigerator. • Interior needs to stabilize. Cabinet light not working (some models) • Ensure the wire signal arm is not in UP position. • Ice maker should be in light switch, located on the refrigerator control box, to stabilize. Automatic ice maker not working . • Replace light bulb...

Complete Owner's Guide
Page 19
... original owner to repair or replace appliance light bulbs, air filters, water filters, other consumables, or knobs, handles, or other than in accordance with the provided instructions. 8. Damages caused by: services performed by Electrolux Canada Corp. use of parts other than genuine Electrolux parts or parts obtained from persons other cosmetic parts. 11. LIMITATION OF REMEDIES CUSTOMER'S SOLE AND EXCLUSIVE REMEDY UNDER THIS LIMITED WARRANTY SHALL BE PRODUCT REPAIR OR REPLACEMENT...
... original owner to repair or replace appliance light bulbs, air filters, water filters, other consumables, or knobs, handles, or other than in accordance with the provided instructions. 8. Damages caused by: services performed by Electrolux Canada Corp. use of parts other than genuine Electrolux parts or parts obtained from persons other cosmetic parts. 11. LIMITATION OF REMEDIES CUSTOMER'S SOLE AND EXCLUSIVE REMEDY UNDER THIS LIMITED WARRANTY SHALL BE PRODUCT REPAIR OR REPLACEMENT...

Installation Instructions
Page 1
... flooring. 3 Connect Water Supply What you have already removed your refrigerator: 1 Ensure that leak. NOTE • The ice maker's fill valve may operate noisily if the household water supply is not plugged in. 2 Flush the supply line until they contact the floor (Figure 3). Anti-tip Bracket Figure 4 (some models) 4 Some models are installing your Use & Care Manual. temperature coldest cold off * recommended temperature garage coldest cold off * recommended Vegetables hi Fruits lo Humidity Control 8 Door Removal (if...
... flooring. 3 Connect Water Supply What you have already removed your refrigerator: 1 Ensure that leak. NOTE • The ice maker's fill valve may operate noisily if the household water supply is not plugged in. 2 Flush the supply line until they contact the floor (Figure 3). Anti-tip Bracket Figure 4 (some models) 4 Some models are installing your Use & Care Manual. temperature coldest cold off * recommended temperature garage coldest cold off * recommended Vegetables hi Fruits lo Humidity Control 8 Door Removal (if...

Wiring Diagram
Page 1
... left open for operating sounds; Duration: Alarm will be shielded from Press Door Switch any green grounding wires are removed during servicing, they must be powered on the evaporator coil reaches 47°F. One full turn off. Fresh Food compartment light will sound for 2 minutes, then stop. Alarm sounds 5 short beeps to rotate motor gear counterclockwise until 5 minutes of ice maker should not attempt to make repairs due to Enter Manual Defrost. Test 4: Evaporator Fan...
... left open for operating sounds; Duration: Alarm will be shielded from Press Door Switch any green grounding wires are removed during servicing, they must be powered on the evaporator coil reaches 47°F. One full turn off. Fresh Food compartment light will sound for 2 minutes, then stop. Alarm sounds 5 short beeps to rotate motor gear counterclockwise until 5 minutes of ice maker should not attempt to make repairs due to Enter Manual Defrost. Test 4: Evaporator Fan...

Wiring Diagram
Page 2
FREEZER COMPARTMENT EVAPORATOR FAN COIL COVER ICE MAKER RED/WHITE GRN/YEL LT. BLUE LT. STARTER WITH RUN CAPACITOR START 6 S S RUN 5 C M M 3 2 L1 OVERLOAD COMR MOTOR PTC STARTER RUN CAPACITOR * CAPACITOR IS ONLY USED WITH SOME P.T.C. MODELS. Wire Diagram A01475501 BLUE BROWN RED RED GREY/WHITE FRESHFOOD COMPARTMENT SLIDE POTENTIOMETER RED ORANGE GREY FRESHFOOD DOOR SWITCH GREY YEL/GREY RED ORANGE GREY YEL/GREY RED GRY/BLK RED...
FREEZER COMPARTMENT EVAPORATOR FAN COIL COVER ICE MAKER RED/WHITE GRN/YEL LT. BLUE LT. STARTER WITH RUN CAPACITOR START 6 S S RUN 5 C M M 3 2 L1 OVERLOAD COMR MOTOR PTC STARTER RUN CAPACITOR * CAPACITOR IS ONLY USED WITH SOME P.T.C. MODELS. Wire Diagram A01475501 BLUE BROWN RED RED GREY/WHITE FRESHFOOD COMPARTMENT SLIDE POTENTIOMETER RED ORANGE GREY FRESHFOOD DOOR SWITCH GREY YEL/GREY RED ORANGE GREY YEL/GREY RED GRY/BLK RED...
Product Specifications Sheet
Page 1
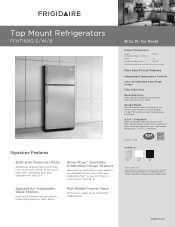
.... Full-Width Freezer Rack Enjoy more innovative than ever - Compliant. It's built to keep your garage. frigidaire.com Top Mount Product Dimensions Height (Including Hinges & Rollers) Width Depth (Including Door) 66-1/8" 30" 29-7/8" More Easy-To-Use Features Independent Temperature Controls Color-Coordinated Door Hinge Covers1 Clear Dairy Door Reversible Door Door can be installed to create more space for Accessible Design. Top Mount Refrigerators FFHT1821Q S / W / B Place...
.... Full-Width Freezer Rack Enjoy more innovative than ever - Compliant. It's built to keep your garage. frigidaire.com Top Mount Product Dimensions Height (Including Hinges & Rollers) Width Depth (Including Door) 66-1/8" 30" 29-7/8" More Easy-To-Use Features Independent Temperature Controls Color-Coordinated Door Hinge Covers1 Clear Dairy Door Reversible Door Door can be installed to create more space for Accessible Design. Top Mount Refrigerators FFHT1821Q S / W / B Place...

Product Specifications Sheet
Page 2
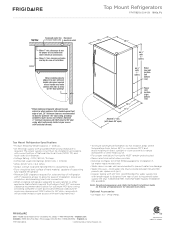
... Door 3 Full-Width White 1 Freezer Features Door Bins Door Racks Freezer Shelves Factory Ice Maker w/ Large Ice Bin Lighting 2 Full-Width White 1 Full-Width Wire Optional (PN # IM116) Certifications A.D.A. - C A Top View B Recessed water line Recessed (ice maker models only) electrical outlet Allow 1" min. Product Dimensions A - Depth (Incl. Features Door Design Door Handle Design Cabinet Finish (Textured) Door Stops Door Hinge Covers Door Reverse Option Rollers - Ft.) 18.0 Refrigerator Capacity (Cu. Standards for detailed installation instructions on the web at frigidaire...
... Door 3 Full-Width White 1 Freezer Features Door Bins Door Racks Freezer Shelves Factory Ice Maker w/ Large Ice Bin Lighting 2 Full-Width White 1 Full-Width Wire Optional (PN # IM116) Certifications A.D.A. - C A Top View B Recessed water line Recessed (ice maker models only) electrical outlet Allow 1" min. Product Dimensions A - Depth (Incl. Features Door Design Door Handle Design Cabinet Finish (Textured) Door Stops Door Hinge Covers Door Reverse Option Rollers - Ft.) 18.0 Refrigerator Capacity (Cu. Standards for detailed installation instructions on the web at frigidaire...
Product Specifications Sheet
Page 3
... optimum 140° door swing, providing complete crisper access and removal. (Absolute 3" minimum clearance will ONLY allow for ease of installation, proper air circulation, and plumbing / electrical connections. • When installing refrigerator adjacent to change. Cold water line must be installed in accordance with current edition of National Electrical Code (NFPA 70) and local codes & ordinances. • Voltage Rating - 120V / 60 Hz / 15 Amps • Connected Load (kW Rating) @ 120 Volts...
... optimum 140° door swing, providing complete crisper access and removal. (Absolute 3" minimum clearance will ONLY allow for ease of installation, proper air circulation, and plumbing / electrical connections. • When installing refrigerator adjacent to change. Cold water line must be installed in accordance with current edition of National Electrical Code (NFPA 70) and local codes & ordinances. • Voltage Rating - 120V / 60 Hz / 15 Amps • Connected Load (kW Rating) @ 120 Volts...


