Complete Owner's Guide (English)
Page 1
All about the Use &Care of your Refrigerator 242063800 (November 2009) TABLE OF CONTENTS Important Safety Instructions 2 Installation 4 Door Removal Instructions 5 Handle Installation 6 Connecting Water Supply 8 Ice Service 9 Controls 9 Normal Operating Sounds and Sights 10 Care and Cleaning 11 Before you Call 12 Major Appliance Warranty 13 www.frigidaire.com USA 1-800-944-9044 www.frigidaire.ca Canada 1-800-265-8352
All about the Use &Care of your Refrigerator 242063800 (November 2009) TABLE OF CONTENTS Important Safety Instructions 2 Installation 4 Door Removal Instructions 5 Handle Installation 6 Connecting Water Supply 8 Ice Service 9 Controls 9 Normal Operating Sounds and Sights 10 Care and Cleaning 11 Before you Call 12 Major Appliance Warranty 13 www.frigidaire.com USA 1-800-944-9044 www.frigidaire.ca Canada 1-800-265-8352
Complete Owner's Guide (English)
Page 2
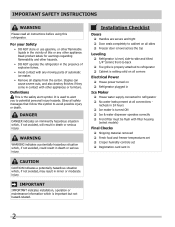
... models) Final Checks Shipping material removed Fresh food and freezer temperatures set Crisper humidity controls set Registration card sent in Ice Maker House water supply connected to refrigerator No water leaks present at all staples from the carton. WARNING WARNING indicates a potentially hazardous situation which is setting solid on all corners Electrical Power House power turned on all sides Freezer door is level across the top Leveling Refrigerator...
... models) Final Checks Shipping material removed Fresh food and freezer temperatures set Crisper humidity controls set Registration card sent in Ice Maker House water supply connected to refrigerator No water leaks present at all staples from the carton. WARNING WARNING indicates a potentially hazardous situation which is setting solid on all corners Electrical Power House power turned on all sides Freezer door is level across the top Leveling Refrigerator...

Complete Owner's Guide (English)
Page 3
... more . Proper Disposal of the past. The power cord of the temperature control panel (Electronic controls), or turning the Freezer and Fresh Food controls to "0" (Mechanical controls) will disable your old refrigerator or freezer, please follow the instructions below to the light bulb and other electrical components. Consult a qualified electrician. Avoid connecting refrigerator to sudden temperature change. 3 To turn off accidentally. Do not use these items to ensure that safety mechanisms...
... more . Proper Disposal of the past. The power cord of the temperature control panel (Electronic controls), or turning the Freezer and Fresh Food controls to "0" (Mechanical controls) will disable your old refrigerator or freezer, please follow the instructions below to the light bulb and other electrical components. Consult a qualified electrician. Avoid connecting refrigerator to sudden temperature change. 3 To turn off accidentally. Do not use these items to ensure that safety mechanisms...
Complete Owner's Guide (English)
Page 4
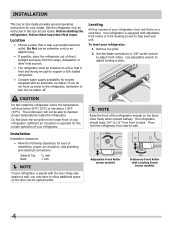
... refrigerator only as instructed in this Use & Care Guide. Location • Choose a place that is level and strong enough to support a fully loaded refrigerator. • Consider water supply availability for models equipped with an automatic ice maker. If you may have to allow additional space so the door can be opened wider. NOTE Raise the front of the refrigerator enough so the doors close freely when opened halfway. Leveling...
... refrigerator only as instructed in this Use & Care Guide. Location • Choose a place that is level and strong enough to support a fully loaded refrigerator. • Consider water supply availability for models equipped with an automatic ice maker. If you may have to allow additional space so the door can be opened wider. NOTE Raise the front of the refrigerator enough so the doors close freely when opened halfway. Leveling...

Complete Owner's Guide (English)
Page 5
... refrigerator temperature control to "0" and remove the electrical power cord from door shelves. IMPORTANT Before you begin, turn refrigerator temperature control to opposite side. Tighten screws. 6 Loosen two outside screws enough to allow hinge and shim to other . Ensure plastic washer stays on next page). 11 Move freezer and refrigerator door stops to center position. Trace around the hinge with adjustable wrench. 10 Reverse door handles (see instruction on hinge pin. 4 Lift refrigerator door off center hinge...
... refrigerator temperature control to "0" and remove the electrical power cord from door shelves. IMPORTANT Before you begin, turn refrigerator temperature control to opposite side. Tighten screws. 6 Loosen two outside screws enough to allow hinge and shim to other . Ensure plastic washer stays on next page). 11 Move freezer and refrigerator door stops to center position. Trace around the hinge with adjustable wrench. 10 Reverse door handles (see instruction on hinge pin. 4 Lift refrigerator door off center hinge...
Complete Owner's Guide (English)
Page 6
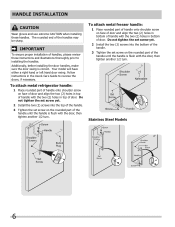
IMPORTANT To ensure proper installation of handles, please review these handles. Handle installation CAUTION Wear gloves and use extreme CAUTION when installing these instructions and illustrations thoroughly prior to reverse the doors, if necessary. To attach metal freezer handle: 1 Place rounded part of handle onto shoulder screw on the rounded part of handle with the door, then tighten another 1/2 turn . Stainless Steel Models 6 Do not tighten the set screw yet. 2 Install the two (2) screws...
IMPORTANT To ensure proper installation of handles, please review these handles. Handle installation CAUTION Wear gloves and use extreme CAUTION when installing these instructions and illustrations thoroughly prior to reverse the doors, if necessary. To attach metal freezer handle: 1 Place rounded part of handle onto shoulder screw on the rounded part of handle with the door, then tighten another 1/2 turn . Stainless Steel Models 6 Do not tighten the set screw yet. 2 Install the two (2) screws...
Complete Owner's Guide (English)
Page 7
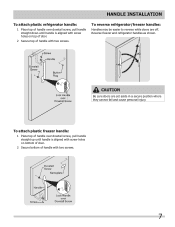
... off. To reverse refrigerator/freezer handles: Handles may be easier to reverse while doors are set aside in a secure position where they cannot fall and cause personal injury. Handle installation To attach plastic refrigerator handle: 1 Place top of handle over dovetail screw, pull handle straight up until handle is aligned with screw holes on top of door. 2 Secure top of handle with two screws. Reverse freezer and refrigerator handles as shown.
... off. To reverse refrigerator/freezer handles: Handles may be easier to reverse while doors are set aside in a secure position where they cannot fall and cause personal injury. Handle installation To attach plastic refrigerator handle: 1 Place top of handle over dovetail screw, pull handle straight up until handle is aligned with screw holes on top of door. 2 Secure top of handle with two screws. Reverse freezer and refrigerator handles as shown.
Complete Owner's Guide (English)
Page 8
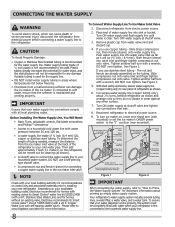
... approximately 7 feet (2.1 meters), so the refrigerator can damage the ice maker. If you use stainless steel tubing - Plastic tubing greatly increases the potential for recommendations on , lower wire signal arm (side mounted) or set the ice maker's On/Off power switch to the refrigerator. IMPORTANT Ensure that leak. 8. Copper Water Line with a 20 ft. Disconnect refrigerator from water valve inlet and discard cap. 4. If you use copper tubing - Plastic Water Tubing to Ice Maker Fill Tube Steel Clamp...
... approximately 7 feet (2.1 meters), so the refrigerator can damage the ice maker. If you use stainless steel tubing - Plastic tubing greatly increases the potential for recommendations on , lower wire signal arm (side mounted) or set the ice maker's On/Off power switch to the refrigerator. IMPORTANT Ensure that leak. 8. Copper Water Line with a 20 ft. Disconnect refrigerator from water valve inlet and discard cap. 4. If you use copper tubing - Plastic Water Tubing to Ice Maker Fill Tube Steel Clamp...
Complete Owner's Guide (English)
Page 9
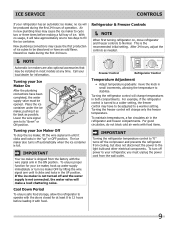
... make a loud chattering noise. Lower the wire signal arm to stabilize. Turning your local dealer for at any time. With no ice will be opened. The ice maker also turns off and the water supply is full. Call your Ice Maker On After the plumbing connections have been completed, the water supply valve must unplug the power cord from cooling, but does not disconnect the power to the light bulb and other electrical...
... make a loud chattering noise. Lower the wire signal arm to stabilize. Turning your local dealer for at any time. With no ice will be opened. The ice maker also turns off and the water supply is full. Call your Ice Maker On After the plumbing connections have been completed, the water supply valve must unplug the power cord from cooling, but does not disconnect the power to the light bulb and other electrical...

Complete Owner's Guide (English)
Page 10
... insulation is very energy efficient, but is not a sound insulator. Some surfaces on usage conditions. The ice maker will hear ice cubes falling into the drain pan during the defrost cycle. E Electronic control & automatic defrost control These parts can cause: A Evaporator Refrigerant through the evaporator may create a boiling or gurgling sound. F Condenser fan You may hear water dripping into the ice bin. I Drain pan (not removable) You may hear air being forced through...
... insulation is very energy efficient, but is not a sound insulator. Some surfaces on usage conditions. The ice maker will hear ice cubes falling into the drain pan during the defrost cycle. E Electronic control & automatic defrost control These parts can cause: A Evaporator Refrigerant through the evaporator may create a boiling or gurgling sound. F Condenser fan You may hear water dripping into the ice bin. I Drain pan (not removable) You may hear air being forced through...
Complete Owner's Guide (English)
Page 11
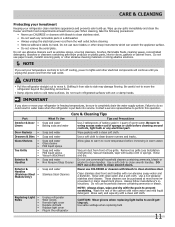
... wipe dry with warm water and mild liquid detergent. Use same wattage when replacing bulb 11 IMPORTANT If you unplug the power cord from side to clean smooth doors. Part Interior & Door • Liners • Door Gaskets • Drawers & Bins • Glass Shelves • • • Toe Grille • • • Exterior & • Handles • Exterior & • Handles (Stainless Steel • Models Only) Replacing Light • Bulbs • • • • • Care & Cleaning Tips What To...
... wipe dry with warm water and mild liquid detergent. Use same wattage when replacing bulb 11 IMPORTANT If you unplug the power cord from side to clean smooth doors. Part Interior & Door • Liners • Door Gaskets • Drawers & Bins • Glass Shelves • • • Toe Grille • • • Exterior & • Handles • Exterior & • Handles (Stainless Steel • Models Only) Replacing Light • Bulbs • • • • • Care & Cleaning Tips What To...
Complete Owner's Guide (English)
Page 12
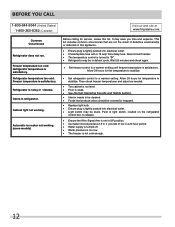
...; Interior needs to "O". • Refrigerator may be stuck. Refrigerator temperature is satisfactory. Reset circuit breaker. • The temperature control is satisfactory. Freezer temperature too cold. Refrigerator temperature too cold. Common Occurrences Refrigerator does not run. Freezer temperature is turned to be cleaned. • Foods that are not the result of ice in refrigerator. Allow 24 hours for service, review this appliance. • Ensure plug is tightly pushed into electrical outlet. • Check/replace fuse with a 15 amp time...
...; Interior needs to "O". • Refrigerator may be stuck. Refrigerator temperature is satisfactory. Reset circuit breaker. • The temperature control is satisfactory. Freezer temperature too cold. Refrigerator temperature too cold. Common Occurrences Refrigerator does not run. Freezer temperature is turned to be cleaned. • Foods that are not the result of ice in refrigerator. Allow 24 hours for service, review this appliance. • Ensure plug is tightly pushed into electrical outlet. • Check/replace fuse with a 15 amp time...
Complete Owner's Guide (English)
Page 13
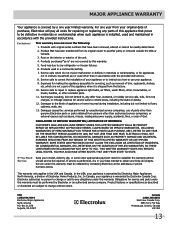
... installed, used other than authorized service companies; Service calls to correct the installation of your appliance or to instruct you Need Service Keep your best interest to floors, cabinets, walls, etc. 13. For one year limited warranty. YOU MAY ALSO HAVE OTHER RIGHTS THAT VARY FROM STATE TO STATE. Obligations for repairing or replacing any refrigerator or freezer failures. 6. Service calls to repair or replace appliance light bulbs, air filters, water filters...
... installed, used other than authorized service companies; Service calls to correct the installation of your appliance or to instruct you Need Service Keep your best interest to floors, cabinets, walls, etc. 13. For one year limited warranty. YOU MAY ALSO HAVE OTHER RIGHTS THAT VARY FROM STATE TO STATE. Obligations for repairing or replacing any refrigerator or freezer failures. 6. Service calls to repair or replace appliance light bulbs, air filters, water filters...
Wiring Diagram (All Languages)
Page 1
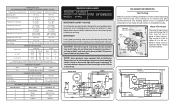
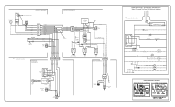
... (.68 oz.). Disconnect power cord before servicing. it will char at 200°F and flash ignite (burn) at 8.96F (-12.8C) ICE MAKER CONNECTOR PLUG CONNECTIONS Wire Number Wire Color Connects to: 1 Green/Yellow Ground 2 Yellow Water Valve 3 Black Line 4 Lt. Excessive heat will change the fill time. To terminate defrost, depress the fresh food light switch 5 times in 6 seconds. (some models) ORANGE (some models) ICE MAKER ICE MAKER INFORMATION Test Cycling Remove cover by inserting screwdriver...
... (.68 oz.). Disconnect power cord before servicing. it will char at 200°F and flash ignite (burn) at 8.96F (-12.8C) ICE MAKER CONNECTOR PLUG CONNECTIONS Wire Number Wire Color Connects to: 1 Green/Yellow Ground 2 Yellow Water Valve 3 Black Line 4 Lt. Excessive heat will change the fill time. To terminate defrost, depress the fresh food light switch 5 times in 6 seconds. (some models) ORANGE (some models) ICE MAKER ICE MAKER INFORMATION Test Cycling Remove cover by inserting screwdriver...
Wiring Diagram (All Languages)
Page 2
... With Optional Water Through The Door Or Mid-level Lighting COMPRESSOR WIRING Induction Run Compressor with Relay DIODE DIODE YELLOW CONDENSER FAN TAN TAN LT. REFRIGERATOR COMPARTMENT DEFROST TIMER BROWN ORANGE RED LT. BLUE FREEZER LIGHT SWITCH NOTE DENOTES NOT ON ALL MODELS. BLUE BLACK RED YELLOW SEE COMPRESSOR WIRING GRN/YEL SPLICE RED GRN/YEL SERVICE CORD RED GRN/YEL LT. BLUE RED/BLACK BROWN SUPPLY SOLENOID WATER VALVE WATER VALVE DOOR COMPARTMENT...
... With Optional Water Through The Door Or Mid-level Lighting COMPRESSOR WIRING Induction Run Compressor with Relay DIODE DIODE YELLOW CONDENSER FAN TAN TAN LT. REFRIGERATOR COMPARTMENT DEFROST TIMER BROWN ORANGE RED LT. BLUE FREEZER LIGHT SWITCH NOTE DENOTES NOT ON ALL MODELS. BLUE BLACK RED YELLOW SEE COMPRESSOR WIRING GRN/YEL SPLICE RED GRN/YEL SERVICE CORD RED GRN/YEL LT. BLUE RED/BLACK BROWN SUPPLY SOLENOID WATER VALVE WATER VALVE DOOR COMPARTMENT...

Installation Instructions (All Languages)
Page 1
... Freezer controls set Crisper Humidity controls set Registration Card sent in Refer to your Owner's Use and Care Manual for the door to swing open. 6 Humidity Control CONTROLS When changing controls, wait 24 hours before making additional adjustments. (For models with Leveling Screw (some models) Raise the front of installation, proper air circulation, and plumbing and electrical connections: • Sides & Top..........3/8" • Back 1" NOTE If you need to remove the doors to enjoy your Use & Care Manual. q L K e äáåÉ t K WATER SUPPLY...
... Freezer controls set Crisper Humidity controls set Registration Card sent in Refer to your Owner's Use and Care Manual for the door to swing open. 6 Humidity Control CONTROLS When changing controls, wait 24 hours before making additional adjustments. (For models with Leveling Screw (some models) Raise the front of installation, proper air circulation, and plumbing and electrical connections: • Sides & Top..........3/8" • Back 1" NOTE If you need to remove the doors to enjoy your Use & Care Manual. q L K e äáåÉ t K WATER SUPPLY...

Product Specifications Sheet (English)
Page 1
... our humidity-controlled crisper drawers. Full-Width Freezer Bins Gives you room for deli meats, cheeses and sandwich fixings or any food items that are frequently used. Bright Lighting Our bright lighting makes it easy to open left or right based on your fruits and vegetables fresh in Stainless Steel Left-Swing Door Reversible Door2 Door can be installed to see what's inside. Ft. Top Mount Product Dimensions Height (Including Hinges & Rollers...
... our humidity-controlled crisper drawers. Full-Width Freezer Bins Gives you room for deli meats, cheeses and sandwich fixings or any food items that are frequently used. Bright Lighting Our bright lighting makes it easy to open left or right based on your fruits and vegetables fresh in Stainless Steel Left-Swing Door Reversible Door2 Door can be installed to see what's inside. Ft. Top Mount Product Dimensions Height (Including Hinges & Rollers...

Product Specifications Sheet (English)
Page 2
... national electric and plumbing codes. Depth (Incl. Height (Incl. Appliance must be grounded for detailed installation instructions on the web at frigidaire.com. Ft. Features Door Design Door Handle Design Cabinet Finish (Textured) Door Stops Door Hinge Covers Door Reverse Option Left-Swing Door Rollers - NOTE: For planning purposes only. Hinges and Rollers) B - Width C - Door) Depth with a separate ground wire. Accessories information available on the web at frigidaire.com Specifications subject to Product Installation Guide...
... national electric and plumbing codes. Depth (Incl. Height (Incl. Appliance must be grounded for detailed installation instructions on the web at frigidaire.com. Ft. Features Door Design Door Handle Design Cabinet Finish (Textured) Door Stops Door Hinge Covers Door Reverse Option Left-Swing Door Rollers - NOTE: For planning purposes only. Hinges and Rollers) B - Width C - Door) Depth with a separate ground wire. Accessories information available on the web at frigidaire.com Specifications subject to Product Installation Guide...


