Use and Care Guide
Page 1
All about the Use &Care of your Top Mount Refrigerator 242290700 (September 2012) TABLE OF CONTENTS Important Safety Instructions 2 Installation 4 Door Reversal Instructions 4 Energy Saving Tips 7 Temperature Controls 7 Features 8 Care and Cleaning 9 Before you Call 10 Major Appliance Warranty 12 www.frigidaire.com USA 1-800-944-9044 www.frigidaire.ca Canada 1-800-265-8352
All about the Use &Care of your Top Mount Refrigerator 242290700 (September 2012) TABLE OF CONTENTS Important Safety Instructions 2 Installation 4 Door Reversal Instructions 4 Energy Saving Tips 7 Temperature Controls 7 Features 8 Care and Cleaning 9 Before you Call 10 Major Appliance Warranty 12 www.frigidaire.com USA 1-800-944-9044 www.frigidaire.ca Canada 1-800-265-8352
Use and Care Guide
Page 2
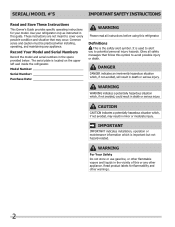
... model and serial numbers in this refrigerator. Obey all instructions before using this guide. WARNING For Your Safety Do not store or use gasoline, or other flammable vapors and liquids in death or serious injury. Definitions This is located on the upper left wall inside the refrigerator. It is important but not hazard-related. SERIAL/MODEL #'S IMPORTANT SAFETY INSTRUCTIONS Read and Save These Instructions This Owner's Guide provides specific operating instructions...
... model and serial numbers in this refrigerator. Obey all instructions before using this guide. WARNING For Your Safety Do not store or use gasoline, or other flammable vapors and liquids in death or serious injury. Definitions This is located on the upper left wall inside the refrigerator. It is important but not hazard-related. SERIAL/MODEL #'S IMPORTANT SAFETY INSTRUCTIONS Read and Save These Instructions This Owner's Guide provides specific operating instructions...

Use and Care Guide
Page 3
... inside. • Have refrigerant removed by a qualified service technician. Staples can damage the compressor. Do not wash in place so children may break suddenly if nicked, scratched, or exposed to sudden temperature change. Consult a qualified electrician. Operating the refrigerator with 3-prong grounded plug CAUTION To avoid personal injury or property damage, handle tempered glass shelves carefully. Junked or abandoned refrigerators are getting rid of the past. Power...
... inside. • Have refrigerant removed by a qualified service technician. Staples can damage the compressor. Do not wash in place so children may break suddenly if nicked, scratched, or exposed to sudden temperature change. Consult a qualified electrician. Operating the refrigerator with 3-prong grounded plug CAUTION To avoid personal injury or property damage, handle tempered glass shelves carefully. Junked or abandoned refrigerators are getting rid of the past. Power...
Use and Care Guide
Page 4
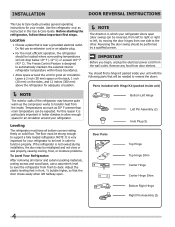
... operation, the refrigerator should find a hinge kit packed inside your refrigerator. INSTALLATION DOOR REVERSAL INSTRUCTIONS This Use & Care Guide provides general operating instructions for adequate circulation. NOTE The direction in front, ½ bubble higher, so that is designed to automatically maintain the selected interior refrigerator temperature within these important first steps. Leave a 2 inch (50 mm) space on the back, 1 inch (20 mm) on solid floor. Door Parts Bottom Left Hinge Left Pin Assembly (2) Hole Plug...
... operation, the refrigerator should find a hinge kit packed inside your refrigerator. INSTALLATION DOOR REVERSAL INSTRUCTIONS This Use & Care Guide provides general operating instructions for adequate circulation. NOTE The direction in front, ½ bubble higher, so that is designed to automatically maintain the selected interior refrigerator temperature within these important first steps. Leave a 2 inch (50 mm) space on the back, 1 inch (20 mm) on solid floor. Door Parts Bottom Left Hinge Left Pin Assembly (2) Hole Plug...
Use and Care Guide
Page 5
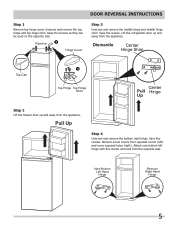
... refrigerator door up and away from the appliance. Keep the screws so they can be used on the opposite side. Remove 1 Hinge Cover Step 3 Unscrew and remove the middle hinge and middle hinge shim. New Bottom Left Hand Hinge Remove Right Hand Hinge 5 Dismantle Center Hinge Shim Top Cap 1 Top Hinge Top Hinge Shim Center Pull Hinge Up Step 2 Lift the freezer door up and away from the appliance. DOOR REVERSAL INSTRUCTIONS Step 1 Remove...
... refrigerator door up and away from the appliance. Keep the screws so they can be used on the opposite side. Remove 1 Hinge Cover Step 3 Unscrew and remove the middle hinge and middle hinge shim. New Bottom Left Hand Hinge Remove Right Hand Hinge 5 Dismantle Center Hinge Shim Top Cap 1 Top Hinge Top Hinge Shim Center Pull Hinge Up Step 2 Lift the freezer door up and away from the appliance. DOOR REVERSAL INSTRUCTIONS Step 1 Remove...
Use and Care Guide
Page 6
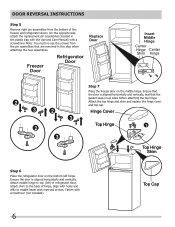
DOOR REVERSAL INSTRUCTIONS Step 5 Remove right pin assemblies from the pin assemblies that the gasket seals on all sides before attaching the top hinge. Freezer Door Refrigerator Door Replace Door Insert Middle Hinge Center Hinge Center Shim Hinge Step 7 2 3 2 Place the freezer door on the bottom left ) of refrigerator door, attach shim to the back of the freezer and refrigerator doors. Hinge Cover 3 2 Top Hinge 1 3 Top Hinge Shim Step 6 Place the refrigerator door on the middle hinge. Ensure the door is aligned horizontally and...
DOOR REVERSAL INSTRUCTIONS Step 5 Remove right pin assemblies from the pin assemblies that the gasket seals on all sides before attaching the top hinge. Freezer Door Refrigerator Door Replace Door Insert Middle Hinge Center Hinge Center Shim Hinge Step 7 2 3 2 Place the freezer door on the bottom left ) of refrigerator door, attach shim to the back of the freezer and refrigerator doors. Hinge Cover 3 2 Top Hinge 1 3 Top Hinge Shim Step 6 Place the refrigerator door on the middle hinge. Ensure the door is aligned horizontally and...
Use and Care Guide
Page 7
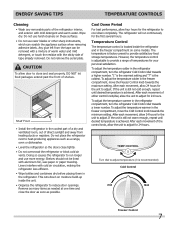
...; Install the refrigerator in the refrigerator compartment, turn the refrigerator Cold Control dial towards a lower number. Shelves should not be removed with a mixture of warm water and mild detergent, or touch the residue with cold air circulation, making the refrigerator less efficient. • Wipe bottles and containers dry before placing them in the refrigerator. To adjust the temperature colder in the freezer compartment on some models. Doing so causes the refrigerator to adjust. Cool...
...; Install the refrigerator in the refrigerator compartment, turn the refrigerator Cold Control dial towards a lower number. Shelves should not be removed with a mixture of warm water and mild detergent, or touch the residue with cold air circulation, making the refrigerator less efficient. • Wipe bottles and containers dry before placing them in the refrigerator. To adjust the temperature colder in the freezer compartment on some models. Doing so causes the refrigerator to adjust. Cool...
Use and Care Guide
Page 8
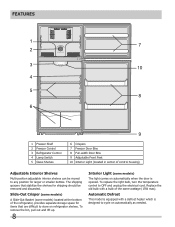
... when the door is opened. Replace the old bulb with a defrost heater which is equipped with a bulb of the refrigerator, provides separate storage space for items that stabilize the shelves for larger or smaller bottles. FEATURES 1 2 temp control 3 4 TEMP CONTROL 3 5 6 7 10 8 1 Freezer Shelf 2 Freezer Control 3 Refrigerator Control 4 Lamp Switch 5 Glass Shelves 9 6 Crispers 7 Freezer Door Bins 8 Full-width Door Bins 9 Adjustable Front Feet 10 Interior Light (located in center of control housing) Adjustable Interior Shelves Multi-position adjustable interior shelves can be...
... when the door is opened. Replace the old bulb with a defrost heater which is equipped with a bulb of the refrigerator, provides separate storage space for items that stabilize the shelves for larger or smaller bottles. FEATURES 1 2 temp control 3 4 TEMP CONTROL 3 5 6 7 10 8 1 Freezer Shelf 2 Freezer Control 3 Refrigerator Control 4 Lamp Switch 5 Glass Shelves 9 6 Crispers 7 Freezer Door Bins 8 Full-width Door Bins 9 Adjustable Front Feet 10 Interior Light (located in center of control housing) Adjustable Interior Shelves Multi-position adjustable interior shelves can be...
Use and Care Guide
Page 9
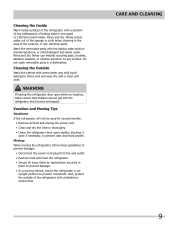
... food and unplug the power cord. • Clean and dry the interior thoroughly. • Leave the refrigerator door open slightly, blocking it open while on any electrical parts. Wash the removable parts with a clean soft cloth. Do not wash removable parts in an upright position to prevent odor and mold growth. WARNING If leaving the refrigerator door open if necessary, to prevent movement. CARE AND CLEANING 9 Rinse well and...
... food and unplug the power cord. • Clean and dry the interior thoroughly. • Leave the refrigerator door open slightly, blocking it open while on any electrical parts. Wash the removable parts with a clean soft cloth. Do not wash removable parts in an upright position to prevent odor and mold growth. WARNING If leaving the refrigerator door open if necessary, to prevent movement. CARE AND CLEANING 9 Rinse well and...
Use and Care Guide
Page 10
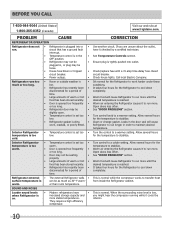
... AND NOISE Louder sound levels • when Refrigerator is warm. Door may not be • slightly open. • Temperature control is normal while the compressor works to cool down completely. This is set too • low. Door is plugged into outlet. CORRECTION Use another circuit. If you might hear the compressor running while it checked by a certified technician. Call local Electric Company. Open doors less often. They require a high efficiency compressor. Open doors...
... AND NOISE Louder sound levels • when Refrigerator is warm. Door may not be • slightly open. • Temperature control is normal while the compressor works to cool down completely. This is set too • low. Door is plugged into outlet. CORRECTION Use another circuit. If you might hear the compressor running while it checked by a certified technician. Call local Electric Company. Open doors less often. They require a high efficiency compressor. Open doors...
Use and Care Guide
Page 11
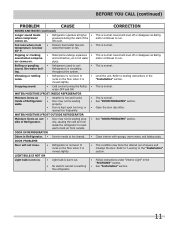
... CALL (continued) PROBLEM CAUSE SOUND AND NOISE (continued) Longer sound levels when compressor comes on. • Refrigerator operates at higher • pressures during the start of Refrigerator • Door may not be seating • walls. Boiling or gurgling • Refrigerant (used to leveling instructions in the "Installation" section. It • noise. Snapping sound. • Cold control turning the Refrig- • erator OFF and ON. WATER/MOISTURE/FROST INSIDE REFRIGERATOR Moisture forms...
... CALL (continued) PROBLEM CAUSE SOUND AND NOISE (continued) Longer sound levels when compressor comes on. • Refrigerator operates at higher • pressures during the start of Refrigerator • Door may not be seating • walls. Boiling or gurgling • Refrigerant (used to leveling instructions in the "Installation" section. It • noise. Snapping sound. • Cold control turning the Refrig- • erator OFF and ON. WATER/MOISTURE/FROST INSIDE REFRIGERATOR Moisture forms...
Use and Care Guide
Page 12
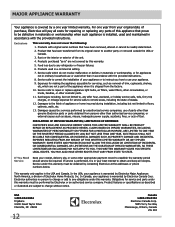
... appliance or to instruct you how to obtain and keep all costs for appliances not in ordinary household use of parts other than genuine Electrolux parts or parts obtained from its original owner to repair or replace appliance light bulbs, air filters, water filters, other consumables, or knobs, handles, or other than authorized service companies; Product features or specifications as -is in accordance with original serial numbers that has...
... appliance or to instruct you how to obtain and keep all costs for appliances not in ordinary household use of parts other than genuine Electrolux parts or parts obtained from its original owner to repair or replace appliance light bulbs, air filters, water filters, other consumables, or knobs, handles, or other than authorized service companies; Product features or specifications as -is in accordance with original serial numbers that has...


