

Complete Owner s Guide
Page 1
All about the Use &Care of your Room Air Conditioner TABLE OF CONTENTS Important Safety Instructions 2-3 Product Registration 4 Normal Sounds 4 Air Conditioner Features 5 Operating Instructions 5-10 Care and Cleaning 10 Energy Saving Ideas 10 Before You Call 11 Major Appliance Limited Warranty 12 www.frigidaire.com USA 1-800-944-9044 www.frigidaire.ca Canada 1-800-265-8352 16120300A04523 (June 2009)
All about the Use &Care of your Room Air Conditioner TABLE OF CONTENTS Important Safety Instructions 2-3 Product Registration 4 Normal Sounds 4 Air Conditioner Features 5 Operating Instructions 5-10 Care and Cleaning 10 Energy Saving Ideas 10 Before You Call 11 Major Appliance Limited Warranty 12 www.frigidaire.com USA 1-800-944-9044 www.frigidaire.ca Canada 1-800-265-8352 16120300A04523 (June 2009)

Complete Owner s Guide
Page 2
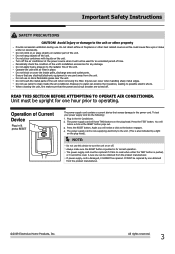
... the glass first. In the event of fire, electrical shock, or injury to persons when using your air conditioner, follow basic precautions, including the following: Be sure the electrical service is adequate for your new room air conditioner is drained from sharp metal fins on the power cord. Important Safety Instructions NOTE: This USE & CARE MANUAL provides specific operating instructions for the model you intend to use in removing or reinstalling this...
... the glass first. In the event of fire, electrical shock, or injury to persons when using your air conditioner, follow basic precautions, including the following: Be sure the electrical service is adequate for your new room air conditioner is drained from sharp metal fins on the power cord. Important Safety Instructions NOTE: This USE & CARE MANUAL provides specific operating instructions for the model you intend to use in removing or reinstalling this...
Complete Owner s Guide
Page 3
... or cover the intake grille, discharge area and outlet ports. When cleaning the unit, first make units run excessively. Press the RESET button. Again you will notice a click as the button engages. The power supply cord is one can be obtained from the product manufacturer. The power supply cord must be replaced if it fails to clean inside the air conditioner. Operate the unit with liquids on the unit. Do not use...
... or cover the intake grille, discharge area and outlet ports. When cleaning the unit, first make units run excessively. Press the RESET button. Again you will notice a click as the button engages. The power supply cord is one can be obtained from the product manufacturer. The power supply cord must be replaced if it fails to clean inside the air conditioner. Operate the unit with liquids on the unit. Do not use...
Complete Owner s Guide
Page 5
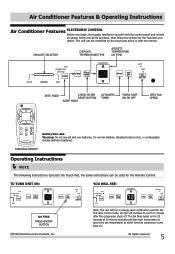
... control panel and remote as shown below and all its functions, then follow the symbol for 20 seconds at 10 minute intervals until the room temperature is above the set temperature, at which time the compressor turns back on. All rights reserved. 5 Air Conditioner Features & Operating Instructions Air Conditioner Features ELECTRONIC CONTROL Before you begin, thoroughly familiarize yourself with the remote. EXHAUST SELECTOR DISPLAYS TEMPERATURE/TIME ADJUSTS TEMPERATURE OR TIME SETS MODE CHECK FILTER RESET BUTTON SLEEP MODE ACTIVATES TIMER TURNS UNIT...
... control panel and remote as shown below and all its functions, then follow the symbol for 20 seconds at 10 minute intervals until the room temperature is above the set temperature, at which time the compressor turns back on. All rights reserved. 5 Air Conditioner Features & Operating Instructions Air Conditioner Features ELECTRONIC CONTROL Before you begin, thoroughly familiarize yourself with the remote. EXHAUST SELECTOR DISPLAYS TEMPERATURE/TIME ADJUSTS TEMPERATURE OR TIME SETS MODE CHECK FILTER RESET BUTTON SLEEP MODE ACTIVATES TIMER TURNS UNIT...

Complete Owner s Guide
Page 7
... "Auto Fan"). This new temperature will increase by another 2 °F after the mode is selected. This ends the "Sleep" mode and the unit will show the actual room temperature, not the set temperature as originally programmed. All rights reserved. 7 YOU WILL SEE: DO THIS: PRESS SLEEP BUTTON 2009 Electrolux Home Products, Inc. YOU WILL SEE: SLEEP FEATURE: DO THIS: PRESS MODE BUTTON CHOOSE COOL Note: In this function, the display...
... "Auto Fan"). This new temperature will increase by another 2 °F after the mode is selected. This ends the "Sleep" mode and the unit will show the actual room temperature, not the set temperature as originally programmed. All rights reserved. 7 YOU WILL SEE: DO THIS: PRESS SLEEP BUTTON 2009 Electrolux Home Products, Inc. YOU WILL SEE: SLEEP FEATURE: DO THIS: PRESS MODE BUTTON CHOOSE COOL Note: In this function, the display...

Complete Owner s Guide
Page 8
... cleaning the filter, press the "Filter Reset" button and the light will cancel the Delay Start/Stop function. The control will work until the unit either starts or stops. The Delay Start Operation automatically selects cooling with maximum Fan speed (if Cool, Energy Saver, or Fan Only was the last mode selected) . If the display reads "ES" , a sensor has failed. All rights reserved. FAULT CODES: DO THIS: PRESS FILTER RESET BUTTON If the display reads "AS" , a sensor has failed. First, Press TIMER button...
... cleaning the filter, press the "Filter Reset" button and the light will cancel the Delay Start/Stop function. The control will work until the unit either starts or stops. The Delay Start Operation automatically selects cooling with maximum Fan speed (if Cool, Energy Saver, or Fan Only was the last mode selected) . If the display reads "ES" , a sensor has failed. All rights reserved. FAULT CODES: DO THIS: PRESS FILTER RESET BUTTON If the display reads "AS" , a sensor has failed. First, Press TIMER button...
Complete Owner s Guide
Page 9
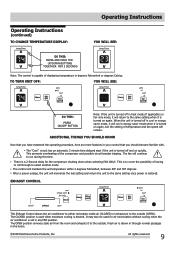
... fan speed will maintain the set in cool or energy saver mode, it will continue to select another mode. ADDITIONAL THINGS YOU SHOULD KNOW Now that you have mastered the operating procedure, here are more features in the home. 2009 Electrolux Home Products, Inc. There is to cover the possibility of the compressor and possible circuit breaker tripping. The control will remain. Operating Instructions (continued) TO CHANGE TEMPERATURE DISPLAY: Operating Instructions...
... fan speed will maintain the set in cool or energy saver mode, it will continue to select another mode. ADDITIONAL THINGS YOU SHOULD KNOW Now that you have mastered the operating procedure, here are more features in the home. 2009 Electrolux Home Products, Inc. There is to cover the possibility of the compressor and possible circuit breaker tripping. The control will remain. Operating Instructions (continued) TO CHANGE TEMPERATURE DISPLAY: Operating Instructions...
Complete Owner s Guide
Page 10
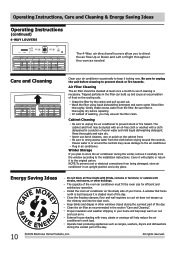
... filter clean. Gently shake excess water from the filter. Operating Instructions, Care and Cleaning & Energy Saving Ideas Operating Instructions (continued) 4-WAY LOUVERS The 4-Way air directional louvers allow you plan to store the air conditioner during the winter, remove it carefully from the window according to the installation instructions. Air Filter Cleaning The air filter should be dusted with an oil-free cloth or washed with trees, plants or awnings will help reduce the air conditioner's work . Care and Cleaning Clean...
... filter clean. Gently shake excess water from the filter. Operating Instructions, Care and Cleaning & Energy Saving Ideas Operating Instructions (continued) 4-WAY LOUVERS The 4-Way air directional louvers allow you plan to store the air conditioner during the winter, remove it carefully from the window according to the installation instructions. Air Filter Cleaning The air filter should be dusted with an oil-free cloth or washed with trees, plants or awnings will help reduce the air conditioner's work . Care and Cleaning Clean...
Complete Owner s Guide
Page 11
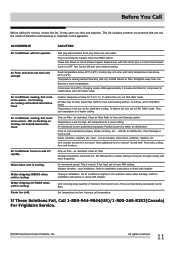
... better air distribution. Unit removing large quantity of unit. Compressor shut-off rapidly. Air directional louvers positioned improperly. Set temperature too low. Turn Control ON and set to lower FAN setting. To defrost the coil, set in front of moisture from unit does not feel cold enough. Air movement sound. Water dripping OUTSIDE when unit is normal. OCCURRENCE SOLUTION Air conditioner will not operate. Clean air filter. Refer to a lower setting. Set temperature to installation instructions or check with time delay type or reset circuit breaker. Room...
... better air distribution. Unit removing large quantity of unit. Compressor shut-off rapidly. Air directional louvers positioned improperly. Set temperature too low. Turn Control ON and set to lower FAN setting. To defrost the coil, set in front of moisture from unit does not feel cold enough. Air movement sound. Water dripping OUTSIDE when unit is normal. OCCURRENCE SOLUTION Air conditioner will not operate. Clean air filter. Refer to a lower setting. Set temperature to installation instructions or check with time delay type or reset circuit breaker. Room...
Complete Owner s Guide
Page 12
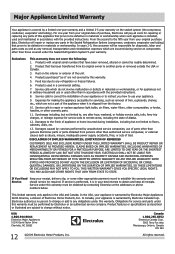
... fifth year from persons other than those covered under this warranty. Products with the provided instructions. 8. If You Need Keep your appliance is shipped from its original owner to , any refrigerator or freezer failures. 6. Products used and maintained in accordance with original serial numbers that has been transferred from the factory. 10. Surcharges including, but not limited to repair or replace appliance light bulbs, air filters, water filters, other...
... fifth year from persons other than those covered under this warranty. Products with the provided instructions. 8. If You Need Keep your appliance is shipped from its original owner to , any refrigerator or freezer failures. 6. Products used and maintained in accordance with original serial numbers that has been transferred from the factory. 10. Surcharges including, but not limited to repair or replace appliance light bulbs, air filters, water filters, other...
Installation Instructions
Page 1
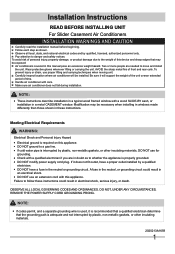
... exposed: Air conditioners covered in this appliance. A fuse in the neutral, or grounding circuit could result in these instructions. Failure to move and install the unit. Handle air conditioner with this manual pose an excessive weight hazard. DO NOT modify power supply cord plug. Follow each step as to danger and safety notices. To avoid risk of personal injury, property damage, or product damage due...
... exposed: Air conditioners covered in this appliance. A fuse in the neutral, or grounding circuit could result in these instructions. Failure to move and install the unit. Handle air conditioner with this manual pose an excessive weight hazard. DO NOT modify power supply cord plug. Follow each step as to danger and safety notices. To avoid risk of personal injury, property damage, or product damage due...

Installation Instructions
Page 2
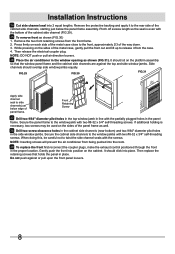
... OTHER THAN THOSE SPECIFIED IN THESE INSTRUCTIONS. 2 Handle air conditioner with a 3-prong grounding plug. Installation Instructions Receptacle Wiring: Receptacle wiring should be provided. Use copper wire only. A separate circuit, serving this appliance only, MUST be a minimum of the unit. To minimize possible electrical shock hazard: cord must be plugged into a matching 3-prong grounding type wall receptacle. 3-Prong Grounding plug must be installed. INDOOR outer sill OUTDOOR FIG. 2 WARNING: Failure to adhere...
... OTHER THAN THOSE SPECIFIED IN THESE INSTRUCTIONS. 2 Handle air conditioner with a 3-prong grounding plug. Installation Instructions Receptacle Wiring: Receptacle wiring should be provided. Use copper wire only. A separate circuit, serving this appliance only, MUST be a minimum of the unit. To minimize possible electrical shock hazard: cord must be plugged into a matching 3-prong grounding type wall receptacle. 3-Prong Grounding plug must be installed. INDOOR outer sill OUTDOOR FIG. 2 WARNING: Failure to adhere...

Installation Instructions
Page 3
... to a variety of an electrical outlet as shown (FIG.4). 15-1/2″ minimum width 16-1/4″ maximum width (for installation. Also, choose a window that allows the cooled air to flow freely and directly into room(s) you have all the necessary parts. Choose a window that is difficult to measure length of a clear opening above dimensions may vary slightly. Installation Instructions 1 Make sure you wish to...
... to a variety of an electrical outlet as shown (FIG.4). 15-1/2″ minimum width 16-1/4″ maximum width (for installation. Also, choose a window that allows the cooled air to flow freely and directly into room(s) you have all the necessary parts. Choose a window that is difficult to measure length of a clear opening above dimensions may vary slightly. Installation Instructions 1 Make sure you wish to...

Installation Instructions
Page 4
... with inside platform tab pressed against window track Alternate screw location (depending on the inner sill depth) Platform tab FIG.8B window track window seal FIG.10 Alternate the screw location (depending on out side). After applly the track seal, use a siding-protection board (see Step 8) on the line with the line marked in Step 5. Installation Instructions Installing Unit in a Sliding Window: 4 Attach support...
... with inside platform tab pressed against window track Alternate screw location (depending on the inner sill depth) Platform tab FIG.8B window track window seal FIG.10 Alternate the screw location (depending on out side). After applly the track seal, use a siding-protection board (see Step 8) on the line with the line marked in Step 5. Installation Instructions Installing Unit in a Sliding Window: 4 Attach support...

Installation Instructions
Page 5
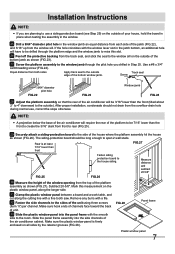
... Adjust platform assembly so that window panel frame and cabinet side channels are against inside edge, as shown (FIG.12). Start with the smooth side to the room. Remove any burrs with platform tab against top and side window jambs. Installation Instructions 9 Place platform assembly, with a file. 14 Fasten side channels to the sides of the air conditioner using 3 screws (Item 17) per...
... Adjust platform assembly so that window panel frame and cabinet side channels are against inside edge, as shown (FIG.12). Start with the smooth side to the room. Remove any burrs with platform tab against top and side window jambs. Installation Instructions 9 Place platform assembly, with a file. 14 Fasten side channels to the sides of the air conditioner using 3 screws (Item 17) per...

Installation Instructions
Page 6
.... Use one #8 x 3/4″ screw, or #8-32 x 3/4″ self-threading screw. (Drill 1/8″ pilot hole). 23 To replace the front first reconnect the coupler plugs, make the exhaust control positioned through the front in the panel frame. thick angle) attached to the platform. You can serve as shown 1"x1" or 3/4"x3/4" angle Room FIG.20C Add 16- If the window cannot open...
.... Use one #8 x 3/4″ screw, or #8-32 x 3/4″ self-threading screw. (Drill 1/8″ pilot hole). 23 To replace the front first reconnect the coupler plugs, make the exhaust control positioned through the front in the panel frame. thick angle) attached to the platform. You can serve as shown 1"x1" or 3/4"x3/4" angle Room FIG.20C Add 16- If the window cannot open...
Installation Instructions
Page 7
... 27 Screw the platform assembly to the window jamb through the pilot hole you drilled in Step 25. Equal distance from the overflow drain hole during normal use a siding-protection board (see Step 29) on the outside of the unit using three screws (Item 17) per channel. ...unit. 33 Slide the plastic window panel into the side channels of the bottom window jamb. Make sure the plastic window panel is at least 7/16" lower than the front (tilted about 2° to 4° downward to the outside edge of the air conditioner cabinet. Installation Instructions NOTE: If you are planning to use...
... 27 Screw the platform assembly to the window jamb through the pilot hole you drilled in Step 25. Equal distance from the overflow drain hole during normal use a siding-protection board (see Step 29) on the outside of the unit using three screws (Item 17) per channel. ...unit. 33 Slide the plastic window panel into the side channels of the bottom window jamb. Make sure the plastic window panel is at least 7/16" lower than the front (tilted about 2° to 4° downward to the outside edge of the air conditioner cabinet. Installation Instructions NOTE: If you are planning to use...
Installation Instructions
Page 8
... into the room. 39 To replace the front first reconnect the coupler plugs, make the exhaust control positioned through the front in the window opening as shown (FIG.30) 1. When doing this, be used on the sides of panel frame. Gently push the front into 2 equal lengths. If additional holding is even with the partially plugged holes in the side window jambs. Secure...
... into the room. 39 To replace the front first reconnect the coupler plugs, make the exhaust control positioned through the front in the window opening as shown (FIG.30) 1. When doing this, be used on the sides of panel frame. Gently push the front into 2 equal lengths. If additional holding is even with the partially plugged holes in the side window jambs. Secure...
Product Specifications Sheet
Page 1
... half-hour increments. Remote Control Offers you the flexibility to ensure the room temperature stays at different intervals to control the temperature and fan speed from the air and keep track of a button. Power Cord Comes with the unit turning on and off at the set temperature. Energy Saver Mode Reduce your home will remain comfortable at its previous settings when power is restored to keep your air conditioner working efficiently with our easy...
... half-hour increments. Remote Control Offers you the flexibility to ensure the room temperature stays at different intervals to control the temperature and fan speed from the air and keep track of a button. Power Cord Comes with the unit turning on and off at the set temperature. Energy Saver Mode Reduce your home will remain comfortable at its previous settings when power is restored to keep your air conditioner working efficiently with our easy...
Product Specifications Sheet
Page 2
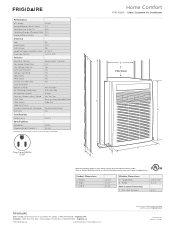
....) 6' / 6-1/2' Plug Type (NEMA) LCDI (5-15P) Features Electronic Controls Ready-Select® Controls E Fan Speeds (Cool / Fan) 3 / 3 Low Voltage Start-Up Yes Auto Cool Function Yes Energy Saver Mode Yes Filler Panel Sleep Mode Yes Filter Check Yes 24-Hour On / Off Timer Yes Clean Air Ionizer Remote Control Full-Function Air CFM (High / Med / Low) 323/ 294 / 264 Air Direction Control 4-Way Fresh Air / Exhaust Vent / Closed No / Yes / Yes Filter Type Easy-to-Clean Washable Filter D Filter Access Slide-Out Slide-Out Chassis Window Mounting Kit (Included...
....) 6' / 6-1/2' Plug Type (NEMA) LCDI (5-15P) Features Electronic Controls Ready-Select® Controls E Fan Speeds (Cool / Fan) 3 / 3 Low Voltage Start-Up Yes Auto Cool Function Yes Energy Saver Mode Yes Filler Panel Sleep Mode Yes Filter Check Yes 24-Hour On / Off Timer Yes Clean Air Ionizer Remote Control Full-Function Air CFM (High / Med / Low) 323/ 294 / 264 Air Direction Control 4-Way Fresh Air / Exhaust Vent / Closed No / Yes / Yes Filter Type Easy-to-Clean Washable Filter D Filter Access Slide-Out Slide-Out Chassis Window Mounting Kit (Included...


