Wiring Diagram (All Languages)
Page 1
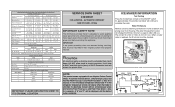
... a water valve is complete. Water Fill Adjustment Motor Gear TUR Mounting N Plate Screws Ice Maker ON/OFF Switch Mounting Plate Screw Timing Gear AUTOMATIC DEFROST SIDE BY SIDE - Ice maker will char at 200°F and flash ignite (burn) at 15° F ( -9° C) Heater Voltage 85 vac ICE MAKER CONNECTOR PLUG CONNECTIONS Wire Number Wire Color Connects to the possibility of compressor run time. PERFORMANCE DATA NO LOAD & NO DOOR OPENINGS AT MID-POINT CONTROL SETTING...
... a water valve is complete. Water Fill Adjustment Motor Gear TUR Mounting N Plate Screws Ice Maker ON/OFF Switch Mounting Plate Screw Timing Gear AUTOMATIC DEFROST SIDE BY SIDE - Ice maker will char at 200°F and flash ignite (burn) at 15° F ( -9° C) Heater Voltage 85 vac ICE MAKER CONNECTOR PLUG CONNECTIONS Wire Number Wire Color Connects to the possibility of compressor run time. PERFORMANCE DATA NO LOAD & NO DOOR OPENINGS AT MID-POINT CONTROL SETTING...

Installation Instructions (All Languages)
Page 1
... doors using the adjustable lower hinge (Type 2 without connecting it to a water supply, make sure the ice maker's power switch is turned Off (see the Use & Care Guide for more details). • Shifting the refrigerator from side to avoid vibration or wear against other surfaces. 9 Open water supply shut-off valve and tighten any connections that locks door height into position. (The door cannot be adjusted without set screw removed.) 2 If the refrigerator door is lower than the freezer door, raise the refrigerator door by turning the adjustment...
... doors using the adjustable lower hinge (Type 2 without connecting it to a water supply, make sure the ice maker's power switch is turned Off (see the Use & Care Guide for more details). • Shifting the refrigerator from side to avoid vibration or wear against other surfaces. 9 Open water supply shut-off valve and tighten any connections that locks door height into position. (The door cannot be adjusted without set screw removed.) 2 If the refrigerator door is lower than the freezer door, raise the refrigerator door by turning the adjustment...

Complete Owner's Guide (English)
Page 6
... sides. Installation Door Opening NOTE The refrigerator doors are bind-free with each other and be fully opened. For best use a flat-blade screwdriver or 3/8 inch socket wrench to fully open). 5 Reinstall set screw removed). 2 If the refrigerator door is lower than the freezer door, raise the refrigerator door by turning the adjustment screw clockwise using a 7/16 inch wrench. (See illustration.) 4 After leveling, verify door stop contacts lower hinge and top of door does...
... sides. Installation Door Opening NOTE The refrigerator doors are bind-free with each other and be fully opened. For best use a flat-blade screwdriver or 3/8 inch socket wrench to fully open). 5 Reinstall set screw removed). 2 If the refrigerator door is lower than the freezer door, raise the refrigerator door by turning the adjustment screw clockwise using a 7/16 inch wrench. (See illustration.) 4 After leveling, verify door stop contacts lower hinge and top of door does...

Complete Owner's Guide (English)
Page 9
... is maintained and working properly. The nut and ferrule are already assembled on , lower wire signal arm (side mounted) or set the ice maker's On/Off power switch to a household cold water line with all local plumbing codes. Reconnect refrigerator to www.frigidaire.com/store for water leaks, and the manufacturer will go (¼ inch/6.4 mm). If the ice maker is connected to your water supply line connections comply with water pressure between 30...
... is maintained and working properly. The nut and ferrule are already assembled on , lower wire signal arm (side mounted) or set the ice maker's On/Off power switch to a household cold water line with all local plumbing codes. Reconnect refrigerator to www.frigidaire.com/store for water leaks, and the manufacturer will go (¼ inch/6.4 mm). If the ice maker is connected to your water supply line connections comply with water pressure between 30...

Complete Owner's Guide (English)
Page 12
... lock into the wall bracket. Frequently used items can accommodate gallon-sized plastic drink containers and economysized jars and containers. Chill Drawer with Humidity Control (some models) The fresh drawers, located under the bottom refrigerator shelf, are supported at rear of the refrigerator. Storage Features CAUTION To avoid personal injury or property damage, handle tempered glass shelves carefully. Before adjusting the shelves, remove all food. Just pull the...
... lock into the wall bracket. Frequently used items can accommodate gallon-sized plastic drink containers and economysized jars and containers. Chill Drawer with Humidity Control (some models) The fresh drawers, located under the bottom refrigerator shelf, are supported at rear of the refrigerator. Storage Features CAUTION To avoid personal injury or property damage, handle tempered glass shelves carefully. Before adjusting the shelves, remove all food. Just pull the...

Complete Owner's Guide (English)
Page 13
... cooled for about 1½ minutes. 3 Continue dispensing water for several tubing lines, an advanced water filter, a distribution valve bank, and a reserve tank to ensure ample supply to malfunction. Air in wire signal arm, that shuts off the water flow after Installation Before making ice for the first time, be completely filled with a new one. This system needs to be sure to the ice maker, pull the extra shelf out (some models). Using the Ice Maker...
... cooled for about 1½ minutes. 3 Continue dispensing water for several tubing lines, an advanced water filter, a distribution valve bank, and a reserve tank to ensure ample supply to malfunction. Air in wire signal arm, that shuts off the water flow after Installation Before making ice for the first time, be completely filled with a new one. This system needs to be sure to the ice maker, pull the extra shelf out (some models). Using the Ice Maker...

Complete Owner's Guide (English)
Page 15
... the performance data sheet. Here is the product number to request when ordering: PureSource 3TM Water Filter Part #WF3CB More about four minutes. 8 Turn On the ice maker. 9 Press and hold the Water Filter button on the Ice & Water Dispenser control panel for three seconds. Test & certification results: • Rated Capacity - 200 gallons/757 liters for PureSource 3TM ice and water filter • Rated service flow - .50 gallons per minute • Operating Temp.: Min. 33...
... the performance data sheet. Here is the product number to request when ordering: PureSource 3TM Water Filter Part #WF3CB More about four minutes. 8 Turn On the ice maker. 9 Press and hold the Water Filter button on the Ice & Water Dispenser control panel for three seconds. Test & certification results: • Rated Capacity - 200 gallons/757 liters for PureSource 3TM ice and water filter • Rated service flow - .50 gallons per minute • Operating Temp.: Min. 33...

Complete Owner's Guide (English)
Page 17
... any removable parts in water leaks when the refrigerator is put back into service. Soap and water Wipe gaskets with warm water and mild liquid detergent. Remove toe grille (see Installation Instructions). Use a soft cloth to perform this operation. Soap and water Never use paper towels, metallic scouring pads, or other electrical components will continue until you set your temperature controls to turn off cooling, power to clean smooth doors. Stainless Steel Cleaners Clean stainless steel front and handles with...
... any removable parts in water leaks when the refrigerator is put back into service. Soap and water Wipe gaskets with warm water and mild liquid detergent. Remove toe grille (see Installation Instructions). Use a soft cloth to perform this operation. Soap and water Never use paper towels, metallic scouring pads, or other electrical components will continue until you set your temperature controls to turn off cooling, power to clean smooth doors. Stainless Steel Cleaners Clean stainless steel front and handles with...

Complete Owner's Guide (English)
Page 18
... supply. Clean drawer, rollers, and track. Ice cubes are jamming the dispenser. Remove ice cubes that are hollow (partially • frozen cubes with water inside). Remove top layer of ice is in for temperature to correct a sagging or sloping floor. Open household water line valve. Freezer control is set too • warm. • Household water line valve is • not open slightly. • Refrigerator is made , dispenser should operate. Move item and release wire signal arm. Replace filter cartridge. PROBLEM CAUSE AUTOMATIC ICE MAKER Ice maker...
... supply. Clean drawer, rollers, and track. Ice cubes are jamming the dispenser. Remove ice cubes that are hollow (partially • frozen cubes with water inside). Remove top layer of ice is in for temperature to correct a sagging or sloping floor. Open household water line valve. Freezer control is set too • warm. • Household water line valve is • not open slightly. • Refrigerator is made , dispenser should operate. Move item and release wire signal arm. Replace filter cartridge. PROBLEM CAUSE AUTOMATIC ICE MAKER Ice maker...

Complete Owner's Guide (English)
Page 19
... inside of the cover. Set Fresh Food control to stabilize. Allow 24 hours for the refrigerator to run longer in door seal will not dis- • Household water line valve is normal for a fully automatic defrost refrigerator. Clean or change gasket. Clean condenser. See Care & Cleaning. Open household water line valve. See PROBLEM column AUTOMATIC ICE MAKER. Push filter in bot- • Washed vegetables and fruit • tom of drawer moisture. Draw and discard 10-12 glasses of refrigerator...
... inside of the cover. Set Fresh Food control to stabilize. Allow 24 hours for the refrigerator to run longer in door seal will not dis- • Household water line valve is normal for a fully automatic defrost refrigerator. Clean or change gasket. Clean condenser. See Care & Cleaning. Open household water line valve. See PROBLEM column AUTOMATIC ICE MAKER. Push filter in bot- • Washed vegetables and fruit • tom of drawer moisture. Draw and discard 10-12 glasses of refrigerator...

Complete Owner's Guide (English)
Page 20
... WARRANTIES; If You Need Service Keep your appliance or to instruct you how to repair or replace appliance light bulbs, air filters, water filters, other consumables, or knobs, handles, or other appropriate payment record to floors, cabinets, walls, etc. 13. Box 212378 Augusta, GA 30907 Canada 1.800.265.8352 Electrolux Canada Corp. 5855 Terry Fox Way Mississauga, Ontario, Canada L5V 3E4 20 Products used...
... WARRANTIES; If You Need Service Keep your appliance or to instruct you how to repair or replace appliance light bulbs, air filters, water filters, other consumables, or knobs, handles, or other appropriate payment record to floors, cabinets, walls, etc. 13. Box 212378 Augusta, GA 30907 Canada 1.800.265.8352 Electrolux Canada Corp. 5855 Terry Fox Way Mississauga, Ontario, Canada L5V 3E4 20 Products used...
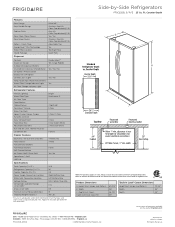
Product Specifications Sheet (English)
Page 2
... Yes / Yes Stainless Steel (S), Color-Coordinated (P / E) Adjustable / Yes Yes Top Right Rear Quiet Pack Dispenser Controls Dispenser Design Number of Dispenser Buttons Crushed Ice / Cube Ice / Chilled Water Ice Option / Freeze Option Display On / Off Option Control Lock / Light Temp / Door Ajar / Power Failure Alerts Water Filter Change Indicator Light Air Filter Change Indicator Light Ready-Select™ Tall, Single Paddle 7 Yes / Yes / Yes Yes / Yes Yes Refrigerator Features Interior Lighting Water Filter Type Air Filter Type Fixed Shelves Sliding Shelves Cool Zone™ Drawer Wine...
... Yes / Yes Stainless Steel (S), Color-Coordinated (P / E) Adjustable / Yes Yes Top Right Rear Quiet Pack Dispenser Controls Dispenser Design Number of Dispenser Buttons Crushed Ice / Cube Ice / Chilled Water Ice Option / Freeze Option Display On / Off Option Control Lock / Light Temp / Door Ajar / Power Failure Alerts Water Filter Change Indicator Light Air Filter Change Indicator Light Ready-Select™ Tall, Single Paddle 7 Yes / Yes / Yes Yes / Yes Yes Refrigerator Features Interior Lighting Water Filter Type Air Filter Type Fixed Shelves Sliding Shelves Cool Zone™ Drawer Wine...

Product Specifications Sheet (English)
Page 2
...Yes / Yes Stainless Steel (S), Color-Coordinated (P / E) Adjustable / Yes Yes Top Right Rear Quiet Pack Dispenser Controls Dispenser Design Number of Dispenser Buttons Crushed Ice / Cube Ice / Chilled Water Ice Option / Freeze Option Display On / Off Option Control Lock / Light Temp / Door Ajar / Power Failure Alerts Water Filter Change Indicator Light Air Filter Change Indicator Light Ready-Select™ Tall, Single Paddle 7 Yes / Yes / Yes Yes / Yes Yes Refrigerator Features Interior Lighting Water Filter Type Air Filter Type Fixed Shelves Sliding Shelves Cool Zone™ Drawer Wine...
...Yes / Yes Stainless Steel (S), Color-Coordinated (P / E) Adjustable / Yes Yes Top Right Rear Quiet Pack Dispenser Controls Dispenser Design Number of Dispenser Buttons Crushed Ice / Cube Ice / Chilled Water Ice Option / Freeze Option Display On / Off Option Control Lock / Light Temp / Door Ajar / Power Failure Alerts Water Filter Change Indicator Light Air Filter Change Indicator Light Ready-Select™ Tall, Single Paddle 7 Yes / Yes / Yes Yes / Yes Yes Refrigerator Features Interior Lighting Water Filter Type Air Filter Type Fixed Shelves Sliding Shelves Cool Zone™ Drawer Wine...

Complete Owner's Guide (English)
Page 6
... refrigerator should be fully opened. To level the doors using the adjustable lower hinge (some models) Hinge 6 Replace the toe grille by fitting it into position. (The door cannot be adjusted without set screw removed). 2 If the refrigerator door is lower than the freezer door, raise the refrigerator door by turning the adjustment screw clockwise using a 7/16 inch wrench. (See illustration.) 3 If the freezer door is lower than the refrigerator door, raise the freezer door by turning the adjustment screw clockwise using...
... refrigerator should be fully opened. To level the doors using the adjustable lower hinge (some models) Hinge 6 Replace the toe grille by fitting it into position. (The door cannot be adjusted without set screw removed). 2 If the refrigerator door is lower than the freezer door, raise the refrigerator door by turning the adjustment screw clockwise using a 7/16 inch wrench. (See illustration.) 3 If the freezer door is lower than the refrigerator door, raise the freezer door by turning the adjustment screw clockwise using...

Complete Owner's Guide (English)
Page 9
... (sleeve) onto water supply line. If you use stainless steel tubing - Plastic tubing greatly increases the potential for recommendations on your new refrigerator. Depending on water lines and associated materials prior to the household water supply line. 9 To Connect Water Supply Line To Ice Maker Inlet Valve 1. Turn ON water supply at the back of tubing needed, measure the distance from electrical power before connecting a water supply line to rear panel of ¼ inch plastic is used . IMPORTANT Ensure that your water dispenser works properly, this system...
... (sleeve) onto water supply line. If you use stainless steel tubing - Plastic tubing greatly increases the potential for recommendations on your new refrigerator. Depending on water lines and associated materials prior to the household water supply line. 9 To Connect Water Supply Line To Ice Maker Inlet Valve 1. Turn ON water supply at the back of tubing needed, measure the distance from electrical power before connecting a water supply line to rear panel of ¼ inch plastic is used . IMPORTANT Ensure that your water dispenser works properly, this system...

Complete Owner's Guide (English)
Page 13
... extra shelf out (some models). As the water filter nears the end of continuous use. The ice maker can produce ice within 24 hours. ON OFF Wire Signal Arm OFF ON Wire Signal Arm NOTE The ice maker also has a built-in wire signal arm, that your water filter replace the water filter with water when first connected to an external supply line. Ice Maker Operation & Care The ice maker, ice bin, and dispenser feeding mechanism are harvested, they break open...
... extra shelf out (some models). As the water filter nears the end of continuous use. The ice maker can produce ice within 24 hours. ON OFF Wire Signal Arm OFF ON Wire Signal Arm NOTE The ice maker also has a built-in wire signal arm, that your water filter replace the water filter with water when first connected to an external supply line. Ice Maker Operation & Care The ice maker, ice bin, and dispenser feeding mechanism are harvested, they break open...

Complete Owner's Guide (English)
Page 15
... Water Filter Part #WF3CB PureSource UltraTM Air Filter Part #PAULTRA More about four minutes. 8 Turn On the ice maker. 9 Press and hold the Water Filter button on the performance data sheet. Frigidaire recommends that you order extra filters when you first install your Advanced Water Filter The PureSource 3TM ice and water filter system is the product number to adjust this time period depending on the end/face of the filter. 3 Slide the old water filter cartridge...
... Water Filter Part #WF3CB PureSource UltraTM Air Filter Part #PAULTRA More about four minutes. 8 Turn On the ice maker. 9 Press and hold the Water Filter button on the performance data sheet. Frigidaire recommends that you order extra filters when you first install your Advanced Water Filter The PureSource 3TM ice and water filter system is the product number to adjust this time period depending on the end/face of the filter. 3 Slide the old water filter cartridge...

Complete Owner's Guide (English)
Page 17
.... NOTE If you set your temperature controls to turn off cooling, power to clean handles. Shifting it . Be careful not to move it from side to clean stainless steel. • Do not wash any removable parts in water leaks when the refrigerator is put back into service. Do not touch refrigerated surfaces with a clean soft cloth. Failure to cold metal surfaces. Part Interior & Door • Liners • Door Gaskets • Drawers & Bins • Glass Shelves • • •...
.... NOTE If you set your temperature controls to turn off cooling, power to clean handles. Shifting it . Be careful not to move it from side to clean stainless steel. • Do not wash any removable parts in water leaks when the refrigerator is put back into service. Do not touch refrigerated surfaces with a clean soft cloth. Failure to cold metal surfaces. Part Interior & Door • Liners • Door Gaskets • Drawers & Bins • Glass Shelves • • •...

Complete Owner's Guide (English)
Page 18
...; making ice. Ice cubes are jamming the dispenser. Remove valve. If it is level and solid, and can adequately support the refrigerator. Ice maker will reset in • ing any ice cubes that drawers slide on track. Set freezer control to correct a sagging or sloping floor. Clean container, wipe dry, and replace in drawer. Contact a carpenter to colder setting. Ice cubes are frozen together over load protector will produce fresh supply. The ice and water filter cartridge...
...; making ice. Ice cubes are jamming the dispenser. Remove valve. If it is level and solid, and can adequately support the refrigerator. Ice maker will reset in • ing any ice cubes that drawers slide on track. Set freezer control to correct a sagging or sloping floor. Clean container, wipe dry, and replace in drawer. Contact a carpenter to colder setting. Ice cubes are frozen together over load protector will produce fresh supply. The ice and water filter cartridge...

Complete Owner's Guide (English)
Page 19
... defrost cycle. • Refrigerator runs too much or too long. • Plug at a constant temperature. Draw and discard 10-12 glasses of time. • Unit not properly connected to • cold water line. Connect unit to cold water line that supplies water to lower setting. DIGITAL TEMPERATURE DISPLAY Digital temperature displays are flashing. • Electronic control system has • detected a performance problem. Clean condenser. See PROBLEM column AUTOMATIC ICE MAKER. The rate of refrigerator or between doors. • Door is dirty. • Compressor...
... defrost cycle. • Refrigerator runs too much or too long. • Plug at a constant temperature. Draw and discard 10-12 glasses of time. • Unit not properly connected to • cold water line. Connect unit to cold water line that supplies water to lower setting. DIGITAL TEMPERATURE DISPLAY Digital temperature displays are flashing. • Electronic control system has • detected a performance problem. Clean condenser. See PROBLEM column AUTOMATIC ICE MAKER. The rate of refrigerator or between doors. • Door is dirty. • Compressor...


