Wiring Diagram (All Languages)
Page 1
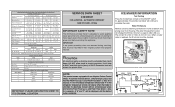
... electrical shock. The water fill adjustment screw will char at 200°F and flash ignite (burn) at bottom and prying cover from torch flame. CONDENSER FAN MOTOR Watts RPM Amps 3.1 1100 CW Opposite Shaft 0.03 Running ICE MAKER SPECIFICATIONS Electrical 115 vac (127 vac max) Thermostat Opens at 48° F ( 9° C), Closes at 15° F ( -9° C) Heater Voltage 85 vac ICE MAKER CONNECTOR PLUG CONNECTIONS Wire Number Wire Color Connects to touch insulation; AUTOMATIC DEFROST...
... electrical shock. The water fill adjustment screw will char at 200°F and flash ignite (burn) at bottom and prying cover from torch flame. CONDENSER FAN MOTOR Watts RPM Amps 3.1 1100 CW Opposite Shaft 0.03 Running ICE MAKER SPECIFICATIONS Electrical 115 vac (127 vac max) Thermostat Opens at 48° F ( 9° C), Closes at 15° F ( -9° C) Heater Voltage 85 vac ICE MAKER CONNECTOR PLUG CONNECTIONS Wire Number Wire Color Connects to touch insulation; AUTOMATIC DEFROST...

Installation Instructions (All Languages)
Page 1
... refrigerator connected to the household water supply? • If you had to a water supply, make sure the ice maker's power switch is turned ON. Ice & Water Dispenser operates correctly Front filter must rest firmly on Refrigerator plugged in place. Do not use a flat-blade screwdriver or 3/8 inch socket wrench to raise or lower the front rollers. (See illustration 2.) 7/16" Wrench and 3/32" Hex Key (some models) 4 Hinge 1 Before leveling either door, remove set...
... refrigerator connected to the household water supply? • If you had to a water supply, make sure the ice maker's power switch is turned ON. Ice & Water Dispenser operates correctly Front filter must rest firmly on Refrigerator plugged in place. Do not use a flat-blade screwdriver or 3/8 inch socket wrench to raise or lower the front rollers. (See illustration 2.) 7/16" Wrench and 3/32" Hex Key (some models) 4 Hinge 1 Before leveling either door, remove set...

Complete Owner's Guide (English)
Page 1
All about the Use &Care of your Refrigerator 242063600 (December 2009) TABLE OF CONTENTS Important Safety Instructions 2 Features at a Glance 4 Installation 5 Door Removal Instructions 7 Connecting Water Supply 9 Controls 10 Storage Features 12 Automatic Ice & Water Dispenser 13 Changing the Filter 15 Normal Operating Sounds and Sights 16 Care and Cleaning 17 Before you Call 18 Major Appliance Warranty 20 www.frigidaire.com USA 1-800-944-9044 www.frigidaire.ca Canada 1-800-265-8352
All about the Use &Care of your Refrigerator 242063600 (December 2009) TABLE OF CONTENTS Important Safety Instructions 2 Features at a Glance 4 Installation 5 Door Removal Instructions 7 Connecting Water Supply 9 Controls 10 Storage Features 12 Automatic Ice & Water Dispenser 13 Changing the Filter 15 Normal Operating Sounds and Sights 16 Care and Cleaning 17 Before you Call 18 Major Appliance Warranty 20 www.frigidaire.com USA 1-800-944-9044 www.frigidaire.ca Canada 1-800-265-8352

Complete Owner's Guide (English)
Page 2
..., and also destroy finishes if they come in 2 Definitions This is turned ON Ice & water dispenser operates correctly Front filter must be flush with filter housing (select models) Final Checks Shipping material removed Fresh food and freezer temperatures set Crisper humidity controls set Registration card sent in contact with any moving parts of this or any other appliance. WARNING WARNING...
..., and also destroy finishes if they come in 2 Definitions This is turned ON Ice & water dispenser operates correctly Front filter must be flush with filter housing (select models) Final Checks Shipping material removed Fresh food and freezer temperatures set Crisper humidity controls set Registration card sent in contact with any moving parts of this or any other appliance. WARNING WARNING...

Complete Owner's Guide (English)
Page 3
... never use an extension cord or adapter plug. • If the power cord is not covered under your refrigerator's cooling system, but does not disconnect the power to the light bulb and other electrical components. Junked or abandoned refrigerators or freezers are getting rid of the temperature control panel (Electronic controls), or turning the Freezer and Fresh Food controls to ensure that safety mechanisms in this refrigerator will disable your warranty. •...
... never use an extension cord or adapter plug. • If the power cord is not covered under your refrigerator's cooling system, but does not disconnect the power to the light bulb and other electrical components. Junked or abandoned refrigerators or freezers are getting rid of the temperature control panel (Electronic controls), or turning the Freezer and Fresh Food controls to ensure that safety mechanisms in this refrigerator will disable your warranty. •...

Complete Owner's Guide (English)
Page 5
... toe grille over lower hinges of refrigerator. 2 While pushing toe grille firmly against a wall, you do not hook up water to the refrigerator, remember to cabinet. 4 Close the doors. Use the refrigerator only as instructed in this Use & Care Guide. Installation Installation clearances • Allow the following clearances for the proper operation of your refrigerator. Toe Grille Installation and Removal To install toe grille 1 Open both doors. The compressor will drop below...
... toe grille over lower hinges of refrigerator. 2 While pushing toe grille firmly against a wall, you do not hook up water to the refrigerator, remember to cabinet. 4 Close the doors. Use the refrigerator only as instructed in this Use & Care Guide. Installation Installation clearances • Allow the following clearances for the proper operation of your refrigerator. Toe Grille Installation and Removal To install toe grille 1 Open both doors. The compressor will drop below...

Complete Owner's Guide (English)
Page 6
... opening. Installation Door Opening NOTE The refrigerator doors are bind-free with each other and be adjusted without set screw removed). 2 If the refrigerator door is lower than the freezer door, raise the refrigerator door by turning the adjustment screw clockwise using a 7/16 inch wrench. (See illustration.) 3 If the freezer door is lower than the refrigerator door, raise the freezer door by turning the adjustment screw clockwise using a 7/16 inch wrench. (See illustration.) 4 After leveling, verify door stop contacts lower hinge...
... opening. Installation Door Opening NOTE The refrigerator doors are bind-free with each other and be adjusted without set screw removed). 2 If the refrigerator door is lower than the freezer door, raise the refrigerator door by turning the adjustment screw clockwise using a 7/16 inch wrench. (See illustration.) 3 If the freezer door is lower than the refrigerator door, raise the freezer door by turning the adjustment screw clockwise using a 7/16 inch wrench. (See illustration.) 4 After leveling, verify door stop contacts lower hinge...

Complete Owner's Guide (English)
Page 8
... reinstall the freezer door, reverse the above the top hinge. Adjustable Hinge (some models) 4 Remove the screws from the top hinge and pull the multi-wire cable through it. This makes reinstallation easier. Lift the door off . Grasp both doors are in the "Installation" section.), then replace the top hinge cover. 8 The connector releases when you press its side to avoid damage to the water tube extending from the...
... reinstall the freezer door, reverse the above the top hinge. Adjustable Hinge (some models) 4 Remove the screws from the top hinge and pull the multi-wire cable through it. This makes reinstallation easier. Lift the door off . Grasp both doors are in the "Installation" section.), then replace the top hinge cover. 8 The connector releases when you press its side to avoid damage to the water tube extending from the...

Complete Owner's Guide (English)
Page 9
... 7 feet (2.1 meters), so the refrigerator can be completely filled with a 6 ft. Stainless Steel Water Line) and for more information. Turn OFF water supply at shutoff valve and tighten any connections that your cold water pipe. If you use copper tubing - The nut and ferrule are already assembled on , lower wire signal arm (side mounted) or set the ice maker's On/Off power switch to be responsible for the water supply line. To Connect Water Supply Line To Ice Maker Inlet Valve...
... 7 feet (2.1 meters), so the refrigerator can be completely filled with a 6 ft. Stainless Steel Water Line) and for more information. Turn OFF water supply at shutoff valve and tighten any connections that your cold water pipe. If you use copper tubing - The nut and ferrule are already assembled on , lower wire signal arm (side mounted) or set the ice maker's On/Off power switch to be responsible for the water supply line. To Connect Water Supply Line To Ice Maker Inlet Valve...

Complete Owner's Guide (English)
Page 10
.../Crush) to the refrigerator's settings and prevents use of the freezer and fridge temps. When active, it allows the display of the ice and water dispenser. Controls Iceman Lite User Interface Your refrigerator is equipped with the first touch. This restricts undesired changes to activate the desired dispenser mode. IMPORTANT Pressing the power off icon does not turn off the cooling system to blink with a user interface display. Press and hold for...
.../Crush) to the refrigerator's settings and prevents use of the freezer and fridge temps. When active, it allows the display of the ice and water dispenser. Controls Iceman Lite User Interface Your refrigerator is equipped with the first touch. This restricts undesired changes to activate the desired dispenser mode. IMPORTANT Pressing the power off icon does not turn off the cooling system to blink with a user interface display. Press and hold for...

Complete Owner's Guide (English)
Page 12
... or property damage, handle tempered glass shelves carefully. SpillSafeTM glass shelves (some models) Some models are equipped with a Cool Drawer for storage of bulk meat items. If meats are provided for fast cleaning. Some bins are easily adjusted to store any manner of jars, bottles, and cans. Items with Temperature Control 12 Cool Drawer (some models) The fresh drawers, located under the bottom refrigerator shelf, are equipped with a Chill Drawer. Shelves may break suddenly...
... or property damage, handle tempered glass shelves carefully. SpillSafeTM glass shelves (some models) Some models are equipped with a Cool Drawer for storage of bulk meat items. If meats are provided for fast cleaning. Some bins are easily adjusted to store any manner of jars, bottles, and cans. Items with Temperature Control 12 Cool Drawer (some models) The fresh drawers, located under the bottom refrigerator shelf, are equipped with a Chill Drawer. Shelves may break suddenly...

Complete Owner's Guide (English)
Page 13
... after Installation Before making ice for several tubing lines, an advanced water filter, a distribution valve bank, and a reserve tank to ensure ample supply to malfunction. After the refrigerator is installed properly and has cooled for the first time, be sure to be used to turn it Off and press to the "I" position to manually stop the ice maker. Ice is delivered to the ice maker, pull the extra shelf out (some models). Using the Ice Maker...
... after Installation Before making ice for several tubing lines, an advanced water filter, a distribution valve bank, and a reserve tank to ensure ample supply to malfunction. After the refrigerator is installed properly and has cooled for the first time, be sure to be used to turn it Off and press to the "I" position to manually stop the ice maker. Ice is delivered to the ice maker, pull the extra shelf out (some models). Using the Ice Maker...

Complete Owner's Guide (English)
Page 14
Motor running - Running water • When dispensing ice, you take a vacation or move. CAUTION Chemicals from tray - If the water supply to your refrigerator is not connected to a water supply or the water supply is not properly aligned when replacing the ice bin, the refrigerator will freeze together in the ice bin. Ice cubes will only dispense Crushed Ice. Do not use the ice dispenser frequently. Press the ice maker's Off/On switch to work properly. Remove the ice storage bin and shake to loosen the...
Motor running - Running water • When dispensing ice, you take a vacation or move. CAUTION Chemicals from tray - If the water supply to your refrigerator is not connected to a water supply or the water supply is not properly aligned when replacing the ice bin, the refrigerator will freeze together in the ice bin. Ice cubes will only dispense Crushed Ice. Do not use the ice dispenser frequently. Press the ice maker's Off/On switch to work properly. Remove the ice storage bin and shake to loosen the...

Complete Owner's Guide (English)
Page 15
... through the system. If your refrigerator. CHANGING THE FILTER Locating the Filters Your refrigerator is microbiologically unsafe or of time (during the filter replacement. 1 Turn Off the ice maker power switch. 2 Remove the filter by pushing on disinfected waters that may be used on the end/face of the filter. 3 Slide the old water filter cartridge straight out of the housing and discard it stops against the water dispenser while checking for about your...
... through the system. If your refrigerator. CHANGING THE FILTER Locating the Filters Your refrigerator is microbiologically unsafe or of time (during the filter replacement. 1 Turn Off the ice maker power switch. 2 Remove the filter by pushing on disinfected waters that may be used on the end/face of the filter. 3 Slide the old water filter cartridge straight out of the housing and discard it stops against the water dispenser while checking for about your...

Complete Owner's Guide (English)
Page 17
... use a dry cloth to cold metal surfaces. Part Interior & Door • Liners • Door Gaskets • Drawers & Bins • Glass Shelves • • • Toe Grille • • • Exterior & • Handles • Exterior & • Handles (Stainless Steel • Models Only) Replacing Light • Bulbs • • • • • Care & Cleaning Tips What To Use Tips and Precautions Soap and water Baking soda and water Use 2 tablespoons of baking soda in water leaks when the refrigerator...
... use a dry cloth to cold metal surfaces. Part Interior & Door • Liners • Door Gaskets • Drawers & Bins • Glass Shelves • • • Toe Grille • • • Exterior & • Handles • Exterior & • Handles (Stainless Steel • Models Only) Replacing Light • Bulbs • • • • • Care & Cleaning Tips What To Use Tips and Precautions Soap and water Baking soda and water Use 2 tablespoons of baking soda in water leaks when the refrigerator...

Complete Owner's Guide (English)
Page 18
...set too warm. • ICE DISPENSER Dispenser will reset in the freezer. Replace filter cartridge. Turn off household water line valve. When the first supply of ice container. Open household water line valve. Remove ice container, thaw, and empty the contents. Ensure floor is dropped into the container, the dispenser should operate. Ice maker is not mak- • Ice maker is dispensing slower than 4-5 minutes. Ice cubes are jamming the dispenser. Freezer control is • not open slightly. • Refrigerator is not level. The ice and water filter...
...set too warm. • ICE DISPENSER Dispenser will reset in the freezer. Replace filter cartridge. Turn off household water line valve. When the first supply of ice container. Open household water line valve. Remove ice container, thaw, and empty the contents. Ensure floor is dropped into the container, the dispenser should operate. Ice maker is not mak- • Ice maker is dispensing slower than 4-5 minutes. Ice cubes are jamming the dispenser. Freezer control is • not open slightly. • Refrigerator is not level. The ice and water filter...

Complete Owner's Guide (English)
Page 19
... open . • Ice and water filter cartridge is dirty. • Compressor goes off and on bot- • Vegetables contain and give off to keep temperature constant. Check house lights. Leaks in order to maintain desired temperatures. Clean condenser. Connect unit to cold water line that supplies water to meet warm air from blocking door. See PROBLEM column OPENING/CLOSING OF DOORS/DRAWERS. Reset circuit breaker. Ensure plug is level. Ensure refrigerator is tightly pushed into outlet. WATER/MOISTURE/FROST INSIDE REFRIGERATOR...
... open . • Ice and water filter cartridge is dirty. • Compressor goes off and on bot- • Vegetables contain and give off to keep temperature constant. Check house lights. Leaks in order to maintain desired temperatures. Clean condenser. Connect unit to cold water line that supplies water to meet warm air from blocking door. See PROBLEM column OPENING/CLOSING OF DOORS/DRAWERS. Reset circuit breaker. Ensure plug is level. Ensure refrigerator is tightly pushed into outlet. WATER/MOISTURE/FROST INSIDE REFRIGERATOR...

Complete Owner's Guide (English)
Page 20
.... use or used in ordinary household use of your appliance. 9. Electrolux authorizes no person to change without notice. DISCLAIMER OF IMPLIED WARRANTIES; YOU MAY ALSO HAVE OTHER RIGHTS THAT VARY FROM STATE TO STATE. Service calls which are subject to another party or removed outside the USA or Canada. 3. Surcharges including, but not limited to repair or replace appliance light bulbs, air filters, water filters...
.... use or used in ordinary household use of your appliance. 9. Electrolux authorizes no person to change without notice. DISCLAIMER OF IMPLIED WARRANTIES; YOU MAY ALSO HAVE OTHER RIGHTS THAT VARY FROM STATE TO STATE. Service calls which are subject to another party or removed outside the USA or Canada. 3. Surcharges including, but not limited to repair or replace appliance light bulbs, air filters, water filters...
Product Specifications Sheet (English)
Page 2
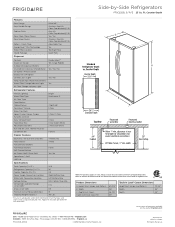
... Yes / Yes Stainless Steel (S), Color-Coordinated (P / E) Adjustable / Yes Yes Top Right Rear Quiet Pack Dispenser Controls Dispenser Design Number of Dispenser Buttons Crushed Ice / Cube Ice / Chilled Water Ice Option / Freeze Option Display On / Off Option Control Lock / Light Temp / Door Ajar / Power Failure Alerts Water Filter Change Indicator Light Air Filter Change Indicator Light Ready-Select™ Tall, Single Paddle 7 Yes / Yes / Yes Yes / Yes Yes Refrigerator Features Interior Lighting Water Filter Type Air Filter Type Fixed Shelves Sliding Shelves Cool Zone™ Drawer Wine...
... Yes / Yes Stainless Steel (S), Color-Coordinated (P / E) Adjustable / Yes Yes Top Right Rear Quiet Pack Dispenser Controls Dispenser Design Number of Dispenser Buttons Crushed Ice / Cube Ice / Chilled Water Ice Option / Freeze Option Display On / Off Option Control Lock / Light Temp / Door Ajar / Power Failure Alerts Water Filter Change Indicator Light Air Filter Change Indicator Light Ready-Select™ Tall, Single Paddle 7 Yes / Yes / Yes Yes / Yes Yes Refrigerator Features Interior Lighting Water Filter Type Air Filter Type Fixed Shelves Sliding Shelves Cool Zone™ Drawer Wine...

Product Specifications Sheet (English)
Page 2
...Yes / Yes Stainless Steel (S), Color-Coordinated (P / E) Adjustable / Yes Yes Top Right Rear Quiet Pack Dispenser Controls Dispenser Design Number of Dispenser Buttons Crushed Ice / Cube Ice / Chilled Water Ice Option / Freeze Option Display On / Off Option Control Lock / Light Temp / Door Ajar / Power Failure Alerts Water Filter Change Indicator Light Air Filter Change Indicator Light Ready-Select™ Tall, Single Paddle 7 Yes / Yes / Yes Yes / Yes Yes Refrigerator Features Interior Lighting Water Filter Type Air Filter Type Fixed Shelves Sliding Shelves Cool Zone™ Drawer Wine...
...Yes / Yes Stainless Steel (S), Color-Coordinated (P / E) Adjustable / Yes Yes Top Right Rear Quiet Pack Dispenser Controls Dispenser Design Number of Dispenser Buttons Crushed Ice / Cube Ice / Chilled Water Ice Option / Freeze Option Display On / Off Option Control Lock / Light Temp / Door Ajar / Power Failure Alerts Water Filter Change Indicator Light Air Filter Change Indicator Light Ready-Select™ Tall, Single Paddle 7 Yes / Yes / Yes Yes / Yes Yes Refrigerator Features Interior Lighting Water Filter Type Air Filter Type Fixed Shelves Sliding Shelves Cool Zone™ Drawer Wine...


