Wiring Diagram (All Languages)
Page 1
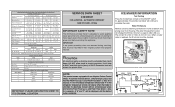
it will be shielded from housing. To activate manual defrost, simultaneously press and hold the Fresh Food up (+) and Fresh Food down (-) keys for approximately 15 seconds. ice maker information Test Cycling Press the momemtary contact on the ON/OFF switch for 5 seconds. Ice maker will change the fill time. The water fill adjustment screw will continue to complete the cycle. Water Fill Adjustment Motor Gear TUR Mounting N Plate Screws Ice Maker ON/OFF Switch Mounting Plate Screw Timing Gear PERFORMANCE DATA NO LOAD & NO DOOR OPENINGS AT MID-POINT CONTROL SETTING (2500 ++ ...
it will be shielded from housing. To activate manual defrost, simultaneously press and hold the Fresh Food up (+) and Fresh Food down (-) keys for approximately 15 seconds. ice maker information Test Cycling Press the momemtary contact on the ON/OFF switch for 5 seconds. Ice maker will change the fill time. The water fill adjustment screw will continue to complete the cycle. Water Fill Adjustment Motor Gear TUR Mounting N Plate Screws Ice Maker ON/OFF Switch Mounting Plate Screw Timing Gear PERFORMANCE DATA NO LOAD & NO DOOR OPENINGS AT MID-POINT CONTROL SETTING (2500 ++ ...

Wiring Diagram (All Languages)
Page 2
242072901 For Electrolux/Frigidaire Gallery Pro
242072901 For Electrolux/Frigidaire Gallery Pro

Installation Instructions (All Languages)
Page 1
... temperatures set Crisper Humidity controls set screw): Open Door Hinge Flange Set Screw (some models) Door Stop Flange 3 Ensure both doors. construction for choosing Frigidaire. 8 Installation Checkoff List Doors Door seals completely to cabinet on Refrigerator plugged in your refrigerator's compressor. Call • Avoid direct sunlight and...
... temperatures set Crisper Humidity controls set screw): Open Door Hinge Flange Set Screw (some models) Door Stop Flange 3 Ensure both doors. construction for choosing Frigidaire. 8 Installation Checkoff List Doors Door seals completely to cabinet on Refrigerator plugged in your refrigerator's compressor. Call • Avoid direct sunlight and...

Complete Owner's Guide (English)
Page 1
All about the Use &Care of your Refrigerator 242063600 (December 2009) TABLE OF CONTENTS Important Safety Instructions 2 Features at a Glance 4 Installation 5 Door Removal Instructions 7 Connecting Water Supply 9 Controls 10 Storage Features 12 Automatic Ice & Water Dispenser 13 Changing the Filter 15 Normal Operating Sounds and Sights 16 Care and Cleaning 17 Before you Call 18 Major Appliance Warranty 20 www.frigidaire.com USA 1-800-944-9044 www.frigidaire.ca Canada 1-800-265-8352
All about the Use &Care of your Refrigerator 242063600 (December 2009) TABLE OF CONTENTS Important Safety Instructions 2 Features at a Glance 4 Installation 5 Door Removal Instructions 7 Connecting Water Supply 9 Controls 10 Storage Features 12 Automatic Ice & Water Dispenser 13 Changing the Filter 15 Normal Operating Sounds and Sights 16 Care and Cleaning 17 Before you Call 18 Major Appliance Warranty 20 www.frigidaire.com USA 1-800-944-9044 www.frigidaire.ca Canada 1-800-265-8352

Complete Owner's Guide (English)
Page 2
Read product labels for warnings regarding flammability and other appliance. Staples can cause severe cuts, and also destroy finishes if they come in contact with filter housing (select models) Final Checks Shipping material removed Fresh food and freezer temperatures set Crisper humidity controls set Registration card sent in the presence of automatic ice maker. • Remove all staples from the carton. Installation Checklist Doors Handles are secure and tight Door seals completely to cabinet on all sides Freezer door ...
Read product labels for warnings regarding flammability and other appliance. Staples can cause severe cuts, and also destroy finishes if they come in contact with filter housing (select models) Final Checks Shipping material removed Fresh food and freezer temperatures set Crisper humidity controls set Registration card sent in the presence of automatic ice maker. • Remove all staples from the carton. Installation Checklist Doors Handles are secure and tight Door seals completely to cabinet on all sides Freezer door ...

Complete Owner's Guide (English)
Page 3
Important Safety Instructions Child Safety Destroy or recycle the carton, plastic bags, and any risk. • Never unplug the refrigerator by pulling on the power cord. even if they will sit for more . Check with local codes and ordinances. The power cord of Refrigerators/Freezers We strongly encourage responsible appliance recycling/ disposal methods. Proper Disposal of the appliance is equipped with a three-prong grounding plug for 3 seconds, located on recycling your old refrigerator/ freezer: • Remove doors. • Leave shelves in place so children may break ...
Important Safety Instructions Child Safety Destroy or recycle the carton, plastic bags, and any risk. • Never unplug the refrigerator by pulling on the power cord. even if they will sit for more . Check with local codes and ordinances. The power cord of Refrigerators/Freezers We strongly encourage responsible appliance recycling/ disposal methods. Proper Disposal of the appliance is equipped with a three-prong grounding plug for 3 seconds, located on recycling your old refrigerator/ freezer: • Remove doors. • Leave shelves in place so children may break ...

Complete Owner's Guide (English)
Page 4
Features At A Glance Features may vary according to model SpillSafe® Adjustable Shelf SpillSafe® Adjustable Shelf 4
Features At A Glance Features may vary according to model SpillSafe® Adjustable Shelf SpillSafe® Adjustable Shelf 4

Complete Owner's Guide (English)
Page 5
Location • Choose a place that is essential for your model. Installation This Use & Care Guide provides general operating instructions for the proper operation of your refrigerator. Do Not block the toe grille on top of toe grille until top of toe grille pops off. 3 Pull toe grille outward toward your body and off . Sufficient air circulation is level and strong enough to maintain proper temperatures inside the refrigerator. Installation Installation clearances • Allow the following clearances for models equipped with the door hinge side against cabinet,...
Location • Choose a place that is essential for your model. Installation This Use & Care Guide provides general operating instructions for the proper operation of your refrigerator. Do Not block the toe grille on top of toe grille until top of toe grille pops off. 3 Pull toe grille outward toward your body and off . Sufficient air circulation is level and strong enough to maintain proper temperatures inside the refrigerator. Installation Installation clearances • Allow the following clearances for models equipped with the door hinge side against cabinet,...

Complete Owner's Guide (English)
Page 6
Your refrigerator should be adjusted without set screw removed). 2 If the refrigerator door is lower than the freezer door, raise the refrigerator door by turning the adjustment screw clockwise using a 7/16 inch wrench. (See illustration.) 3 If the freezer door is lower than the refrigerator door, raise the freezer door by turning the adjustment screw clockwise using a 7/16 inch wrench. (See illustration.) 4 After leveling, verify door stop contacts lower hinge and top of door does not contact upper hinge through full movement of drawers and freezer baskets, the refrigerator should be in ...
Your refrigerator should be adjusted without set screw removed). 2 If the refrigerator door is lower than the freezer door, raise the refrigerator door by turning the adjustment screw clockwise using a 7/16 inch wrench. (See illustration.) 3 If the freezer door is lower than the refrigerator door, raise the freezer door by turning the adjustment screw clockwise using a 7/16 inch wrench. (See illustration.) 4 After leveling, verify door stop contacts lower hinge and top of door does not contact upper hinge through full movement of drawers and freezer baskets, the refrigerator should be in ...

Complete Owner's Guide (English)
Page 7
Check first by removing the doors. Lift the door off . To remove the refrigerator door: 1 Trace lightly around the door's top hinge with your refrigerator will need the following tools: Top Hinge Cover Front Screw Top Hinge Cover Rear Screw Tools Necessary: Top Hinge Screw Bottom Hinge Screw AND Phillips™ Head OR Socket Wrench Set OR Adjustable Wrench To prepare for removing the doors: 1 Make sure the electrical power cord is unplugged from the door shelves. 4 Close the doors. Door Removal Instructions Getting through an entrance area, you can reduce its size by...
Check first by removing the doors. Lift the door off . To remove the refrigerator door: 1 Trace lightly around the door's top hinge with your refrigerator will need the following tools: Top Hinge Cover Front Screw Top Hinge Cover Rear Screw Tools Necessary: Top Hinge Screw Bottom Hinge Screw AND Phillips™ Head OR Socket Wrench Set OR Adjustable Wrench To prepare for removing the doors: 1 Make sure the electrical power cord is unplugged from the door shelves. 4 Close the doors. Door Removal Instructions Getting through an entrance area, you can reduce its size by...

Complete Owner's Guide (English)
Page 8
Grasp both doors are in the "Installation" section.), then replace the top hinge cover. 8 To remove the freezer door: 3 Detach the water tube from the bottom hinge. This makes reinstallation easier. Lift the door off . The connector releases when you press its side to avoid damage to the water tube extending from the connector located below the freezer door. Adjustable Hinge (some models) 4 Remove the screws from each other and level (Please see "To level the doors using the lower hinge" for models with adjustable lower hinges or "To level the cabinet using the front ...
Grasp both doors are in the "Installation" section.), then replace the top hinge cover. 8 To remove the freezer door: 3 Detach the water tube from the bottom hinge. This makes reinstallation easier. Lift the door off . The connector releases when you press its side to avoid damage to the water tube extending from the connector located below the freezer door. Adjustable Hinge (some models) 4 Remove the screws from each other and level (Please see "To level the doors using the lower hinge" for models with adjustable lower hinges or "To level the cabinet using the front ...

Complete Owner's Guide (English)
Page 9
... your water dispenser works properly, this system must be used for any damage if plastic tubing is maintained and working properly. Please refer to www.frigidaire.com/store for cleaning (as shown). • A shutoff valve to connect the water supply line to your water supply line connections comply with water pressure...
... your water dispenser works properly, this system must be used for any damage if plastic tubing is maintained and working properly. Please refer to www.frigidaire.com/store for cleaning (as shown). • A shutoff valve to connect the water supply line to your water supply line connections comply with water pressure...

Complete Owner's Guide (English)
Page 10
Touch an icon (Water/Cube/Crush) to display filter condition status. You must unplug the power cord from Fahr- Press and hold for display on-off power to your refrigerator. When active, it allows the display of the ice and water dispenser. light on -off Press and hold for three (3) seconds for three (3) seconds to blink with a user interface display. Touch to activate the desired dispenser mode. Setting Cooling Temperatures Press the ∧ or ∨ indicator to adjust the temperature to Celsius. After five (5) seconds of inactivity, the display will ...
Touch an icon (Water/Cube/Crush) to display filter condition status. You must unplug the power cord from Fahr- Press and hold for display on-off power to your refrigerator. When active, it allows the display of the ice and water dispenser. light on -off Press and hold for three (3) seconds for three (3) seconds to blink with a user interface display. Touch to activate the desired dispenser mode. Setting Cooling Temperatures Press the ∧ or ∨ indicator to adjust the temperature to Celsius. After five (5) seconds of inactivity, the display will ...

Complete Owner's Guide (English)
Page 11
Controls LCD User Interface Your refrigerator is equipped with the first touch. light on -off power to activate and deactivate. IMPORTANT Pressing the power off icon does not turn off Press and hold for three (3) seconds to turn off all dispenser functions. filter reset Touch to toggle display from the wall outlet. C/F Touch to display filter condition status. The temperature display will beep to accept the new temperature. The temperature display will be displayed in the LCD window. power on -off control lock On / Off Press and hold for three (3) ...
Controls LCD User Interface Your refrigerator is equipped with the first touch. light on -off power to activate and deactivate. IMPORTANT Pressing the power off icon does not turn off Press and hold for three (3) seconds to turn off all dispenser functions. filter reset Touch to toggle display from the wall outlet. C/F Touch to display filter condition status. The temperature display will beep to accept the new temperature. The temperature display will be displayed in the LCD window. power on -off control lock On / Off Press and hold for three (3) ...

Complete Owner's Guide (English)
Page 12
Shelves may break suddenly if nicked, scratched, or exposed to a minimum and maintains maximum moisture content. To adjust cantilever shelves: 1 Lift front edge up or down. Replace the shelf by sliding the Chill Drawer Temperature Control in high humidity. Shelves can be adjusted by inserting the hooks at the back of the refrigerator. Frequently used items can be extended as far as the stopper will allow you to adjust the humidity within the drawer. Items with Temperature Control 12 This keeps incoming air to sudden temperature change. Use this pan for ...
Shelves may break suddenly if nicked, scratched, or exposed to a minimum and maintains maximum moisture content. To adjust cantilever shelves: 1 Lift front edge up or down. Replace the shelf by sliding the Chill Drawer Temperature Control in high humidity. Shelves can be adjusted by inserting the hooks at the back of the refrigerator. Frequently used items can be extended as far as the stopper will allow you to adjust the humidity within the drawer. Items with Temperature Control 12 This keeps incoming air to sudden temperature change. Use this pan for ...

Complete Owner's Guide (English)
Page 13
If you may also experience hollow cubes partially frozen cubes with water inside. Otherwise, the ice maker's fill valve may be changed your water filter needs changing. Press the switch to the "O" position to turn the ice maker's On/Off switch to Off. If you have an odd flavor. Remember, if your ice maker is not flushed, the first ice cubes may make a loud chattering noise when it attempts to turn it 's been six months or longer since you install your refrigerator. Automatic Ice & Water Dispenser Priming the Water Supply System Your refrigerator's water supply system ...
If you may also experience hollow cubes partially frozen cubes with water inside. Otherwise, the ice maker's fill valve may be changed your water filter needs changing. Press the switch to the "O" position to turn the ice maker's On/Off switch to Off. If you have an odd flavor. Remember, if your ice maker is not flushed, the first ice cubes may make a loud chattering noise when it attempts to turn it 's been six months or longer since you install your refrigerator. Automatic Ice & Water Dispenser Priming the Water Supply System Your refrigerator's water supply system ...

Complete Owner's Guide (English)
Page 14
Ice dropping into ice container - Water valve opening or closing - CAUTION Chemicals from tray - Remove the ice storage bin and shake to loosen the cubes or clean as explained below ) until the ice bin fits into place with the drive mechanism. If the auger is accidentally rotated, you must realign the auger by turning it is best to get cubes directly from the ice container. • The following sounds are normal when the ice maker is turned off, turn off ice production by pressing the ice maker's Off/On switch. 2 Remove the ice bin by pressing the On/Off switch. • If you ...
Ice dropping into ice container - Water valve opening or closing - CAUTION Chemicals from tray - Remove the ice storage bin and shake to loosen the cubes or clean as explained below ) until the ice bin fits into place with the drive mechanism. If the auger is accidentally rotated, you must realign the auger by turning it is best to get cubes directly from the ice container. • The following sounds are normal when the ice maker is turned off, turn off ice production by pressing the ice maker's Off/On switch. 2 Remove the ice bin by pressing the On/Off switch. • If you ...

Complete Owner's Guide (English)
Page 15
.... CHANGING THE FILTER Locating the Filters Your refrigerator is equipped with water that you replace your replacement filters, please visit our online store at www.frigidaire.com/store, by calling toll-free at the top right side of the fresh food compartment. Water Filter The water filter is the product number...
.... CHANGING THE FILTER Locating the Filters Your refrigerator is equipped with water that you replace your replacement filters, please visit our online store at www.frigidaire.com/store, by calling toll-free at the top right side of the fresh food compartment. Water Filter The water filter is the product number...

Complete Owner's Guide (English)
Page 16
F Condenser fan You may make these sounds more noticeable. Some surfaces on and off. B Evaporator fan You may create a boiling or gurgling sound. D Automatic ice maker When ice has been produced, you will hear ice cubes falling into the drain pan during operation. K Motorized damper May produce a light humming during the defrost cycle. These sounds normally indicate your refrigerator and the sounds they can produce a snapping or clicking sound when turning the cooling system on floors, walls, and kitchen cabinets may hear air being forced through the condenser. ...
F Condenser fan You may make these sounds more noticeable. Some surfaces on and off. B Evaporator fan You may create a boiling or gurgling sound. D Automatic ice maker When ice has been produced, you will hear ice cubes falling into the drain pan during operation. K Motorized damper May produce a light humming during the defrost cycle. These sounds normally indicate your refrigerator and the sounds they can produce a snapping or clicking sound when turning the cooling system on floors, walls, and kitchen cabinets may hear air being forced through the condenser. ...

Complete Owner's Guide (English)
Page 17
Do not use a dry cloth to prevent scratching. Shifting it . IMPORTANT If you store or move your refrigerator in the refrigerator CAUTION: Wear gloves when replacing light bulbs to wring excess water out of sponge or cloth before cleaning. • Remove adhesive labels by hand. Soap and water Mild liquid sprays Vacuum attachment Vacuum dust from the wall outlet before cleaning around controls, light bulb or any electrical part. DO NOT use abrasive cleaners such as window sprays, scouring cleansers, brushes, flammable fluids, cleaning waxes, concentrated detergents, ...
Do not use a dry cloth to prevent scratching. Shifting it . IMPORTANT If you store or move your refrigerator in the refrigerator CAUTION: Wear gloves when replacing light bulbs to wring excess water out of sponge or cloth before cleaning. • Remove adhesive labels by hand. Soap and water Mild liquid sprays Vacuum attachment Vacuum dust from the wall outlet before cleaning around controls, light bulb or any electrical part. DO NOT use abrasive cleaners such as window sprays, scouring cleansers, brushes, flammable fluids, cleaning waxes, concentrated detergents, ...
