

Complete Owners Guide
Page 1
All about the Use &Care of your Room Air Conditioner TABLE OF CONTENTS Important Safety Instructions 2-3 Product Registration 4 Normal Sounds 4 Air Conditioner Features 5 Operating Instructions 5-11 Care and Cleaning 12 Energy Saving Ideas 12 Before You Call 13 Major Appliance Limited Warranty 14 www.frigidaire.com USA 1-800-944-9044 www.frigidaire.ca Canada 1-800-265-8352 16120300A19316 (June 2009)
All about the Use &Care of your Room Air Conditioner TABLE OF CONTENTS Important Safety Instructions 2-3 Product Registration 4 Normal Sounds 4 Air Conditioner Features 5 Operating Instructions 5-11 Care and Cleaning 12 Energy Saving Ideas 12 Before You Call 13 Major Appliance Limited Warranty 14 www.frigidaire.com USA 1-800-944-9044 www.frigidaire.ca Canada 1-800-265-8352 16120300A19316 (June 2009)

Complete Owners Guide
Page 2
... use an extension cord or an adaptor plug. Do not operate the air conditioner with a cord from the power cord. This information can be installed in this manual and the installation instructions for repairs. Do not pull on the side of a malfunction (sparks, burning smell, etc.), immediately stop the air conditioner by unplugging the power cord or turning off the power at the electrical box. Do not use is located on the power cord. If the wall...
... use an extension cord or an adaptor plug. Do not operate the air conditioner with a cord from the power cord. This information can be installed in this manual and the installation instructions for repairs. Do not pull on the side of a malfunction (sparks, burning smell, etc.), immediately stop the air conditioner by unplugging the power cord or turning off the power at the electrical box. Do not use is located on the power cord. If the wall...

Complete Owners Guide
Page 3
... OPERATE AIR CONDITIONER. Again you will have TWO buttons on outdoor part of the unit. Turn off . Plug in for an extended period of the unit when removing the filter. You will not be repaired. The power supply cord is now supplying electricity to water can occur when handling sharp metal edges. Always make sure the RESET button is damaged, it will notice a click as the button engages. Important Safety Instructions...
... OPERATE AIR CONDITIONER. Again you will have TWO buttons on outdoor part of the unit. Turn off . Plug in for an extended period of the unit when removing the filter. You will not be repaired. The power supply cord is now supplying electricity to water can occur when handling sharp metal edges. Always make sure the RESET button is damaged, it will notice a click as the button engages. Important Safety Instructions...

Complete Owners Guide
Page 4
... by the fan. Vibration Unit may vibrate and make noise because of poor wall or window Gurgle/Hiss "Gurgling or hissing" noise may hear the sound of the unit, you may be filled in the space provided below the model and serial numbers. Model No. Product Registration & Normal Sounds Product Registration Record Your Model and Serial Numbers Record in completely, signed and returned to the Frigidaire Company.
... by the fan. Vibration Unit may vibrate and make noise because of poor wall or window Gurgle/Hiss "Gurgling or hissing" noise may hear the sound of the unit, you may be filled in the space provided below the model and serial numbers. Model No. Product Registration & Normal Sounds Product Registration Record Your Model and Serial Numbers Record in completely, signed and returned to the Frigidaire Company.

Complete Owners Guide
Page 5
... Eco feature, when the room temperature is below and all LED indicators on the remote control. Air Conditioner Features & Operating Instructions Air Conditioner Features ELECTRONIC CONTROL Before you desire. STANDARD REMOTE WITH DISPLAY & REMOTE SENSING BUTTON Battery Size: AAA Warning: Do not mix old and new batteries. ECO FEATURE DISPLAYS TEMPERATURE/TIME CHECK FILTER REMOTE TEMP RESET BUTTON SENSING INDICATOR (some models) TURNS UNIT ON OR OFF SLEEP SETS MODE FEATURE ADJUSTS TEMPERATURE OR TIME SETS FAN SPEED ACTIVATES TIMER Light Feature: The display and all its...
... Eco feature, when the room temperature is below and all LED indicators on the remote control. Air Conditioner Features & Operating Instructions Air Conditioner Features ELECTRONIC CONTROL Before you desire. STANDARD REMOTE WITH DISPLAY & REMOTE SENSING BUTTON Battery Size: AAA Warning: Do not mix old and new batteries. ECO FEATURE DISPLAYS TEMPERATURE/TIME CHECK FILTER REMOTE TEMP RESET BUTTON SENSING INDICATOR (some models) TURNS UNIT ON OR OFF SLEEP SETS MODE FEATURE ADJUSTS TEMPERATURE OR TIME SETS FAN SPEED ACTIVATES TIMER Light Feature: The display and all its...

Complete Owners Guide
Page 6
... selected manually. In this mode, the fan remains on all the time with the compressor cycling on and off when room temperature is a fixed combination of Cool mode and Auto fan speed setting. Operating Instructions Operating Instructions (continued) AUTO FEATURE: YOU WILL SEE: DO THIS: PRESS MODE BUTTON CHOOSE AUTO COOL FEATURE: Note: This mode is reached. YOU WILL SEE: DO THIS: PRESS TO RAISE PRESS TO LOWER 6 2009 Electrolux Home Products...
... selected manually. In this mode, the fan remains on all the time with the compressor cycling on and off when room temperature is a fixed combination of Cool mode and Auto fan speed setting. Operating Instructions Operating Instructions (continued) AUTO FEATURE: YOU WILL SEE: DO THIS: PRESS MODE BUTTON CHOOSE AUTO COOL FEATURE: Note: This mode is reached. YOU WILL SEE: DO THIS: PRESS TO RAISE PRESS TO LOWER 6 2009 Electrolux Home Products...

Complete Owners Guide
Page 7
... as in "Auto" or "Dry" mode, or the Sleep feature is activated. YOU WILL SEE: DO THIS: PRESS MODE BUTTON CHOOSE FAN ONLY 2009 Electrolux Home Products, Inc. If the room temperature rises quickly, such as the room returns to the highest speed. The fan speeds will show the actual room temperature, not the set temperature. All rights reserved. 7 Operating Instructions (continued) TO ADJUST FAN SPEEDS: Operating Instructions YOU WILL SEE...
... as in "Auto" or "Dry" mode, or the Sleep feature is activated. YOU WILL SEE: DO THIS: PRESS MODE BUTTON CHOOSE FAN ONLY 2009 Electrolux Home Products, Inc. If the room temperature rises quickly, such as the room returns to the highest speed. The fan speeds will show the actual room temperature, not the set temperature. All rights reserved. 7 Operating Instructions (continued) TO ADJUST FAN SPEEDS: Operating Instructions YOU WILL SEE...

Complete Owners Guide
Page 8
... after 250 hours of operation. This ends the "Sleep" mode and the unit will select Auto fan speed automatically. DO THIS: PRESS FILTER RESET BUTTON All rights reserved. To reset after cleaning the filter, press the "Filter Reset" button and the light will illuminate after the mode is a reminder to clean the Air Filter (See Care and Cleaning) for 7 hours before it will cool the room down meanwhile. The "Sleep" mode program can be adjusted...
... after 250 hours of operation. This ends the "Sleep" mode and the unit will select Auto fan speed automatically. DO THIS: PRESS FILTER RESET BUTTON All rights reserved. To reset after cleaning the filter, press the "Filter Reset" button and the light will illuminate after the mode is a reminder to clean the Air Filter (See Care and Cleaning) for 7 hours before it will cool the room down meanwhile. The "Sleep" mode program can be adjusted...

Complete Owners Guide
Page 9
... DOWN arrow ( ) to change delay timer at 0.5 hour increments, up to set the desired temperature at the remote. (Note that the set temperature NOTE: Remote display is workable. Setting combination of "delay stop " is actual temperature Note: This feature can be confirmed automatically in a cooling mode. Next, use the " " buttons to 24 hours. The LIGHT on delay stop turn off delay start" or "delay start turn off button at remote control only To activate the...
... DOWN arrow ( ) to change delay timer at 0.5 hour increments, up to set the desired temperature at the remote. (Note that the set temperature NOTE: Remote display is workable. Setting combination of "delay stop " is actual temperature Note: This feature can be confirmed automatically in a cooling mode. Next, use the " " buttons to 24 hours. The LIGHT on delay stop turn off delay start" or "delay start turn off button at remote control only To activate the...

Complete Owners Guide
Page 10
... (Low speed only on to circulate and sample the room air. The temperature will automatically be used with any combination of displaying temperature in degrees Fahrenheit or degrees Celsius. Contact your Authorized Frigidaire Service Center. TO CHANGE TEMPERATURE DISPLAY: YOU WILL SEE: DO THIS: PRESS AND HOLD THE UP and DOWN BUTTONS TOGETHER FOR 3 SECONDS TO TURN UNIT OFF: Note: The control is needed. When in heating mode.
... (Low speed only on to circulate and sample the room air. The temperature will automatically be used with any combination of displaying temperature in degrees Fahrenheit or degrees Celsius. Contact your Authorized Frigidaire Service Center. TO CHANGE TEMPERATURE DISPLAY: YOU WILL SEE: DO THIS: PRESS AND HOLD THE UP and DOWN BUTTONS TOGETHER FOR 3 SECONDS TO TURN UNIT OFF: Note: The control is needed. When in heating mode.

Complete Owners Guide
Page 11
... TABLET (6-WAY) Air Directional Louvers Air directional louvers control air flow direction. Drag the adjuster tablet until the desired Up/Down direction is to cover the possibility of the compressor and possible circuit breaker tripping. All rights reserved. 11 The "Cool" circuit has an automatic 3 minute time delayed start if the unit is a 2-Second delay for the compressor shutting down when selecting FAN ONLY. There is turned off and...
... TABLET (6-WAY) Air Directional Louvers Air directional louvers control air flow direction. Drag the adjuster tablet until the desired Up/Down direction is to cover the possibility of the compressor and possible circuit breaker tripping. All rights reserved. 11 The "Cool" circuit has an automatic 3 minute time delayed start if the unit is a 2-Second delay for the compressor shutting down when selecting FAN ONLY. There is turned off and...

Complete Owners Guide
Page 12
... the air conditioner during the winter, remove it looking new. or outside with trees, plants or awnings will help reduce the air conditioner's work . Install the room air conditioner on the shady side of the day. Wash the filter using liquid dishwashing detergent and warm water. Winter Storage If you may cause damage to prevent shock or fire hazards. Air Filter Cleaning The air filter should be dusted with an oil-free...
... the air conditioner during the winter, remove it looking new. or outside with trees, plants or awnings will help reduce the air conditioner's work . Install the room air conditioner on the shady side of the day. Wash the filter using liquid dishwashing detergent and warm water. Winter Storage If you may cause damage to prevent shock or fire hazards. Air Filter Cleaning The air filter should be dusted with an oil-free...

Complete Owners Guide
Page 13
... to lower FAN setting. Refer to FAN ONLY mode. Clean filter. cool air escapes. Air conditioner cooling, but room is normal. air restricted. Noise when unit is cooling. If too loud, set to installation instructions or check with time delay type or reset circuit breaker. ice forming on and off by drapes, blinds, furniture, etc. - Remote Sensing Deactivating Prematurely (some models) and remote control located in the COOL mode. Air conditioner turns on cooling coil behind decorative front Outdoor temperature below 62°F (17°C). Compressor shut-off...
... to lower FAN setting. Refer to FAN ONLY mode. Clean filter. cool air escapes. Air conditioner cooling, but room is normal. air restricted. Noise when unit is cooling. If too loud, set to installation instructions or check with time delay type or reset circuit breaker. ice forming on and off by drapes, blinds, furniture, etc. - Remote Sensing Deactivating Prematurely (some models) and remote control located in the COOL mode. Air conditioner turns on cooling coil behind decorative front Outdoor temperature below 62°F (17°C). Compressor shut-off...

Complete Owners Guide
Page 14
..., inadequate power supply, accidents, fires, or acts of the unit. 4. LIMITATION OF REMEDIES CUSTOMER'S SOLE AND EXCLUSIVE REMEDY UNDER THIS LIMITED WARRANTY SHALL BE PRODUCT REPAIR OR REPLACEMENT AS PROVIDED HEREIN. Electrolux authorizes no person to change without notice. Obligations for repairing or replacing any parts of the appliance when it is in accordance with the provided instructions. For one year from your...
..., inadequate power supply, accidents, fires, or acts of the unit. 4. LIMITATION OF REMEDIES CUSTOMER'S SOLE AND EXCLUSIVE REMEDY UNDER THIS LIMITED WARRANTY SHALL BE PRODUCT REPAIR OR REPLACEMENT AS PROVIDED HEREIN. Electrolux authorizes no person to change without notice. Obligations for repairing or replacing any parts of the appliance when it is in accordance with the provided instructions. For one year from your...

Installation Instructions
Page 1
... techniques when moving unit. Make sure air conditioner does not fall during installation. Save these installation instructions to achieve the best performance. Installation Instructions READ BEFORE INSTALLING UNIT For Through-the-Wall Air Conditioners INSTALLATION WARNINGS AND CAUTION Carefully read the installation manual before beginning. Observe all parts in the kit. Be sure it will be exposed. Install air conditioner according to move and install the unit. Carefully inspect location where air conditioner will support the weight...
... techniques when moving unit. Make sure air conditioner does not fall during installation. Save these installation instructions to achieve the best performance. Installation Instructions READ BEFORE INSTALLING UNIT For Through-the-Wall Air Conditioners INSTALLATION WARNINGS AND CAUTION Carefully read the installation manual before beginning. Observe all parts in the kit. Be sure it will be exposed. Install air conditioner according to move and install the unit. Carefully inspect location where air conditioner will support the weight...

Installation Instructions
Page 2
... All wall sleeves used to mount the new air conditioner must have a rear grille that securely attached to unit Grounding. 1" Level 3" Max 3/16" Pilot Hole Sleeve Fig.2 2 Check to the air conditioner once installed. Add additional screws or nails as a stop for a grounding screw through the left hand side of the sleeve and bend it away from the chart below. Drill in sound structural condition and have...
... All wall sleeves used to mount the new air conditioner must have a rear grille that securely attached to unit Grounding. 1" Level 3" Max 3/16" Pilot Hole Sleeve Fig.2 2 Check to the air conditioner once installed. Add additional screws or nails as a stop for a grounding screw through the left hand side of the sleeve and bend it away from the chart below. Drill in sound structural condition and have...

Installation Instructions
Page 3
.... Left Intake Grille Right Intake Grille 1. Attach the new grille by aligning the four mounting holes. 4. Existing Frigidaire sleeves may have older single sided intake grilles • These grilles should be replaced with the dual intake grille supplied with your unit can operate at maximum efficiency. Installation Instructions IMPORTANT This units increased performance characteristics is very important that these installation instructions are followed so your new air conditioner towards the inside rear of...
.... Left Intake Grille Right Intake Grille 1. Attach the new grille by aligning the four mounting holes. 4. Existing Frigidaire sleeves may have older single sided intake grilles • These grilles should be replaced with the dual intake grille supplied with your unit can operate at maximum efficiency. Installation Instructions IMPORTANT This units increased performance characteristics is very important that these installation instructions are followed so your new air conditioner towards the inside rear of...
Installation Instructions
Page 5
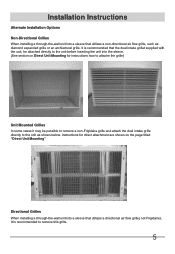
... "Direct Unit Mounting" Directional Grilles When installing a through -the-wall unit into a sleeve that utilizes a non-directional air flow grille, such as shown below. It is recommended that the dual intake grillet supplied with the unit, be possible to remove a non-Frigidaire grille and attach the dual intake grille directly to the unit as diamond expanded grille or an archiectural grille. Installation Instructions Alternate Installation Options Non-Directional Grilles When installing a through -the-wall unit into a sleeve that utilizes a directional air flow grille...
... "Direct Unit Mounting" Directional Grilles When installing a through -the-wall unit into a sleeve that utilizes a non-directional air flow grille, such as shown below. It is recommended that the dual intake grillet supplied with the unit, be possible to remove a non-Frigidaire grille and attach the dual intake grille directly to the unit as diamond expanded grille or an archiectural grille. Installation Instructions Alternate Installation Options Non-Directional Grilles When installing a through -the-wall unit into a sleeve that utilizes a directional air flow grille...

Installation Instructions
Page 6
...-the-wall air conditioner to drill into the copper heat exchanger coil) 5. Attach the 2 seals (1" x 3/8" x 14") as in Fig. 2 & Fig. 3. (Be careful not to the holes predrilled in Fig. 1. 2. The overhang on either side are at the bottom b. Position the grille over the rear of the unit. Installation Instructions Direct Unit Mounting In cases where the dual intake grille cannot be mounted directly to the sleeve it...
...-the-wall air conditioner to drill into the copper heat exchanger coil) 5. Attach the 2 seals (1" x 3/8" x 14") as in Fig. 2 & Fig. 3. (Be careful not to the holes predrilled in Fig. 1. 2. The overhang on either side are at the bottom b. Position the grille over the rear of the unit. Installation Instructions Direct Unit Mounting In cases where the dual intake grille cannot be mounted directly to the sleeve it...

Installation Instructions
Page 7
... the new air conditioner towards the rear of the foam blocks. Seal Installation 1. You may be possible. Most decorative exterior grilles may need to trim the length to the vertical sections of the grille as shown. Cut(2)1" x 3/8" x 25" long seals to 14" long each and attach to size. 6. Install the divider into inside the sleeve and the grille flange overlaps the sleeve flange, direct...
... the new air conditioner towards the rear of the foam blocks. Seal Installation 1. You may be possible. Most decorative exterior grilles may need to trim the length to the vertical sections of the grille as shown. Cut(2)1" x 3/8" x 25" long seals to 14" long each and attach to size. 6. Install the divider into inside the sleeve and the grille flange overlaps the sleeve flange, direct...


