
Complete Owner's Guide
Page 2
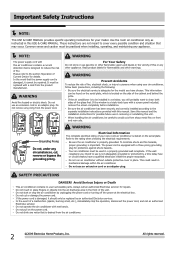
...this unit. Do not use an extension cord or an adapter plug. Save this manual and the installation instructions for your model. Do not run air conditioner without outside protective cover in this manual. Do not insert or place fingers or objects into the air discharge area in .... Do not cut , remove or bypass the grounding prong. All rights reserved. NOTE: WARNING The power supply cord with this USE & CARE MANUAL. Read product labels for flammability and other appliance. If the window is properly grounded. When handling the air conditioner, be found on the serial ...
...this unit. Do not use an extension cord or an adapter plug. Save this manual and the installation instructions for your model. Do not run air conditioner without outside protective cover in this manual. Do not insert or place fingers or objects into the air discharge area in .... Do not cut , remove or bypass the grounding prong. All rights reserved. NOTE: WARNING The power supply cord with this USE & CARE MANUAL. Read product labels for flammability and other appliance. If the window is properly grounded. When handling the air conditioner, be found on the serial ...
Complete Owner's Guide
Page 6
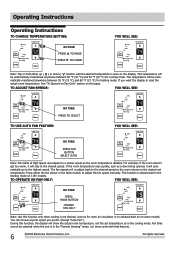
... to the original set temperature as the room temperature dictates. You can choose any fan speed you want the display to adjust the fan speed manually. This function is seen on 115V models. TO ADJUST FAN SPEEDS: YOU WILL SEE: DO THIS: PRESS TO SELECT TO USE AUTO FAN FEATURE: YOU...
... to the original set temperature as the room temperature dictates. You can choose any fan speed you want the display to adjust the fan speed manually. This function is seen on 115V models. TO ADJUST FAN SPEEDS: YOU WILL SEE: DO THIS: PRESS TO SELECT TO USE AUTO FAN FEATURE: YOU...
Installation Instructions
Page 1
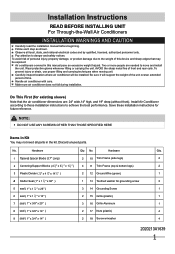
... DO NOT USE ANY SCREWS OTHER THAN THOSE SPECIFIED HERE Items in the kit. Discard unused parts. No. To avoid risk of this manual pose an excessive weight hazard. Observe all parts in Kit You may be installed. Two or more people are : 24" wide,14"... conditioner with care. Installation Instructions READ BEFORE INSTALLING UNIT For Through-the-Wall Air Conditioners INSTALLATION WARNINGS AND CAUTION Carefully read the installation manual before beginning. Do This First (for existing sleeve) Note that the air conditioner dimensions are needed to the weight of personal injury,...
... DO NOT USE ANY SCREWS OTHER THAN THOSE SPECIFIED HERE Items in the kit. Discard unused parts. No. To avoid risk of this manual pose an excessive weight hazard. Observe all parts in Kit You may be installed. Two or more people are : 24" wide,14"... conditioner with care. Installation Instructions READ BEFORE INSTALLING UNIT For Through-the-Wall Air Conditioners INSTALLATION WARNINGS AND CAUTION Carefully read the installation manual before beginning. Do This First (for existing sleeve) Note that the air conditioner dimensions are needed to the weight of personal injury,...

Installation Instructions
Page 4
... side wall with provided louvered rear panel. Screw and attach the other end of the ground wire from sleeve to the vertical sections of this manual and replace with the tapered end facing the opening. 6. Attach (2) 4 1 2 " x 3 1 2" x 11 2" centering/support blocks one on Page 3 of the grille as shown in center of...
... side wall with provided louvered rear panel. Screw and attach the other end of the ground wire from sleeve to the vertical sections of this manual and replace with the tapered end facing the opening. 6. Attach (2) 4 1 2 " x 3 1 2" x 11 2" centering/support blocks one on Page 3 of the grille as shown in center of...

Installation Instructions
Page 5
... screw. 11. Slide the unit completely to the rear to 14" long each side wall. Remove the plastic washer from front on Page 3 of this manual and replace with the tapered end facing the back of the sleeve. The 4" section is against the cabinet. 12. Cut (2) 1" x 3/8" x 25" long seals to ensure...
... screw. 11. Slide the unit completely to the rear to 14" long each side wall. Remove the plastic washer from front on Page 3 of this manual and replace with the tapered end facing the back of the sleeve. The 4" section is against the cabinet. 12. Cut (2) 1" x 3/8" x 25" long seals to ensure...

Installation Instructions
Page 6
... of the rib on each and attach to 14" long each side wall. Make sure that the toothed washer is placed in center of this manual and replace with mounting the grill to match new rear grille Rear Louvers 4.5" 50º 50º 80º 4" 80º Top View 2. Remove the...
... of the rib on each and attach to 14" long each side wall. Make sure that the toothed washer is placed in center of this manual and replace with mounting the grill to match new rear grille Rear Louvers 4.5" 50º 50º 80º 4" 80º Top View 2. Remove the...

Installation Instructions
Page 7
... grille as shown with the tapered end 1/2" from the screw. 10. Install as shown in picture. Install as shown on the last page of this manual and replace with mounting the grill to the vertical sections of the sleeve. This helps induce a rearward slope on Page 13. 7 Remove the backing paper...
... grille as shown with the tapered end 1/2" from the screw. 10. Install as shown in picture. Install as shown on the last page of this manual and replace with mounting the grill to the vertical sections of the sleeve. This helps induce a rearward slope on Page 13. 7 Remove the backing paper...

Installation Instructions
Page 8
... sure that the toothed washer is against the cabinet. 11. Install (2) tapered spacer blocks to drill holes in the center at the top of this manual and replace with the tapered end 1/2" from the screw. 10. Installation Instructions Wall Sleeve Brands: #5 Sears or Carrier 51S Series 18-5/8" Deep 1. Remove existing rear...
... sure that the toothed washer is against the cabinet. 11. Install (2) tapered spacer blocks to drill holes in the center at the top of this manual and replace with the tapered end 1/2" from the screw. 10. Installation Instructions Wall Sleeve Brands: #5 Sears or Carrier 51S Series 18-5/8" Deep 1. Remove existing rear...

Installation Instructions
Page 9
...; Top View 2. If you have difficulty with provided louvered rear panel. Center unit & gently slide unit into position. 5. Install as shown on Page 3 of this manual and replace with mounting the grill to the floor of unit. 9. This helps induce a rearward slope on left and right sides of these instructions. 13...
...; Top View 2. If you have difficulty with provided louvered rear panel. Center unit & gently slide unit into position. 5. Install as shown on Page 3 of this manual and replace with mounting the grill to the floor of unit. 9. This helps induce a rearward slope on left and right sides of these instructions. 13...

Installation Instructions
Page 10
... as described on Page 3 of the rear grille. 10. Now go to step 15. Attach 1" x 3 4 " x 14" long seal over the solid vertical portion of this manual and replace with provided louvered rear panel. Cut the 1" x 11 2" x 25" seal to the edge of these next steps if the unit requires extra extension...
... as described on Page 3 of the rear grille. 10. Now go to step 15. Attach 1" x 3 4 " x 14" long seal over the solid vertical portion of this manual and replace with provided louvered rear panel. Cut the 1" x 11 2" x 25" seal to the edge of these next steps if the unit requires extra extension...

Installation Instructions
Page 11
... center at the top of unit. 7. Remove the plastic washer from the left side of the sleeve. Attach (1) 1" x 3/8" x 25" long seal in flange of this manual and replace with mounting the grill to match new rear grille Rear Louvers 4.5" 50º 50º 80º 4" 80º Top View 2. Screw and... Page 13. 11 Attach (1) 1" x 3 4 " x 14" long seal vertically 3.5" from the screw. 8. Seal & Frame the unit as shown here. Installation Instructions Wall Sleeve Brands: #8 White Westinghouse/Frigidaire/ Carrier 52F Series 16"+ 17-1/2" Deep 1.
... center at the top of unit. 7. Remove the plastic washer from the left side of the sleeve. Attach (1) 1" x 3/8" x 25" long seal in flange of this manual and replace with mounting the grill to match new rear grille Rear Louvers 4.5" 50º 50º 80º 4" 80º Top View 2. Screw and... Page 13. 11 Attach (1) 1" x 3 4 " x 14" long seal vertically 3.5" from the screw. 8. Seal & Frame the unit as shown here. Installation Instructions Wall Sleeve Brands: #8 White Westinghouse/Frigidaire/ Carrier 52F Series 16"+ 17-1/2" Deep 1.

Installation Instructions
Page 12
... shown in the picture. 12. NOTE: You may need to drill holes in picture. Remove the backing paper and press into the slots of this manual and replace with provided louvered rear panel. Proceed to step 8. 5. Attach 1" x 3 4 " x 14" long seal over the solid vertical portion ..." x 14" seals along the sides of unit. 16. Remove the plastic washer from the right side. 7. Installation Instructions Wall Sleeve Brands: #9 White Westinghouse or Frigidaire 22" Deep 1. If position is okay, remove unit and Proceed to the next step.If not go to step 14. Make sure that the toothed...
... shown in the picture. 12. NOTE: You may need to drill holes in picture. Remove the backing paper and press into the slots of this manual and replace with provided louvered rear panel. Proceed to step 8. 5. Attach 1" x 3 4 " x 14" long seal over the solid vertical portion ..." x 14" seals along the sides of unit. 16. Remove the plastic washer from the right side. 7. Installation Instructions Wall Sleeve Brands: #9 White Westinghouse or Frigidaire 22" Deep 1. If position is okay, remove unit and Proceed to the next step.If not go to step 14. Make sure that the toothed...


