
Complete Owner's Guide
Page 2
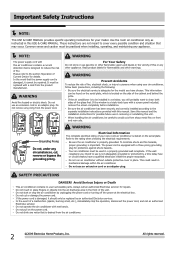
... panel included, remove the screen completely before installation. SAFETY PRECAUTIONS DANGER! In the event that the power supply cord is damaged, it should only be found on the power cord. Use the room air conditioner only as instructed in removing or reinstalling this manual. WARNING Electrical Information The complete electrical rating of your model. Do not remove any circumstances, cut or damage the power cord. Do not run air conditioner without outside protective cover...
... panel included, remove the screen completely before installation. SAFETY PRECAUTIONS DANGER! In the event that the power supply cord is damaged, it should only be found on the power cord. Use the room air conditioner only as instructed in removing or reinstalling this manual. WARNING Electrical Information The complete electrical rating of your model. Do not remove any circumstances, cut or damage the power cord. Do not run air conditioner without outside protective cover...
Complete Owner's Guide
Page 3
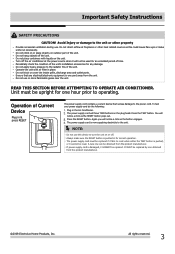
... on the plug head. The power supply cord will notice a click as this device to reset when either the TEST button is pushed, or it fails to turn the unit on the unit. Do not place containers with air filter in the Air Conditioner. Unit must be replaced if it cannot be obtained from the product manufacturer. 2009 Electrolux Home Products, Inc. NOTE: Do not use or...
... on the plug head. The power supply cord will notice a click as this device to reset when either the TEST button is pushed, or it fails to turn the unit on the unit. Do not place containers with air filter in the Air Conditioner. Unit must be replaced if it cannot be obtained from the product manufacturer. 2009 Electrolux Home Products, Inc. NOTE: Do not use or...
Complete Owner's Guide
Page 5
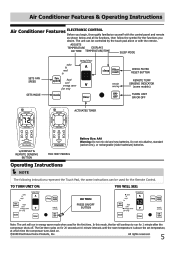
... energy saver mode when used for the Remote Control. Operating Instructions NOTE The following instructions represent the Touch Pad, the same instructions can be used for 1 minute after the compressor shuts off. All rights reserved. 5 Do not mix alkaline, standard (carbon-zinc), or rechargeable (nickel-cadmium) batteries. In this mode, the fan will run for the first time. ADJUSTS TEMPERATURE DISPLAYS OR TIME TEMPERATURE/TIME SLEEP MODE SETS FAN SPEED SETS MODE ACTIVATES TIMER CHECK FILTER RESET BUTTON REMOTE TEMP...
... energy saver mode when used for the Remote Control. Operating Instructions NOTE The following instructions represent the Touch Pad, the same instructions can be used for 1 minute after the compressor shuts off. All rights reserved. 5 Do not mix alkaline, standard (carbon-zinc), or rechargeable (nickel-cadmium) batteries. In this mode, the fan will run for the first time. ADJUSTS TEMPERATURE DISPLAYS OR TIME TEMPERATURE/TIME SLEEP MODE SETS FAN SPEED SETS MODE ACTIVATES TIMER CHECK FILTER RESET BUTTON REMOTE TEMP...
Complete Owner's Guide
Page 6
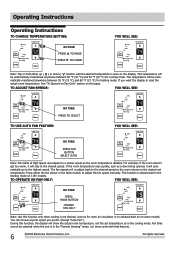
... air on the display. If you prefer. (Except "Auto Fan"). The temperature will stay at High Speed and adjusts to a slower speed as in the heating mode on those units with that feature). 6 2009 Electrolux Home Products, Inc. TO ADJUST FAN SPEEDS: YOU WILL SEE: DO THIS: PRESS TO SELECT TO USE AUTO FAN FEATURE: YOU WILL SEE: DO THIS: PRESS FAN BUTTON SELECT AUTO Note: Fan starts...
... air on the display. If you prefer. (Except "Auto Fan"). The temperature will stay at High Speed and adjusts to a slower speed as in the heating mode on those units with that feature). 6 2009 Electrolux Home Products, Inc. TO ADJUST FAN SPEEDS: YOU WILL SEE: DO THIS: PRESS TO SELECT TO USE AUTO FAN FEATURE: YOU WILL SEE: DO THIS: PRESS FAN BUTTON SELECT AUTO Note: Fan starts...

Complete Owner's Guide
Page 7
...: Operating Instructions YOU WILL SEE: DO THIS: PRESS MODE BUTTON CHOOSE COOL Note: In this mode the selected temperature will increase by 2 °F 30 minutes after an additional 30 minutes. The Delay Start Operation automatically selects cooling with maximum Fan speed (if Cool, Energy Saver, or Fan Only was the last mode selected. This ends the "Sleep" mode and the unit will be the same as originally programmed. TIMER: DELAY STOP / START...
...: Operating Instructions YOU WILL SEE: DO THIS: PRESS MODE BUTTON CHOOSE COOL Note: In this mode the selected temperature will increase by 2 °F 30 minutes after an additional 30 minutes. The Delay Start Operation automatically selects cooling with maximum Fan speed (if Cool, Energy Saver, or Fan Only was the last mode selected. This ends the "Sleep" mode and the unit will be the same as originally programmed. TIMER: DELAY STOP / START...
Complete Owner's Guide
Page 8
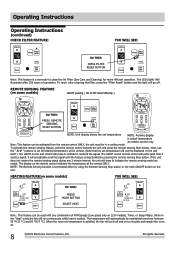
... "Heat" mode,the fan will pulse each time it received the signal. Next, use the " " buttons to set temperature NOTE: Remote display is needed. All rights reserved. Operating Instructions Operating Instructions (continued) CHECK FILTER FEATURE: YOU WILL SEE: DO THIS: PRESS FILTER RESET BUTTON Note: This feature is terminated either by pressing the remote sensing Stop button. REMOTE SENSING FEATURE (on the unit control will beep to indicate it sends a signal. The LIGHT on some models...
... "Heat" mode,the fan will pulse each time it received the signal. Next, use the " " buttons to set temperature NOTE: Remote display is needed. All rights reserved. Operating Instructions Operating Instructions (continued) CHECK FILTER FEATURE: YOU WILL SEE: DO THIS: PRESS FILTER RESET BUTTON Note: This feature is terminated either by pressing the remote sensing Stop button. REMOTE SENSING FEATURE (on the unit control will beep to indicate it sends a signal. The LIGHT on some models...
Complete Owner's Guide
Page 9
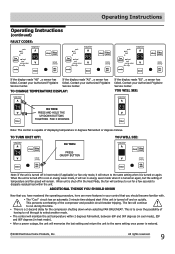
... mode. TO CHANGE TEMPERATURE DISPLAY: If the display reads "ES" , a sensor has failed. TO TURN UNIT OFF: YOU WILL SEE: DO THIS: PRESS ON/OFF BUTTON Note: If the unit is turned on again. The "Cool" circuit has an automatic 3 minute time delayed start if the unit is to cover the possibility of the compressor and possible circuit breaker tripping. This is turned off in heat mode). Operating Instructions (continued) FAULT CODES: Operating Instructions If the display reads "HS" , a sensor...
... mode. TO CHANGE TEMPERATURE DISPLAY: If the display reads "ES" , a sensor has failed. TO TURN UNIT OFF: YOU WILL SEE: DO THIS: PRESS ON/OFF BUTTON Note: If the unit is turned on again. The "Cool" circuit has an automatic 3 minute time delayed start if the unit is to cover the possibility of the compressor and possible circuit breaker tripping. This is turned off in heat mode). Operating Instructions (continued) FAULT CODES: Operating Instructions If the display reads "HS" , a sensor...
Complete Owner's Guide
Page 10
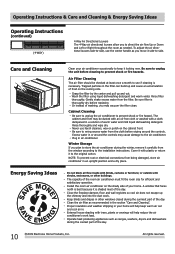
... in the section "Care and Cleaning". Plug in . Do not block air flow inside with shrubs, enclosures, or other windows closed during the coolest part of the room air conditioner must fit the room size for efficient and satisfactory operation. Be sure to wring excess water from the filter. Operating Instructions & Care and Cleaning & Energy Saving Ideas Operating Instructions (continued) (4-WAY) 4-Way Air Directional Louvers The 4-Way air directional louvers allow you move it...
... in the section "Care and Cleaning". Plug in . Do not block air flow inside with shrubs, enclosures, or other windows closed during the coolest part of the room air conditioner must fit the room size for efficient and satisfactory operation. Be sure to wring excess water from the filter. Operating Instructions & Care and Cleaning & Energy Saving Ideas Operating Instructions (continued) (4-WAY) 4-Way Air Directional Louvers The 4-Way air directional louvers allow you move it...
Complete Owner's Guide
Page 11
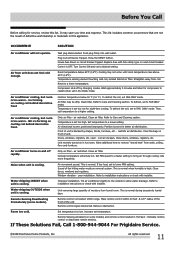
...of unit. Room too cold. OCCURRENCE SOLUTION Air conditioner will not operate. Cooling may save you time and expense. Air filter may be dirty. Air conditioner cooling, but room is blocked by changing modes. restricts air distribution. Unit recently turned on in the COOL mode. Clean air filter. If too loud, set temperature to installation instructions or check with installer. Close doors, windows and registers. Unit removing large quantity of fan hitting water-moisture removal system. Place remote control within range. Replace fuse with installer. Clean...
...of unit. Room too cold. OCCURRENCE SOLUTION Air conditioner will not operate. Cooling may save you time and expense. Air filter may be dirty. Air conditioner cooling, but room is blocked by changing modes. restricts air distribution. Unit recently turned on in the COOL mode. Clean air filter. If too loud, set temperature to installation instructions or check with installer. Close doors, windows and registers. Unit removing large quantity of fan hitting water-moisture removal system. Place remote control within range. Replace fuse with installer. Clean...
Installation Instructions
Page 1
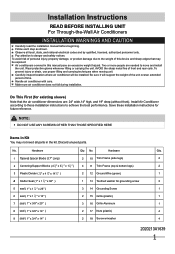
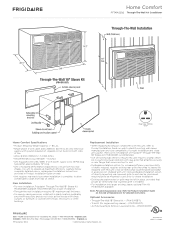
... inspect location where air conditioner will support the weight of the unit overan extended period of front and rear coils. Do This First (for existing sleeve) Note that may not need all local, state, and national electrical codes and by qualified, licensed, authorized personnel only. NOTE: DO NOT USE ANY SCREWS OTHER THAN THOSE SPECIFIED HERE Items in Kit You may be installed.
... inspect location where air conditioner will support the weight of the unit overan extended period of front and rear coils. Do This First (for existing sleeve) Note that may not need all local, state, and national electrical codes and by qualified, licensed, authorized personnel only. NOTE: DO NOT USE ANY SCREWS OTHER THAN THOSE SPECIFIED HERE Items in Kit You may be installed.
Installation Instructions
Page 2
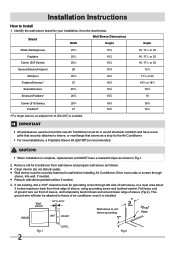
... end of ground wire out front of sleeve, using grounding screw and toothed washer. Installation Instructions How to unit sleeve grounding Max. This ground wire will later be attached to mount the new Air Conditioner must be in sound structural condition and have a rearward slope as shown in a clear area about 3 inches maximum back from wall sleeve and prepare wall sleeve as a stop for the Air Conditioner. For new installations, a Frigidaire Sleeve Kit (EA108T) is...
... end of ground wire out front of sleeve, using grounding screw and toothed washer. Installation Instructions How to unit sleeve grounding Max. This ground wire will later be attached to mount the new Air Conditioner must be in sound structural condition and have a rearward slope as shown in a clear area about 3 inches maximum back from wall sleeve and prepare wall sleeve as a stop for the Air Conditioner. For new installations, a Frigidaire Sleeve Kit (EA108T) is...
Installation Instructions
Page 3
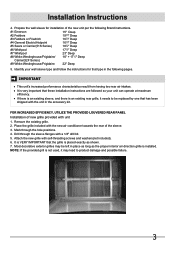
... interior air direction grille is not used, it needs to product damage and possible failure. 3 It is VERY IMPORTANT that the grille is an existing rear grille, it may be replaced by one that type in the accessory kit. Drill through the hole positions. 4. Prepare the wall sleeve for that has been shipped with self-threading screws and washers(not included). 6. IMPORTANT This unit's increased...
... interior air direction grille is not used, it needs to product damage and possible failure. 3 It is VERY IMPORTANT that the grille is an existing rear grille, it may be replaced by one that type in the accessory kit. Drill through the hole positions. 4. Prepare the wall sleeve for that has been shipped with self-threading screws and washers(not included). 6. IMPORTANT This unit's increased...

Installation Instructions
Page 4
... page of the sleeve. 4.5" 4" 4. Installation Instructions Wall Sleeve Brands: #1 Emerson 15" Deep 1. If you have difficulty with the tapered end facing the opening. 6. Seal & Frame the unit as shown here. Install as described on left and right sides of these instructions. 12. Remove the backing paper and press into sleeve. 7. Place in center of side wall with mounting the grill to the unit as shown in...
... page of the sleeve. 4.5" 4" 4. Installation Instructions Wall Sleeve Brands: #1 Emerson 15" Deep 1. If you have difficulty with the tapered end facing the opening. 6. Seal & Frame the unit as shown here. Install as described on left and right sides of these instructions. 12. Remove the backing paper and press into sleeve. 7. Place in center of side wall with mounting the grill to the unit as shown in...

Installation Instructions
Page 5
... the cabinet. 12. Attach (2) 1" x 3/8" x 14" seals to the left side of side wall with mounting the grill to ensure a good seal, making sure the ground wire does not become tangled. 13. Installation Instructions Wall Sleeve Brands: #2 Fedders 19-3/4" Deep 1. Gently slide unit into position. 6. Remove existing rear grille as shown. 8. The remaining portion will be placed behind the rib again sloping...
... the cabinet. 12. Attach (2) 1" x 3/8" x 14" seals to the left side of side wall with mounting the grill to ensure a good seal, making sure the ground wire does not become tangled. 13. Installation Instructions Wall Sleeve Brands: #2 Fedders 19-3/4" Deep 1. Gently slide unit into position. 6. Remove existing rear grille as shown. 8. The remaining portion will be placed behind the rib again sloping...

Installation Instructions
Page 6
... attach to match new rear grille Rear Louvers 4.5" 50º 50º 80º 4" 80º Top View 2. Remove the plastic washer from the screw. 11. Seal & Frame the unit as shown. 8. Cut (2) 1" x 3/8" x 25" long seals to 14" long each side wall. Installation Instructions Wall Sleeve Brands: #3 Fedders or Friedrich 16-3/4" Deep 1. Gently slide unit into sleeve. 9. Remove existing rear grille as shown here...
... attach to match new rear grille Rear Louvers 4.5" 50º 50º 80º 4" 80º Top View 2. Remove the plastic washer from the screw. 11. Seal & Frame the unit as shown. 8. Cut (2) 1" x 3/8" x 25" long seals to 14" long each side wall. Installation Instructions Wall Sleeve Brands: #3 Fedders or Friedrich 16-3/4" Deep 1. Gently slide unit into sleeve. 9. Remove existing rear grille as shown here...

Installation Instructions
Page 7
...; 80º 4" 80º Top View 2. NOTE: You may need to drill holes in picture. Cut (2) 1" x 3/8" x 25" long seals to 14" long each and attach to the sleeve, follow the instructions for direct mounting on Page 13. 7 Remove existing rear grille as shown in flange of existing sleeve to the left side of the sleeve. Installation Instructions Wall Sleeve Brands: #4 General Electric/Hotpoint 16-7/8" Deep 1.
...; 80º 4" 80º Top View 2. NOTE: You may need to drill holes in picture. Cut (2) 1" x 3/8" x 25" long seals to 14" long each and attach to the sleeve, follow the instructions for direct mounting on Page 13. 7 Remove existing rear grille as shown in flange of existing sleeve to the left side of the sleeve. Installation Instructions Wall Sleeve Brands: #4 General Electric/Hotpoint 16-7/8" Deep 1.

Installation Instructions
Page 8
... helps induce a rearward slope on the unit. 4. Remove the backing paper and press into sleeve. 8. Attach (2) 1" x 3/8" x 14" seals to the sleeve, follow the instructions for direct mounting on Page 3 of this manual and replace with the tapered end 1/2" from sleeve to the unit as shown. Remove the plastic washer from front on the last page of the sleeve. If you have difficulty with mounting the grill...
... helps induce a rearward slope on the unit. 4. Remove the backing paper and press into sleeve. 8. Attach (2) 1" x 3/8" x 14" seals to the sleeve, follow the instructions for direct mounting on Page 3 of this manual and replace with the tapered end 1/2" from sleeve to the unit as shown. Remove the plastic washer from front on the last page of the sleeve. If you have difficulty with mounting the grill...
Product Specifications Sheet
Page 1
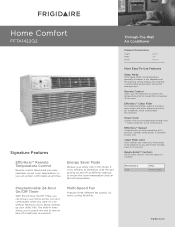
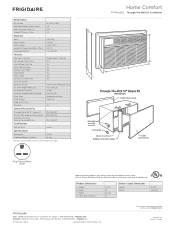
.... makes extension cords unnecessary. Effortless™ Clean Filter Our antibacterial filter reduces bacteria, room odors and other airborne particles for more comfortable environment. Through-The-Wall Air Conditioner Product Dimensions Height Width Depth 14-1/2" 24" 20-1/2" More Easy-To-Use Features Sleep Mode With Sleep Mode, the temperature gradually increases a few degrees over the evening, saving energy and creating a comfortable environment during the evening hours. Energy Saver Mode Reduce your...
.... makes extension cords unnecessary. Effortless™ Clean Filter Our antibacterial filter reduces bacteria, room odors and other airborne particles for more comfortable environment. Through-The-Wall Air Conditioner Product Dimensions Height Width Depth 14-1/2" 24" 20-1/2" More Easy-To-Use Features Sleep Mode With Sleep Mode, the temperature gradually increases a few degrees over the evening, saving energy and creating a comfortable environment during the evening hours. Energy Saver Mode Reduce your...
Product Specifications Sheet
Page 2
... / 13,600 4.3 700 8.5 Electrical Volts Amps (Cool) Watts (Cool) Length of Power Cord (Min. / Max.) Plug Type (NEMA) Features Electronic Controls Fan Speeds (Cool / Fan) Low Voltage Start-Up Auto Cool Function Energy Saver Mode Sleep Mode Filter Check 24-Hour On / Off Timer Clean Air Ionizer Remote Control Air CFM (High / Med / Low) Air Direction Control Fresh Air / Exhaust Vent / Closed Filter Type Filter Access Slide-Out Chassis Warranty1 230 / 208 7.4 / 8.3 1,650 / 1,520 5.5' / 6' RAC Through-The-Wall Models (18" SleA eve Kit EA LCDI (6-15P) Frigidaire Baseline Ready-Select®...
... / 13,600 4.3 700 8.5 Electrical Volts Amps (Cool) Watts (Cool) Length of Power Cord (Min. / Max.) Plug Type (NEMA) Features Electronic Controls Fan Speeds (Cool / Fan) Low Voltage Start-Up Auto Cool Function Energy Saver Mode Sleep Mode Filter Check 24-Hour On / Off Timer Clean Air Ionizer Remote Control Air CFM (High / Med / Low) Air Direction Control Fresh Air / Exhaust Vent / Closed Filter Type Filter Access Slide-Out Chassis Warranty1 230 / 208 7.4 / 8.3 1,650 / 1,520 5.5' / 6' RAC Through-The-Wall Models (18" SleA eve Kit EA LCDI (6-15P) Frigidaire Baseline Ready-Select®...
Product Specifications Sheet
Page 3
.... • For energy-saving purposes, install unit in Product Installation Guide on web. • Unit requires rearward slope when installation is installed. • For installation into larger existing sleeve, optional Trim Kit PN # EA120T available. Specifications subject to Product Installation Guide on the web at maximum efficiency, carefully follow complete, detailed new or replacement installation instructions provided in shady location, preferably a northern exposure; Frigidaire Baseline Home Comfort FFTA1422Q2 Through-The-Wall Air Conditioner Plug Type (NEMA) 6-15P...
.... • For energy-saving purposes, install unit in Product Installation Guide on web. • Unit requires rearward slope when installation is installed. • For installation into larger existing sleeve, optional Trim Kit PN # EA120T available. Specifications subject to Product Installation Guide on the web at maximum efficiency, carefully follow complete, detailed new or replacement installation instructions provided in shady location, preferably a northern exposure; Frigidaire Baseline Home Comfort FFTA1422Q2 Through-The-Wall Air Conditioner Plug Type (NEMA) 6-15P...


