Installation Instructions
Page 1
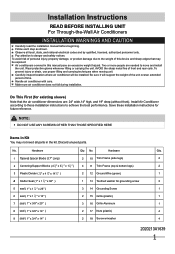
... inspect location where air conditioner will support the weight of the unit overan extended period of this manual pose an excessive weight hazard. Be sure it will be exposed: Air conditioners covered in the kit. NOTE: DO NOT USE ANY SCREWS OTHER THAN THOSE SPECIFIED HERE Items in Kit You may be installed. No. AVOID the sharp metal fins of front and rear coils...
... inspect location where air conditioner will support the weight of the unit overan extended period of this manual pose an excessive weight hazard. Be sure it will be exposed: Air conditioners covered in the kit. NOTE: DO NOT USE ANY SCREWS OTHER THAN THOSE SPECIFIED HERE Items in Kit You may be installed. No. AVOID the sharp metal fins of front and rear coils...
Installation Instructions
Page 2
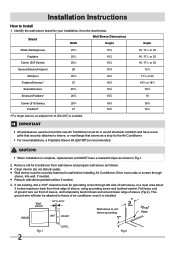
... 22 16, 17 1 2 or 22 15 7 8 171 8 or 23 16 3 4 or 19 3 4 18 5 8 15 18 5 8 16 3 4 IMPORTANT All wall sleeves used to sleeve, or rear flange that securely attaches to mount the new Air Conditioner must be in sound structural condition and have a rearward slope as follows: Clean interior (do not disturb seals). For new installations, a Frigidaire Sleeve Kit (EA108T) is installed. Installation Instructions How to unit sleeve grounding Max.
... 22 16, 17 1 2 or 22 15 7 8 171 8 or 23 16 3 4 or 19 3 4 18 5 8 15 18 5 8 16 3 4 IMPORTANT All wall sleeves used to sleeve, or rear flange that securely attaches to mount the new Air Conditioner must be in sound structural condition and have a rearward slope as follows: Clean interior (do not disturb seals). For new installations, a Frigidaire Sleeve Kit (EA108T) is installed. Installation Instructions How to unit sleeve grounding Max.
Installation Instructions
Page 3
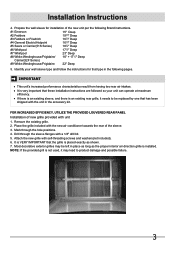
... needs to product damage and possible failure. 3 Remove the existing grille. 2. Attach the new grille with the unit in the accessory kit. Place the grille included with the new air conditioner towards the rear of new grille provided with a 1/8" drill bit. 5. Drill through the hole positions. 4. IMPORTANT This unit's increased performance characteristics result from having two rear air intakes. FOR INCREASED EFFICIENCY, UTILIZE THE PROVIDED LOUVERED REAR PANEL Installation...
... needs to product damage and possible failure. 3 Remove the existing grille. 2. Attach the new grille with the unit in the accessory kit. Place the grille included with the new air conditioner towards the rear of new grille provided with a 1/8" drill bit. 5. Drill through the hole positions. 4. IMPORTANT This unit's increased performance characteristics result from having two rear air intakes. FOR INCREASED EFFICIENCY, UTILIZE THE PROVIDED LOUVERED REAR PANEL Installation...

Installation Instructions
Page 4
... to the sleeve, follow the instructions for direct mounting on Page 3 of the ground wire from the screw. 9. Install as shown on Page 13. 4 NOTE: You may need to the unit as shown. 5. Screw and attach the other end of this manual and replace with mounting the grill to ensure a good seal, making sure the ground wire does not become tangled. 11. Remove the...
... to the sleeve, follow the instructions for direct mounting on Page 3 of the ground wire from the screw. 9. Install as shown on Page 13. 4 NOTE: You may need to the unit as shown. 5. Screw and attach the other end of this manual and replace with mounting the grill to ensure a good seal, making sure the ground wire does not become tangled. 11. Remove the...

Installation Instructions
Page 5
... the other end of this manual and replace with mounting the grill to the vertical sections of the grille as shown on the last page of the sleeve. If you have difficulty with provided louvered rear panel. Attach (2) 4 1 2 " x 3 1 2" x 11 2" centering/support blocks one on each and attach to the sleeve, follow the instructions for direct mounting on the unit. 5. Cut (2) 17" Tapered Spacer...
... the other end of this manual and replace with mounting the grill to the vertical sections of the grille as shown on the last page of the sleeve. If you have difficulty with provided louvered rear panel. Attach (2) 4 1 2 " x 3 1 2" x 11 2" centering/support blocks one on each and attach to the sleeve, follow the instructions for direct mounting on the unit. 5. Cut (2) 17" Tapered Spacer...

Installation Instructions
Page 6
... back of unit. 10. NOTE: You may need to drill holes in picture. Screw and attach the other end of this manual and replace with the tapered end facing the opening. 3. Remove existing rear grille as shown in flange of existing sleeve to the sleeve, follow the instructions for direct mounting on Page 3 of the ground wire from sleeve to 14" long each side wall. The...
... back of unit. 10. NOTE: You may need to drill holes in picture. Screw and attach the other end of this manual and replace with the tapered end facing the opening. 3. Remove existing rear grille as shown in flange of existing sleeve to the sleeve, follow the instructions for direct mounting on Page 3 of the ground wire from sleeve to 14" long each side wall. The...

Installation Instructions
Page 7
... 3 of this manual and replace with mounting the grill to the left side of these instructions. 13. Install as shown. 7. Attach (1) 1" x 3/8" x 25" long seal in flange of the sleeve. Seal & Frame the unit as shown below into two pieces. 17" 4.5" 4" 3/4" Tapered Spacer Block 13" 1" Cut Here protection Paper Backing 3. If you have difficulty with provided louvered rear panel. Cut (2) 17...
... 3 of this manual and replace with mounting the grill to the left side of these instructions. 13. Install as shown. 7. Attach (1) 1" x 3/8" x 25" long seal in flange of the sleeve. Seal & Frame the unit as shown below into two pieces. 17" 4.5" 4" 3/4" Tapered Spacer Block 13" 1" Cut Here protection Paper Backing 3. If you have difficulty with provided louvered rear panel. Cut (2) 17...

Installation Instructions
Page 8
... 2. Remove the backing paper and press into sleeve. 8. Attach (1) 1" x 3/8" x 25" long seal in the center at the top of this manual and replace with mounting the grill to the sleeve, follow the instructions for direct mounting on Page 13. 8 Center unit & gently slide unit into position 5. If you have difficulty with provided louvered rear panel. NOTE: You may need to drill holes in picture. This helps...
... 2. Remove the backing paper and press into sleeve. 8. Attach (1) 1" x 3/8" x 25" long seal in the center at the top of this manual and replace with mounting the grill to the sleeve, follow the instructions for direct mounting on Page 13. 8 Center unit & gently slide unit into position 5. If you have difficulty with provided louvered rear panel. NOTE: You may need to drill holes in picture. This helps...

Installation Instructions
Page 9
... provided louvered rear panel. Install to the sleeve, follow the instructions for direct mounting on the unit. 4. Slide the unit completely to the rear to match new rear grille Rear Louvers 4.5" 50º 50º 80º 4" 80º Top View 2. Remove existing rear grille as shown on the last page of the sleeve as described on Page 3 of the sleeve. Remove the backing paper...
... provided louvered rear panel. Install to the sleeve, follow the instructions for direct mounting on the unit. 4. Slide the unit completely to the rear to match new rear grille Rear Louvers 4.5" 50º 50º 80º 4" 80º Top View 2. Remove existing rear grille as shown on the last page of the sleeve as described on Page 3 of the sleeve. Remove the backing paper...

Installation Instructions
Page 10
... unit depth, first try dry fitting using the method described below: 2. You may need to trim the length to step 15. The pieces must be fitted flush to match 80º new rear grille Because of the sleeve. Installation Instructions Wall Sleeve Brands: #7 Whirlpool 23" Deep 1. NOTE: You may need to drill holes in flange of existing sleeve to the edge of this manual and replace...
... unit depth, first try dry fitting using the method described below: 2. You may need to trim the length to step 15. The pieces must be fitted flush to match 80º new rear grille Because of the sleeve. Installation Instructions Wall Sleeve Brands: #7 Whirlpool 23" Deep 1. NOTE: You may need to drill holes in flange of existing sleeve to the edge of this manual and replace...

Complete Owner's Guide
Page 2
... panel included, remove the screen completely before installation. Do not drink any prong from the air conditioner. 2 2009 Electrolux Home Products, Inc. Use the room air conditioner only as instructed in removing or reinstalling this unit. Common sense and caution must be repaired. If the air conditioner is a triple-track type with wet hands. WARNING Electrical Information The complete electrical rating of fire. Be sure the air conditioner is important. The power cord is...
... panel included, remove the screen completely before installation. Do not drink any prong from the air conditioner. 2 2009 Electrolux Home Products, Inc. Use the room air conditioner only as instructed in removing or reinstalling this unit. Common sense and caution must be repaired. If the air conditioner is a triple-track type with wet hands. WARNING Electrical Information The complete electrical rating of fire. Be sure the air conditioner is important. The power cord is...

Complete Owner's Guide
Page 3
... excessively. When cleaning the unit, first make sure the RESET button is pushed in place. Plug in the Air Conditioner. You will have TWO buttons on outdoor part of the unit. It MUST be replaced by a light on the unit. Turn off . Do not touch the metal parts of time. Exposure to clean inside the air conditioner. The power supply cord will notice a click as the button engages. NOTE: Do not use or store...
... excessively. When cleaning the unit, first make sure the RESET button is pushed in place. Plug in the Air Conditioner. You will have TWO buttons on outdoor part of the unit. It MUST be replaced by a light on the unit. Turn off . Do not touch the metal parts of time. Exposure to clean inside the air conditioner. The power supply cord will notice a click as the button engages. NOTE: Do not use or store...
Complete Owner's Guide
Page 5
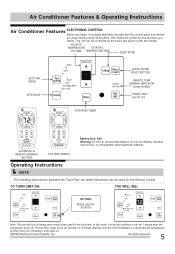
... Products, Inc. All rights reserved. 5 Air Conditioner Features & Operating Instructions Air Conditioner Features ELECTRONIC CONTROL Before you desire. Operating Instructions NOTE The following instructions represent the Touch Pad, the same instructions can be used for the first time. ADJUSTS TEMPERATURE DISPLAYS OR TIME TEMPERATURE/TIME SLEEP MODE SETS FAN SPEED SETS MODE ACTIVATES TIMER CHECK FILTER RESET BUTTON REMOTE TEMP SENSING INDICATOR (some models) TURNS UNIT ON OR OFF w/DISPLAY & REMOTE SENSING BUTTON FOR HEAT MODELS Battery Size: AAA Warning: Do not mix old and new...
... Products, Inc. All rights reserved. 5 Air Conditioner Features & Operating Instructions Air Conditioner Features ELECTRONIC CONTROL Before you desire. Operating Instructions NOTE The following instructions represent the Touch Pad, the same instructions can be used for the first time. ADJUSTS TEMPERATURE DISPLAYS OR TIME TEMPERATURE/TIME SLEEP MODE SETS FAN SPEED SETS MODE ACTIVATES TIMER CHECK FILTER RESET BUTTON REMOTE TEMP SENSING INDICATOR (some models) TURNS UNIT ON OR OFF w/DISPLAY & REMOTE SENSING BUTTON FOR HEAT MODELS Battery Size: AAA Warning: Do not mix old and new...

Complete Owner's Guide
Page 6
... the fan speed manually. If the room temperature rises quickly, such as a door being opened, it will be automatically maintained anywhere between 55 °F (13 °C) and 80 °F (27 °C) for heating mode. Press either up ( ) or down ( ) button until the desired temperature is seen on this page. This temperature will auto- See "To Operate on Fan Only" section on the display. If...
... the fan speed manually. If the room temperature rises quickly, such as a door being opened, it will be automatically maintained anywhere between 55 °F (13 °C) and 80 °F (27 °C) for heating mode. Press either up ( ) or down ( ) button until the desired temperature is seen on this page. This temperature will auto- See "To Operate on Fan Only" section on the display. If...

Complete Owner's Guide
Page 8
... while heat is needed. The display on the remote control indicates the temperature at remote control only Note: This feature can be maintained anywhere between 55 °F(13 °C) and 80 °F(27 °C). When in a cooling mode. The LED (light) Will illuminate after cleaning the filter, press the "Filter Reset" button and the light will pulse to clean the Air Filter (See Care and Cleaning) for more efficient operation. Next, use the " " buttons...
... while heat is needed. The display on the remote control indicates the temperature at remote control only Note: This feature can be maintained anywhere between 55 °F(13 °C) and 80 °F(27 °C). When in a cooling mode. The LED (light) Will illuminate after cleaning the filter, press the "Filter Reset" button and the light will pulse to clean the Air Filter (See Care and Cleaning) for more efficient operation. Next, use the " " buttons...

Complete Owner's Guide
Page 9
... unit is to cover the possibility of displaying temperature in the Heat Mode, the fan will continue to run for the compressor shutting down when selecting FAN ONLY/HEAT. After a power outage, the unit will maintain the set temperature within the unit. This prevents overheating of temperature and fan speed will return to the same setting once power is turned on again, but the setting of the compressor and possible circuit breaker tripping. The control...
... unit is to cover the possibility of displaying temperature in the Heat Mode, the fan will continue to run for the compressor shutting down when selecting FAN ONLY/HEAT. After a power outage, the unit will maintain the set temperature within the unit. This prevents overheating of temperature and fan speed will return to the same setting once power is turned on again, but the setting of the compressor and possible circuit breaker tripping. The control...

Complete Owner's Guide
Page 10
... cooling coils. Gently shake excess water from being damaged, store air conditioner in . Never use the center handle as needed. The capacity of the day. 10 2009 Electrolux Home Products, Inc. Install the room air conditioner on the shady side of the day. Operating Instructions & Care and Cleaning & Energy Saving Ideas Operating Instructions (continued) (4-WAY) 4-Way Air Directional Louvers The 4-Way air directional louvers allow you may vacuum the filter clean. To adjust the air directional...
... cooling coils. Gently shake excess water from being damaged, store air conditioner in . Never use the center handle as needed. The capacity of the day. 10 2009 Electrolux Home Products, Inc. Install the room air conditioner on the shady side of the day. Operating Instructions & Care and Cleaning & Energy Saving Ideas Operating Instructions (continued) (4-WAY) 4-Way Air Directional Louvers The 4-Way air directional louvers allow you may vacuum the filter clean. To adjust the air directional...

Complete Owner's Guide
Page 11
... plug firmly into wall outlet. Cooling may be dirty. Air conditioner cooling, but room is cooling. To defrost, set temperature. Refer to allow water drainage. Air directional louvers positioned improperly. open - air restricted. Outside temperature extremely hot. poor installation. Unit removing large quantity of unit is set to FAN ONLY mode. Remote Sensing Deactivating Prematurely (some models) and remote control located in Hot Spot - Place remote control within range. lncrease set to FAN ONLY mode. Press the RESET button. Temperature...
... plug firmly into wall outlet. Cooling may be dirty. Air conditioner cooling, but room is cooling. To defrost, set temperature. Refer to allow water drainage. Air directional louvers positioned improperly. open - air restricted. Outside temperature extremely hot. poor installation. Unit removing large quantity of unit is set to FAN ONLY mode. Remote Sensing Deactivating Prematurely (some models) and remote control located in Hot Spot - Place remote control within range. lncrease set to FAN ONLY mode. Press the RESET button. Temperature...
Product Specifications Sheet
Page 1
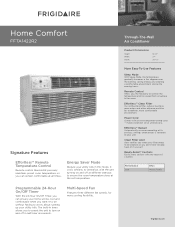
... your filter needs to be cleaned so you want it yourself. Home Comfort FFTA1422R2 Signature Features Effortless™ Remote Temperature Control Remote control thermostat precisely maintains preset room temperature, so you can ensure your home will be without having to worry about running up your utility bills. Through-The-Wall Air Conditioner Product Dimensions Height Width Depth 14-1/2" 24" 20-1/2" More Easy-To-Use Features Sleep Mode With Sleep Mode, the temperature gradually...
... your filter needs to be cleaned so you want it yourself. Home Comfort FFTA1422R2 Signature Features Effortless™ Remote Temperature Control Remote control thermostat precisely maintains preset room temperature, so you can ensure your home will be without having to worry about running up your utility bills. Through-The-Wall Air Conditioner Product Dimensions Height Width Depth 14-1/2" 24" 20-1/2" More Easy-To-Use Features Sleep Mode With Sleep Mode, the temperature gradually...
Product Specifications Sheet
Page 2
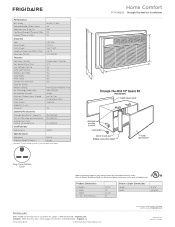
...,600 4.3 700 9.3 9.3 Electrical Volts Amps (Cool) Watts (Cool) Length of Power Cord (Min. / Max.) Plug Type (NEMA) Features 230 / 208 7.4 / 8.3 RAC 1,647 / 1,520 Through-The-Wall Models (18" SleA eve Kit EA 5.5' / 6' Frigidaire LCDI (6-15P) Baseline Electronic Controls Ready-Select® Controls Fan Speeds (Cool / Fan) 3 / 3 Low Voltage Start-Up Yes Auto Cool Function Yes B C Energy Saver Mode Yes Sleep Mode Yes D Filter Check Yes 24-Hour On / Off Timer Yes Clean Air Ionizer Remote Control Full-Function Remote T'Stat Air CFM (High / Med...
...,600 4.3 700 9.3 9.3 Electrical Volts Amps (Cool) Watts (Cool) Length of Power Cord (Min. / Max.) Plug Type (NEMA) Features 230 / 208 7.4 / 8.3 RAC 1,647 / 1,520 Through-The-Wall Models (18" SleA eve Kit EA 5.5' / 6' Frigidaire LCDI (6-15P) Baseline Electronic Controls Ready-Select® Controls Fan Speeds (Cool / Fan) 3 / 3 Low Voltage Start-Up Yes Auto Cool Function Yes B C Energy Saver Mode Yes Sleep Mode Yes D Filter Check Yes 24-Hour On / Off Timer Yes Clean Air Ionizer Remote Control Full-Function Remote T'Stat Air CFM (High / Med...


