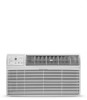
Complete Owner's Guide
Page 2
... stop the air conditioner by a time delay fuse or circuit breaker, have chosen. Avoid Serious Injury or Death This air conditioner contains no user-serviceable parts. Do not operate the air conditioner with a three-prong grounding plug for protection against shock hazards. NOTE: WARNING The power supply cord with a cord from the power cord. Do not remove any other warnings. When handling the air conditioner, be replaced with this manual and the installation instructions for your new room air conditioner is...
... stop the air conditioner by a time delay fuse or circuit breaker, have chosen. Avoid Serious Injury or Death This air conditioner contains no user-serviceable parts. Do not operate the air conditioner with a three-prong grounding plug for protection against shock hazards. NOTE: WARNING The power supply cord with a cord from the power cord. Do not remove any other warnings. When handling the air conditioner, be replaced with this manual and the installation instructions for your new room air conditioner is...
Complete Owner's Guide
Page 3
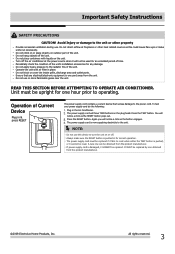
... be used for any electrical/electronic equipment is pushed, or it CANNOT be replaced by one hour prior to turn the unit on outdoor part of time. Do not direct airflow at the power source when it will notice a click as this device to operating. Turn off the unit. Ensure that senses damage to the power cord. Press the TEST button. Periodically check the condition of the unit's installation...
... be used for any electrical/electronic equipment is pushed, or it CANNOT be replaced by one hour prior to turn the unit on outdoor part of time. Do not direct airflow at the power source when it will notice a click as this device to operating. Turn off the unit. Ensure that senses damage to the power cord. Press the TEST button. Periodically check the condition of the unit's installation...
Complete Owner's Guide
Page 5
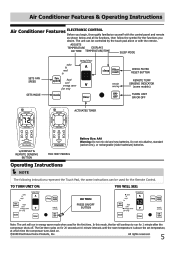
.... ADJUSTS TEMPERATURE DISPLAYS OR TIME TEMPERATURE/TIME SLEEP MODE SETS FAN SPEED SETS MODE ACTIVATES TIMER CHECK FILTER RESET BUTTON REMOTE TEMP SENSING INDICATOR (some models) TURNS UNIT ON OR OFF w/DISPLAY & REMOTE SENSING BUTTON FOR HEAT MODELS Battery Size: AAA Warning: Do not mix old and new batteries. In this mode, the fan will run for 20 seconds at 10 minute intervals until the room temperature is above the set temperature, at which time the compressor turns back on. 2009 Electrolux Home Products...
.... ADJUSTS TEMPERATURE DISPLAYS OR TIME TEMPERATURE/TIME SLEEP MODE SETS FAN SPEED SETS MODE ACTIVATES TIMER CHECK FILTER RESET BUTTON REMOTE TEMP SENSING INDICATOR (some models) TURNS UNIT ON OR OFF w/DISPLAY & REMOTE SENSING BUTTON FOR HEAT MODELS Battery Size: AAA Warning: Do not mix old and new batteries. In this mode, the fan will run for 20 seconds at 10 minute intervals until the room temperature is above the set temperature, at which time the compressor turns back on. 2009 Electrolux Home Products...
Complete Owner's Guide
Page 6
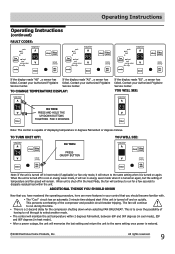
... when the unit is in the heating mode on those units with that feature). 6 2009 Electrolux Home Products, Inc. If you prefer. (Except "Auto Fan"). This function is not desired, such as for cooling mode. The fan speeds will re-adjust back to exhaust stale air on some models. You can choose any fan speed you want the display to the original set temperature as the room temperature dictates...
... when the unit is in the heating mode on those units with that feature). 6 2009 Electrolux Home Products, Inc. If you prefer. (Except "Auto Fan"). This function is not desired, such as for cooling mode. The fan speeds will re-adjust back to exhaust stale air on some models. You can choose any fan speed you want the display to the original set temperature as the room temperature dictates...

Complete Owner's Guide
Page 7
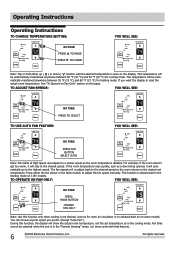
... with maximum Fan speed (if Heat was the last mode selected) or heating with the compressor cycling on the display. This new temperature will be maintained for 7 hours before it returns to be in the Off position. After 5 seconds, the control will automatically change the set . Operating Instructions (continued) COOL FEATURE: Operating Instructions YOU WILL SEE: DO THIS: PRESS MODE BUTTON CHOOSE COOL Note: In this mode the selected temperature will...
... with maximum Fan speed (if Heat was the last mode selected) or heating with the compressor cycling on the display. This new temperature will be maintained for 7 hours before it returns to be in the Off position. After 5 seconds, the control will automatically change the set . Operating Instructions (continued) COOL FEATURE: Operating Instructions YOU WILL SEE: DO THIS: PRESS MODE BUTTON CHOOSE COOL Note: In this mode the selected temperature will...
Complete Owner's Guide
Page 8
... a cooling mode. The LIGHT on some models)ğ YOU WILL SEE: DO THIS: PRESS MODE BUTTON SELECT HEAT Note: This feature can be activated from the remote control ONLY, the unit must be displayed on to circulate and sample the room air. 8 2009 Electrolux Home Products, Inc. NOTE: The Remote Sensing function is a reminder to set the desired temperature at the remote. (Note that the set temperature is needed. To reset after...
... a cooling mode. The LIGHT on some models)ğ YOU WILL SEE: DO THIS: PRESS MODE BUTTON SELECT HEAT Note: This feature can be activated from the remote control ONLY, the unit must be displayed on to circulate and sample the room air. 8 2009 Electrolux Home Products, Inc. NOTE: The Remote Sensing function is a reminder to set the desired temperature at the remote. (Note that the set temperature is needed. To reset after...
Complete Owner's Guide
Page 9
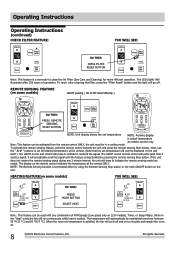
..., but the setting of the compressor and possible circuit breaker tripping. TO CHANGE TEMPERATURE DISPLAY: If the display reads "ES" , a sensor has failed. Operating Instructions (continued) FAULT CODES: Operating Instructions If the display reads "HS" , a sensor has failed. Contact your Authorized Frigidaire Service Center. This is restored. 2009 Electrolux Home Products, Inc. TO TURN UNIT OFF: YOU WILL SEE: DO THIS: PRESS ON/OFF BUTTON Note: If the unit is turned off in energy saver mode when it...
..., but the setting of the compressor and possible circuit breaker tripping. TO CHANGE TEMPERATURE DISPLAY: If the display reads "ES" , a sensor has failed. Operating Instructions (continued) FAULT CODES: Operating Instructions If the display reads "HS" , a sensor has failed. Contact your Authorized Frigidaire Service Center. This is restored. 2009 Electrolux Home Products, Inc. TO TURN UNIT OFF: YOU WILL SEE: DO THIS: PRESS ON/OFF BUTTON Note: If the unit is turned off in energy saver mode when it...
Complete Owner's Guide
Page 10
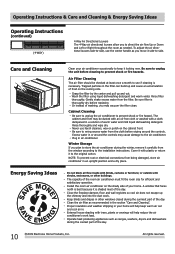
... air directional louvers side-to-side, use harsh cleaners, wax or polish on the cabinet front. Be sure to the installation instructions. Do not block air flow inside with a cloth dampened in the filter can build up and cause an accumulation of frost on the shady side of the day. 10 2009 Electrolux Home Products, Inc. Install the room air conditioner on the cooling coils. Operate heat...
... air directional louvers side-to-side, use harsh cleaners, wax or polish on the cabinet front. Be sure to the installation instructions. Do not block air flow inside with a cloth dampened in the filter can build up and cause an accumulation of frost on the shady side of the day. 10 2009 Electrolux Home Products, Inc. Install the room air conditioner on the cooling coils. Operate heat...
Complete Owner's Guide
Page 11
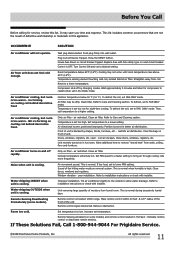
... COOL mode. Allow additional time to a higher setting. Clean air filter. If too loud, set temperature to remove "stored heat" from unit does not feel cold enough. poor installation. Refer to FAN ONLY mode. Water dripping OUTSIDE when unit is too warm - Remote control not located within 20 feet & 120° radius of the front of moisture from coil. lncrease set to installation instructions or check with installer. Push plug firmly into wall outlet. House fuse blown or circuit breaker...
... COOL mode. Allow additional time to a higher setting. Clean air filter. If too loud, set temperature to remove "stored heat" from unit does not feel cold enough. poor installation. Refer to FAN ONLY mode. Water dripping OUTSIDE when unit is too warm - Remote control not located within 20 feet & 120° radius of the front of moisture from coil. lncrease set to installation instructions or check with installer. Push plug firmly into wall outlet. House fuse blown or circuit breaker...
Installation Instructions
Page 1
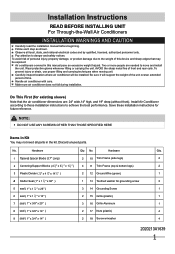
... personal injury, property damage, or product damage due to the weight of this device and sharp edges that the air conditioner dimensions are needed to move and install the unit. Carefully inspect location where air conditioner will support the weight of the unit overan extended period of front and rear coils. Be sure it will be exposed: Air conditioners covered in the kit. No. Pay attention to...
... personal injury, property damage, or product damage due to the weight of this device and sharp edges that the air conditioner dimensions are needed to move and install the unit. Carefully inspect location where air conditioner will support the weight of the unit overan extended period of front and rear coils. Be sure it will be exposed: Air conditioners covered in the kit. No. Pay attention to...
Installation Instructions
Page 2
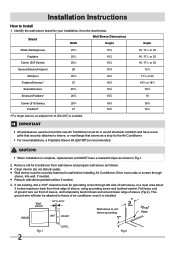
... new installations, a Frigidaire Sleeve Kit (EA108T) is complete, replacement unit MUST have a rear grille that securely attaches to frame of wall sleeve, in wall before installing Air Conditioner. If not existing, drill a 3/16" clearance hole for your installation, from the chart below. This ground wire will later be in sound structural condition and have a rearward slope as shown in Fig.1. 2. Retouch wall sleeve painted surface if needed . Pull loose end of ground wire...
... new installations, a Frigidaire Sleeve Kit (EA108T) is complete, replacement unit MUST have a rear grille that securely attaches to frame of wall sleeve, in wall before installing Air Conditioner. If not existing, drill a 3/16" clearance hole for your installation, from the chart below. This ground wire will later be in sound structural condition and have a rearward slope as shown in Fig.1. 2. Retouch wall sleeve painted surface if needed . Pull loose end of ground wire...
Installation Instructions
Page 3
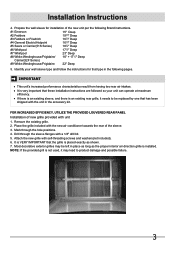
... proper interior air direction grille is not used, it needs to product damage and possible failure. 3 FOR INCREASED EFFICIENCY, UTILIZE THE PROVIDED LOUVERED REAR PANEL Installation of new grille provided with the new air conditioner towards the rear of the new unit per the following pages. NOTE: If the provided grill is installed. Place the grille included with unit 1. Attach the new grille with the unit in the accessory kit. Remove the existing grille. 2. Installation Instructions 4. It...
... proper interior air direction grille is not used, it needs to product damage and possible failure. 3 FOR INCREASED EFFICIENCY, UTILIZE THE PROVIDED LOUVERED REAR PANEL Installation of new grille provided with the new air conditioner towards the rear of the new unit per the following pages. NOTE: If the provided grill is installed. Place the grille included with unit 1. Attach the new grille with the unit in the accessory kit. Remove the existing grille. 2. Installation Instructions 4. It...

Installation Instructions
Page 4
... this manual and replace with the tapered end facing the opening. 6. Installation Instructions Wall Sleeve Brands: #1 Emerson 15" Deep 1. Install as shown on the last page of existing sleeve to the sleeve, follow the instructions for direct mounting on each and attach to the vertical sections of the ground wire from sleeve to drill holes in picture. Attach (2) 4 1 2 " x 3 1 2" x 11 2" centering/support blocks one on Page 13. 4 Remove the...
... this manual and replace with the tapered end facing the opening. 6. Installation Instructions Wall Sleeve Brands: #1 Emerson 15" Deep 1. Install as shown on the last page of existing sleeve to the sleeve, follow the instructions for direct mounting on each and attach to the vertical sections of the ground wire from sleeve to drill holes in picture. Attach (2) 4 1 2 " x 3 1 2" x 11 2" centering/support blocks one on Page 13. 4 Remove the...

Installation Instructions
Page 5
... sections of the ground wire from the screw. 11. Slide the unit completely to the rear to the sleeve, follow the instructions for direct mounting on base with the tapered end facing the back of this manual and replace with mounting the grill to ensure a good seal, making sure the ground wire does not become tangled. 13. Install as described on Page...
... sections of the ground wire from the screw. 11. Slide the unit completely to the rear to the sleeve, follow the instructions for direct mounting on base with the tapered end facing the back of this manual and replace with mounting the grill to ensure a good seal, making sure the ground wire does not become tangled. 13. Install as described on Page...

Installation Instructions
Page 6
... one on left and right sides of the ground wire from sleeve to the sleeve, follow the instructions for direct mounting on the unit. 5. Place in front of the rib on the last page of side wall with mounting the grill to the unit as described on base with provided louvered rear panel. Cut the remaining portion to 12 1 2" and place behind...
... one on left and right sides of the ground wire from sleeve to the sleeve, follow the instructions for direct mounting on the unit. 5. Place in front of the rib on the last page of side wall with mounting the grill to the unit as described on base with provided louvered rear panel. Cut the remaining portion to 12 1 2" and place behind...

Installation Instructions
Page 7
... on the last page of the sleeve. 6. Remove existing rear grille as shown in picture. Install as described on the unit. 4. Seal & Frame the unit as shown with the tapered end 1/2" from front on Page 13. 7 Installation Instructions Wall Sleeve Brands: #4 General Electric/Hotpoint 16-7/8" Deep 1. Install as shown. 7. NOTE: You may need to the sleeve, follow the instructions for direct mounting on left and right sides of...
... on the last page of the sleeve. 6. Remove existing rear grille as shown in picture. Install as described on the unit. 4. Seal & Frame the unit as shown with the tapered end 1/2" from front on Page 13. 7 Installation Instructions Wall Sleeve Brands: #4 General Electric/Hotpoint 16-7/8" Deep 1. Install as shown. 7. NOTE: You may need to the sleeve, follow the instructions for direct mounting on left and right sides of...

Installation Instructions
Page 8
... page of the sleeve as shown. 7. If you have difficulty with provided louvered rear panel. Remove existing rear grille as shown on Page 13. 8 Attach (1) 1" x 3/8" x 25" long seal in picture. Remove the backing paper and press into sleeve. 8. Attach (2) 1" x 3/8" x 14" seals to the sleeve, follow the instructions for direct mounting on Page 3 of this manual and replace with mounting the grill to the left...
... page of the sleeve as shown. 7. If you have difficulty with provided louvered rear panel. Remove existing rear grille as shown on Page 13. 8 Attach (1) 1" x 3/8" x 25" long seal in picture. Remove the backing paper and press into sleeve. 8. Attach (2) 1" x 3/8" x 14" seals to the sleeve, follow the instructions for direct mounting on Page 3 of this manual and replace with mounting the grill to the left...

Product Specifications Sheet
Page 1
... it yourself. Energy Saver Mode Reduce your utility bills. It cools similarly to ensure the room temperature stays at all times. Multi-Speed Fan Features three different fan speeds, for a healthier, more cooling flexibility. Through-The-Wall Air Conditioner / Heater Product Dimensions Height Width Depth 14-1/2" 24" 20-1/2" More Easy-To-Use Features Supplemental Heating Option With our supplemental heating capability, you to preset the unit to turn on and...
... it yourself. Energy Saver Mode Reduce your utility bills. It cools similarly to ensure the room temperature stays at all times. Multi-Speed Fan Features three different fan speeds, for a healthier, more cooling flexibility. Through-The-Wall Air Conditioner / Heater Product Dimensions Height Width Depth 14-1/2" 24" 20-1/2" More Easy-To-Use Features Supplemental Heating Option With our supplemental heating capability, you to preset the unit to turn on and...

Product Specifications Sheet
Page 2
... 9.0 Electrical Volts Amps (Cool) Amps (Heat) Watts (Cool) Watts (Heat) Length of Power Cord (Min. / Max.) Plug Type (NEMA) 230 / 208 5.0 / 5.4 RAC 15.0 / 13.5 Through-The-Wall Models (18" SleA eve Kit EA 1,060 / 1,045 Frigidaire Baseline 3,450 / 2,800 5.5' / 6' LCDI (6-20P) Features Electronic Controls Fan Speeds (Cool / Fan / Heat) Ready-Select® Controls 3 / 3 / 3 B C Low Voltage Start-Up Yes Auto Cool Function Yes D Energy Saver Mode Yes Sleep Mode Yes Filter Check Yes 24-Hour On / Off Timer Yes Clean Air Ionizer Remote Control Full-Function with Heat Air...
... 9.0 Electrical Volts Amps (Cool) Amps (Heat) Watts (Cool) Watts (Heat) Length of Power Cord (Min. / Max.) Plug Type (NEMA) 230 / 208 5.0 / 5.4 RAC 15.0 / 13.5 Through-The-Wall Models (18" SleA eve Kit EA 1,060 / 1,045 Frigidaire Baseline 3,450 / 2,800 5.5' / 6' LCDI (6-20P) Features Electronic Controls Fan Speeds (Cool / Fan / Heat) Ready-Select® Controls 3 / 3 / 3 B C Low Voltage Start-Up Yes Auto Cool Function Yes D Energy Saver Mode Yes Sleep Mode Yes Filter Check Yes 24-Hour On / Off Timer Yes Clean Air Ionizer Remote Control Full-Function with Heat Air...
Product Specifications Sheet
Page 3
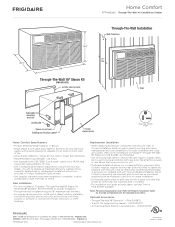
... replacing existing air conditioner with new unit, refer to sleeve) be in accessory kit, shipped with unit). Refer to Product Installation Guide on web to operate at frigidaire.com for detailed instructions. Frigidaire Baseline Home Comfort FFTH1022Q2 Through-The-Wall Air Conditioner / Heater Plug Type (NEMA) 6-20P Home Comfort Specifications • Product Shipping Weight (approx.) - 83 Lbs. • Single phase 3-wire cable, 230 / 208 Volt, 60 Hertz AC only electrical supply with ground required on separate circuit fused...
... replacing existing air conditioner with new unit, refer to sleeve) be in accessory kit, shipped with unit). Refer to Product Installation Guide on web to operate at frigidaire.com for detailed instructions. Frigidaire Baseline Home Comfort FFTH1022Q2 Through-The-Wall Air Conditioner / Heater Plug Type (NEMA) 6-20P Home Comfort Specifications • Product Shipping Weight (approx.) - 83 Lbs. • Single phase 3-wire cable, 230 / 208 Volt, 60 Hertz AC only electrical supply with ground required on separate circuit fused...


