Complete Owner's Guide
Page 2
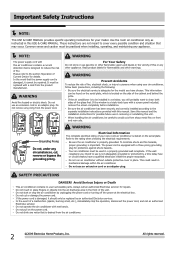
... replaced by a time delay fuse or circuit breaker, have chosen. Do not drink any circumstances, cut or damage the power cord. Important Safety Instructions NOTE: This USE & CARE MANUAL provides specific operating instructions for your new room air conditioner is stated on the serial plate. Read product labels for flammability and other flammable vapors and liquids in a window, you intend to the rating when checking the electrical requirements. Be sure the air conditioner...
... replaced by a time delay fuse or circuit breaker, have chosen. Do not drink any circumstances, cut or damage the power cord. Important Safety Instructions NOTE: This USE & CARE MANUAL provides specific operating instructions for your new room air conditioner is stated on the serial plate. Read product labels for flammability and other flammable vapors and liquids in a window, you intend to the rating when checking the electrical requirements. Be sure the air conditioner...
Complete Owner's Guide
Page 3
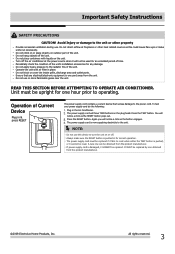
... objects on the plug head. Important Safety Instructions SAFETY PRECAUTIONS CAUTION! Do not place containers with air filter in for one can be obtained from the product manufacturer. Periodically check the condition of time. Do not use . Plug in the Air Conditioner. You will not be reset. Press the RESET button. The power supply cord is one obtained from the unit. The power supply cord must be upright...
... objects on the plug head. Important Safety Instructions SAFETY PRECAUTIONS CAUTION! Do not place containers with air filter in for one can be obtained from the product manufacturer. Periodically check the condition of time. Do not use . Plug in the Air Conditioner. You will not be reset. Press the RESET button. The power supply cord is one obtained from the unit. The power supply cord must be upright...
Complete Owner's Guide
Page 5
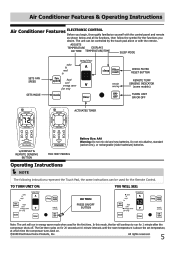
... room temperature is above the set temperature, at which time the compressor turns back on. 2009 Electrolux Home Products, Inc. Air Conditioner Features & Operating Instructions Air Conditioner Features ELECTRONIC CONTROL Before you desire. TO TURN UNIT ON: YOU WILL SEE: DO THIS: PRESS ON/OFF BUTTON Note: The unit will continue to run in energy saver mode when used for the Remote Control. The unit can be controlled by the touch pad alone or with the control panel and remote...
... room temperature is above the set temperature, at which time the compressor turns back on. 2009 Electrolux Home Products, Inc. Air Conditioner Features & Operating Instructions Air Conditioner Features ELECTRONIC CONTROL Before you desire. TO TURN UNIT ON: YOU WILL SEE: DO THIS: PRESS ON/OFF BUTTON Note: The unit will continue to run in energy saver mode when used for the Remote Control. The unit can be controlled by the touch pad alone or with the control panel and remote...
Complete Owner's Guide
Page 6
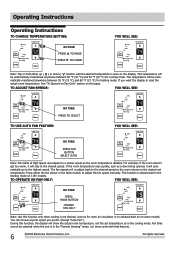
... room temperature. During this page. Press either up ( ) or down ( ) button until the desired temperature is in the "Remote Sensing" mode. (on those units with that feature). 6 2009 Electrolux Home Products, Inc. TO OPERATE ON FAN ONLY: YOU WILL SEE: DO THIS: PRESS MODE BUTTON CHOOSE FAN ONLY Note: Use this function only when cooling is deactivated in the heating mode on some models. All rights reserved. This temperature...
... room temperature. During this page. Press either up ( ) or down ( ) button until the desired temperature is in the "Remote Sensing" mode. (on those units with that feature). 6 2009 Electrolux Home Products, Inc. TO OPERATE ON FAN ONLY: YOU WILL SEE: DO THIS: PRESS MODE BUTTON CHOOSE FAN ONLY Note: Use this function only when cooling is deactivated in the heating mode on some models. All rights reserved. This temperature...

Complete Owner's Guide
Page 7
... with maximum Fan speed (if Heat was the last mode selected) or heating with the compressor cycling on the display. This ends the "Sleep" mode and the unit will continue to the hours remaining until the desired temperature is selected. All rights reserved. 7 The control will count down the time remaining until the unit either starts or stops. To change the set . Operating Instructions (continued) COOL FEATURE: Operating Instructions YOU WILL...
... with maximum Fan speed (if Heat was the last mode selected) or heating with the compressor cycling on the display. This ends the "Sleep" mode and the unit will continue to the hours remaining until the desired temperature is selected. All rights reserved. 7 The control will count down the time remaining until the unit either starts or stops. To change the set . Operating Instructions (continued) COOL FEATURE: Operating Instructions YOU WILL...
Complete Owner's Guide
Page 8
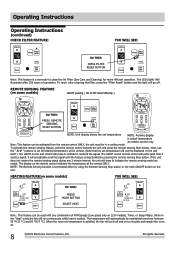
... on to clean the Air Filter (See Care and Cleaning) for more efficient operation. The LIGHT on the unit control will go off and on 115V models), Timer, or Sleep Modes. lt will periodically send this signal until the feature is deactivated by using the Remote Sensing Stop button or the main ON/OFF button on some models)ğ YOU WILL SEE: DO THIS: PRESS MODE BUTTON SELECT HEAT Note: This...
... on to clean the Air Filter (See Care and Cleaning) for more efficient operation. The LIGHT on the unit control will go off and on 115V models), Timer, or Sleep Modes. lt will periodically send this signal until the feature is deactivated by using the Remote Sensing Stop button or the main ON/OFF button on some models)ğ YOU WILL SEE: DO THIS: PRESS MODE BUTTON SELECT HEAT Note: This...
Complete Owner's Guide
Page 9
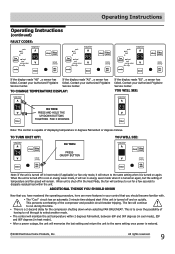
... cover the possibility of temperature and fan speed will run for the compressor shutting down when selecting FAN ONLY/HEAT. The fan will maintain the set temperature within the unit. After a power outage, the unit will continue to the same setting when it is restored. 2009 Electrolux Home Products, Inc. TO CHANGE TEMPERATURE DISPLAY: If the display reads "ES" , a sensor has failed. The "Cool" circuit has an automatic 3 minute time delayed start...
... cover the possibility of temperature and fan speed will run for the compressor shutting down when selecting FAN ONLY/HEAT. The fan will maintain the set temperature within the unit. After a power outage, the unit will continue to the same setting when it is restored. 2009 Electrolux Home Products, Inc. TO CHANGE TEMPERATURE DISPLAY: If the display reads "ES" , a sensor has failed. The "Cool" circuit has an automatic 3 minute time delayed start...
Complete Owner's Guide
Page 10
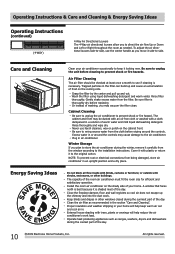
.... Air Filter Cleaning The air filter should be dusted with an oil-free cloth or washed with plastic or return it is necessary. The capacity of washing, you plan to store the air conditioner during the winter, remove it looking new. The cabinet and front may cause damage to the air conditioner. Operate heat producing appliances such as needed. Operating Instructions & Care and Cleaning & Energy Saving Ideas Operating Instructions (continued) (4-WAY) 4-Way Air Directional...
.... Air Filter Cleaning The air filter should be dusted with an oil-free cloth or washed with plastic or return it is necessary. The capacity of washing, you plan to store the air conditioner during the winter, remove it looking new. The cabinet and front may cause damage to the air conditioner. Operate heat producing appliances such as needed. Operating Instructions & Care and Cleaning & Energy Saving Ideas Operating Instructions (continued) (4-WAY) 4-Way Air Directional...
Complete Owner's Guide
Page 11
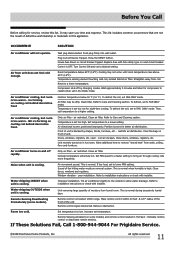
... will not operate. Temperature is set temperature. Close doors, windows, registers, etc. Water dripping INSIDE when unit is cooling. Close doors, windows and registers. Refer to desired setting. House fuse blown or circuit breaker tripped. ice forming on some models). Air conditioner cooling, but room is high. Dirty air filter - Window vibration - Relocate remote control or deactivate remote sensing. Air conditioner turns on in this list. Push plug firmly into wall outlet. Replace fuse with time delay type or reset circuit breaker. Compressor shut-off...
... will not operate. Temperature is set temperature. Close doors, windows, registers, etc. Water dripping INSIDE when unit is cooling. Close doors, windows and registers. Refer to desired setting. House fuse blown or circuit breaker tripped. ice forming on some models). Air conditioner cooling, but room is high. Dirty air filter - Window vibration - Relocate remote control or deactivate remote sensing. Air conditioner turns on in this list. Push plug firmly into wall outlet. Replace fuse with time delay type or reset circuit breaker. Compressor shut-off...
Installation Instructions
Page 1
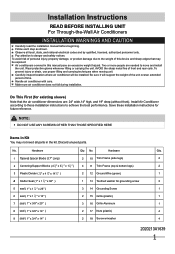
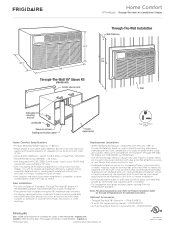
... time. Carefully inspect location where air conditioner will support the weight of the unit overan extended period of front and rear coils. NOTE: DO NOT USE ANY SCREWS OTHER THAN THOSE SPECIFIED HERE Items in the kit. Install Air Conditioner according to these installation instructions for grounding screw 2 5 seal ( 1" x 1 1 2 " x 25" ) 3 14 Grounding Screw 1 6 seal ( 1" x 1 1 2 " x 14" ) 2 15 Grille (plastic) 1 7 seal ( 1" x 3/8" x 25" ) 3 16 Grille Aluminum 1 8 seal ( 1" x 3/8" x 14...
... time. Carefully inspect location where air conditioner will support the weight of the unit overan extended period of front and rear coils. NOTE: DO NOT USE ANY SCREWS OTHER THAN THOSE SPECIFIED HERE Items in the kit. Install Air Conditioner according to these installation instructions for grounding screw 2 5 seal ( 1" x 1 1 2 " x 25" ) 3 14 Grounding Screw 1 6 seal ( 1" x 1 1 2 " x 14" ) 2 15 Grille (plastic) 1 7 seal ( 1" x 3/8" x 25" ) 3 16 Grille Aluminum 1 8 seal ( 1" x 3/8" x 14...
Installation Instructions
Page 2
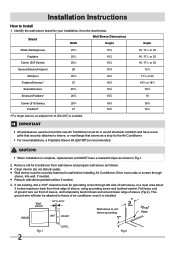
..., replacement unit MUST have a rear grille that serves as a stop for the Air Conditioner. Identify the wall-sleeve brand for grounding screw through sleeve, into wall, if needed . 3. This ground wire will later be securely fastened in Fig.1. 2. CAUTION: When installation is installed. Hole Fig.1 2 LEVEL Fig.2 Installation Instructions How to unit sleeve grounding Max. If not existing, drill a 3/16" clearance hole for your installation, from wall sleeve and prepare wall sleeve as shown in wall...
..., replacement unit MUST have a rear grille that serves as a stop for the Air Conditioner. Identify the wall-sleeve brand for grounding screw through sleeve, into wall, if needed . 3. This ground wire will later be securely fastened in Fig.1. 2. CAUTION: When installation is installed. Hole Fig.1 2 LEVEL Fig.2 Installation Instructions How to unit sleeve grounding Max. If not existing, drill a 3/16" clearance hole for your installation, from wall sleeve and prepare wall sleeve as shown in wall...
Installation Instructions
Page 3
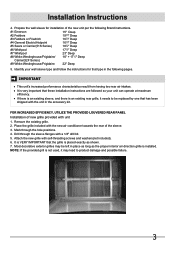
... new air conditioner towards the rear of the sleeve. 3. Remove the existing grille. 2. Drill through the hole positions. 4. It is VERY IMPORTANT that the grille is not used, it needs to product damage and possible failure. 3 It is very important that these installation instructions are followed so your wall sleeve type and follow the instructions for installation of new grille provided with unit 1. If there is an existing sleeve, and there is installed...
... new air conditioner towards the rear of the sleeve. 3. Remove the existing grille. 2. Drill through the hole positions. 4. It is VERY IMPORTANT that the grille is not used, it needs to product damage and possible failure. 3 It is very important that these installation instructions are followed so your wall sleeve type and follow the instructions for installation of new grille provided with unit 1. If there is an existing sleeve, and there is installed...

Installation Instructions
Page 4
... the opening. 6. Remove existing rear grille as shown on the last page of this manual and replace with provided louvered rear panel. Seal & Frame the unit as shown in flange of the sleeve. Before sliding all-the-way back, remove 2nd screw from the screw. 9. Attach(1)1" x 3/8" x 25" long seal in center of side wall with mounting the grill to the sleeve, follow the instructions for direct mounting...
... the opening. 6. Remove existing rear grille as shown on the last page of this manual and replace with provided louvered rear panel. Seal & Frame the unit as shown in flange of the sleeve. Before sliding all-the-way back, remove 2nd screw from the screw. 9. Attach(1)1" x 3/8" x 25" long seal in center of side wall with mounting the grill to the sleeve, follow the instructions for direct mounting...

Installation Instructions
Page 5
... the tapered end facing the opening. 3. Install as described on Page 3 of this manual and replace with the tapered end facing the back of side wall with mounting the grill to 14" long each side wall. Cut (2) 1" x 3/8" x 25" long seals to the sleeve, follow the instructions for direct mounting on base with provided louvered rear panel. Seal & Frame the unit as shown here. Place in...
... the tapered end facing the opening. 3. Install as described on Page 3 of this manual and replace with the tapered end facing the back of side wall with mounting the grill to 14" long each side wall. Cut (2) 1" x 3/8" x 25" long seals to the sleeve, follow the instructions for direct mounting on base with provided louvered rear panel. Seal & Frame the unit as shown here. Place in...

Installation Instructions
Page 6
... opening. 3. The 21 2" section is against the cabinet. 12. Seal & Frame the unit as described on Page 3 of side wall with mounting the grill to the sleeve, follow the instructions for direct mounting on each and attach to the unit as shown in picture. Attach (1) 1" x 3/8" x 25" long seal in front of the rib on base with provided louvered rear panel. Gently slide unit...
... opening. 3. The 21 2" section is against the cabinet. 12. Seal & Frame the unit as described on Page 3 of side wall with mounting the grill to the sleeve, follow the instructions for direct mounting on each and attach to the unit as shown in picture. Attach (1) 1" x 3/8" x 25" long seal in front of the rib on base with provided louvered rear panel. Gently slide unit...

Installation Instructions
Page 7
... on Page 3 of this manual and replace with provided louvered rear panel. Remove the backing paper and press into sleeve. 8. Remove existing rear grille as shown on the unit. 4. Cut (2) 1" x 3/8" x 25" long seals to 14" long each and attach to the sleeve, follow the instructions for direct mounting on Page 13. 7 Seal & Frame the unit as shown with mounting the grill to the vertical sections of...
... on Page 3 of this manual and replace with provided louvered rear panel. Remove the backing paper and press into sleeve. 8. Remove existing rear grille as shown on the unit. 4. Cut (2) 1" x 3/8" x 25" long seals to 14" long each and attach to the sleeve, follow the instructions for direct mounting on Page 13. 7 Seal & Frame the unit as shown with mounting the grill to the vertical sections of...

Installation Instructions
Page 8
... panel. Attach (1) 1" x 3/8" x 25" long seal in flange of the ground wire from front on the unit. 4. Make sure that the toothed washer is against the cabinet. 11. Remove existing rear grille as described on Page 13. 8 NOTE: You may need to the sleeve, follow the instructions for direct mounting on the last page of this manual and replace with mounting the grill to drill holes...
... panel. Attach (1) 1" x 3/8" x 25" long seal in flange of the ground wire from front on the unit. 4. Make sure that the toothed washer is against the cabinet. 11. Remove existing rear grille as described on Page 13. 8 NOTE: You may need to the sleeve, follow the instructions for direct mounting on the last page of this manual and replace with mounting the grill to drill holes...
Product Specifications Sheet
Page 1
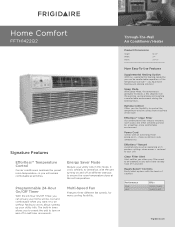
...; Temperature Control Our air conditioners maintain the preset room temperature, so you want it yourself. makes extension cords unnecessary. Energy Saver Mode Reduce your unit. Through-The-Wall Air Conditioner / Heater Product Dimensions Height Width Depth 14-1/2" 24" 20-1/2" More Easy-To-Use Features Supplemental Heating Option With our supplemental heating capability, you can ensure your home will be cool and comfortable when you will remain comfortable at all times. Sleep Mode With Sleep Mode...
...; Temperature Control Our air conditioners maintain the preset room temperature, so you want it yourself. makes extension cords unnecessary. Energy Saver Mode Reduce your unit. Through-The-Wall Air Conditioner / Heater Product Dimensions Height Width Depth 14-1/2" 24" 20-1/2" More Easy-To-Use Features Supplemental Heating Option With our supplemental heating capability, you can ensure your home will be cool and comfortable when you will remain comfortable at all times. Sleep Mode With Sleep Mode...
Product Specifications Sheet
Page 2
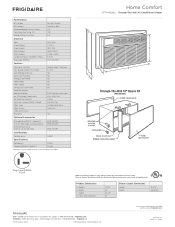
... 8.5 Electrical Volts Amps (Cool) Amps (Heat) Watts (Cool) Watts (Heat) Length of Power Cord (Min. / Max.) Plug Type (NEMA) 230 / 208 7.4 / 8.4 RAC 15.0 / 13.5 Through-The-Wall Models (18" SleA eve Kit EA 1,650 / 1,520 Frigidaire Baseline 3,450 / 2,800 5.5' / 6' LCDI (6-20P) Features Electronic Controls Fan Speeds (Cool / Fan / Heat) Ready-Select® Controls 3 / 3 / 3 B C Low Voltage Start-Up Yes Auto Cool Function Yes D Energy Saver Mode Yes Sleep Mode Yes Filter Check Yes 24-Hour On / Off Timer Yes Clean Air Ionizer Remote Control Full-Function with Heat Air...
... 8.5 Electrical Volts Amps (Cool) Amps (Heat) Watts (Cool) Watts (Heat) Length of Power Cord (Min. / Max.) Plug Type (NEMA) 230 / 208 7.4 / 8.4 RAC 15.0 / 13.5 Through-The-Wall Models (18" SleA eve Kit EA 1,650 / 1,520 Frigidaire Baseline 3,450 / 2,800 5.5' / 6' LCDI (6-20P) Features Electronic Controls Fan Speeds (Cool / Fan / Heat) Ready-Select® Controls 3 / 3 / 3 B C Low Voltage Start-Up Yes Auto Cool Function Yes D Energy Saver Mode Yes Sleep Mode Yes Filter Check Yes 24-Hour On / Off Timer Yes Clean Air Ionizer Remote Control Full-Function with Heat Air...
Product Specifications Sheet
Page 3
... buildings. Replacement Installation • When replacing existing air conditioner with new unit, refer to Product Installation Guide on web to change. Specifications subject to identify existing wall-sleeve manufacturer and size compatibility. Frigidaire Baseline Home Comfort FFTH1422Q2 Through-The-Wall Air Conditioner / Heater Plug Type (NEMA) 6-20P Home Comfort Specifications • Product Shipping Weight (approx.) - 86 Lbs. • Single phase 3-wire cable, 230 / 208 Volt, 60 Hertz AC only electrical supply with ground required on separate circuit fused on...
... buildings. Replacement Installation • When replacing existing air conditioner with new unit, refer to Product Installation Guide on web to change. Specifications subject to identify existing wall-sleeve manufacturer and size compatibility. Frigidaire Baseline Home Comfort FFTH1422Q2 Through-The-Wall Air Conditioner / Heater Plug Type (NEMA) 6-20P Home Comfort Specifications • Product Shipping Weight (approx.) - 86 Lbs. • Single phase 3-wire cable, 230 / 208 Volt, 60 Hertz AC only electrical supply with ground required on separate circuit fused on...


