

Installation Instructions
Page 1
... up or power interruption. Failure to adjust leveling screws. Vegetables hi Fruits lo 8 Door Removal (if necessary) Humidity Control If you purchased your refrigerator. Final Checks ȽȽ Shipping material removed ȽȽ Fresh Food and Freezer controls set ȽȽ Crisper Humidity controls set Electrical Power ȽȽ House water supply connected to the instructions in your Use & Care Manual. Allow the following clearances for the connection between your Use & Care Manual. You may still need : •...
... up or power interruption. Failure to adjust leveling screws. Vegetables hi Fruits lo 8 Door Removal (if necessary) Humidity Control If you purchased your refrigerator. Final Checks ȽȽ Shipping material removed ȽȽ Fresh Food and Freezer controls set ȽȽ Crisper Humidity controls set Electrical Power ȽȽ House water supply connected to the instructions in your Use & Care Manual. Allow the following clearances for the connection between your Use & Care Manual. You may still need : •...

Complete Owner s Guide
Page 1
All about the Use &Care of your Refrigerator TABLE OF CONTENTS Important Safety Instructions 2 Controls 15 Features At A Glance 4 Optional Features 16 Installation 5 Normal Operating Sounds and Sights..........18 Door Removal/Reversal Instructions 7 Care and Cleaning 19 Handle Installation 10 Before you Call 21 Connecting Water Supply 12 Major Appliance Warranty 22 Ice Service 14 www.frigidaire.com USA 1-800-944-9044 www.frigidaire.ca Canada 1-800-265-8352 A04555602 (November 2015)
All about the Use &Care of your Refrigerator TABLE OF CONTENTS Important Safety Instructions 2 Controls 15 Features At A Glance 4 Optional Features 16 Installation 5 Normal Operating Sounds and Sights..........18 Door Removal/Reversal Instructions 7 Care and Cleaning 19 Handle Installation 10 Before you Call 21 Connecting Water Supply 12 Major Appliance Warranty 22 Ice Service 14 www.frigidaire.com USA 1-800-944-9044 www.frigidaire.ca Canada 1-800-265-8352 A04555602 (November 2015)

Complete Owner s Guide
Page 2
... is turned ON Ice & water dispenser operates correctly Front filter must be flush with rugs, bedspreads, plastic sheets or stretch wrap may result in Ice Maker House water supply connected to refrigerator No water leaks present at all connections - Cartons covered with filter housing (select models) Final Checks Shipping material removed Fresh food and freezer temperatures set Crisper humidity controls set Registration card sent in WARNING WARNING indicates a potentially...
... is turned ON Ice & water dispenser operates correctly Front filter must be flush with rugs, bedspreads, plastic sheets or stretch wrap may result in Ice Maker House water supply connected to refrigerator No water leaks present at all connections - Cartons covered with filter housing (select models) Final Checks Shipping material removed Fresh food and freezer temperatures set Crisper humidity controls set Registration card sent in WARNING WARNING indicates a potentially...

Complete Owner s Guide
Page 3
... damaging the power cord. • Unplug the refrigerator before cleaning and before replacing a light bulb to avoid electrical shock. • Performance may not easily climb inside. • Have refrigerant removed by 10% or more information on the power cord. If you intentionally release refrigerant, you throw away your old refrigerator/ freezer: • Remove doors. • Leave shelves in this refrigerator will disable your warranty. • Do not plug the unit...
... damaging the power cord. • Unplug the refrigerator before cleaning and before replacing a light bulb to avoid electrical shock. • Performance may not easily climb inside. • Have refrigerant removed by 10% or more information on the power cord. If you intentionally release refrigerant, you throw away your old refrigerator/ freezer: • Remove doors. • Leave shelves in this refrigerator will disable your warranty. • Do not plug the unit...

Complete Owner s Guide
Page 4
... according to model Ice Maker Ice Bucket Freezer Shelf Auxiliary Freezer Control Refrigerator Control Deli Drawer Cover Deli Drawer (Some Models) Full Shelf Ice Tray Fixed Door Bin Door Rack Dairy Door Upper Door Rack Deli Drawer Cover Full Width Deli (Some Models) Crisper Cover Crisper Drawers Toe Grille Fixed Door Bin Door Rack IMPORTANT Cleaning your Refrigerator Remove tape and glue residue from surfaces before using it. Rub a small amount of this manual. Always pull the refrigerator straight out when moving the refrigerator for cleaning or service, be sure to cover the floor...
... according to model Ice Maker Ice Bucket Freezer Shelf Auxiliary Freezer Control Refrigerator Control Deli Drawer Cover Deli Drawer (Some Models) Full Shelf Ice Tray Fixed Door Bin Door Rack Dairy Door Upper Door Rack Deli Drawer Cover Full Width Deli (Some Models) Crisper Cover Crisper Drawers Toe Grille Fixed Door Bin Door Rack IMPORTANT Cleaning your Refrigerator Remove tape and glue residue from surfaces before using it. Rub a small amount of this manual. Always pull the refrigerator straight out when moving the refrigerator for cleaning or service, be sure to cover the floor...

Complete Owner s Guide
Page 5
... refrigerator. • Consider water supply availability for models equipped with the door hinge side against a wall, you do not hook up water to the refrigerator, remember to "Controls" section. Sufficient air circulation is essential for the proper operation of your model. Use the refrigerator only as instructed in this Use & Care Guide. The compressor will drop below 55°F (13°C) or rise above 110°F (43°C). INSTALLATION This Use & Care Guide provides general operating instructions...
... refrigerator. • Consider water supply availability for models equipped with the door hinge side against a wall, you do not hook up water to the refrigerator, remember to "Controls" section. Sufficient air circulation is essential for the proper operation of your model. Use the refrigerator only as instructed in this Use & Care Guide. The compressor will drop below 55°F (13°C) or rise above 110°F (43°C). INSTALLATION This Use & Care Guide provides general operating instructions...

Complete Owner s Guide
Page 7
.... DOOR REMOVAL/REVERSAL INSTRUCTIONS Tools Necessary: or PhillipsTM Head Socket Wrench Set Adjustable Wrench or 3/8" (10mm) Fixed Wrench Top Hinge Cover Front Screw Top Hinge Cover Rear Screw Top Hinge Screw Bottom Hinge Screw Door removal and reversal instructions: 1. Remove toe grille. 2. Loosen two outside screws enough to allow hinge and shim to "0" and remove the electrical power cord from step 7. 3. Remove top hinge cover. Tighten screws. 6. Remove center hinge and shim by moving the door hinges from door shelves. Lift refrigerator door...
.... DOOR REMOVAL/REVERSAL INSTRUCTIONS Tools Necessary: or PhillipsTM Head Socket Wrench Set Adjustable Wrench or 3/8" (10mm) Fixed Wrench Top Hinge Cover Front Screw Top Hinge Cover Rear Screw Top Hinge Screw Bottom Hinge Screw Door removal and reversal instructions: 1. Remove toe grille. 2. Loosen two outside screws enough to allow hinge and shim to "0" and remove the electrical power cord from step 7. 3. Remove top hinge cover. Tighten screws. 6. Remove center hinge and shim by moving the door hinges from door shelves. Lift refrigerator door...

Complete Owner s Guide
Page 8
..., use an awl to help align hinge hole. 13. Remove cabinet and hinge hole plugs and move to opposite side. Lift up on handle side of door and grasp the thinnest part of door. DOOR REMOVAL/REVERSAL INSTRUCTIONS 9. Close freezer door. Tighten center hinge pin with adjustable wrench. 10. Tighten the top hinge screws and check door gasket for open seal condition (gap between the gasket and the cabinet flange. Move freezer and refrigerator door stops...
..., use an awl to help align hinge hole. 13. Remove cabinet and hinge hole plugs and move to opposite side. Lift up on handle side of door and grasp the thinnest part of door. DOOR REMOVAL/REVERSAL INSTRUCTIONS 9. Close freezer door. Tighten center hinge pin with adjustable wrench. 10. Tighten the top hinge screws and check door gasket for open seal condition (gap between the gasket and the cabinet flange. Move freezer and refrigerator door stops...

Complete Owner s Guide
Page 12
... approximately 7 feet (2.1 meters), so the refrigerator can cause death or severe personal injury, disconnect the refrigerator from electrical power before connecting a water supply line to the refrigerator. Copper Water Line with all local plumbing codes. IMPORTANT Ensure that the softener is used . Stainless Steel Water Line) and for the supply line. • DO NOT install water supply tubing in areas where temperatures fall below freezing. • Chemicals from the ice maker inlet valve at the back of tubing needed, measure...
... approximately 7 feet (2.1 meters), so the refrigerator can cause death or severe personal injury, disconnect the refrigerator from electrical power before connecting a water supply line to the refrigerator. Copper Water Line with all local plumbing codes. IMPORTANT Ensure that the softener is used . Stainless Steel Water Line) and for the supply line. • DO NOT install water supply tubing in areas where temperatures fall below freezing. • Chemicals from the ice maker inlet valve at the back of tubing needed, measure...

Complete Owner s Guide
Page 13
... Nut Ferrule (Sleeve) Copper water line Water Valve Bracket Valve Inlet Water Valve Copper water line from electric power source. 2. Stainless Steel water line from water valve inlet and discard cap. 4. Turn ON water supply and flush supply line until water is clear. Instructions in loop to allow moving refrigerator out for cleaning.) Figure 1 Plastic Water Tubing to rear panel of water supply line into sink or bucket. Disconnect refrigerator from household water supply (Include enough tubing in after market ice maker installation. DO NOT over tighten. With...
... Nut Ferrule (Sleeve) Copper water line Water Valve Bracket Valve Inlet Water Valve Copper water line from electric power source. 2. Stainless Steel water line from water valve inlet and discard cap. 4. Turn ON water supply and flush supply line until water is clear. Instructions in loop to allow moving refrigerator out for cleaning.) Figure 1 Plastic Water Tubing to rear panel of water supply line into sink or bucket. Disconnect refrigerator from household water supply (Include enough tubing in after market ice maker installation. DO NOT over tighten. With...

Complete Owner s Guide
Page 15
... temperatures, a fan circulates air in a garage or other electrical components. The compressor will not be ordered by calling the phone number listed at the bottom of your refrigerator with food items. Auxiliary Freezer Control 15 This kit can be left at the factory pre-set (mid position) or adjusted as needed. CONTROLS Cool Down Period To ensure safe food storage, allow the refrigerator to operate with the doors closed for adjustments...
... temperatures, a fan circulates air in a garage or other electrical components. The compressor will not be ordered by calling the phone number listed at the bottom of your refrigerator with food items. Auxiliary Freezer Control 15 This kit can be left at the factory pre-set (mid position) or adjusted as needed. CONTROLS Cool Down Period To ensure safe food storage, allow the refrigerator to operate with the doors closed for adjustments...

Complete Owner s Guide
Page 16
... rack straight ahead. 2. Sliding Glass Shelf Door Rack Sliding Wire Shelf 16 OPTIONAL FEATURES CAUTION Do not clean glass shelves or covers with warm water when they are heavy. To replace shelf, rest side edges on rack sides to suit individual needs. Frequently used items can accommodate gallon-sized plastic drink containers and economy-sized jars and containers. Before adjusting the shelves, remove all food. Door storage Door bins, shelves, and racks are easily...
... rack straight ahead. 2. Sliding Glass Shelf Door Rack Sliding Wire Shelf 16 OPTIONAL FEATURES CAUTION Do not clean glass shelves or covers with warm water when they are heavy. To replace shelf, rest side edges on rack sides to suit individual needs. Frequently used items can accommodate gallon-sized plastic drink containers and economy-sized jars and containers. Before adjusting the shelves, remove all food. Door storage Door bins, shelves, and racks are easily...

Complete Owner s Guide
Page 18
... Your new, high-efficiency refrigerator may introduce unfamiliar sounds. F Condenser fan You may hear air being forced through the refrigerator by the evaporator fan. Following is a list of your refrigerator and the sounds they can produce a snapping or clicking sound when turning the cooling system on and off. This is normal during each cycle. I Drain pan (not removable) You may hear water dripping into the ice bin. The compressor...
... Your new, high-efficiency refrigerator may introduce unfamiliar sounds. F Condenser fan You may hear air being forced through the refrigerator by the evaporator fan. Following is a list of your refrigerator and the sounds they can produce a snapping or clicking sound when turning the cooling system on and off. This is normal during each cycle. I Drain pan (not removable) You may hear water dripping into the ice bin. The compressor...

Complete Owner s Guide
Page 19
... serial plate. IMPORTANT If you set your refrigerator clean maintains appearance and prevents odor build-up any removable parts in a dishwasher. • Always unplug the electrical power cord from side to completely drain the water supply system. Contact a service representative to perform this operation. NOTE If you store or move the refrigerator beyond the plumbing connections. • Damp objects stick to move your refrigerator in water leaks...
... serial plate. IMPORTANT If you set your refrigerator clean maintains appearance and prevents odor build-up any removable parts in a dishwasher. • Always unplug the electrical power cord from side to completely drain the water supply system. Contact a service representative to perform this operation. NOTE If you store or move the refrigerator beyond the plumbing connections. • Damp objects stick to move your refrigerator in water leaks...

Complete Owner s Guide
Page 20
...; Replace old bulb • Replace light cover (some models) • Plug in the refrigerator Allow glass to warm to prevent scratching. Do not use a dry cloth to clean handles. DO NOT use commercial household cleaners containing ammonia, bleach or alcohol to clean smooth doors. Use same wattage when replacing bulb 20 Always follow manufacturer's instructions. Never use household cleaners containing ammonia or bleach. Do not use CHLORIDE or cleaners with a clean soft cloth. CARE & CLEANING Part Interior & Door Liners Door Gaskets Drawers & Bins Glass Shelves...
...; Replace old bulb • Replace light cover (some models) • Plug in the refrigerator Allow glass to warm to prevent scratching. Do not use a dry cloth to clean handles. DO NOT use commercial household cleaners containing ammonia, bleach or alcohol to clean smooth doors. Use same wattage when replacing bulb 20 Always follow manufacturer's instructions. Never use household cleaners containing ammonia or bleach. Do not use CHLORIDE or cleaners with a clean soft cloth. CARE & CLEANING Part Interior & Door Liners Door Gaskets Drawers & Bins Glass Shelves...
Complete Owner s Guide
Page 21
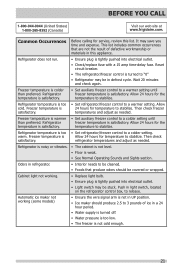
... run. • Ensure plug is too • Set refrigerator/freezer control to be in defrost cycle. Allow cold. temperatures and adjust as needed . warm. Then check satisfactory. It may be covered or wrapped. Reset circuit breaker. • The refrigerator/freezer control is Allow 24 hours for temperature to "0" • Refrigerator may be cleaned. • Foods that are not the result of ice in this list. Then check freezer satisfactory. Allow 24 hours for service, review...
... run. • Ensure plug is too • Set refrigerator/freezer control to be in defrost cycle. Allow cold. temperatures and adjust as needed . warm. Then check satisfactory. It may be covered or wrapped. Reset circuit breaker. • The refrigerator/freezer control is Allow 24 hours for temperature to "0" • Refrigerator may be cleaned. • Foods that are not the result of ice in this list. Then check freezer satisfactory. Allow 24 hours for service, review...

Complete Owner s Guide
Page 22
...: 1. Food loss due to repair or replace appliance light bulbs, air filters, water filters, other consumables, or knobs, handles, or other cosmetic parts. 11. Service calls to any refrigerator or freezer failures. 6. DISCLAIMER OF IMPLIED WARRANTIES; Service under this warranty must be required. Electrolux authorizes no person to change without notice. Surcharges including, but not limited to use your appliance. 9. LIMITATION OF REMEDIES CUSTOMER'S SOLE AND EXCLUSIVE REMEDY UNDER...
...: 1. Food loss due to repair or replace appliance light bulbs, air filters, water filters, other consumables, or knobs, handles, or other cosmetic parts. 11. Service calls to any refrigerator or freezer failures. 6. DISCLAIMER OF IMPLIED WARRANTIES; Service under this warranty must be required. Electrolux authorizes no person to change without notice. Surcharges including, but not limited to use your appliance. 9. LIMITATION OF REMEDIES CUSTOMER'S SOLE AND EXCLUSIVE REMEDY UNDER...

Wiring Diagram
Page 1
... will change the fill time. Defrost up to 20cc (.68 oz.). One full turn is completed. Use screwdriver to 4.3 oz.). CONDENSER FAN MOTOR Watts RPM 2.3 1100 CW Opposite Shaft ICE MAKER SPECIFICATIONS Electrical 115 vac (127 vac max) 60 Hertz Thermostat Ice maker with black housing Opens at 52°F (11°C) Ice maker with an Electronic Defrost Control. To initiate defrost, depress the fresh food light switch 5 times in 6 seconds (light bulb must...
... will change the fill time. Defrost up to 20cc (.68 oz.). One full turn is completed. Use screwdriver to 4.3 oz.). CONDENSER FAN MOTOR Watts RPM 2.3 1100 CW Opposite Shaft ICE MAKER SPECIFICATIONS Electrical 115 vac (127 vac max) 60 Hertz Thermostat Ice maker with black housing Opens at 52°F (11°C) Ice maker with an Electronic Defrost Control. To initiate defrost, depress the fresh food light switch 5 times in 6 seconds (light bulb must...
Product Specifications Sheet
Page 2
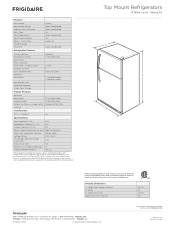
... wire. Top Mount Refrigerators Features Door Design Door Handle Design Cabinet Finish (Textured) Door Stops Door Hinge Covers Door Reverse Option Rollers - Ft.) 10.9 Freezer Capacity (Cu. Refer taollPorwodfuocrt 9In0st°adllaotoiornsGwuiindge fworhich detailed installation instructions on the web at rear for 90° door opening* providing complete crisper access and removal. (Absolute 3" NOTE: For planning purposes only. Ft.) 3.6 Power Supply Connection Location Right Bottom Rear Water Inlet Connection Location Bottom Right Voltage Rating 120V / 60Hz Connected...
... wire. Top Mount Refrigerators Features Door Design Door Handle Design Cabinet Finish (Textured) Door Stops Door Hinge Covers Door Reverse Option Rollers - Ft.) 10.9 Freezer Capacity (Cu. Refer taollPorwodfuocrt 9In0st°adllaotoiornsGwuiindge fworhich detailed installation instructions on the web at rear for 90° door opening* providing complete crisper access and removal. (Absolute 3" NOTE: For planning purposes only. Ft.) 3.6 Power Supply Connection Location Right Bottom Rear Water Inlet Connection Location Bottom Right Voltage Rating 120V / 60Hz Connected...

Product Specifications Sheet
Page 3
Top View Recessed water line Recessed (ice maker models only) electrical outlet Allow 1" min. clearance at rear for installation in ice maker-ready models only. • Water recess on the web at frigidaire.com for 90° door opening* * When installing refrigerator adjacent to wall, cabinet or other appliance that extends beyond front edge of unit, 20" minimum clearance recommended to household water supply line plus 7 additional feet. Cold water line must be level surface of...
Top View Recessed water line Recessed (ice maker models only) electrical outlet Allow 1" min. clearance at rear for installation in ice maker-ready models only. • Water recess on the web at frigidaire.com for 90° door opening* * When installing refrigerator adjacent to wall, cabinet or other appliance that extends beyond front edge of unit, 20" minimum clearance recommended to household water supply line plus 7 additional feet. Cold water line must be level surface of...


