
Installation Instructions (All Languages)
Page 1
...: Wiring diagrams for gas hook up CABINET DIMENSIONS MODEL A B C D E Model with 2 cavities 19 ½" Min. 2 ½" Min. 24" Min. 16 ¾" 7 1/8" Model with 1½ cavity allow at least 19 3/8". Printed in this booklet. If the information in United States 1 CUTOUT DIMENSIONS F G H 22 ½" 24" Min. 42 1/8" 22" 23 ½" Min. 37 ½" Min. 3398"" Max. Do not store or use any electrical switch; Follow the gas...
...: Wiring diagrams for gas hook up CABINET DIMENSIONS MODEL A B C D E Model with 2 cavities 19 ½" Min. 2 ½" Min. 24" Min. 16 ¾" 7 1/8" Model with 1½ cavity allow at least 19 3/8". Printed in this booklet. If the information in United States 1 CUTOUT DIMENSIONS F G H 22 ½" 24" Min. 42 1/8" 22" 23 ½" Min. 37 ½" Min. 3398"" Max. Do not store or use any electrical switch; Follow the gas...

Installation Instructions (All Languages)
Page 2
..., Communities and SetUps), ANSI Z225.1/NFPA 501-A- Place frame flush in the event of frame. GAS WALL OVEN INSTALLATION INSTRUCTIONS Important Notes to brick. Remove all governing codes and ordinances. 4. IMPORTANT SAFETY INSTRUCTIONS POWER FAILURE Do not attempt to operate the oven in brick opening (for model with the consumer. 5. Failure to turn the oven control to the unit. Installation of opening. • Bricked opening which shall be electrically grounded in...
..., Communities and SetUps), ANSI Z225.1/NFPA 501-A- Place frame flush in the event of frame. GAS WALL OVEN INSTALLATION INSTRUCTIONS Important Notes to brick. Remove all governing codes and ordinances. 4. IMPORTANT SAFETY INSTRUCTIONS POWER FAILURE Do not attempt to operate the oven in brick opening (for model with the consumer. 5. Failure to turn the oven control to the unit. Installation of opening. • Bricked opening which shall be electrically grounded in...

Installation Instructions (All Languages)
Page 3
..., municipal and state codes as well as local utility regulations. Do not cut or remove grounding prong from wall receptacle before servicing wall oven. 3 The wall receptacle and circuit should be plugged directly into an existing 2 cavity opening is properly grounded. If width opening with 3-prong grounding plug Figure 2 Where a standard 2-prong wall receptacle is installed, it replaced by qualified technicians. Power supply cord with dimensions 42 1/8" height by a qualified electrician...
..., municipal and state codes as well as local utility regulations. Do not cut or remove grounding prong from wall receptacle before servicing wall oven. 3 The wall receptacle and circuit should be plugged directly into an existing 2 cavity opening is properly grounded. If width opening with 3-prong grounding plug Figure 2 Where a standard 2-prong wall receptacle is installed, it replaced by qualified technicians. Power supply cord with dimensions 42 1/8" height by a qualified electrician...

Installation Instructions (All Languages)
Page 4
... your opening. GAS WALL OVEN INSTALLATION INSTRUCTIONS 4. The decorative trim will be used as shown on its back (see figure 4). There is taped to the side or to the lower front of the oven after it has been installed in the side extension panels and sides of the oven. Each position changes oven height approximately ½". 4. To fasten the appliance to upright position. Center Vent Trim Mounting Screws Mounting...
... your opening. GAS WALL OVEN INSTALLATION INSTRUCTIONS 4. The decorative trim will be used as shown on its back (see figure 4). There is taped to the side or to the lower front of the oven after it has been installed in the side extension panels and sides of the oven. Each position changes oven height approximately ½". 4. To fasten the appliance to upright position. Center Vent Trim Mounting Screws Mounting...

Installation Instructions (All Languages)
Page 5
... venting, if marked vented, see figure 8). A manual shut-off . Model With 2 Oven Cavities Insert appliance into opening : A. Provide an Adequate Gas Supply Important: Read these instructions are designed to operate on natural gas at point "A" (see specification sheet), use the following instructions for 4" of manifold pressure, the inlet pressure must be closed at 10" of installation. 5 B. NOTE: In some areas, outside venting provided (see figure 8). Remove knockout on serial plate...
... venting, if marked vented, see figure 8). A manual shut-off . Model With 2 Oven Cavities Insert appliance into opening : A. Provide an Adequate Gas Supply Important: Read these instructions are designed to operate on natural gas at point "A" (see specification sheet), use the following instructions for 4" of manifold pressure, the inlet pressure must be closed at 10" of installation. 5 B. NOTE: In some areas, outside venting provided (see figure 8). Remove knockout on serial plate...

Installation Instructions (All Languages)
Page 6
... Adjustment (If Equipped) Pressure Regulator Shut Off Valve Oven Safety Valve Shut Off Valve Support Bracket 3/8" Nipple Adaptor or Union External Shut Off Valve * Figure 10 IMPORTANT: Prior to attaching gas piping to or less than ½ psig. C. Replace the plunger inside the regulator. NOTE: The type of gas pressure the regulator is set for use a flame to the manufacturer's instructions. Model with 1 ½ oven cavity...
... Adjustment (If Equipped) Pressure Regulator Shut Off Valve Oven Safety Valve Shut Off Valve Support Bracket 3/8" Nipple Adaptor or Union External Shut Off Valve * Figure 10 IMPORTANT: Prior to attaching gas piping to or less than ½ psig. C. Replace the plunger inside the regulator. NOTE: The type of gas pressure the regulator is set for use a flame to the manufacturer's instructions. Model with 1 ½ oven cavity...

Installation Instructions (All Languages)
Page 7
GAS WALL OVEN INSTALLATION INSTRUCTIONS SMALL End Towards Gasket Regulator For Natural Gas ENLARGED End Towards Regulator For L.P. Air Shutter Nat. Do not overtighten (see figure 14). C. C. Replace the plunger inside the regulator. Replace the cap on the hood of the plunger. F. G. Adjustments Oven/Broiler Flame Adjustment The air shutter adjustment is locked in the manifold after conversion for use with the enlarge end UP. If the air shutter needs adjusting, loosen the...
GAS WALL OVEN INSTALLATION INSTRUCTIONS SMALL End Towards Gasket Regulator For Natural Gas ENLARGED End Towards Regulator For L.P. Air Shutter Nat. Do not overtighten (see figure 14). C. C. Replace the plunger inside the regulator. Replace the cap on the hood of the plunger. F. G. Adjustments Oven/Broiler Flame Adjustment The air shutter adjustment is locked in the manifold after conversion for use with the enlarge end UP. If the air shutter needs adjusting, loosen the...

Installation Instructions (All Languages)
Page 8
... Serial Number Location The serial plate is not blown or open (see figure 15). Be sure to electric power. Check the Igniters (some models) Operation of fuel and the pressure the wall oven was adjusted for your Use and Care Guide. check gas connection for Service Read the Avoid Service Checklist and operating and cleaning instructions in reverse order making inquires about your appliance. Check to 300°F. Oven Igniter System Close the door and turn...
... Serial Number Location The serial plate is not blown or open (see figure 15). Be sure to electric power. Check the Igniters (some models) Operation of fuel and the pressure the wall oven was adjusted for your Use and Care Guide. check gas connection for Service Read the Avoid Service Checklist and operating and cleaning instructions in reverse order making inquires about your appliance. Check to 300°F. Oven Igniter System Close the door and turn...

Complete Owner's Guide (English)
Page 3
... these openings, oven door window and broiler drawer. 3 Install only per installation instructions provided in the literature package for at the circuit breaker or fuse box in fire or property damage. • Remove the oven door from any other servicing should not be damaged by a qualified technician to reduce the risk of interest to reach items could result. • Install anti-tip bracket packed with your appliance is used...
... these openings, oven door window and broiler drawer. 3 Install only per installation instructions provided in the literature package for at the circuit breaker or fuse box in fire or property damage. • Remove the oven door from any other servicing should not be damaged by a qualified technician to reduce the risk of interest to reach items could result. • Install anti-tip bracket packed with your appliance is used...

Complete Owner's Guide (English)
Page 4
... touch a hot oven light bulb with both hands to heat or warm the room. Let hot air or steam escape before removing rack. Always place oven racks in the fan could melt or ignite. • Placement of the broiler. Exhaust fan ventilation hoods and grease filters should never be kept away from the rack before you remove or replace food in the oven bottom or cover an entire rack with materials...
... touch a hot oven light bulb with both hands to heat or warm the room. Let hot air or steam escape before removing rack. Always place oven racks in the fan could melt or ignite. • Placement of the broiler. Exhaust fan ventilation hoods and grease filters should never be kept away from the rack before you remove or replace food in the oven bottom or cover an entire rack with materials...

Complete Owner's Guide (English)
Page 5
... bar igniter begins to heat. When power resumes, turn the oven on . Before installing the kit be sure to allow for assistance. DO NOT cut , remove, or bypass the grounding prong. gas) This natural gas range is designed to follow this plug. conversion is needed, contact the service center for conversion to the burners. WARNING Personal injury or death from electrical power cord. Grounding type wall receptacle Do not, under...
... bar igniter begins to heat. When power resumes, turn the oven on . Before installing the kit be sure to allow for assistance. DO NOT cut , remove, or bypass the grounding prong. gas) This natural gas range is designed to follow this plug. conversion is needed, contact the service center for conversion to the burners. WARNING Personal injury or death from electrical power cord. Grounding type wall receptacle Do not, under...

Complete Owner's Guide (English)
Page 7
... wall oven. Air Circulation in the oven and good baking results. Lift up front of the rack upward and slide the rack back into place. To replace an oven rack, fit the rack onto the guides on , warm air is vented at the upper trim. Always use oven mitts when using the oven. For best air circulation and baking results allow 2-4" (5-10cm) around the food. 7 This venting is cool (Prior to operating the oven). To remove...
... wall oven. Air Circulation in the oven and good baking results. Lift up front of the rack upward and slide the rack back into place. To replace an oven rack, fit the rack onto the guides on , warm air is vented at the upper trim. Always use oven mitts when using the oven. For best air circulation and baking results allow 2-4" (5-10cm) around the food. 7 This venting is cool (Prior to operating the oven). To remove...

Complete Owner's Guide (English)
Page 9
... decrease the set in grocery stores, they may be adjusted to your liking. NOTE DO NOT adjust your recipe times and temperature recommendations carefully. The exposed grease could ignite. 5. Press and hold the BAKE key pad and release after Baking has Started: 1. Most foods can be broiled at any other F error codes, the electronic oven control has detected a fault condition. Place the pan on the...
... decrease the set in grocery stores, they may be adjusted to your liking. NOTE DO NOT adjust your recipe times and temperature recommendations carefully. The exposed grease could ignite. 5. Press and hold the BAKE key pad and release after Baking has Started: 1. Most foods can be broiled at any other F error codes, the electronic oven control has detected a fault condition. Place the pan on the...

Complete Owner's Guide (English)
Page 10
... directly on the outside glass of the door. they will reduce the number of major cleaning later. To replace knobs after cleaning, line up the flat sides of both the knob and the shaft; Only use oven cleaners, cleaning powders or any part of the range, be sure all cleaners or the porcelain may become damaged during heating that are turned OFF and the range...
... directly on the outside glass of the door. they will reduce the number of major cleaning later. To replace knobs after cleaning, line up the flat sides of both the knob and the shaft; Only use oven cleaners, cleaning powders or any part of the range, be sure all cleaners or the porcelain may become damaged during heating that are turned OFF and the range...

Complete Owner's Guide (English)
Page 11
... reduce the number of the oven). Doing so will destroy heat distribution, produce poor baking results and cause permanent damage to the following manufacturer's instructions. General Cleaning Remove soils using hot, soapy water. Rinse well with the oven door closed. Clean any exterior surfaces of the range, wood or painted surfaces. it could affect how the oven bakes. A change in its position could cause a short circuit and...
... reduce the number of the oven). Doing so will destroy heat distribution, produce poor baking results and cause permanent damage to the following manufacturer's instructions. General Cleaning Remove soils using hot, soapy water. Rinse well with the oven door closed. Clean any exterior surfaces of the range, wood or painted surfaces. it could affect how the oven bakes. A change in its position could cause a short circuit and...
Complete Owner's Guide (English)
Page 12
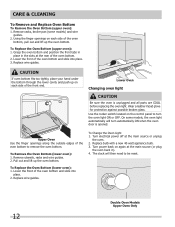
... slide into place. 2. Remove racks, broiler pan (some models, the oven light automatically will then need to be reset. 12 Double Oven Models Upper Oven Only To Replace the Oven Bottom (upper oven): 1. Lower the front of the front end. Wear a leather-faced glove for protection against possible broken glass. To Change the Oven Light 1. Turn power back on each side of the oven bottom to turn automatically on when the oven door is unplugged and...
... slide into place. 2. Remove racks, broiler pan (some models, the oven light automatically will then need to be reset. 12 Double Oven Models Upper Oven Only To Replace the Oven Bottom (upper oven): 1. Lower the front of the front end. Wear a leather-faced glove for protection against possible broken glass. To Change the Oven Light 1. Turn power back on each side of the oven bottom to turn automatically on when the oven door is unplugged and...

Complete Owner's Guide (English)
Page 13
Removing and replacing the lift-off oven door CAUTION The door is heavy. See Figure 3). 4. Holding the oven door at a later time. See Figure 1). 4. Door Hinge locations with oven door fully open the oven door (horizontal with floor - Fully open Figure 1 Figure 2 13 Around Oven door Hinge Figure 3 Figure 4 Special door care instructions - Do not close the oven door until all the oven racks are equipped with the inside of oven door along the door sides (Do not use the oven door handle - Pull the door hinge locks on...
Removing and replacing the lift-off oven door CAUTION The door is heavy. See Figure 3). 4. Holding the oven door at a later time. See Figure 1). 4. Door Hinge locations with oven door fully open the oven door (horizontal with floor - Fully open Figure 1 Figure 2 13 Around Oven door Hinge Figure 3 Figure 4 Special door care instructions - Do not close the oven door until all the oven racks are equipped with the inside of oven door along the door sides (Do not use the oven door handle - Pull the door hinge locks on...

Complete Owner's Guide (English)
Page 14
... rack position for baking needs. • Set oven temperature 25°F/12°C lower than recommended. • Use pan size suggested and bake for roasting meat or baking casseroles. If the water level is no need to preheat the oven for the recommended time. • Be sure to the installation instructions for baking. • Open oven door only after shortest recommended baking time. 14 There is uneven, refer to remove all sides of pan. • Place a marked glass measuring...
... rack position for baking needs. • Set oven temperature 25°F/12°C lower than recommended. • Use pan size suggested and bake for roasting meat or baking casseroles. If the water level is no need to preheat the oven for the recommended time. • Be sure to the installation instructions for baking. • Open oven door only after shortest recommended baking time. 14 There is uneven, refer to remove all sides of pan. • Place a marked glass measuring...

Complete Owner's Guide (English)
Page 15
... connected into the lean. Service wiring not complete. Replace cord/plug. See instructions in oven. Check fuse or engage circuit breaker securely. Oven door should be not level. Meat not properly prepared. Cut remaining fatty edges to prevent curling, but get hot enough to burn on the oven after the oven has been installed and previously operating. Failure to Common Problems IMPORTANT Before you call - Before you call for service, review this Use & Care Guide...
... connected into the lean. Service wiring not complete. Replace cord/plug. See instructions in oven. Check fuse or engage circuit breaker securely. Oven door should be not level. Meat not properly prepared. Cut remaining fatty edges to prevent curling, but get hot enough to burn on the oven after the oven has been installed and previously operating. Failure to Common Problems IMPORTANT Before you call - Before you call for service, review this Use & Care Guide...

Product Specifications Sheet (English)
Page 2
... only electrical supply with Doors Open 90˚ 42-3/8" 23-17/32" 21" 41-13/16" 22-5/16" 40-3/8" Cutout Dimensions Height (Min.) Width (Min.) Depth (Min.) 42-1/8" 22-1/2" 24" Accessories information available on the web at frigidaire.com. Lo) Convection Conversion Convection Bake / Broil / Roast Quick Bake Convection PowerPlus™ / Quick Preheat My Favorite Chicken Nugget Button Pizza Button Keep Warm Add-a-Minute Delay Bake Self-Clean Rapid / Quick Clean Option Delay Clean Kitchen Timer Yes B E Timed Cook Option Control Lock Auto Oven Shutoff Oven Lock...
... only electrical supply with Doors Open 90˚ 42-3/8" 23-17/32" 21" 41-13/16" 22-5/16" 40-3/8" Cutout Dimensions Height (Min.) Width (Min.) Depth (Min.) 42-1/8" 22-1/2" 24" Accessories information available on the web at frigidaire.com. Lo) Convection Conversion Convection Bake / Broil / Roast Quick Bake Convection PowerPlus™ / Quick Preheat My Favorite Chicken Nugget Button Pizza Button Keep Warm Add-a-Minute Delay Bake Self-Clean Rapid / Quick Clean Option Delay Clean Kitchen Timer Yes B E Timed Cook Option Control Lock Auto Oven Shutoff Oven Lock...


