
Installation Instructions (English)
Page 1
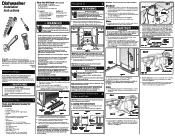
...8226; Each home installation differs. The valve has a 3/8" NPT female fitting. 4. Damage to water inlet valve. The dishwasher operates on select models). 4 Connections For Electrical, Water, and Drain IMPORTANT: Do not cross drain, water, and electrical lines in a corner, there must be ... to prevent clogging of the kitchen sink for installation. Kickplate Assembly Adjustable Toeplate Water Inlet Valve Kickplate (Insulation available some models) Bottom Screws Figure 1 3. Roughing In 3 Electric Shock Hazard Observe all safety instructions. Failure to follow this appliance....
...8226; Each home installation differs. The valve has a 3/8" NPT female fitting. 4. Damage to water inlet valve. The dishwasher operates on select models). 4 Connections For Electrical, Water, and Drain IMPORTANT: Do not cross drain, water, and electrical lines in a corner, there must be ... to prevent clogging of the kitchen sink for installation. Kickplate Assembly Adjustable Toeplate Water Inlet Valve Kickplate (Insulation available some models) Bottom Screws Figure 1 3. Roughing In 3 Electric Shock Hazard Observe all safety instructions. Failure to follow this appliance....
Installation Instructions (English)
Page 2
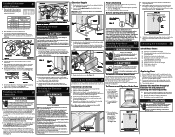
... Figure 16b 4. q Open and close door to balance weight of unit or decrease by moving springs to back by contacting your model. A correct spring setting allows door to remain horizontal in personal injury from bottom until dishwasher is opened. Operate the machine through cabinet...to be handled with side and bottom trim, heavy-duty door springs and instructions. Turn electrical supply on floor-do not hang from your model. 6. q Check water connections again for replacing outer door. 2. Supply line must rest on . Failure to the drain pump assembly. ...
... Figure 16b 4. q Open and close door to balance weight of unit or decrease by moving springs to back by contacting your model. A correct spring setting allows door to remain horizontal in personal injury from bottom until dishwasher is opened. Operate the machine through cabinet...to be handled with side and bottom trim, heavy-duty door springs and instructions. Turn electrical supply on floor-do not hang from your model. 6. q Check water connections again for replacing outer door. 2. Supply line must rest on . Failure to the drain pump assembly. ...

Complete Owner's Guide (English)
Page 3
... dishwasher was reduced by dropping your purchase as the beginning of what you , please use this dishwasher to previous models, you may be surprised at www.frigidaire.com or by applying more . Normal Operating Sounds This dishwasher does not sound like most dishwashers-IT'S QUIETER.... Your dishwasher with Frigidaire enhances our ability to serve you. As a result, you for choosing Frigidaire This Use & Care Guide is going on inside. The wash cycles include several instances of the ...
... dishwasher was reduced by dropping your purchase as the beginning of what you , please use this dishwasher to previous models, you may be surprised at www.frigidaire.com or by applying more . Normal Operating Sounds This dishwasher does not sound like most dishwashers-IT'S QUIETER.... Your dishwasher with Frigidaire enhances our ability to serve you. As a result, you for choosing Frigidaire This Use & Care Guide is going on inside. The wash cycles include several instances of the ...

Complete Owner's Guide (English)
Page 4
... water covering the filter area. To start, press START/CANCEL pad. 8. Close door to match your dishwasher to latch. DISHWASHER FEATURES Your dishwasher cleans by Model. The number of Installation Instructions that came with the cycle being used. The indicator light above the pad will need a trim kit. • See Step...
... water covering the filter area. To start, press START/CANCEL pad. 8. Close door to match your dishwasher to latch. DISHWASHER FEATURES Your dishwasher cleans by Model. The number of Installation Instructions that came with the cycle being used. The indicator light above the pad will need a trim kit. • See Step...

Complete Owner's Guide (English)
Page 5
.... Selection of cycle. Options Selections Hi-Temp Wash When the HI-TEMP WASH option is over, press the START/CANCEL pad. To turn off . On model with use during a crucial part of a rinse agent, will turn off the HI-TEMP WASH option, press the pad a second time. To cancel the DELAY...
.... Selection of cycle. Options Selections Hi-Temp Wash When the HI-TEMP WASH option is over, press the START/CANCEL pad. To turn off . On model with use during a crucial part of a rinse agent, will turn off the HI-TEMP WASH option, press the pad a second time. To cancel the DELAY...

Complete Owner's Guide (English)
Page 6
... lock 1-24 hrs washing drying clean sanitized START cancel Cycle Heavy Wash For pots, pans, casseroles and dinnerware with dried-on or baked-on all models. gal. 26 liters 6 gal. 2 5 imp.
... lock 1-24 hrs washing drying clean sanitized START cancel Cycle Heavy Wash For pots, pans, casseroles and dinnerware with dried-on or baked-on all models. gal. 26 liters 6 gal. 2 5 imp.

Complete Owner's Guide (English)
Page 7
... for a long period of items including cups, glasses, stemware, small plates, bowls, etc. Burned-on some models, indicates the following activity: Dish Preparation Scrape away large pieces of the main wash. Empty liquids from your model. Indicates a water heat delay. Damage may vary from glasses and cups. Status Window The STATUS window...
... for a long period of items including cups, glasses, stemware, small plates, bowls, etc. Burned-on some models, indicates the following activity: Dish Preparation Scrape away large pieces of the main wash. Empty liquids from your model. Indicates a water heat delay. Damage may vary from glasses and cups. Status Window The STATUS window...

Complete Owner's Guide (English)
Page 8
PREPARING AND LOADING DISHES 10 place settings standard loading pattern 12 place settings standard loading pattern Some models have a full load. They can be used to load two levels of items when you don't have to use this unique feature. Open completely for ...
PREPARING AND LOADING DISHES 10 place settings standard loading pattern 12 place settings standard loading pattern Some models have a full load. They can be used to load two levels of items when you don't have to use this unique feature. Open completely for ...

Complete Owner's Guide (English)
Page 9
... the center of the rack and block the spray arm rotation. 12 place settings standard loading pattern on select models (Fold Down Tines) 12 place settings standard loading pattern on select models) To raise the upper rack, refer to the figure below. Large items should be placed along the outer...pattern To lower the upper rack, press the lever and push down on the rack. PREPARING AND LOADING DISHES Adjustable Upper Rack (available on select models (Fixed Tines) 9 Be sure pan handles or other dishware items do not block the spray arm rotation. Press the Lever toward the center. ...
... the center of the rack and block the spray arm rotation. 12 place settings standard loading pattern on select models (Fold Down Tines) 12 place settings standard loading pattern on select models) To raise the upper rack, refer to the figure below. Large items should be placed along the outer...pattern To lower the upper rack, press the lever and push down on the rack. PREPARING AND LOADING DISHES Adjustable Upper Rack (available on select models (Fixed Tines) 9 Be sure pan handles or other dishware items do not block the spray arm rotation. Press the Lever toward the center. ...

Complete Owner's Guide (English)
Page 10
...or just one uncovered cup. DISHWASHER DISPENSER & DETERGENTS Filling the Detergent Dispenser The detergent dispenser has one covered and one , depending on your model. Detergent in the uncovered cup falls into the dishwasher when the door is in the bottom rack or take the basket out for loading on...down for more space to release detergent. • Use only fresh automatic dishwashing detergent. PREPARING AND LOADING DISHES Fold-down Tines (available select models) The fold-down tines in the lower rack make easy loading for those extra large and hard-to-fit items. The tines may be ...
...or just one uncovered cup. DISHWASHER DISPENSER & DETERGENTS Filling the Detergent Dispenser The detergent dispenser has one covered and one , depending on your model. Detergent in the uncovered cup falls into the dishwasher when the door is in the bottom rack or take the basket out for loading on...down for more space to release detergent. • Use only fresh automatic dishwashing detergent. PREPARING AND LOADING DISHES Fold-down Tines (available select models) The fold-down tines in the lower rack make easy loading for those extra large and hard-to-fit items. The tines may be ...

Complete Owner's Guide (English)
Page 11
... Cup Rinse Aid Indicator If the cover is closed on the Main Wash Cup, open by pressing the cover latch. You may vary from your model. Detergent Usage Guide Cycle Heavy Wash or Normal Wash Soft Water (0-3 grains) 2 teaspoons (each cup- 1/4 full) Medium Hard Water (4-8 grains) 5 teaspoons (each cup...
... Cup Rinse Aid Indicator If the cover is closed on the Main Wash Cup, open by pressing the cover latch. You may vary from your model. Detergent Usage Guide Cycle Heavy Wash or Normal Wash Soft Water (0-3 grains) 2 teaspoons (each cup- 1/4 full) Medium Hard Water (4-8 grains) 5 teaspoons (each cup...

Complete Owner's Guide (English)
Page 12
... poor drying are in the water stream to collect pieces of the dishwasher is needed , clean around the tub gasket area with a damp cloth. On models with warm soapy water and a dishcloth or sponge. Dispenser Opening Indicator Water Pressure The hot water line to clear cool water from pipe. Water Temperature...
... poor drying are in the water stream to collect pieces of the dishwasher is needed , clean around the tub gasket area with a damp cloth. On models with warm soapy water and a dishcloth or sponge. Dispenser Opening Indicator Water Pressure The hot water line to clear cool water from pipe. Water Temperature...

Parts Diagram
Page 2
... HO.........Water heating delay CL..........Close and latch the door '01-24'....Hour(s) delay before start (Some models) '01-10í....Hour(s) delay before start (Some models) Display Codes (LED) SENSING Turbidity sensor is a special function initiated from the use by persons having ... 0 1 0 TOTAL 462.4 01 0 1 X - DRYING Drying portion of this Service Data Sheet. HI-TEMP WASH and NO HEAT DRY/POWER DRY OFF LED's flashing (Some models) indicates power failure has occurred. While in the appliance repair trade. lock Press and hold the AIR DRY pad for For controls 90 seconds, then...
... HO.........Water heating delay CL..........Close and latch the door '01-24'....Hour(s) delay before start (Some models) '01-10í....Hour(s) delay before start (Some models) Display Codes (LED) SENSING Turbidity sensor is a special function initiated from the use by persons having ... 0 1 0 TOTAL 462.4 01 0 1 X - DRYING Drying portion of this Service Data Sheet. HI-TEMP WASH and NO HEAT DRY/POWER DRY OFF LED's flashing (Some models) indicates power failure has occurred. While in the appliance repair trade. lock Press and hold the AIR DRY pad for For controls 90 seconds, then...


