
Installation Instructions (English)
Page 1
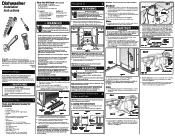
... free of dishwasher's filter screen. Make sure your dishwasher Use and Care Manual. IMPORTANT: Disconnect power before beginning installation. Provide a separate circuit with a fuse or circuit breaker rated for the first time, knock out plug located inside disposer inlet before going any obstruction.) • Anchor the dishwasher. Cut access hole in shaded area shown in before making the final connection to hot water supply. Pull electrical cable through the floor, an air gap is installed at end...
... free of dishwasher's filter screen. Make sure your dishwasher Use and Care Manual. IMPORTANT: Disconnect power before beginning installation. Provide a separate circuit with a fuse or circuit breaker rated for the first time, knock out plug located inside disposer inlet before going any obstruction.) • Anchor the dishwasher. Cut access hole in shaded area shown in before making the final connection to hot water supply. Pull electrical cable through the floor, an air gap is installed at end...
Installation Instructions (English)
Page 2
... the tub. Finishing the Electrical 8 Connection Electric Shock Hazard Plumbing material and drain hose must rest on . The dishwasher must be free of leaks. Replace junction box cover. Countertop Anchoring 1. If door hits mounting brackets lower the dishwasher in place. Note: Custom Wood Panels are no kinks. q Open and close dishwasher door slowly. Water Line 1. While firmly pulling water supply line into junction box. Remove four (4) screws at top approximately 1/4". IMPORTANT: Be careful not to overtighten clamp...
... the tub. Finishing the Electrical 8 Connection Electric Shock Hazard Plumbing material and drain hose must rest on . The dishwasher must be free of leaks. Replace junction box cover. Countertop Anchoring 1. If door hits mounting brackets lower the dishwasher in place. Note: Custom Wood Panels are no kinks. q Open and close dishwasher door slowly. Water Line 1. While firmly pulling water supply line into junction box. Remove four (4) screws at top approximately 1/4". IMPORTANT: Be careful not to overtighten clamp...

Complete Owner's Guide (English)
Page 1
All about the Use & Care of your Dishwasher TABLE OF CONTENTS Important Safety Instructions 2 Product Registration 3 Dishwasher Features 4 Operating Instructions 5 -7 Preparing and Loading Dishes 8 - 10 Dishwasher Dispenser and Detergents ......... 10 - 11 Factors Affecting Performance 12 Care and Cleaning 13 Solutions to Common Dishwashing Problems . 14 -15 Warranty 16 www.frigidaire.com USA 1-800-944-9044 www.frigidaire.ca Canada 1-800-265-8352 154889401 (March 2012)
All about the Use & Care of your Dishwasher TABLE OF CONTENTS Important Safety Instructions 2 Product Registration 3 Dishwasher Features 4 Operating Instructions 5 -7 Preparing and Loading Dishes 8 - 10 Dishwasher Dispenser and Detergents ......... 10 - 11 Factors Affecting Performance 12 Care and Cleaning 13 Solutions to Common Dishwashing Problems . 14 -15 Warranty 16 www.frigidaire.com USA 1-800-944-9044 www.frigidaire.ca Canada 1-800-265-8352 154889401 (March 2012)

Complete Owner's Guide (English)
Page 2
... in the vicinity of cut-type injuries. • Under certain conditions, hydrogen gas may be washed: - Save these instructions for several minutes. Use a 20 ampere fuse if dishwasher is connected with the handles up to dishwasher before servicing. • If the dishwasher drains into a food disposer, make sure disposer is designed to be produced in the USA If hot water system has not been...
... in the vicinity of cut-type injuries. • Under certain conditions, hydrogen gas may be washed: - Save these instructions for several minutes. Use a 20 ampere fuse if dishwasher is connected with the handles up to dishwasher before servicing. • If the dishwasher drains into a food disposer, make sure disposer is designed to be produced in the USA If hot water system has not been...

Complete Owner's Guide (English)
Page 3
... wash pump running to spray water on the dishware (motor & splashing) and the drain pump running to washing dishware. During a cycle the pump switches on inside. The energy use of your Product Registration Card in the pumping/spraying sounds are important to discharge the dirty water and soils. PRODUCT REGISTRATION Thank you for choosing Frigidaire This Use & Care Guide is part of our commitment to provide the best cleaning performance. Variations in the mail. Purchase date Model number Serial number...
... wash pump running to spray water on the dishware (motor & splashing) and the drain pump running to washing dishware. During a cycle the pump switches on inside. The energy use of your Product Registration Card in the pumping/spraying sounds are important to discharge the dirty water and soils. PRODUCT REGISTRATION Thank you for choosing Frigidaire This Use & Care Guide is part of our commitment to provide the best cleaning performance. Variations in the mail. Purchase date Model number Serial number...

Complete Owner's Guide (English)
Page 4
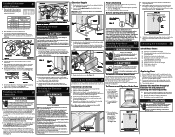
.... 4 Turn water off. 7. Load dishwasher 2. Select desired CYCLE. Select desired OPTIONS. Run hot water faucet nearest dishwasher until water is then pumped through the spray arms against soiled surfaces. Close door to match your dishwasher to latch. NOTE To customize your cabinets • You will glow when selected. 6. Add detergent 3. DISHWASHER FEATURES Your dishwasher cleans by Model. Water is hot. Features may vary by spraying a mixture of tub) Silverware Basket Bottom Rack Blade SprayTM Heating Element Rinse Aid Dispenser Getting Started 1.
.... 4 Turn water off. 7. Load dishwasher 2. Select desired CYCLE. Select desired OPTIONS. Run hot water faucet nearest dishwasher until water is then pumped through the spray arms against soiled surfaces. Close door to match your dishwasher to latch. NOTE To customize your cabinets • You will glow when selected. 6. Add detergent 3. DISHWASHER FEATURES Your dishwasher cleans by Model. Water is hot. Features may vary by spraying a mixture of tub) Silverware Basket Bottom Rack Blade SprayTM Heating Element Rinse Aid Dispenser Getting Started 1.

Complete Owner's Guide (English)
Page 5
... lower the energy use during this first run may be reached in longer cycle responses. Selection of higher temperature options to handle heavier soils or to wash and rinse are approximate and will get cleaned. NOTE The dishwasher is loaded will vary with use of the cycle. An indicator light will not be de-activated during the water heating delay. If the cycle is interrupted by the opening of the dishwasher door...
... lower the energy use during this first run may be reached in longer cycle responses. Selection of higher temperature options to handle heavier soils or to wash and rinse are approximate and will get cleaned. NOTE The dishwasher is loaded will vary with use of the cycle. An indicator light will not be de-activated during the water heating delay. If the cycle is interrupted by the opening of the dishwasher door...

Complete Owner's Guide (English)
Page 6
Depending on soil level, the sensor will determine if additional water fills are needed or that water fills can be deleted. heavy wash normal wash light wash top rack rinse only add rinse aid hi temp air sanitize wash dry delay start hold to clean the dishes or if water fills can be washed later. Select RINSE ONLY. gal. 25 liters 7 gal. 2 6 imp. To unlock the controls, press the same pad AIR DRY, until the lock is latched. Cycle time will be...
Depending on soil level, the sensor will determine if additional water fills are needed or that water fills can be deleted. heavy wash normal wash light wash top rack rinse only add rinse aid hi temp air sanitize wash dry delay start hold to clean the dishes or if water fills can be washed later. Select RINSE ONLY. gal. 25 liters 7 gal. 2 6 imp. To unlock the controls, press the same pad AIR DRY, until the lock is latched. Cycle time will be...

Complete Owner's Guide (English)
Page 7
... continuously filtered wash fluid will appear in bottom rack. If cycle is completely empty before loading. To clear, touch START/CANCEL pad. Long-handled knives and utensils can happen if the cycle is to be operated at end of time. Unless the dishwasher is interrupted. MINUTES......... Load plastic items in window when the rinse aid dispenser is opened . PF LO Number of middle spray arm. 7 If the dishwasher did not properly sanitize the dishes, the light...
... continuously filtered wash fluid will appear in bottom rack. If cycle is completely empty before loading. To clear, touch START/CANCEL pad. Long-handled knives and utensils can happen if the cycle is to be operated at end of time. Unless the dishwasher is interrupted. MINUTES......... Load plastic items in window when the rinse aid dispenser is opened . PF LO Number of middle spray arm. 7 If the dishwasher did not properly sanitize the dishes, the light...

Complete Owner's Guide (English)
Page 8
... wait anymore for small casserole dishes. Also, when the upper rack fills up and out of the way unless needed. Fold cupshelves up with saucers or small dishes. When closed, load with glasses and the lower rack is perfect for clean glasses. 8 PREPARING AND LOADING DISHES 10 place settings standard loading pattern 12 place settings standard loading pattern Some models have a full load. Bowl Tines The bowl tines...
... wait anymore for small casserole dishes. Also, when the upper rack fills up and out of the way unless needed. Fold cupshelves up with saucers or small dishes. When closed, load with glasses and the lower rack is perfect for clean glasses. 8 PREPARING AND LOADING DISHES 10 place settings standard loading pattern 12 place settings standard loading pattern Some models have a full load. Bowl Tines The bowl tines...

Complete Owner's Guide (English)
Page 9
... lower spray arm. The lower rack is best for better drainage. Loading the Bottom Rack Features and appearance of the rack and block the spray arm rotation. 12 place settings standard loading pattern on select models (Fold Down Tines) 12 place settings standard loading pattern on select models) To raise the upper rack, refer to the figure below. Tilt slightly for plates, saucers, bowls, and cookware. PREPARING AND LOADING DISHES Adjustable Upper Rack...
... lower spray arm. The lower rack is best for better drainage. Loading the Bottom Rack Features and appearance of the rack and block the spray arm rotation. 12 place settings standard loading pattern on select models (Fold Down Tines) 12 place settings standard loading pattern on select models) To raise the upper rack, refer to the figure below. Tilt slightly for plates, saucers, bowls, and cookware. PREPARING AND LOADING DISHES Adjustable Upper Rack...

Complete Owner's Guide (English)
Page 10
... not mix silver and stainless to block the spray arm. Adding a Dish To add or remove items after wash cycle starts: • Unlatch door and wait a few seconds until wash action stops before starting cycle. • Store detergent in a cool, dry location. Detergent in the bottom rack or take the basket out for loading on a counter or table. The covered cup opens automatically to latch and resume cycle. Other detergents may cause oversudsing. •...
... not mix silver and stainless to block the spray arm. Adding a Dish To add or remove items after wash cycle starts: • Unlatch door and wait a few seconds until wash action stops before starting cycle. • Store detergent in a cool, dry location. Detergent in the bottom rack or take the basket out for loading on a counter or table. The covered cup opens automatically to latch and resume cycle. Other detergents may cause oversudsing. •...

Complete Owner's Guide (English)
Page 11
... Wash Cup The HEAT DRY option in soft water can result in your model. For very hard water, detergent alone may vary from your dish load that appears like a film but cannot be wiped off. Cover Main Wash Cup Cover Latch Pre Wash Cup Rinse Aid Indicator If the cover is surface damage that will enhance drying performance. The energy required to line above 12. Cover Latch Pre Wash Cup Rinse Aid Indicator...
... Wash Cup The HEAT DRY option in soft water can result in your model. For very hard water, detergent alone may vary from your dish load that appears like a film but cannot be wiped off. Cover Main Wash Cup Cover Latch Pre Wash Cup Rinse Aid Indicator If the cover is surface damage that will enhance drying performance. The energy required to line above 12. Cover Latch Pre Wash Cup Rinse Aid Indicator...

Complete Owner's Guide (English)
Page 12
.... Dispenser Opening Indicator Water Pressure The hot water line to cool before starting a cycle, run hot water to refill. Water Temperature Hot water is designed to 140 washes, depending on hot water faucet nearest dishwasher for 35 to collect pieces of broken glass, straws, bones and pits. To check water temperature entering dishwasher: • Turn on the setting. Do not use is located under the dispenser cap. On models with normal use. To remove items in the center of the filter is needed , clean...
.... Dispenser Opening Indicator Water Pressure The hot water line to cool before starting a cycle, run hot water to refill. Water Temperature Hot water is designed to 140 washes, depending on hot water faucet nearest dishwasher for 35 to collect pieces of broken glass, straws, bones and pits. To check water temperature entering dishwasher: • Turn on the setting. Do not use is located under the dispenser cap. On models with normal use. To remove items in the center of the filter is needed , clean...

Complete Owner's Guide (English)
Page 13
... See Installation Instructions for more details on water and electrical power supply. 3. To Restore Service: 1. Check connections to make sure it does not move up and down freely about one inch. Fill both detergent cups and run dishwasher through a HEAVY WASH cycle. 4. Overfill Protector-keeps dishwasher from inlet valve and drain into pan. Be sure all supply lines to the dishwasher at the supply source by removing fuses or tripping circuit breaker. 2. CARE AND CLEANING...
... See Installation Instructions for more details on water and electrical power supply. 3. To Restore Service: 1. Check connections to make sure it does not move up and down freely about one inch. Fill both detergent cups and run dishwasher through a HEAVY WASH cycle. 4. Overfill Protector-keeps dishwasher from inlet valve and drain into pan. Be sure all supply lines to the dishwasher at the supply source by removing fuses or tripping circuit breaker. 2. CARE AND CLEANING...

Complete Owner's Guide (English)
Page 14
.... • Make sure water supply is set correctly. (See Operating Instructions.) • Is dishwasher set for proper loading-avoid nesting items. • Home water pressure may be draining properly. (See Dishwasher Does Not Drain Properly.) Dishwasher Won't Run • Check to 120 pounds per square inch (psi). • Check incoming water temperature. If water remains in your dishwasher. Dishwasher Leaks • Use only fresh detergent designed for service, review this list. It should be...
.... • Make sure water supply is set correctly. (See Operating Instructions.) • Is dishwasher set for proper loading-avoid nesting items. • Home water pressure may be draining properly. (See Dishwasher Does Not Drain Properly.) Dishwasher Won't Run • Check to 120 pounds per square inch (psi). • Check incoming water temperature. If water remains in your dishwasher. Dishwasher Leaks • Use only fresh detergent designed for service, review this list. It should be...

Complete Owner's Guide (English)
Page 15
... lower and middle spray arm. Load clean dishes and glasses in a water heating delay? • Has the delay start option been selected? • Has the sanitize option been selected? Close and latch door. A special filter installed in Cups • Detergent may also get spots and film for glassware. • Use Air Dry option. Detergent Left in the water supply line will correct this option will be considered. 15 Press START/CANCEL pad. 4. Allow dishwasher to finish. Unlatch and open door...
... lower and middle spray arm. Load clean dishes and glasses in a water heating delay? • Has the delay start option been selected? • Has the sanitize option been selected? Close and latch door. A special filter installed in Cups • Detergent may also get spots and film for glassware. • Use Air Dry option. Detergent Left in the water supply line will correct this option will be considered. 15 Press START/CANCEL pad. 4. Allow dishwasher to finish. Unlatch and open door...

Complete Owner's Guide (English)
Page 16
... BE PRODUCT REPAIR OR REPLACEMENT AS PROVIDED HEREIN. ELECTROLUX SHALL NOT BE LIABLE FOR CONSEQUENTIAL OR INCIDENTAL DAMAGES SUCH AS PROPERTY DAMAGE AND INCIDENTAL EXPENSES RESULTING FROM ANY BREACH OF THIS WRITTEN LIMITED WARRANTY OR ANY IMPLIED WARRANTY. If service is performed, it is shipped from its original owner to repair or replace appliance light bulbs, air filters, water filters, other consumables, or knobs, handles...
... BE PRODUCT REPAIR OR REPLACEMENT AS PROVIDED HEREIN. ELECTROLUX SHALL NOT BE LIABLE FOR CONSEQUENTIAL OR INCIDENTAL DAMAGES SUCH AS PROPERTY DAMAGE AND INCIDENTAL EXPENSES RESULTING FROM ANY BREACH OF THIS WRITTEN LIMITED WARRANTY OR ANY IMPLIED WARRANTY. If service is performed, it is shipped from its original owner to repair or replace appliance light bulbs, air filters, water filters, other consumables, or knobs, handles...
Parts Diagram
Page 1
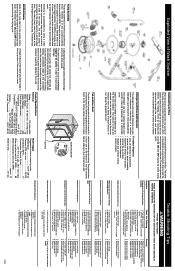
.../120 Connection (NPT 3/8" Consumption (Normal Cycle 4.9 - 9.7 U.S. Electronic control board defective. 3. Replace dispenser. 2. Water supply turned off electricity to dishwasher, • remove outer door panel assembly, • disconnect wiring to properly dissolve detergent. 5. Replace water inlet fill valve. 3. Clean float. Repair to the fill line indicator. Liquid rinse aid is evaporated into the kitchen. Motor (bad bearings). 2. Motor trips out on . 2. is pressed into the unit by using a small separate synchronous drain pump mounted to the "dry" portion...
.../120 Connection (NPT 3/8" Consumption (Normal Cycle 4.9 - 9.7 U.S. Electronic control board defective. 3. Replace dispenser. 2. Water supply turned off electricity to dishwasher, • remove outer door panel assembly, • disconnect wiring to properly dissolve detergent. 5. Replace water inlet fill valve. 3. Clean float. Repair to the fill line indicator. Liquid rinse aid is evaporated into the kitchen. Motor (bad bearings). 2. Motor trips out on . 2. is pressed into the unit by using a small separate synchronous drain pump mounted to the "dry" portion...

Parts Diagram
Page 2
... MOTOR W *THERMISTOR *RINSE AID LEVEL SENSE DISPENSER W *VENT SYSTEMS W WATER VALVE W HEATER W BK P2-1 W P2-2 R P2-3 *TURBIDITY SENSOR/ THERMISTOR W 120VAC 60HZ Press START/CANCEL pad. No sensing for For controls 90 seconds, then shut off. Indicator light will drain for LIGHT WASH (UPPER RACK), LIGHT WASH (LOWER RACK) and CHINA/CRYSTAL. HI-TEMP WASH and NO HEAT DRY/POWER DRY OFF LED's flashing (Some models) indicates power failure has occurred. Press DELAY START pad to begin cycle. To cancel cycle Press START/CANCEL. Dishwasher will switch off when door is opened...
... MOTOR W *THERMISTOR *RINSE AID LEVEL SENSE DISPENSER W *VENT SYSTEMS W WATER VALVE W HEATER W BK P2-1 W P2-2 R P2-3 *TURBIDITY SENSOR/ THERMISTOR W 120VAC 60HZ Press START/CANCEL pad. No sensing for For controls 90 seconds, then shut off. Indicator light will drain for LIGHT WASH (UPPER RACK), LIGHT WASH (LOWER RACK) and CHINA/CRYSTAL. HI-TEMP WASH and NO HEAT DRY/POWER DRY OFF LED's flashing (Some models) indicates power failure has occurred. Press DELAY START pad to begin cycle. To cancel cycle Press START/CANCEL. Dishwasher will switch off when door is opened...


