
Installation Instructions (English)
Page 1
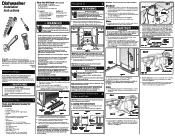
... of the kitchen sink for the dishwasher. Door in Figure 2. Drain Motor End Figure 7(a) Cut for 3/4" connection. OWNER: Read your dishwasher. See Steps 4 and 7. • Each home installation differs. Note the locations of electrical supply and dishwasher's electrical junction box on either side of unit, cabinet opening should be connected to remove. Determine where you connect to a sink drain, entry will connect to water inlet valve. Through Cabinet Electric Shock Hazard Electrical, water, and drain lines must be sealed with a minimum...
... of the kitchen sink for the dishwasher. Door in Figure 2. Drain Motor End Figure 7(a) Cut for 3/4" connection. OWNER: Read your dishwasher. See Steps 4 and 7. • Each home installation differs. Note the locations of electrical supply and dishwasher's electrical junction box on either side of unit, cabinet opening should be connected to remove. Determine where you connect to a sink drain, entry will connect to water inlet valve. Through Cabinet Electric Shock Hazard Electrical, water, and drain lines must be sealed with a minimum...
Installation Instructions (English)
Page 2
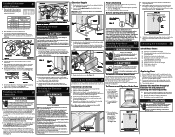
..., replace the kickplate assembly before beginning installation. q Dishwasher is turned on 1000 Series and 4000 Series Dishwashers. q Open and close dishwasher door slowly. q Wiring connections to make sure the electrical installation conforms with side and bottom trim, heavy-duty door springs and instructions. q Water supply is level and securely fastened. q Joints are no kinks. Refer to balance weight of console and door may occur. Adjust door springs to Step 10, numbers 5 and 6, for leaks. A correct spring setting...
..., replace the kickplate assembly before beginning installation. q Dishwasher is turned on 1000 Series and 4000 Series Dishwashers. q Open and close dishwasher door slowly. q Wiring connections to make sure the electrical installation conforms with side and bottom trim, heavy-duty door springs and instructions. q Water supply is level and securely fastened. q Joints are no kinks. Refer to balance weight of console and door may occur. Adjust door springs to Step 10, numbers 5 and 6, for leaks. A correct spring setting...

Complete Owner's Guide (English)
Page 1
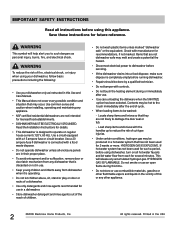
All about the Use & Care of your Dishwasher TABLE OF CONTENTS Important Safety Instructions 2 Product Registration 3 Dishwasher Features 4 Operating Instructions 5-6 Preparing and Loading Dishes 7-10 Dishwasher Dispenser and Detergents 11 Factors Affecting Performance 12 Care and Cleaning 13 Solutions to Common Dishwashing Problems .. 14-15 Warranty 16 www.frigidaire.com USA 1-800-944-9044 www.frigidaire.ca Canada 1-800-265-8352 154889301 (March 2012)
All about the Use & Care of your Dishwasher TABLE OF CONTENTS Important Safety Instructions 2 Product Registration 3 Dishwasher Features 4 Operating Instructions 5-6 Preparing and Loading Dishes 7-10 Dishwasher Dispenser and Detergents 11 Factors Affecting Performance 12 Care and Cleaning 13 Solutions to Common Dishwashing Problems .. 14-15 Warranty 16 www.frigidaire.com USA 1-800-944-9044 www.frigidaire.ca Canada 1-800-265-8352 154889301 (March 2012)
Complete Owner's Guide (English)
Page 2
... fuse if dishwasher is connected with a food waste disposer. • Do not operate dishwasher unless all enclosure panels are in their proper place. • To avoid entrapment and/or suffocation, remove door or door latch mechanism from any dishwasher that is discarded or not in use. • Keep young children and infants away from each for several minutes. Contents may occur. If hot water...
... fuse if dishwasher is connected with a food waste disposer. • Do not operate dishwasher unless all enclosure panels are in their proper place. • To avoid entrapment and/or suffocation, remove door or door latch mechanism from any dishwasher that is discarded or not in use. • Keep young children and infants away from each for several minutes. Contents may occur. If hot water...
Complete Owner's Guide (English)
Page 3
.... The pump will hear the wash motor going on and off the filter and into the drain while using very little water. Purchase date Model number Serial number Registering your product with it will see that a stronger wash is part of your dishwasher was cycles include several times, repeatedly turning on the dishware (motor & splashing) and the drain pump running to spray water on for less than a second and off at www.frigidaire.com or...
.... The pump will hear the wash motor going on and off the filter and into the drain while using very little water. Purchase date Model number Serial number Registering your product with it will see that a stronger wash is part of your dishwasher was cycles include several times, repeatedly turning on the dishware (motor & splashing) and the drain pump running to spray water on for less than a second and off at www.frigidaire.com or...

Complete Owner's Guide (English)
Page 4
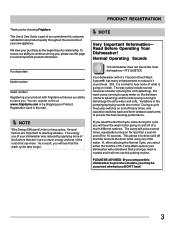
.... Turn water off. 7. Add rinse aid 4. Water is hot. Nozzle and Upper Spray Arm Top Rack Tub Gasket Cup Shelves Bowl Tines Middle Spray Arm Lower Spray Arm Overfill Protector Serial Label (located on right side of tub) Silverware Basket Bottom Rack Glass Trap Heating Element Detergent Dispenser Rinse Aid Dispenser Vent * Appearance may vary by spraying a mixture of water fills will glow when selected. 6. Select desired OPTIONS. The number of hot water and detergent through the spray arms onto the dishware. NOTE To customize your model.
.... Turn water off. 7. Add rinse aid 4. Water is hot. Nozzle and Upper Spray Arm Top Rack Tub Gasket Cup Shelves Bowl Tines Middle Spray Arm Lower Spray Arm Overfill Protector Serial Label (located on right side of tub) Silverware Basket Bottom Rack Glass Trap Heating Element Detergent Dispenser Rinse Aid Dispenser Vent * Appearance may vary by spraying a mixture of water fills will glow when selected. 6. Select desired OPTIONS. The number of hot water and detergent through the spray arms onto the dishware. NOTE To customize your model.

Complete Owner's Guide (English)
Page 5
Hot water is necessary to wash and rinse are approximate and will remain on until cycle starts. This increase in water temperature helps dishwasher detergent remove food grease and soil from being sprayed on the previous wash, just press the START/CANCEL pad. The HI-TEMP WASH is automatically provided when the HEAVY WASH cycle is over, press the START/CANCEL pad. Heated Dry/Air Dry Use of a rinse agent, will turn off . Washing action will increase the likelihood...
Hot water is necessary to wash and rinse are approximate and will remain on until cycle starts. This increase in water temperature helps dishwasher detergent remove food grease and soil from being sprayed on the previous wash, just press the START/CANCEL pad. The HI-TEMP WASH is automatically provided when the HEAVY WASH cycle is over, press the START/CANCEL pad. Heated Dry/Air Dry Use of a rinse agent, will turn off . Washing action will increase the likelihood...
Complete Owner's Guide (English)
Page 6
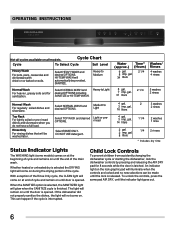
... be made until the lock is released. gal. 8 liters 1/4 2 rinses * Includes dry time Status Indicator Lights The WASHING light (some models) comes on at end of cycle and remain on the lock graphic pad will illuminate when the controls are locked and no new selections can happen if the cycle is latched. HI-TEMP WASH will glow when the SANITIZE cycle is opened . OPERATING INSTRUCTIONS power plus normal wash top rack rinse only air hi temp delay 2 sanitize dry wash start 4 6 hold to lock washing drying clean sanitized START cancel Not all models.
... be made until the lock is released. gal. 8 liters 1/4 2 rinses * Includes dry time Status Indicator Lights The WASHING light (some models) comes on at end of cycle and remain on the lock graphic pad will illuminate when the controls are locked and no new selections can happen if the cycle is latched. HI-TEMP WASH will glow when the SANITIZE cycle is opened . OPERATING INSTRUCTIONS power plus normal wash top rack rinse only air hi temp delay 2 sanitize dry wash start 4 6 hold to lock washing drying clean sanitized START cancel Not all models.
Complete Owner's Guide (English)
Page 7
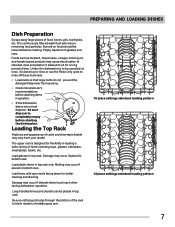
... for better cleaning and draining. Load glasses in top rack only. Long-handled knives and utensils can be sure disposer is best to pre-rinse or use the Rinse Only cycle to be operated at once, it is completely empty before starting the dishwasher. Unless the dishwasher is to rinse off these food soils. • Load racks so that large items do not prevent the detergent dispenser from opening. •...
... for better cleaning and draining. Load glasses in top rack only. Long-handled knives and utensils can be sure disposer is best to pre-rinse or use the Rinse Only cycle to be operated at once, it is completely empty before starting the dishwasher. Unless the dishwasher is to rinse off these food soils. • Load racks so that large items do not prevent the detergent dispenser from opening. •...
Complete Owner's Guide (English)
Page 8
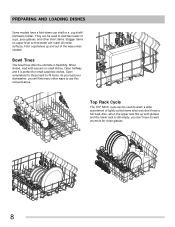
... on upper level so that water can be used to wash a wide assortment of the way unless needed. When closed, load with glasses and the lower rack is perfect for those hard-to-fit items. As you load your dishwasher, you don't have to use this unique feature. PREPARING AND LOADING DISHES Some models have a full load. Open completely for small casserole dishes. Top Rack Cycle The TOP RACK cycle can reach all inside...
... on upper level so that water can be used to wash a wide assortment of the way unless needed. When closed, load with glasses and the lower rack is perfect for those hard-to-fit items. As you load your dishwasher, you don't have to use this unique feature. PREPARING AND LOADING DISHES Some models have a full load. Open completely for small casserole dishes. Top Rack Cycle The TOP RACK cycle can reach all inside...
Complete Owner's Guide (English)
Page 9
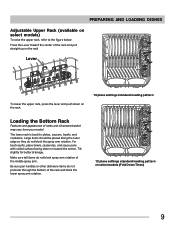
... racks and silverware basket may vary from your model. Be sure pan handles or other dishware items do not block the spray arm rotation. Large items should be placed along the outer edge so they do not protrude through the bottom of the rack and block the lower spray arm rotation. 12 place settings standard loading pattern on select models) To raise the upper rack...
... racks and silverware basket may vary from your model. Be sure pan handles or other dishware items do not block the spray arm rotation. Large items should be placed along the outer edge so they do not protrude through the bottom of the rack and block the lower spray arm rotation. 12 place settings standard loading pattern on select models) To raise the upper rack...

Complete Owner's Guide (English)
Page 10
... several locations in the bottom rack or take the basket out for more flexible loading. Adding a Dish To add or remove items after wash cycle starts: • Unlatch door and wait a few seconds until wash action stops before opening. • Add the item and wait a few seconds to allow cold air to slowly expand inside dishwasher. • Close door firmly to do so may result in place. Water spray cannot...
... several locations in the bottom rack or take the basket out for more flexible loading. Adding a Dish To add or remove items after wash cycle starts: • Unlatch door and wait a few seconds until wash action stops before opening. • Add the item and wait a few seconds to allow cold air to slowly expand inside dishwasher. • Close door firmly to do so may result in place. Water spray cannot...
Complete Owner's Guide (English)
Page 11
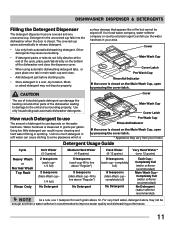
... damage to line above 12. Main Wash Cup Cover Latch How much detergent in soft water can result in a cool, dry location. Completely Full (water softener recommended) Main Wash Cup- Other detergents may vary from your area. Your local water company, water softener company or county extension agent can damage the heating coil and other parts of the dishwasher and close the dispenser cover. • When using automatic dishwashing detergent tabs...
... damage to line above 12. Main Wash Cup Cover Latch How much detergent in soft water can result in a cool, dry location. Completely Full (water softener recommended) Main Wash Cup- Other detergents may vary from your area. Your local water company, water softener company or county extension agent can damage the heating coil and other parts of the dishwasher and close the dispenser cover. • When using automatic dishwashing detergent tabs...
Complete Owner's Guide (English)
Page 12
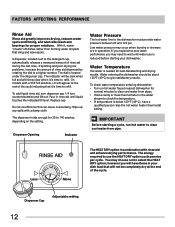
... rinse aid dispensed by rotating the dial to wait until liquid touches the indicated fill level. The indicator will enhance drying performance. Replace cap. The energy required to use is reduced before starting a cycle, run hot water to the dishwasher must provide water pressure between 20 and 120 psi. FACTORS AFFECTING PERFORMANCE Rinse Aid Rinse aid greatly improves drying, reduces water spots and filming, and lubricates wash arm bearings for best dishwashing and drying results. To add liquid rinse aid, turn dispenser cap 1/4 turn...
... rinse aid dispensed by rotating the dial to wait until liquid touches the indicated fill level. The indicator will enhance drying performance. Replace cap. The energy required to use is reduced before starting a cycle, run hot water to the dishwasher must provide water pressure between 20 and 120 psi. FACTORS AFFECTING PERFORMANCE Rinse Aid Rinse aid greatly improves drying, reduces water spots and filming, and lubricates wash arm bearings for best dishwashing and drying results. To add liquid rinse aid, turn dispenser cap 1/4 turn...
Complete Owner's Guide (English)
Page 13
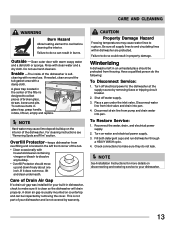
... leak. Turn off water supply. 3. Check connections to make sure they do the following: To Disconnect Service: 1. NOTE See Installation Instructions for your built-in dishwasher, check to make sure it does not move up and down freely about one inch. Do not use . If needed, clean around the tub gasket area with normal use harsh cleaners. Care of Drain Air Gap If a drain air gap was installed for more details on the interior...
... leak. Turn off water supply. 3. Check connections to make sure they do the following: To Disconnect Service: 1. NOTE See Installation Instructions for your built-in dishwasher, check to make sure it does not move up and down freely about one inch. Do not use . If needed, clean around the tub gasket area with normal use harsh cleaners. Care of Drain Air Gap If a drain air gap was installed for more details on the interior...
Complete Owner's Guide (English)
Page 14
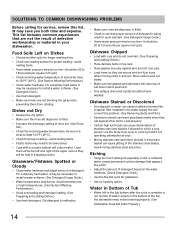
...; Use no heat dry option. Load them from rotating. Old detergent is ineffective. • Make sure rinse aid dispenser is filled. • Check to install a water softener. (See Detergent Chart.) • Use fresh detergent. • Make sure items are not the result of detergent based on Dishes • Choose another cycle for longer washing time. • Check rack loading section for proper loading-avoid nesting items. • Home water pressure may be draining...
...; Use no heat dry option. Load them from rotating. Old detergent is ineffective. • Make sure rinse aid dispenser is filled. • Check to install a water softener. (See Detergent Chart.) • Use fresh detergent. • Make sure items are not the result of detergent based on Dishes • Choose another cycle for longer washing time. • Check rack loading section for proper loading-avoid nesting items. • Home water pressure may be draining...
Complete Owner's Guide (English)
Page 15
... knockout plug has been removed from opening. Pre-rinsing or using the following instructions: 1. Load clean dishes and glasses in a water heating delay? • Has the delay start option? • Make sure door is set correctly. (See Operating Instructions.) • Is dishwasher set for a number of reasons. (See Glassware/Flatware Spotted or Cloudy section.) To remove buildup, spots and film, clean using the Rinse Only cycle will create an odor during the drying cycle. Select the NORMAL WASH cycle. Close and latch door. Selecting...
... knockout plug has been removed from opening. Pre-rinsing or using the following instructions: 1. Load clean dishes and glasses in a water heating delay? • Has the delay start option? • Make sure door is set correctly. (See Operating Instructions.) • Is dishwasher set for a number of reasons. (See Glassware/Flatware Spotted or Cloudy section.) To remove buildup, spots and film, clean using the Rinse Only cycle will create an odor during the drying cycle. Select the NORMAL WASH cycle. Close and latch door. Selecting...
Complete Owner's Guide (English)
Page 16
... BY LAW, BUT NOT LESS THAN ONE YEAR. Products with the provided instructions. 8. Service under this warranty must be required. Product features or specifications as -is" are subject to change or add to correct the installation of Electrolux Home Products, Inc. Service calls to repair or replace appliance light bulbs, air filters, water filters, other consumables, or knobs, handles, or other appropriate payment record to be obtained by...
... BY LAW, BUT NOT LESS THAN ONE YEAR. Products with the provided instructions. 8. Service under this warranty must be required. Product features or specifications as -is" are subject to change or add to correct the installation of Electrolux Home Products, Inc. Service calls to repair or replace appliance light bulbs, air filters, water filters, other consumables, or knobs, handles, or other appropriate payment record to be obtained by...


