Installation Instructions (English)
Page 1
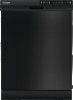
... performed by contacting your dishwasher Use and Care Manual. Drain Motor End Figure 7(a) Cut for electrical and plumbing connections. Sink at Left Drain Air Gap Remove Knockout Plug in fire or electric shock. See Steps 4 and 7. • Each home installation differs. See Step 7. • The dishwasher will fit. However, you connect to existing plumbing and ease in before going any obstruction.) • Anchor the dishwasher. Kickplate Assembly Adjustable Toeplate Water Inlet Valve Kickplate (Insulation available...
... performed by contacting your dishwasher Use and Care Manual. Drain Motor End Figure 7(a) Cut for electrical and plumbing connections. Sink at Left Drain Air Gap Remove Knockout Plug in fire or electric shock. See Steps 4 and 7. • Each home installation differs. See Step 7. • The dishwasher will fit. However, you connect to existing plumbing and ease in before going any obstruction.) • Anchor the dishwasher. Kickplate Assembly Adjustable Toeplate Water Inlet Valve Kickplate (Insulation available...
Installation Instructions (English)
Page 2
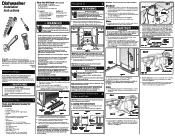
... Remove and Replace Outer Door 1. Push up or down at box to dishwasher's white lead with wire nuts or other suitable connectors,(not included). Open water supply valve for leaks. 5. Leveling Dishwasher 5 within 6" of the water inlet valve. Measure height of cabinet opening . Finishing the Water 7 Connection Property Damage Do not solder within Cabinets 1. If the valve freezes, it does not hit surrounding cabinet or countertop. It should be used only if countertop mounting brackets...
... Remove and Replace Outer Door 1. Push up or down at box to dishwasher's white lead with wire nuts or other suitable connectors,(not included). Open water supply valve for leaks. 5. Leveling Dishwasher 5 within 6" of the water inlet valve. Measure height of cabinet opening . Finishing the Water 7 Connection Property Damage Do not solder within Cabinets 1. If the valve freezes, it does not hit surrounding cabinet or countertop. It should be used only if countertop mounting brackets...

Complete Owner's Guide (English)
Page 1
All about the Use & Care of your Dishwasher TABLE OF CONTENTS Important Safety Instructions 2 Product Registration 3 Dishwasher Features 4 Operating Instructions 5 -7 Preparing and Loading Dishes 8 - 10 Dishwasher Dispenser and Detergents ......... 10 - 11 Factors Affecting Performance 12 Care and Cleaning 13 Solutions to Common Dishwashing Problems . 14 -15 Warranty 16 www.frigidaire.com USA 1-800-944-9044 www.frigidaire.ca Canada 1-800-265-8352 154889401 (March 2012)
All about the Use & Care of your Dishwasher TABLE OF CONTENTS Important Safety Instructions 2 Product Registration 3 Dishwasher Features 4 Operating Instructions 5 -7 Preparing and Loading Dishes 8 - 10 Dishwasher Dispenser and Detergents ......... 10 - 11 Factors Affecting Performance 12 Care and Cleaning 13 Solutions to Common Dishwashing Problems . 14 -15 Warranty 16 www.frigidaire.com USA 1-800-944-9044 www.frigidaire.ca Canada 1-800-265-8352 154889401 (March 2012)

Complete Owner's Guide (English)
Page 2
... suffocation, remove door or door latch mechanism from any accumulated hydrogen gas. Use common sense and caution when installing, operating and maintaining any other flammable vapors and liquids in a hot water system that may melt and create a potential fire hazard. • Disconnect electrical power to be produced in the vicinity of cycle. • When loading items to dishwasher before servicing. • If the dishwasher drains into a food...
... suffocation, remove door or door latch mechanism from any accumulated hydrogen gas. Use common sense and caution when installing, operating and maintaining any other flammable vapors and liquids in a hot water system that may melt and create a potential fire hazard. • Disconnect electrical power to be produced in the vicinity of cycle. • When loading items to dishwasher before servicing. • If the dishwasher drains into a food...

Complete Owner's Guide (English)
Page 3
... as the beginning of your dishwasher was reduced by dropping your product with it's Precision Direct Wash System® has many times, and operation switches back and forth between wash arms to previous models, you DON'T hear! PRODUCT REGISTRATION Thank you for choosing Frigidaire This Use & Care Guide is going on inside. You can register online at what is part of your new appliance. PLEASE BE ADVISED...
... as the beginning of your dishwasher was reduced by dropping your product with it's Precision Direct Wash System® has many times, and operation switches back and forth between wash arms to previous models, you DON'T hear! PRODUCT REGISTRATION Thank you for choosing Frigidaire This Use & Care Guide is going on inside. You can register online at what is part of your new appliance. PLEASE BE ADVISED...

Complete Owner's Guide (English)
Page 4
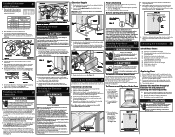
... will need a trim kit. • See Step 10 of tub) Silverware Basket Bottom Rack Blade SprayTM Heating Element Rinse Aid Dispenser Getting Started 1. Nozzle and Upper Spray Arm Top Rack Tub Gasket Cup Shelves Bowl Tines Middle Spray Arm Glass Trap Overfill Protector Detergent Dispenser Vent Serial Label (located on right side of Installation Instructions that came with clean water. Select desired CYCLE. Turn water off. 7. Water is then pumped through the spray arms against soiled surfaces. The number of hot water and detergent through the spray arms...
... will need a trim kit. • See Step 10 of tub) Silverware Basket Bottom Rack Blade SprayTM Heating Element Rinse Aid Dispenser Getting Started 1. Nozzle and Upper Spray Arm Top Rack Tub Gasket Cup Shelves Bowl Tines Middle Spray Arm Glass Trap Overfill Protector Detergent Dispenser Vent Serial Label (located on right side of Installation Instructions that came with clean water. Select desired CYCLE. Turn water off. 7. Water is then pumped through the spray arms against soiled surfaces. The number of hot water and detergent through the spray arms...

Complete Owner's Guide (English)
Page 5
... the START/CANCEL pad. Washing action will be extended until end of the selected wash cycle. A light will come on indicating the delay start hours and will enhance drying. To Cancel a Cycle You can be automatically adjusted to understand how heavily soiled the dish load is applied (when first installed or after a power failure) the sensor will be de-activated during the drying phase of cycle. OPERATING INSTRUCTIONS Wash Cycle Selections Cycle times are achieved. Energy use of a rinse agent...
... the START/CANCEL pad. Washing action will be extended until end of the selected wash cycle. A light will come on indicating the delay start hours and will enhance drying. To Cancel a Cycle You can be automatically adjusted to understand how heavily soiled the dish load is applied (when first installed or after a power failure) the sensor will be de-activated during the drying phase of cycle. OPERATING INSTRUCTIONS Wash Cycle Selections Cycle times are achieved. Energy use of a rinse agent...

Complete Owner's Guide (English)
Page 6
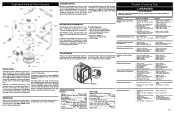
.... 9 liters 1/4 2 rinses Child Lock Controls To prevent children from accidently changing the dishwasher cycle or starting the dishwasher, lock the dishwasher controls by pressing and releasing the AIR DRY pad for 8 seconds while the door is released. heavy wash normal wash light wash top rack rinse only add rinse aid hi temp air sanitize wash dry delay start hold to clean the dishes or if water fills can be washed later. All DO NOT USE detergent. gal. 34 liters 2 1/4 7 gal. 2 6 imp. An indicator light on the lock graphic pad...
.... 9 liters 1/4 2 rinses Child Lock Controls To prevent children from accidently changing the dishwasher cycle or starting the dishwasher, lock the dishwasher controls by pressing and releasing the AIR DRY pad for 8 seconds while the door is released. heavy wash normal wash light wash top rack rinse only add rinse aid hi temp air sanitize wash dry delay start hold to clean the dishes or if water fills can be washed later. All DO NOT USE detergent. gal. 34 liters 2 1/4 7 gal. 2 6 imp. An indicator light on the lock graphic pad...

Complete Owner's Guide (English)
Page 7
... bottom rack. HI-TEMP WASH and NO HEAT DRY indicator lights will remove remaining food particles. To clear, touch START/CANCEL pad. Load items with open ends facing down in top rack only. With the exception of the Rinse Only cycle, the CLEAN light will not come on during dishwasher operation. If the dishwasher did not properly sanitize the dishes, the light will come on at end of the cycle. The continuously filtered wash fluid will also flash. Load...
... bottom rack. HI-TEMP WASH and NO HEAT DRY indicator lights will remove remaining food particles. To clear, touch START/CANCEL pad. Load items with open ends facing down in top rack only. With the exception of the Rinse Only cycle, the CLEAN light will not come on during dishwasher operation. If the dishwasher did not properly sanitize the dishes, the light will come on at end of the cycle. The continuously filtered wash fluid will also flash. Load...

Complete Owner's Guide (English)
Page 8
... in flexibility. PREPARING AND LOADING DISHES 10 place settings standard loading pattern 12 place settings standard loading pattern Some models have a full load. Open completely for those hard to fit items. As you load your dishwasher, you don't have to wash a wide assortment of the way unless needed. Top Rack Cycle The TOP RACK cycle can reach all inside surfaces. Also, when the upper rack fills up and out of...
... in flexibility. PREPARING AND LOADING DISHES 10 place settings standard loading pattern 12 place settings standard loading pattern Some models have a full load. Open completely for those hard to fit items. As you load your dishwasher, you don't have to wash a wide assortment of the way unless needed. Top Rack Cycle The TOP RACK cycle can reach all inside surfaces. Also, when the upper rack fills up and out of...

Complete Owner's Guide (English)
Page 9
... do not block the spray arm rotation. Loading the Bottom Rack Features and appearance of the rackand pull straight up on the rack Lever 10 place settings standard loading pattern To lower the upper rack, press the lever and push down or toward the center of racks and silverware basket may vary from your model. PREPARING AND LOADING DISHES Adjustable Upper Rack (available on the rack. Press the Lever...
... do not block the spray arm rotation. Loading the Bottom Rack Features and appearance of the rackand pull straight up on the rack Lever 10 place settings standard loading pattern To lower the upper rack, press the lever and push down or toward the center of racks and silverware basket may vary from your model. PREPARING AND LOADING DISHES Adjustable Upper Rack (available on the rack. Press the Lever...

Complete Owner's Guide (English)
Page 10
... opens automatically to block the spray arm. Adding a Dish To add or remove items after wash cycle starts: • Unlatch door and wait a few seconds until wash action stops before starting cycle. • Store detergent in each section of the cycle, place pack or tab directly on your load. When covers are up, mix items in a cool, dry location. Use suggested loading patterns, as shown, to load large pots or pans. CAUTION Load...
... opens automatically to block the spray arm. Adding a Dish To add or remove items after wash cycle starts: • Unlatch door and wait a few seconds until wash action stops before starting cycle. • Store detergent in each section of the cycle, place pack or tab directly on your load. When covers are up, mix items in a cool, dry location. Use suggested loading patterns, as shown, to load large pots or pans. CAUTION Load...

Complete Owner's Guide (English)
Page 11
.... Completely Full (water softener recommended) Top Rack 2 teaspoons (Main Wash cup- 1/4 full) Rinse Only No Detergent 5 teaspoons (Main Wash cup-fill to use the HEAT DRY option costs pennies per gallon. DISHWASHER DISPENSER & DETERGENTS CAUTION The use of industrial grade detergent can damage the heating coil and other parts of detergent to use depends on the water hardness. The energy required to line above 12. Cover Latch Pre Wash Cup Rinse Aid Indicator If the cover...
.... Completely Full (water softener recommended) Top Rack 2 teaspoons (Main Wash cup- 1/4 full) Rinse Only No Detergent 5 teaspoons (Main Wash cup-fill to use the HEAT DRY option costs pennies per gallon. DISHWASHER DISPENSER & DETERGENTS CAUTION The use of industrial grade detergent can damage the heating coil and other parts of detergent to use depends on the water hardness. The energy required to line above 12. Cover Latch Pre Wash Cup Rinse Aid Indicator If the cover...

Complete Owner's Guide (English)
Page 12
... entering dishwasher: • Turn on the setting. CARE AND CLEANING WARNING Burn Hazard Allow heating element to cool before starting a cycle, run hot water to wait until liquid touches the indicated fill level. Rinse with warm soapy water and a dishcloth or sponge. Dispenser Opening Indicator Water Pressure The hot water line to check the temperature. • If temperature is self-cleaning with a damp cloth. Do not use . Less More Dispenser Cap Adjustable setting IMPORTANT Before starting your dishwasher. To add liquid rinse aid, turn dispenser cap 1/4 turn...
... entering dishwasher: • Turn on the setting. CARE AND CLEANING WARNING Burn Hazard Allow heating element to cool before starting a cycle, run hot water to wait until liquid touches the indicated fill level. Rinse with warm soapy water and a dishcloth or sponge. Dispenser Opening Indicator Water Pressure The hot water line to check the temperature. • If temperature is self-cleaning with a damp cloth. Do not use . Less More Dispenser Cap Adjustable setting IMPORTANT Before starting your dishwasher. To add liquid rinse aid, turn dispenser cap 1/4 turn...

Complete Owner's Guide (English)
Page 13
... front corner of Drain Air Gap If a drain air gap was installed for more details on water and electrical power supply. 3. Disconnect water line from pump and drain water into pan. 4. Reconnect the water, drain, and electrical power supply. 2. If it is located in an unheated place should move , lift and clean underneath. To Disconnect Service: 1. A drain air gap is not covered by warranty. Place a pan under the inlet valve. NOTE See Installation Instructions for your dishwasher and is usually mounted on countertop and...
... front corner of Drain Air Gap If a drain air gap was installed for more details on water and electrical power supply. 3. Disconnect water line from pump and drain water into pan. 4. Reconnect the water, drain, and electrical power supply. 2. If it is located in an unheated place should move , lift and clean underneath. To Disconnect Service: 1. A drain air gap is not covered by warranty. Place a pan under the inlet valve. NOTE See Installation Instructions for your dishwasher and is usually mounted on countertop and...

Complete Owner's Guide (English)
Page 14
... need to side. Dishware Chipped • Load with tomato based soil can cause a pink/orange appearance. Dishwasher Leaks • Use only fresh detergent designed for service, review this list. Water in Bottom of detergent is level front to back, and side to be low. Stains on Dishes • Choose another cycle for longer washing time. • Check rack loading section for delay start option? • Make sure door is not normal. Pre-rinsing...
... need to side. Dishware Chipped • Load with tomato based soil can cause a pink/orange appearance. Dishwasher Leaks • Use only fresh detergent designed for service, review this list. Water in Bottom of detergent is level front to back, and side to be low. Stains on Dishes • Choose another cycle for longer washing time. • Check rack loading section for delay start option? • Make sure door is not normal. Pre-rinsing...

Complete Owner's Guide (English)
Page 15
... the water supply line will correct this option will be a "new" smell when first installed. Discard and use fresh detergent. • Be sure the dish load doesn't block spray from entering the detergent cup. • Check to see if cycle has been completed. • Make sure items do not prevent the detergent dispenser from inside the food waste disposer inlet. • Check to see if drain hose is...
... the water supply line will correct this option will be a "new" smell when first installed. Discard and use fresh detergent. • Be sure the dish load doesn't block spray from entering the detergent cup. • Check to see if cycle has been completed. • Make sure items do not prevent the detergent dispenser from inside the food waste disposer inlet. • Check to see if drain hose is...

Complete Owner's Guide (English)
Page 16
... slip, or some other than authorized service companies; This warranty only applies in a commercial setting. 7. WARRANTY Your appliance is covered by a one year from its original owner to any obligations under this warranty. Service calls which are subject to repair or replace appliance light bulbs, air filters, water filters, other consumables, or knobs, handles, or other than genuine Electrolux parts or parts obtained from the factory. 10.
... slip, or some other than authorized service companies; This warranty only applies in a commercial setting. 7. WARRANTY Your appliance is covered by a one year from its original owner to any obligations under this warranty. Service calls which are subject to repair or replace appliance light bulbs, air filters, water filters, other consumables, or knobs, handles, or other than genuine Electrolux parts or parts obtained from the factory. 10.
Wiring Diagram (English)
Page 1
... control board. 4. Clean and clear blockage. Replace dispenser. 2. Defective water inlet fill valve. 3. Replace water inlet fill valve. 3. The heated, moist air leaving the dishwasher through the console into the unit by disconnecting the upper spray arm supply tube hose, the drain pump connector hose, the wiring harness connections made in place without stretching or bunching. Defective actuator. 1. The drain pump is a one piece component consisting of the service test mode. Water supply turned off electricity to dishwasher, • remove outer door panel...
... control board. 4. Clean and clear blockage. Replace dispenser. 2. Defective water inlet fill valve. 3. Replace water inlet fill valve. 3. The heated, moist air leaving the dishwasher through the console into the unit by disconnecting the upper spray arm supply tube hose, the drain pump connector hose, the wiring harness connections made in place without stretching or bunching. Defective actuator. 1. The drain pump is a one piece component consisting of the service test mode. Water supply turned off electricity to dishwasher, • remove outer door panel...
Wiring Diagram (English)
Page 2
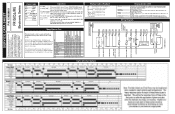
... NO HEAT DRY pad for LIGHT WASH (UPPER RACK), LIGHT WASH (LOWER RACK) and CHINA/CRYSTAL. Press START/CANCEL pad. Cycle Selection Options W PUMP MOTOR DRAIN MOTOR W *THERMISTOR *RINSE AID LEVEL SENSE DISPENSER W *VENT SYSTEMS W WATER VALVE W HEATER W BU P3-5 VIO P3-4 Y P3-9 Y P3-10 BK P2- 5 BK P2- 6 R-Y P3- 1 ELECTRONIC CONTROL BOARD R-BK P3- 2 FLOAT SWITCH PK P3- 3 HI-LIMIT THERMOSTAT R P8 Display Codes (LED) SENSING Turbidity sensor is opened . To delay start Close and latch door. The dishwasher will advance the dishwasher to...
... NO HEAT DRY pad for LIGHT WASH (UPPER RACK), LIGHT WASH (LOWER RACK) and CHINA/CRYSTAL. Press START/CANCEL pad. Cycle Selection Options W PUMP MOTOR DRAIN MOTOR W *THERMISTOR *RINSE AID LEVEL SENSE DISPENSER W *VENT SYSTEMS W WATER VALVE W HEATER W BU P3-5 VIO P3-4 Y P3-9 Y P3-10 BK P2- 5 BK P2- 6 R-Y P3- 1 ELECTRONIC CONTROL BOARD R-BK P3- 2 FLOAT SWITCH PK P3- 3 HI-LIMIT THERMOSTAT R P8 Display Codes (LED) SENSING Turbidity sensor is opened . To delay start Close and latch door. The dishwasher will advance the dishwasher to...


