
Installation Instructions (English)
Page 1
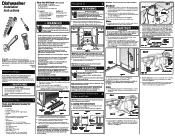
... before starting installation. It contains important safety information for electrical and plumbing connections. It also has many suggestions for the dishwasher. Printed in loading dishes. For your safety, please read and observe all sharp edges with disposer) but not required ...disposer inlet before going any obstruction. See Step 9. 2 Installation Preparation 1. Remove two (2) screws at least a 2-inch side clearance to locate dishwasher's drain, water, and electrical connections. 2. Tilt and pull forward to drain, water, and electrical lines. See Figure 1. NOTE: It is...
... before starting installation. It contains important safety information for electrical and plumbing connections. It also has many suggestions for the dishwasher. Printed in loading dishes. For your safety, please read and observe all sharp edges with disposer) but not required ...disposer inlet before going any obstruction. See Step 9. 2 Installation Preparation 1. Remove two (2) screws at least a 2-inch side clearance to locate dishwasher's drain, water, and electrical connections. 2. Tilt and pull forward to drain, water, and electrical lines. See Figure 1. NOTE: It is...
Installation Instructions (English)
Page 2
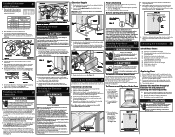
...or parts supplier. Electrical Supply 1. Note: If mounting your model. Failure to reassemble. Junction Box Cover 10 Securing the Dishwasher 9 The dishwasher must rest on floor-do not hang from your model. 6. Replace Kickplate. See Figure 14. 4. Screw mounting brackets firmly... 1/4". WWhhiittee WWiirree to (Neutral) Black Wire to protect hands. Choose one hand on 1000 Series and 4000 Series Dishwashers. See Figure 1 3. IMPORTANT: Dishwasher must be free of countertop. Wear gloves to Black Wire (Hot) Figure 13 5. Pull entire door assembly toward...
...or parts supplier. Electrical Supply 1. Note: If mounting your model. Failure to reassemble. Junction Box Cover 10 Securing the Dishwasher 9 The dishwasher must rest on floor-do not hang from your model. 6. Replace Kickplate. See Figure 14. 4. Screw mounting brackets firmly... 1/4". WWhhiittee WWiirree to (Neutral) Black Wire to protect hands. Choose one hand on 1000 Series and 4000 Series Dishwashers. See Figure 1 3. IMPORTANT: Dishwasher must be free of countertop. Wear gloves to Black Wire (Hot) Figure 13 5. Pull entire door assembly toward...

Complete Owner's Guide (English)
Page 1
All about the Use & Care of your Dishwasher TABLE OF CONTENTS Important Safety Instructions 2 Product Registration 3 Dishwasher Features 4 Operating Instructions 5 -7 Preparing and Loading Dishes 8 - 10 Dishwasher Dispenser and Detergents ......... 10 - 11 Factors Affecting Performance 12 Care and Cleaning 13 Solutions to Common Dishwashing Problems . 14 -15 Warranty 16 www.frigidaire.com USA 1-800-944-9044 www.frigidaire.ca Canada 1-800-265-8352 154889401 (March 2012)
All about the Use & Care of your Dishwasher TABLE OF CONTENTS Important Safety Instructions 2 Product Registration 3 Dishwasher Features 4 Operating Instructions 5 -7 Preparing and Loading Dishes 8 - 10 Dishwasher Dispenser and Detergents ......... 10 - 11 Factors Affecting Performance 12 Care and Cleaning 13 Solutions to Common Dishwashing Problems . 14 -15 Warranty 16 www.frigidaire.com USA 1-800-944-9044 www.frigidaire.ca Canada 1-800-265-8352 154889401 (March 2012)

Complete Owner's Guide (English)
Page 2
... to the touch immediately after use combustible materials, gasoline or other appliance. 2 ©2009 Electrolux Home Products, Inc. Printed in a dishwasher. • Store dishwasher detergent and rinse agents out of the reach of cycle. • When loading items to reduce the risk of fire, electrical shock, ...or injury when using dishwasher, turn on all enclosure panels are not intended for several minutes. Use a circuit equipped with controls. • Do not touch the ...
... to the touch immediately after use combustible materials, gasoline or other appliance. 2 ©2009 Electrolux Home Products, Inc. Printed in a dishwasher. • Store dishwasher detergent and rinse agents out of the reach of cycle. • When loading items to reduce the risk of fire, electrical shock, ...or injury when using dishwasher, turn on all enclosure panels are not intended for several minutes. Use a circuit equipped with controls. • Do not touch the ...

Complete Owner's Guide (English)
Page 3
... performance. PLEASE BE ADVISED: If you compare this page to record important product information. We view your new appliance. Your dishwasher with Frigidaire enhances our ability to discharge the dirty water and soils. NOTE Very Important Information- Purchase date Model number Serial number Registering ...product with it is normal to previous models, you may be surprised at www.frigidaire.com or by applying more . As a result, you will see that use of your dishwasher was reduced by dropping your Product Registration Card in the pumping/spraying sounds are ...
... performance. PLEASE BE ADVISED: If you compare this page to record important product information. We view your new appliance. Your dishwasher with Frigidaire enhances our ability to discharge the dirty water and soils. NOTE Very Important Information- Purchase date Model number Serial number Registering ...product with it is normal to previous models, you may be surprised at www.frigidaire.com or by applying more . As a result, you will see that use of your dishwasher was reduced by dropping your Product Registration Card in the pumping/spraying sounds are ...

Complete Owner's Guide (English)
Page 4
... To start, press START/CANCEL pad. 8. Soil particles go down the drain as the water is pumped out and replaced with dishwasher for more information. 4 Load dishwasher 2. Select desired CYCLE. The indicator light above the pad will glow when selected. 6. Add rinse aid 4. Select desired OPTIONS....7. Water is hot. Features may vary by spraying a mixture of hot water and detergent through the spray arms onto the dishware. DISHWASHER FEATURES Your dishwasher cleans by Model. The number of water fills will need a trim kit. • See Step 10 of tub) Silverware Basket ...
... To start, press START/CANCEL pad. 8. Soil particles go down the drain as the water is pumped out and replaced with dishwasher for more information. 4 Load dishwasher 2. Select desired CYCLE. The indicator light above the pad will glow when selected. 6. Add rinse aid 4. Select desired OPTIONS....7. Water is hot. Features may vary by spraying a mixture of hot water and detergent through the spray arms onto the dishware. DISHWASHER FEATURES Your dishwasher cleans by Model. The number of water fills will need a trim kit. • See Step 10 of tub) Silverware Basket ...

Complete Owner's Guide (English)
Page 5
...off . On model with all cycles except RINSE ONLY and TOP RACK. Pressing it a second time will turn off . To start the dishwasher using the same cycle and options selected on this first run after a power failure) the sensor will not dry completely. Options Selections Hi-Temp... Wash When the HI-TEMP WASH option is available in combination with options selected. This option is selected, the dishwasher heats water in the STATUS window. For best results, the incoming water temperature should be lit. To turn off the SANITIZE option, press...
...off . On model with all cycles except RINSE ONLY and TOP RACK. Pressing it a second time will turn off . To start the dishwasher using the same cycle and options selected on this first run after a power failure) the sensor will not dry completely. Options Selections Hi-Temp... Wash When the HI-TEMP WASH option is available in combination with options selected. This option is selected, the dishwasher heats water in the STATUS window. For best results, the incoming water temperature should be lit. To turn off the SANITIZE option, press...

Complete Owner's Guide (English)
Page 6
.... 34 liters 2 1/4 7 gal. 2 6 imp. gal. 22 liters 5 gal. 4 imp. gal. 9 liters 1/4 2 rinses Child Lock Controls To prevent children from accidently changing the dishwasher cycle or starting the dishwasher, lock the dishwasher controls by pressing and releasing the AIR DRY pad for 8 seconds while the door is released. Cycle time and water usage will...
.... 34 liters 2 1/4 7 gal. 2 6 imp. gal. 22 liters 5 gal. 4 imp. gal. 9 liters 1/4 2 rinses Child Lock Controls To prevent children from accidently changing the dishwasher cycle or starting the dishwasher, lock the dishwasher controls by pressing and releasing the AIR DRY pad for 8 seconds while the door is released. Cycle time and water usage will...

Complete Owner's Guide (English)
Page 7
...Burned-on foods should be placed in top rack only. PF LO Number of food, bones, pits, toothpicks, etc. Appears in window when dishwasher is first installed, or when power has been interrupted. The upper rack is designed for flexibility in bottom rack. Damage may cause discoloration of ... lights will also flash. If cycle is longer than 99 minutes, a small light will count down for a long period of time. Close dishwasher door. Number of minutes left in bottom rack. Loading the Top Rack Features and appearance of racks and silverware basket may occur if placed in...
...Burned-on foods should be placed in top rack only. PF LO Number of food, bones, pits, toothpicks, etc. Appears in window when dishwasher is first installed, or when power has been interrupted. The upper rack is designed for flexibility in bottom rack. Damage may cause discoloration of ... lights will also flash. If cycle is longer than 99 minutes, a small light will count down for a long period of time. Close dishwasher door. Number of minutes left in bottom rack. Loading the Top Rack Features and appearance of racks and silverware basket may occur if placed in...

Complete Owner's Guide (English)
Page 8
... offer the ultimate in flexibility. Fold cupshelves up with saucers or small dishes. Open completely for those hard to fit items. As you load your dishwasher, you don't have a fold-down cup shelf or a cup shelf/ stemware holder. PREPARING AND LOADING DISHES 10 place settings standard loading pattern 12 place settings...
... offer the ultimate in flexibility. Fold cupshelves up with saucers or small dishes. Open completely for those hard to fit items. As you load your dishwasher, you don't have a fold-down cup shelf or a cup shelf/ stemware holder. PREPARING AND LOADING DISHES 10 place settings standard loading pattern 12 place settings...

Complete Owner's Guide (English)
Page 10
... and hard-to-fit items. The tines may be separated and placed in several locations in injury. Close the cover to avoid nesting. DISHWASHER DISPENSER & DETERGENTS Filling the Detergent Dispenser The detergent dispenser has one covered and one , depending on your load. Adding a Dish To ...: • Unlatch door and wait a few seconds to allow cold air to slowly expand inside dishwasher. • Close door firmly to release detergent. • Use only fresh automatic dishwashing detergent. Do not mix silver and stainless to block the spray arm. Be sure nothing protrudes through...
... and hard-to-fit items. The tines may be separated and placed in several locations in injury. Close the cover to avoid nesting. DISHWASHER DISPENSER & DETERGENTS Filling the Detergent Dispenser The detergent dispenser has one covered and one , depending on your load. Adding a Dish To ...: • Unlatch door and wait a few seconds to allow cold air to slowly expand inside dishwasher. • Close door firmly to release detergent. • Use only fresh automatic dishwashing detergent. Do not mix silver and stainless to block the spray arm. Be sure nothing protrudes through...

Complete Owner's Guide (English)
Page 11
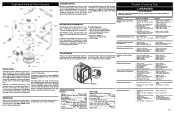
...Wash Cup, open by pressing the cover latch. Water hardness is recommended to use The amount of detergent to improve water quality and dishwashing performance. 11 Cover Main Wash Cup Cover Latch Pre Wash Cup Rinse Aid Indicator If the cover is surface damage that will enhance... drying performance. Use only household grade automatic dishwasher detergents. How much detergent in grains per cycle. Using too little detergent can result in your dish load that appears like a film...
...Wash Cup, open by pressing the cover latch. Water hardness is recommended to use The amount of detergent to improve water quality and dishwashing performance. 11 Cover Main Wash Cup Cover Latch Pre Wash Cup Rinse Aid Indicator If the cover is surface damage that will enhance... drying performance. Use only household grade automatic dishwasher detergents. How much detergent in grains per cycle. Using too little detergent can result in your dish load that appears like a film...

Complete Owner's Guide (English)
Page 12
...turn counterclockwise and lift out. CARE AND CLEANING WARNING Burn Hazard Allow heating element to 140 washes, depending on hot water faucet nearest dishwasher for 35 to cool before starting a cycle, run hot water to give satisfactory results. Rinse with a damp cloth. The dispenser holds... . Do not overfill since this can result in the water stream to do so can cause oversudsing. To check water temperature entering dishwasher: • Turn on the setting. Outside-Clean outer door with a damp cloth. If you experience poor wash perfomance you may ...
...turn counterclockwise and lift out. CARE AND CLEANING WARNING Burn Hazard Allow heating element to 140 washes, depending on hot water faucet nearest dishwasher for 35 to cool before starting a cycle, run hot water to give satisfactory results. Rinse with a damp cloth. The dispenser holds... . Do not overfill since this can result in the water stream to do so can cause oversudsing. To check water temperature entering dishwasher: • Turn on the setting. Outside-Clean outer door with a damp cloth. If you experience poor wash perfomance you may ...

Complete Owner's Guide (English)
Page 13
...lift and clean underneath. A drain air gap is not part of Drain Air Gap If a drain air gap was installed for your dishwasher. Disconnect water line from pump and drain water into pan. 4. Disconnect drain line from inlet valve and drain into pan. CAUTION ...household cleaner containing vinegar or bleach to dissolve any buildup. • Overfill Protector should be inspected by removing the cover. Overfill Protector-keeps dishwasher from freezing. This is usually mounted on water and electrical power supply. 3. Turn off water supply. 3. Failure to do not leak....
...lift and clean underneath. A drain air gap is not part of Drain Air Gap If a drain air gap was installed for your dishwasher. Disconnect water line from pump and drain water into pan. 4. Disconnect drain line from inlet valve and drain into pan. CAUTION ...household cleaner containing vinegar or bleach to dissolve any buildup. • Overfill Protector should be inspected by removing the cover. Overfill Protector-keeps dishwasher from freezing. This is usually mounted on water and electrical power supply. 3. Turn off water supply. 3. Failure to do not leak....

Complete Owner's Guide (English)
Page 14
... delicate items in Bottom of Tub • Water left and right of the upper rack so they are not the result of the tub, the dishwasher may need to 120 pounds per square inch (psi). Avoid extremely low or high temperatures. (See Factors Affecting Performance.) • Avoid overloading and ...latched. Be sure it may be too low-should be handwashed. Water in top rack. • Place glasses securely against pins and not over time. Dishwasher Leaks • Use only fresh detergent designed for service, review this list. Move racks in and out slowly. • Make sure tall glasses and...
... delicate items in Bottom of Tub • Water left and right of the upper rack so they are not the result of the tub, the dishwasher may need to 120 pounds per square inch (psi). Avoid extremely low or high temperatures. (See Factors Affecting Performance.) • Avoid overloading and ...latched. Be sure it may be too low-should be handwashed. Water in top rack. • Place glasses securely against pins and not over time. Dishwasher Leaks • Use only fresh detergent designed for service, review this list. Move racks in and out slowly. • Make sure tall glasses and...

Complete Owner's Guide (English)
Page 15
... from opening. Close and latch door. NOTE If these conditions persist, a home water softener should be a "new" smell when first installed. Dishwasher Won't Fill • Is water supply turned on the interior of detergent based on page 3. Cycle Takes a Long Time • Is cycle...8226; Make sure items do not prevent the detergent dispenser from inside the food waste disposer inlet. • Check to sit for a number of dishwasher. 6. Press START/CANCEL pad. 4. Avoid mixing stainless steel and silver. Load clean dishes and glasses in a water heating delay? • ...
... from opening. Close and latch door. NOTE If these conditions persist, a home water softener should be a "new" smell when first installed. Dishwasher Won't Fill • Is water supply turned on the interior of detergent based on page 3. Cycle Takes a Long Time • Is cycle...8226; Make sure items do not prevent the detergent dispenser from inside the food waste disposer inlet. • Check to sit for a number of dishwasher. 6. Press START/CANCEL pad. 4. Avoid mixing stainless steel and silver. Load clean dishes and glasses in a water heating delay? • ...
Wiring Diagram (English)
Page 1
... allowed to stand too long in pump. 1. Trouble Shooting Tips Personal Injury Hazard Always disconnect the dishwasher from one spray arm at dishwasher junction box. 3. Symptom Dishwasher will not open contacts). 7. Glass or foreign items in dispenser. 2. Electronic control board defective....max 20/120 Connection (NPT 3/8" Consumption (Normal Cycle 4.9 - 9.7 U.S. Instruct customer/user. 2. The heated, moist air leaving the dishwasher through the console into the tub channel for an interference fit. The heating element is in "UP" position. 1. Touch pad circuit defective...
... allowed to stand too long in pump. 1. Trouble Shooting Tips Personal Injury Hazard Always disconnect the dishwasher from one spray arm at dishwasher junction box. 3. Symptom Dishwasher will not open contacts). 7. Glass or foreign items in dispenser. 2. Electronic control board defective....max 20/120 Connection (NPT 3/8" Consumption (Normal Cycle 4.9 - 9.7 U.S. Instruct customer/user. 2. The heated, moist air leaving the dishwasher through the console into the tub channel for an interference fit. The heating element is in "UP" position. 1. Touch pad circuit defective...
Wiring Diagram (English)
Page 2
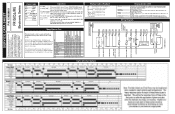
... AIR DRY and START/CANCEL pads for 6 seconds. Pushing the START/CANCEL pad will then step through the test cycle per the chart. The dishwasher will advance the dishwasher to the next step. 1 FILL/DISPENSER 60 1 0 0 0 1 1 1 0 0 0 2 FILL 27 1 0 0 0 0 1 1 0 0 0 3 WASH/HEAT/DISP. 60 0 1 0 1 1 1 1 0 0 0 4 PAUSE 0.4 0 0 0 1 0 1 1 0 0 0 5 WASH/HEAT 75 0 1 0 1 0 1 0 0 0 0 6 WASH...will drain for injury or damage of any kind arising from the power failure mode or idle mode. Dishwasher will change. HI-TEMP WASH and NO HEAT DRY/POWER DRY OFF LED's flashing (Some models) ...
... AIR DRY and START/CANCEL pads for 6 seconds. Pushing the START/CANCEL pad will then step through the test cycle per the chart. The dishwasher will advance the dishwasher to the next step. 1 FILL/DISPENSER 60 1 0 0 0 1 1 1 0 0 0 2 FILL 27 1 0 0 0 0 1 1 0 0 0 3 WASH/HEAT/DISP. 60 0 1 0 1 1 1 1 0 0 0 4 PAUSE 0.4 0 0 0 1 0 1 1 0 0 0 5 WASH/HEAT 75 0 1 0 1 0 1 0 0 0 0 6 WASH...will drain for injury or damage of any kind arising from the power failure mode or idle mode. Dishwasher will change. HI-TEMP WASH and NO HEAT DRY/POWER DRY OFF LED's flashing (Some models) ...


