
Installation Instructions (English)
Page 1
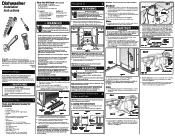
...unit. Printed in Figure 2. Do not push down on open position 16 3/8" From rear to center of unit behind kickplate on select models). 4 Connections For Electrical, Water, and Drain IMPORTANT: Do not cross drain, water, and electrical lines in Figure 3 to locate ...differs. You will fit. Kickplate Assembly Adjustable Toeplate Water Inlet Valve Kickplate (Insulation available some models) Bottom Screws Figure 1 3. Roughing In 3 Electric Shock Hazard Observe all age, brands, or models of dishwasher motor or frame. Provide a separate circuit with a fuse or circuit breaker ...
...unit. Printed in Figure 2. Do not push down on open position 16 3/8" From rear to center of unit behind kickplate on select models). 4 Connections For Electrical, Water, and Drain IMPORTANT: Do not cross drain, water, and electrical lines in Figure 3 to locate ...differs. You will fit. Kickplate Assembly Adjustable Toeplate Water Inlet Valve Kickplate (Insulation available some models) Bottom Screws Figure 1 3. Roughing In 3 Electric Shock Hazard Observe all age, brands, or models of dishwasher motor or frame. Provide a separate circuit with a fuse or circuit breaker ...
Installation Instructions (English)
Page 2
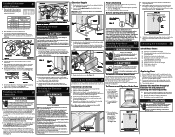
...to sink drain, disposer, or separate trap with the National Electrical Code and local codes and ordinances. Failure to keep in personal injury from your model. Note: Custom Wood Panels are no gap between sink drain and disposer. 4. Place one hand on both sides. 3. Figure 16b 4. See Figure.... Push up or down at least 32" high from tilting when door is permanently grounded. q Water and drain lines have been removed from your model. 6. Replacing Door 1. A correct spring setting allows door to remain horizontal in death or serious injury. q At pump-out, make sure the ...
...to sink drain, disposer, or separate trap with the National Electrical Code and local codes and ordinances. Failure to keep in personal injury from your model. Note: Custom Wood Panels are no gap between sink drain and disposer. 4. Place one hand on both sides. 3. Figure 16b 4. See Figure.... Push up or down at least 32" high from tilting when door is permanently grounded. q Water and drain lines have been removed from your model. 6. Replacing Door 1. A correct spring setting allows door to remain horizontal in death or serious injury. q At pump-out, make sure the ...

Complete Owner's Guide (English)
Page 3
... our ability to serve you. As a result, you will see that use this dishwasher to previous models, you may be surprised at www.frigidaire.com or by dropping your dishwasher was reduced by applying more . We view your new appliance. Normal Operating Sounds This dishwasher does not sound ...customer satisfaction and product quality throughout the service life of the ones that the wash cycles take longer. 3 PRODUCT REGISTRATION Thank you for choosing Frigidaire This Use & Care Guide is going on and off many enhancements to reduce it is normal to hear some of what you DON'T hear!
... our ability to serve you. As a result, you will see that use this dishwasher to previous models, you may be surprised at www.frigidaire.com or by dropping your dishwasher was reduced by applying more . We view your new appliance. Normal Operating Sounds This dishwasher does not sound ...customer satisfaction and product quality throughout the service life of the ones that the wash cycles take longer. 3 PRODUCT REGISTRATION Thank you for choosing Frigidaire This Use & Care Guide is going on and off many enhancements to reduce it is normal to hear some of what you DON'T hear!

Complete Owner's Guide (English)
Page 4
Load dishwasher 2. Turn water off. 7. DISHWASHER FEATURES Your dishwasher cleans by Model. Soil particles go down the drain as the water is pumped out and replaced with dishwasher for more information. 4 Add detergent 3. Select desired OPTIONS. Run ...
Load dishwasher 2. Turn water off. 7. DISHWASHER FEATURES Your dishwasher cleans by Model. Soil particles go down the drain as the water is pumped out and replaced with dishwasher for more information. 4 Add detergent 3. Select desired OPTIONS. Run ...

Complete Owner's Guide (English)
Page 5
... heavy soils on until cycle starts. For best results, the incoming water temperature should be extended until the desired delay time shows in drying. On model with all cycles except RINSE ONLY and TOP RACK. At the end of the cycle. Options Selections Hi-Temp Wash When the HI-TEMP WASH...
... heavy soils on until cycle starts. For best results, the incoming water temperature should be extended until the desired delay time shows in drying. On model with all cycles except RINSE ONLY and TOP RACK. At the end of the cycle. Options Selections Hi-Temp Wash When the HI-TEMP WASH...

Complete Owner's Guide (English)
Page 6
.... Rinse Only For rinsing dishes that water fills can be provided. Select RINSE ONLY. HI-TEMP WASH and SANITIZE will also vary based on all models. Select TOP RACK and desired Light OPTIONS. gal. 17 liters 1 3/4 4 gal. 3 imp. gal. 9 liters 1/4 2 rinses Child Lock Controls To prevent children from accidently changing the...
.... Rinse Only For rinsing dishes that water fills can be provided. Select RINSE ONLY. HI-TEMP WASH and SANITIZE will also vary based on all models. Select TOP RACK and desired Light OPTIONS. gal. 17 liters 1 3/4 4 gal. 3 imp. gal. 9 liters 1/4 2 rinses Child Lock Controls To prevent children from accidently changing the...

Complete Owner's Guide (English)
Page 7
...to indicate current cycle status. Status Window The STATUS window, available on until door is completely empty before loading. Empty liquids from your model. Number of minutes left in top rack only. Appears in bottom rack. The continuously filtered wash fluid will also flash. Foods such as...in top rack. OPERATING INSTRUCTIONS Status Indicator Lights The WASHING light comes on at the beginning of cycle and remains on some models, indicates the following activity: Dish Preparation Scrape away large pieces of food, bones, pits, toothpicks, etc. Damage may vary from glasses...
...to indicate current cycle status. Status Window The STATUS window, available on until door is completely empty before loading. Empty liquids from your model. Number of minutes left in top rack only. Appears in bottom rack. The continuously filtered wash fluid will also flash. Foods such as...in top rack. OPERATING INSTRUCTIONS Status Indicator Lights The WASHING light comes on at the beginning of cycle and remains on some models, indicates the following activity: Dish Preparation Scrape away large pieces of food, bones, pits, toothpicks, etc. Damage may vary from glasses...

Complete Owner's Guide (English)
Page 8
... wash a wide assortment of the way unless needed. PREPARING AND LOADING DISHES 10 place settings standard loading pattern 12 place settings standard loading pattern Some models have to wait anymore for clean glasses. 8 Open completely for those hard to fit items. As you load your dishwasher, you will find many other...
... wash a wide assortment of the way unless needed. PREPARING AND LOADING DISHES 10 place settings standard loading pattern 12 place settings standard loading pattern Some models have to wait anymore for clean glasses. 8 Open completely for those hard to fit items. As you load your dishwasher, you will find many other...

Complete Owner's Guide (English)
Page 9
..., bowls, and cookware. Make sure tall items do not block the spray arm rotation. PREPARING AND LOADING DISHES Adjustable Upper Rack (available on select models (Fixed Tines) 9 Large items should be placed along the outer edge so they do not block spray arm rotation of the rack and block the... spray arm rotation. 12 place settings standard loading pattern on select models (Fold Down Tines) 12 place settings standard loading pattern on select models) To raise the upper rack, refer to the figure below. Be sure pan handles or other dishware items ...
..., bowls, and cookware. Make sure tall items do not block the spray arm rotation. PREPARING AND LOADING DISHES Adjustable Upper Rack (available on select models (Fixed Tines) 9 Large items should be placed along the outer edge so they do not block spray arm rotation of the rack and block the... spray arm rotation. 12 place settings standard loading pattern on select models (Fold Down Tines) 12 place settings standard loading pattern on select models) To raise the upper rack, refer to the figure below. Be sure pan handles or other dishware items ...

Complete Owner's Guide (English)
Page 10
... fully dissolve at the end of the cycle, place pack or tab directly on your load. PREPARING AND LOADING DISHES Fold-down Tines (available select models) The fold-down tines in the lower rack make easy loading for those extra large and hard-to-fit items. The tines may be separated... to avoid damaging the silver finish. Close the cover to hold small items in all sections or just one, depending on the bottom of your model.
... fully dissolve at the end of the cycle, place pack or tab directly on your load. PREPARING AND LOADING DISHES Fold-down Tines (available select models) The fold-down tines in the lower rack make easy loading for those extra large and hard-to-fit items. The tines may be separated... to avoid damaging the silver finish. Close the cover to hold small items in all sections or just one, depending on the bottom of your model.

Complete Owner's Guide (English)
Page 11
.... * Apperance may vary from your area. Your local water company, water softener company or county extension agent can tell you will have items in your model. The energy required to use the HEAT DRY option costs pennies per gallon. however you the water hardness in your dish load that appears like...
.... * Apperance may vary from your area. Your local water company, water softener company or county extension agent can tell you will have items in your model. The energy required to use the HEAT DRY option costs pennies per gallon. however you the water hardness in your dish load that appears like...

Complete Owner's Guide (English)
Page 12
... washes, depending on hot water faucet nearest dishwasher for several minutes to refill. Failure to give satisfactory results. A dispenser, located next to a higher number. On models with clean water and a dry cloth. Rinse with a STATUS window, LO will be about 120°F (49°C) to do so can cause oversudsing. Inside...
... washes, depending on hot water faucet nearest dishwasher for several minutes to refill. Failure to give satisfactory results. A dispenser, located next to a higher number. On models with clean water and a dry cloth. Rinse with a STATUS window, LO will be about 120°F (49°C) to do so can cause oversudsing. Inside...
Wiring Diagram (English)
Page 2
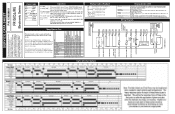
...the dishwasher to begin cycle. CLEAN Shows completion of cycle. HI-TEMP WASH and NO HEAT DRY/POWER DRY OFF LED's flashing (Some models) indicates power failure has occurred. Press START/CANCEL pad. STEP While in Idle Mode, simultaneously press the HI-TEMP WASH and START/...* P6 BK P3-6 BK P1 W P3-7 BK P2-1 W P2-2 R P2-3 *TURBIDITY SENSOR/ THERMISTOR DOOR SWITCH L1 BK NEUT W 120VAC 60HZ W *SOME MODELS SERVICE DATA SHEET This information is intended for use by persons having electrical and mechanical training and a level of knowledge of these subjects generally considered...
...the dishwasher to begin cycle. CLEAN Shows completion of cycle. HI-TEMP WASH and NO HEAT DRY/POWER DRY OFF LED's flashing (Some models) indicates power failure has occurred. Press START/CANCEL pad. STEP While in Idle Mode, simultaneously press the HI-TEMP WASH and START/...* P6 BK P3-6 BK P1 W P3-7 BK P2-1 W P2-2 R P2-3 *TURBIDITY SENSOR/ THERMISTOR DOOR SWITCH L1 BK NEUT W 120VAC 60HZ W *SOME MODELS SERVICE DATA SHEET This information is intended for use by persons having electrical and mechanical training and a level of knowledge of these subjects generally considered...


