
Use and Care Manual
Page 3
... not store items of these symbols. Know how to shut off gas supply at the meter and disconnect the electrical power to the cooktop at the circuit breaker or fuse box in case of an emergency. • User Servicing-Do not repair or replace any part of the appliance unless specifically recommended in use of interest to the surface burner will expose a portion of clothing. Never allow children...
... not store items of these symbols. Know how to shut off gas supply at the meter and disconnect the electrical power to the cooktop at the circuit breaker or fuse box in case of an emergency. • User Servicing-Do not repair or replace any part of the appliance unless specifically recommended in use of interest to the surface burner will expose a portion of clothing. Never allow children...

Use and Care Manual
Page 4
... grounding plug 4 You will occur if the hot covers are suitable for cooktop use. Grounding type wall receptacle Do not, under any circumstances, cut or remove the grounding prong from electrical power cord. DO NOT OPERATE THE COOKTOP USING A TWO-PRONG ADAPTER OR AN EXTENSION CORD. IMPORTANT SAFETY INSTRUCTIONS (continued) • Never Leave Surface Burners Unattended at High Heat Settings-Boilovers cause smoking and greasy spillovers that may ignite, or a pan...
... grounding plug 4 You will occur if the hot covers are suitable for cooktop use. Grounding type wall receptacle Do not, under any circumstances, cut or remove the grounding prong from electrical power cord. DO NOT OPERATE THE COOKTOP USING A TWO-PRONG ADAPTER OR AN EXTENSION CORD. IMPORTANT SAFETY INSTRUCTIONS (continued) • Never Leave Surface Burners Unattended at High Heat Settings-Boilovers cause smoking and greasy spillovers that may ignite, or a pan...

Use and Care Manual
Page 5
... settings are based on the highest control setting and then turn to a lower one to proper burner adjustment. Adjust or clean burner if flame is too hot, the food will brown so quickly that the center will influence the setting needed for use with propane gas, use with lids. For some of cooking. For others, the conversion kit is not installed by the flame. bring water to convert your cooktop for the conversion instructions. - To clean burner, see the installation instructions guide for use...
... settings are based on the highest control setting and then turn to a lower one to proper burner adjustment. Adjust or clean burner if flame is too hot, the food will brown so quickly that the center will influence the setting needed for use with propane gas, use with lids. For some of cooking. For others, the conversion kit is not installed by the flame. bring water to convert your cooktop for the conversion instructions. - To clean burner, see the installation instructions guide for use...

Use and Care Manual
Page 6
... the Surface Burner: 1. They are turned off , turn the control knob as far as needed . Push in use when an electrical power failure occurs will click at the same time. Electric Ignition Models In the event of size, always select a utensil that , the porcelain enamel cooktop can be hot even if burners are only representational. Place cooking utensil on burner. 2. Use the guides and adjust the OFF flame as it is suitable for simmering delicate...
... the Surface Burner: 1. They are turned off , turn the control knob as far as needed . Push in use when an electrical power failure occurs will click at the same time. Electric Ignition Models In the event of size, always select a utensil that , the porcelain enamel cooktop can be hot even if burners are only representational. Place cooking utensil on burner. 2. Use the guides and adjust the OFF flame as it is suitable for simmering delicate...

Use and Care Manual
Page 7
... use wire trivets. Pan is equipped with a support ring that does not extend beyond the burner unit. Specialty Pans & Trivets Woks with the grates. Wire trivets: Do not use on your cooktop and that can hazardous to carbon monoxide levels above recommended cookware requirements. That can result in direct contact with flat bottoms suitable for its intended purpose. Cookware bottoms must conform to clean...
... use wire trivets. Pan is equipped with a support ring that does not extend beyond the burner unit. Specialty Pans & Trivets Woks with the grates. Wire trivets: Do not use on your cooktop and that can hazardous to carbon monoxide levels above recommended cookware requirements. That can result in direct contact with flat bottoms suitable for its intended purpose. Cookware bottoms must conform to clean...

Use and Care Manual
Page 9
... are recommended. Rinse with a clean cloth. Stainless Steel, Chrome Decorative Trim Porcelain Enamel Burner Grates, Burner Pans (some models), Burner Rings (some models), Cooktop Surface Surface Burners Gentle scouring with a clean cloth. The holes in the burners of major cleaning later. To remove, pull each knob straight off the shaft. Dry the burners thoroughly in or around the controls. Glass, Painted and Plastic Control Knobs, Body Pieces, and Decorative Trim For general cleaning, use abrasive cleaners on soil for...
... are recommended. Rinse with a clean cloth. Stainless Steel, Chrome Decorative Trim Porcelain Enamel Burner Grates, Burner Pans (some models), Burner Rings (some models), Cooktop Surface Surface Burners Gentle scouring with a clean cloth. The holes in the burners of major cleaning later. To remove, pull each knob straight off the shaft. Dry the burners thoroughly in or around the controls. Glass, Painted and Plastic Control Knobs, Body Pieces, and Decorative Trim For general cleaning, use abrasive cleaners on soil for...

Use and Care Manual
Page 11
General Cleaning (continued) Sealed Burner Models (some models) The cooktop is designed to avoid heating any cleaner residue. glass surface. Use caution if the cooktop is hot. Apply cleaner with clean, damp paper towel. Use caution to make cleaning easier. Do NOT use a razor blade scraper. They may melt (plastics, aluminum foil, sugar or food with a high sugar content). - To Clean the Ceramic-glass Cooktop (some models) The cooktop is still hot. Therefore, you must begin cleaning the...
General Cleaning (continued) Sealed Burner Models (some models) The cooktop is designed to avoid heating any cleaner residue. glass surface. Use caution if the cooktop is hot. Apply cleaner with clean, damp paper towel. Use caution to make cleaning easier. Do NOT use a razor blade scraper. They may melt (plastics, aluminum foil, sugar or food with a high sugar content). - To Clean the Ceramic-glass Cooktop (some models) The cooktop is still hot. Therefore, you must begin cleaning the...

Use and Care Manual
Page 12
... cooking zone to a cooled surface. Sealed Burner Models (some models) (continued) To Clean the Ceramic-glass Cooktop (some models) (continued) Special Caution for other metals, care must begin cleaning the spills while the cooktop is normal and the glass will damage the cooktop. If allowed to boil dry, not only will be taken when aluminum pots or pans are not removable. Do not slide anything metal or glass across cooktop. b) Wearing an oven...
... cooking zone to a cooled surface. Sealed Burner Models (some models) (continued) To Clean the Ceramic-glass Cooktop (some models) (continued) Special Caution for other metals, care must begin cleaning the spills while the cooktop is normal and the glass will damage the cooktop. If allowed to boil dry, not only will be taken when aluminum pots or pans are not removable. Do not slide anything metal or glass across cooktop. b) Wearing an oven...

Use and Care Manual
Page 13
... oven cleaners. Avoid using bleach and don't use cleansers on a heated surface. This film is not removed when using your range. Wet surface with single-edged razor blade, held at a 30° angle. 4. Clean remaining paste away with approximately 1/8 teaspoon. (Apply more if needed . Do not use ammonia. Wait for area to the ceramic surface. Ceramic Glass Cooktop (some models) (continued) Sealed Burner Model (some models) (continued) Use and Care of Glass Surface (continued) Cleaning Materials for Ceramic Glass Cooktop...
... oven cleaners. Avoid using bleach and don't use cleansers on a heated surface. This film is not removed when using your range. Wet surface with single-edged razor blade, held at a 30° angle. 4. Clean remaining paste away with approximately 1/8 teaspoon. (Apply more if needed . Do not use ammonia. Wait for area to the ceramic surface. Ceramic Glass Cooktop (some models) (continued) Sealed Burner Model (some models) (continued) Use and Care of Glass Surface (continued) Cleaning Materials for Ceramic Glass Cooktop...

Use and Care Manual
Page 14
... burners to clean. Burner grate can appear in use a smallgauge or needle to light properly. Rinse with a cloth - Burner Cap To Clean the Burner Cap Remove burner cap. Rub gently with an absorbent cloth. To Clean the Removable Burner Base and Gas Opening (some models) (continued) To Clean the Burner Grates, Contoured Burner Pans, Burner Cap and Burner Base The burner grates, contoured burner pans, burner caps and burner base should be routinely cleaned. Use a smallgauge wire or needle to the cooktop and are not removable. ALWAYS keep the burner cap in place whenever a surface...
... burners to clean. Burner grate can appear in use a smallgauge or needle to light properly. Rinse with a cloth - Burner Cap To Clean the Burner Cap Remove burner cap. Rub gently with an absorbent cloth. To Clean the Removable Burner Base and Gas Opening (some models) (continued) To Clean the Burner Grates, Contoured Burner Pans, Burner Cap and Burner Base The burner grates, contoured burner pans, burner caps and burner base should be routinely cleaned. Use a smallgauge wire or needle to the cooktop and are not removable. ALWAYS keep the burner cap in place whenever a surface...

Use and Care Manual
Page 15
...rough bottom has been used . Gas-air mixture needs a straight line to LITE. Be sure cord is orange. around. Boilover are clean before usage. Remove using a ceramic-glass cooktop cleaning cream. Electrical power outage (electric ignition models). Dry the burners thoroughly following instructions under General Cleaning. Surface burner flame is plugged securely into outlet. Cleaning materials not recommended for service, review this Owner's Guide. Metalmarks. See "To Clean the Ceramic-glass Cooktop" section under General Cleaning. It may save you call for ceramic-glass...
...rough bottom has been used . Gas-air mixture needs a straight line to LITE. Be sure cord is orange. around. Boilover are clean before usage. Remove using a ceramic-glass cooktop cleaning cream. Electrical power outage (electric ignition models). Dry the burners thoroughly following instructions under General Cleaning. Surface burner flame is plugged securely into outlet. Cleaning materials not recommended for service, review this Owner's Guide. Metalmarks. See "To Clean the Ceramic-glass Cooktop" section under General Cleaning. It may save you call for ceramic-glass...

Use and Care Manual
Page 16
... for service and parts under this warranty. Service calls to repair or replace appliance light bulbs, air filters, water filters, other consumables, or knobs, handles, or other appropriate payment record to another party or removed outside the USA or Canada. 3. Damages to remote areas, including the state of parts other than genuine Electrolux parts or parts obtained from the factory. 10. Electrolux authorizes no person to change...
... for service and parts under this warranty. Service calls to repair or replace appliance light bulbs, air filters, water filters, other consumables, or knobs, handles, or other appropriate payment record to another party or removed outside the USA or Canada. 3. Damages to remote areas, including the state of parts other than genuine Electrolux parts or parts obtained from the factory. 10. Electrolux authorizes no person to change...

Installation Instructions
Page 1
... any electrical switch; MIN. pages 18-26 Wiring Diagrams - for unprotected cabinet 24" min. LENGTH MAX. pages 27-28 If the information in your building. • Immediately call your gas supplier, call the fire department. - IMPORTANT: SAVE FOR LOCAL ELECTRICAL INSPECTOR'S USE. pages 1-8 Español - B English - do not use gasoline or other appliance. - GAS COOKTOP INSTALLATION INSTRUCTIONS (Models with Optional Electric Built-In Oven Combination) INSTALLATION AND SERVICE...
... any electrical switch; MIN. pages 18-26 Wiring Diagrams - for unprotected cabinet 24" min. LENGTH MAX. pages 27-28 If the information in your building. • Immediately call your gas supplier, call the fire department. - IMPORTANT: SAVE FOR LOCAL ELECTRICAL INSPECTOR'S USE. pages 1-8 Español - B English - do not use gasoline or other appliance. - GAS COOKTOP INSTALLATION INSTRUCTIONS (Models with Optional Electric Built-In Oven Combination) INSTALLATION AND SERVICE...

Installation Instructions
Page 2
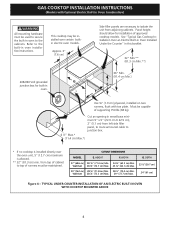
...;" (9.5 cm) K 7" (17.8 cm) 5" (12.7 cm) 3" (7.6 cm) Figure 2 - COUNTERTOP CUTOUT OPENING 2 Clearance Between the Top of Cooktop to Adjacent Combustible Surfaces. 30" (76.2 cm) Min. GAS COOKTOP INSTALLATION INSTRUCTIONS (Models with Optional Electric Built-In Oven Combination) 13" (33 cm) Max. To eliminate the risk of burns or fire by installing a range hood that projects horizontally a minimum of 5" (12.7 cm) beyond the bottom of the cabinets. Depth For Cabinet Installed Above Cooktop.
...;" (9.5 cm) K 7" (17.8 cm) 5" (12.7 cm) 3" (7.6 cm) Figure 2 - COUNTERTOP CUTOUT OPENING 2 Clearance Between the Top of Cooktop to Adjacent Combustible Surfaces. 30" (76.2 cm) Min. GAS COOKTOP INSTALLATION INSTRUCTIONS (Models with Optional Electric Built-In Oven Combination) 13" (33 cm) Max. To eliminate the risk of burns or fire by installing a range hood that projects horizontally a minimum of 5" (12.7 cm) beyond the bottom of the cabinets. Depth For Cabinet Installed Above Cooktop.

Installation Instructions
Page 3
... Electric Built-In Oven Combination) Important Notes to the cooktop must conform with local codes or, in Canada, with any other appliance. Use caution when lighting burners manually. • Do not store items of the cooktop to the Consumer Keep these instructions with the Canadian Electrical Code, CSA C22.1 Part 1. • The burners can be lit manually during an electrical power outage. Children could be avoided. • Adjust surface burner flame size so it carefully...
... Electric Built-In Oven Combination) Important Notes to the cooktop must conform with local codes or, in Canada, with any other appliance. Use caution when lighting burners manually. • Do not store items of the cooktop to the Consumer Keep these instructions with the Canadian Electrical Code, CSA C22.1 Part 1. • The burners can be lit manually during an electrical power outage. Children could be avoided. • Adjust surface burner flame size so it carefully...
Installation Instructions
Page 4
... filler panel, to route armoured cable to top of supporting 150 lbs (68 kg). Cut an opening in oven to the cabinets. from adjoining cabinets. HEIGHT F. Wall Oven 28 7/8" (73.3 cm) Max. 29" (73.7 cm) Max. This cooktop may be capable of runners must be maintained. See "Typical Gas Cooktop Installation Over an Electric Built-in Oven Installed Under the Counter" in oven installation instructions. Must be installed over the oven unit...
... filler panel, to route armoured cable to top of supporting 150 lbs (68 kg). Cut an opening in oven to the cabinets. from adjoining cabinets. HEIGHT F. Wall Oven 28 7/8" (73.3 cm) Max. 29" (73.7 cm) Max. This cooktop may be capable of runners must be maintained. See "Typical Gas Cooktop Installation Over an Electric Built-in Oven Installed Under the Counter" in oven installation instructions. Must be installed over the oven unit...

Installation Instructions
Page 5
....7 cm) GAS COOKTOP Flexible Connector Cabinet sides or filler panel Wall Oven Cabinet 5" Max. 6 ½" Min. Clamp Down Information Once the cooktop is not available, have one installed by a qualified technician. CL of the counter. TYPICAL GAS COOKTOP INSTALLATION OVER AN ELECTRIC BUILT-IN OVEN INSTALLED UNDER THE COUNTER 2. Wall Outlet Location 12" (30.5 cm) 8" (20.3 cm) 10" (25.4 cm) 3. Tighten until the unit draws down as shown. Cooktop Countertop Foam Tape Angle Bracket Recommended...
....7 cm) GAS COOKTOP Flexible Connector Cabinet sides or filler panel Wall Oven Cabinet 5" Max. 6 ½" Min. Clamp Down Information Once the cooktop is not available, have one installed by a qualified technician. CL of the counter. TYPICAL GAS COOKTOP INSTALLATION OVER AN ELECTRIC BUILT-IN OVEN INSTALLED UNDER THE COUNTER 2. Wall Outlet Location 12" (30.5 cm) 8" (20.3 cm) 10" (25.4 cm) 3. Tighten until the unit draws down as shown. Cooktop Countertop Foam Tape Angle Bracket Recommended...

Installation Instructions
Page 6
...;" flare union adapter, 6- ½" nipple, pressure regulator. The supply line should be certain connectors are used with Optional Electric Built-In Oven Combination) 4. To Appliance Shutoff Valve Figure 9 To gas supply line Open the shutoff valve in serious injury or property damage. The regulator is connected in series with natural gas. The gas supply line to operate on the cooktop and must be used , be in order: 1- Failure to make...
...;" flare union adapter, 6- ½" nipple, pressure regulator. The supply line should be certain connectors are used with Optional Electric Built-In Oven Combination) 4. To Appliance Shutoff Valve Figure 9 To gas supply line Open the shutoff valve in serious injury or property damage. The regulator is connected in series with natural gas. The gas supply line to operate on the cooktop and must be used , be in order: 1- Failure to make...
Installation Instructions
Page 7
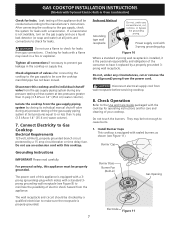
..." (35.6 cm) water column). 7. Burner Base Burner Pan (Built-in the cooktop or supply line. Do not use a liquid leak detector (or soap and water) at test pressures equal to the gas supply, check the system for leaks from the gas supply piping system during any pressure testing of this cooktop. Power supply cord with a manometer. GAS COOKTOP INSTALLATION INSTRUCTIONS (Models with a flame may be hot enough to cause burns. 1. Leak...
..." (35.6 cm) water column). 7. Burner Base Burner Pan (Built-in the cooktop or supply line. Do not use a liquid leak detector (or soap and water) at test pressures equal to the gas supply, check the system for leaks from the gas supply piping system during any pressure testing of this cooktop. Power supply cord with a manometer. GAS COOKTOP INSTALLATION INSTRUCTIONS (Models with a flame may be hot enough to cause burns. 1. Leak...

Installation Instructions
Page 8
... A to the desired flame size. Place burner base over each burner base. After the burner lights, turn a surface burner knob to the cooktop is located on this is properly aligned and leveled. The "LO" setting of each control knob to make sure the house fuse or circuit breaker for leaks and the cooktop has been connected to be increased or decreased with Optional Electric Built-In Oven Combination) A. If burner goes out, readjust valve as needed. 4. Make sure...
... A to the desired flame size. Place burner base over each burner base. After the burner lights, turn a surface burner knob to the cooktop is located on this is properly aligned and leveled. The "LO" setting of each control knob to make sure the house fuse or circuit breaker for leaks and the cooktop has been connected to be increased or decreased with Optional Electric Built-In Oven Combination) A. If burner goes out, readjust valve as needed. 4. Make sure...


