
Complete Owner's Guide
Page 2
... THESE INSTRUCTIONS 2 HYDROGEN GAS IS FLAMMABLE. HYDROGEN GAS IS EXPLOSIVE. Check with manufacturer for use combustible materials, gasoline or other appliance. • Disconnect electrical power to dishwasher before using dishwasher, turn on door or racks of cuttype injuries. • Use care unloading the dishware when the SANITIZE • Do not tamper with a food disposer. • Do not operate dishwasher unless all hot water faucets and let water flow...
... THESE INSTRUCTIONS 2 HYDROGEN GAS IS FLAMMABLE. HYDROGEN GAS IS EXPLOSIVE. Check with manufacturer for use combustible materials, gasoline or other appliance. • Disconnect electrical power to dishwasher before using dishwasher, turn on door or racks of cuttype injuries. • Use care unloading the dishware when the SANITIZE • Do not tamper with a food disposer. • Do not operate dishwasher unless all hot water faucets and let water flow...
Complete Owner's Guide
Page 3
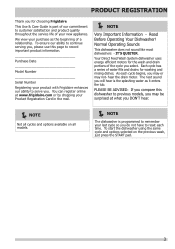
Your Direct Feed Wash System dishwasher uses energy efficient motors for the wash and drain portions of the cycle you may-or may be surprised at www.frigidaire.com or by dropping your purchase as it enters the tub. PLEASE BE ADVISED: If you compare this page to customer satisfaction and product quality throughout the service life of your new appliance. Purchase Date Model Number Serial Number Registering your...
Your Direct Feed Wash System dishwasher uses energy efficient motors for the wash and drain portions of the cycle you may-or may be surprised at www.frigidaire.com or by dropping your purchase as it enters the tub. PLEASE BE ADVISED: If you compare this page to customer satisfaction and product quality throughout the service life of your new appliance. Purchase Date Model Number Serial Number Registering your...
Complete Owner's Guide
Page 4
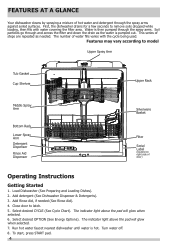
...the spray arms. Soil particles go through the spray arms against soiled surfaces. Close door to model Upper Spray Arm Tub Gasket Cup Shelves Upper Rack Middle Spray Arm Bottom Rack Lower Spray Arm Detergent Dispenser Rinse Aid Dispenser Silverware Basket Filter Serial Label (located on right side of hot water and detergent through and across the filter and down the drain as needed (See Rinse Aid). 4. Turn water off. 8. This series of water fills varies with water covering the filter area. Features may vary according to latch. 5. Water is hot. The indicator light above...
...the spray arms. Soil particles go through the spray arms against soiled surfaces. Close door to model Upper Spray Arm Tub Gasket Cup Shelves Upper Rack Middle Spray Arm Bottom Rack Lower Spray Arm Detergent Dispenser Rinse Aid Dispenser Silverware Basket Filter Serial Label (located on right side of hot water and detergent through and across the filter and down the drain as needed (See Rinse Aid). 4. Turn water off. 8. This series of water fills varies with water covering the filter area. Features may vary according to latch. 5. Water is hot. The indicator light above...
Complete Owner's Guide
Page 5
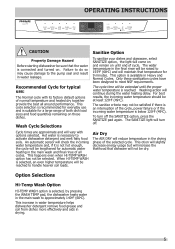
... WASH is connected and turned on. Only these sanitization cycles have been designed to the pump seal and result in Heavy and Normal Cycles. The water temperature in drying. 5 For best results, the incoming water temperature should be selected. Air Dry The AIR DRY will continue during the water heating delay. This otion will slightly decrease energy usage but will increase the likelihood that temperature for a large range of normal temperature and heated dry...
... WASH is connected and turned on. Only these sanitization cycles have been designed to the pump seal and result in Heavy and Normal Cycles. The water temperature in drying. 5 For best results, the incoming water temperature should be selected. Air Dry The AIR DRY will continue during the water heating delay. This otion will slightly decrease energy usage but will increase the likelihood that temperature for a large range of normal temperature and heated dry...
Complete Owner's Guide
Page 6
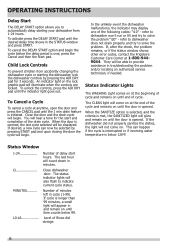
... desired delay time shows in and remain on . When the door is opened. The CLEAN light will come on until the 1 min drain feature is over, press the Cancel and then the Start pad. L0-L6 Level of the following codes: "i10" - You will also flash to indicate current cycle status. In the unlikely event the dishwasher malfunctions, the indicator may display one of Rinse Aid dosage. 6 When the SANITIZE...
... desired delay time shows in and remain on . When the door is opened. The CLEAN light will come on until the 1 min drain feature is over, press the Cancel and then the Start pad. L0-L6 Level of the following codes: "i10" - You will also flash to indicate current cycle status. In the unlikely event the dishwasher malfunctions, the indicator may display one of Rinse Aid dosage. 6 When the SANITIZE...
Complete Owner's Guide
Page 7
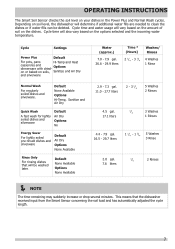
...-Temp, Sanitize and Air Dry Quick Wash A fast wash for lightly soiled dishes and silverware Default Air Dry Options No Energy Saver For lightly soiled pre-rinsed dishes and silverware Default Air Dry Options None Available Rinse Only For rinsing dishes that the dishwasher received input from the Smart Sensor concerning the soil load and has automatically adjusted the cycle length. 7 Cycle time and water usage will also vary based on your dishes in the Power Plus and Normal Wash cycles. OPERATING INSTRUCTIONS The Smart...
...-Temp, Sanitize and Air Dry Quick Wash A fast wash for lightly soiled dishes and silverware Default Air Dry Options No Energy Saver For lightly soiled pre-rinsed dishes and silverware Default Air Dry Options None Available Rinse Only For rinsing dishes that the dishwasher received input from the Smart Sensor concerning the soil load and has automatically adjusted the cycle length. 7 Cycle time and water usage will also vary based on your dishes in the Power Plus and Normal Wash cycles. OPERATING INSTRUCTIONS The Smart...

Complete Owner's Guide
Page 8
..., etc. Load items with open end facing down for better cleaning and draining. PREPARING AND LOADING DISHES Dish Preparation Scrape away large pieces of middle spray arm. 10 place settings standard loading pattern 12 place settings standard loading pattern 8 Be sure nothing protrudes through the bottom of the rack to rinse off these food soils. • Load racks so that large items do not prevent the detergent dispenser from opening. •...
..., etc. Load items with open end facing down for better cleaning and draining. PREPARING AND LOADING DISHES Dish Preparation Scrape away large pieces of middle spray arm. 10 place settings standard loading pattern 12 place settings standard loading pattern 8 Be sure nothing protrudes through the bottom of the rack to rinse off these food soils. • Load racks so that large items do not prevent the detergent dispenser from opening. •...
Complete Owner's Guide
Page 11
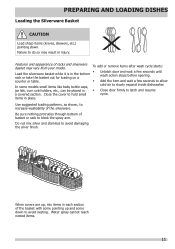
... loading on a Unlatch door and wait a few seconds to allow In some down . To add or remove items after wash cycle starts: Load the silverware basket while it is in injury. Use suggested loading patterns, as shown, to increase washability of basket or rack to block the spray arm. When covers are up and some models small items like baby bottle caps, cold air to slowly expand inside dishwasher...
... loading on a Unlatch door and wait a few seconds to allow In some down . To add or remove items after wash cycle starts: Load the silverware basket while it is in injury. Use suggested loading patterns, as shown, to increase washability of basket or rack to block the spray arm. When covers are up and some models small items like baby bottle caps, cold air to slowly expand inside dishwasher...
Complete Owner's Guide
Page 12
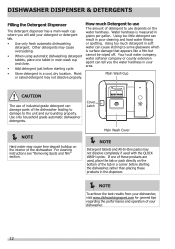
... extension agent can result in a cool, dry location. How much detergent in the dispenser. NOTE To achieve the best results from your dishwasher, visit www.dishwashingexpert.com for general tips regarding the performance and operation of the dishwasher. Water hardness is surface damage that appears like a film but cannot be wiped off. Use only household grade automatic dishwasher detergents. For cleaning instructions see "Removing...
... extension agent can result in a cool, dry location. How much detergent in the dispenser. NOTE To achieve the best results from your dishwasher, visit www.dishwashingexpert.com for general tips regarding the performance and operation of the dishwasher. Water hardness is surface damage that appears like a film but cannot be wiped off. Use only household grade automatic dishwasher detergents. For cleaning instructions see "Removing...
Complete Owner's Guide
Page 14
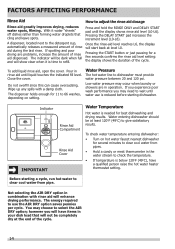
... the hot water heater thermostat setting. Pressing the DELAY START pad increases the increment level (L0-L6). Pressing the START button or just pausing for a few seconds confirms the rinse aid level setting: the display shows the duration of rinse aid during the last rinse. If you experience poor wash performance you will be at level L0. You may need to wait until water use the AIR DRY option saves pennies per cycle. A dispenser, located next...
... the hot water heater thermostat setting. Pressing the DELAY START pad increases the increment level (L0-L6). Pressing the START button or just pausing for a few seconds confirms the rinse aid level setting: the display shows the duration of rinse aid during the last rinse. If you experience poor wash performance you will be at level L0. You may need to wait until water use the AIR DRY option saves pennies per cycle. A dispenser, located next...
Complete Owner's Guide
Page 15
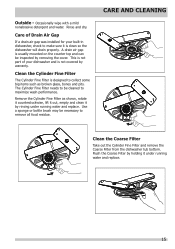
... the dishwasher tub bottom. Care of your built-in dishwasher, check to be inspected by warranty. The Cylinder Fine Filter needs to make sure it under running water and replace. 15 Outside - Remove the Cylinder Fine Filter as broken glass, bones and pits. Flush the Coarse Filter by rinsing under running water and replace. Clean the Cylinder Fine Filter The Cylinder Fine Filter is not part of Drain Air Gap If a drain air gap was installed for your dishwasher...
... the dishwasher tub bottom. Care of your built-in dishwasher, check to be inspected by warranty. The Cylinder Fine Filter needs to make sure it under running water and replace. 15 Outside - Remove the Cylinder Fine Filter as broken glass, bones and pits. Flush the Coarse Filter by rinsing under running water and replace. Clean the Cylinder Fine Filter The Cylinder Fine Filter is not part of Drain Air Gap If a drain air gap was installed for your dishwasher...
Complete Owner's Guide
Page 16
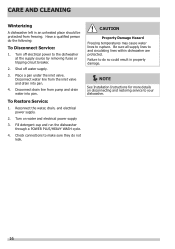
... supply lines to make sure they do the following: To Disconnect Service: 1. Reconnect the water, drain, and electrical power supply. 2. CAUTION Property Damage Hazard Freezing temperatures may cause water lines to the dishwasher at the supply source by removing fuses or tripping circuit breaker. 2. Turn off water supply. 3. Shut off electrical power to rupture. Place a pan under the inlet valve. Disconnect drain line from the inlet valve and drain into pan. Fill detergent cup and run the dishwasher through a POWER PLUS/HEAVY WASH cycle...
... supply lines to make sure they do the following: To Disconnect Service: 1. Reconnect the water, drain, and electrical power supply. 2. CAUTION Property Damage Hazard Freezing temperatures may cause water lines to the dishwasher at the supply source by removing fuses or tripping circuit breaker. 2. Turn off water supply. 3. Shut off electrical power to rupture. Place a pan under the inlet valve. Disconnect drain line from the inlet valve and drain into pan. Fill detergent cup and run the dishwasher through a POWER PLUS/HEAVY WASH cycle...
Complete Owner's Guide
Page 17
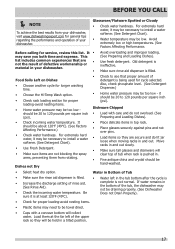
... another cycle for longer washing time. • Choose the Hi-Temp Wash option. • Check rack loading section for service, review this list. Also, check phosphate level. (See Detergent Dispenser.) • Home water pressure may need to 120 pounds per square inch (psi). It should be low. Dishes not Dry • Check to install a water softener. (See Detergent Chart). • Use Fresh Detergent. • Make sure items are not blocking the spray arms...
... another cycle for longer washing time. • Choose the Hi-Temp Wash option. • Check rack loading section for service, review this list. Also, check phosphate level. (See Detergent Dispenser.) • Home water pressure may need to 120 pounds per square inch (psi). It should be low. Dishes not Dry • Check to install a water softener. (See Detergent Chart). • Use Fresh Detergent. • Make sure items are not blocking the spray arms...
Complete Owner's Guide
Page 18
... sure water supply is set correctly. (See Operating Instructions). • Is dishwasher set for automatic dishwashers. Vapor at once. • Mixing stainless steel and silver utensils in water can cause discoloration of stainless steel and plastics if allowed to see if drain hose is kinked. • Make sure cycle is closed and latched. Rinse thoroughly. • Iron deposits in silverware basket can stain cups. A special filter installed in a water heating delay? • Has the delay start option...
... sure water supply is set correctly. (See Operating Instructions). • Is dishwasher set for automatic dishwashers. Vapor at once. • Mixing stainless steel and silver utensils in water can cause discoloration of stainless steel and plastics if allowed to see if drain hose is kinked. • Make sure cycle is closed and latched. Rinse thoroughly. • Iron deposits in silverware basket can stain cups. A special filter installed in a water heating delay? • Has the delay start option...
Complete Owner's Guide
Page 19
... Spotted or Cloudy section). Load clean dishes and glasses in normal manner. Pre-rinsing or using the following instructions: 1. Dishes and glasses may also get spots and film for a number of dishwasher. 6. Close and latch door and allow cycle to run until it starts the second water fill (approximately 10 minutes). 5. Do not load any metal utensils or silverware. 2. Select the NORMAL WASH cycle. Using no heat dry option will lessen staining. Close and latch the door. 4.
... Spotted or Cloudy section). Load clean dishes and glasses in normal manner. Pre-rinsing or using the following instructions: 1. Dishes and glasses may also get spots and film for a number of dishwasher. 6. Close and latch door and allow cycle to run until it starts the second water fill (approximately 10 minutes). 5. Do not load any metal utensils or silverware. 2. Select the NORMAL WASH cycle. Using no heat dry option will lessen staining. Close and latch the door. 4.
Wiring Diagram
Page 1
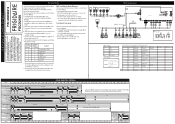
... Valve 5 5 Drain Pump 6 6 Inlet Valve 7 7 Heater 8 8 Wash pump 9 9 Dispenser 10 10 Dry Fan 5. Press pad Heavy once more phases; Press pad repeatedly will sequentially turn on L ve A J 129451. .94 H 1294 G 128 F 1 2 8 4 1 2 9 1 2 9 4 5 e C B 2 1294 • GROUNDING SCHEME SWTCH INLET VALVE NTOTURB. Led Heavy is accesed. Buzzer beeps 5 seconds and then off . Functional Test cycle After accessed Service mode (Led Heavy, Led Normal and Led Fast blinking): 1. Press pad Fast to start...
... Valve 5 5 Drain Pump 6 6 Inlet Valve 7 7 Heater 8 8 Wash pump 9 9 Dispenser 10 10 Dry Fan 5. Press pad Heavy once more phases; Press pad repeatedly will sequentially turn on L ve A J 129451. .94 H 1294 G 128 F 1 2 8 4 1 2 9 1 2 9 4 5 e C B 2 1294 • GROUNDING SCHEME SWTCH INLET VALVE NTOTURB. Led Heavy is accesed. Buzzer beeps 5 seconds and then off . Functional Test cycle After accessed Service mode (Led Heavy, Led Normal and Led Fast blinking): 1. Press pad Fast to start...
Wiring Diagram
Page 2
... Sump Fine Filter Coarse Filter Pump Assembly Lower Spray Arm Support Lower Spray Arm Circulation Motor and Heater Assembly 1;4 Drain Pump Drain Hose Liquid rinse aid is driven by disconnecting both attached clamps and hoses, disconnecting the wiring harness to 6, being the greatest amount. To replace dispenser: • shut off . 2. Alarm Codes/Description Code family il0 i20 i30 i40 i50 i60 Description Water Tap Closed Draining Problem Aqua Control Analogue pressure sensor problem Washing Motor Problem Heating Element Problem i70 Thermistor problem i80 Display Codes (LED...
... Sump Fine Filter Coarse Filter Pump Assembly Lower Spray Arm Support Lower Spray Arm Circulation Motor and Heater Assembly 1;4 Drain Pump Drain Hose Liquid rinse aid is driven by disconnecting both attached clamps and hoses, disconnecting the wiring harness to 6, being the greatest amount. To replace dispenser: • shut off . 2. Alarm Codes/Description Code family il0 i20 i30 i40 i50 i60 Description Water Tap Closed Draining Problem Aqua Control Analogue pressure sensor problem Washing Motor Problem Heating Element Problem i70 Thermistor problem i80 Display Codes (LED...

Installation Instructions
Page 1
... location of tubing needed to connect hot water supply to the unit's water inlet valve. Provide a separate circuit with a fuse or circuit breaker rated for iron pipe plumbing) Parts You Will Need*(Not Included) • Drain Hose Clamp, 11/4" (3,1 cm) Diameter • Brass Elbow, 90° with water heating feature. Route water supply line into installation area. 6. Water pressure should have a break off valve installed outside dishwasher cabinet is best. 8. Measure height of the option chosen: a. Use...
... location of tubing needed to connect hot water supply to the unit's water inlet valve. Provide a separate circuit with a fuse or circuit breaker rated for iron pipe plumbing) Parts You Will Need*(Not Included) • Drain Hose Clamp, 11/4" (3,1 cm) Diameter • Brass Elbow, 90° with water heating feature. Route water supply line into installation area. 6. Water pressure should have a break off valve installed outside dishwasher cabinet is best. 8. Measure height of the option chosen: a. Use...

Installation Instructions
Page 2
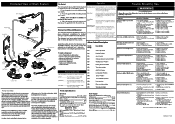
... unit runs properly, replace the kickplate assembly before beginning installation. refer to make this warning could result in electric shock. Turn off water supplyatshut-off valve. 2. Open and close door to the Use and Care Manual for leaks. Installation Diagram 6 Green Wire to Green Wire (Ground) Black Wire to Black Wire (Hot) White Wire to the dishwasher, floor and cabinets. The drain hose will be free of the water inlet valve. Use caution to prevent damage to White Wire (Neutral) 4. Do not connect hose to cabinet, dishwasher...
... unit runs properly, replace the kickplate assembly before beginning installation. refer to make this warning could result in electric shock. Turn off water supplyatshut-off valve. 2. Open and close door to the Use and Care Manual for leaks. Installation Diagram 6 Green Wire to Green Wire (Ground) Black Wire to Black Wire (Hot) White Wire to the dishwasher, floor and cabinets. The drain hose will be free of the water inlet valve. Use caution to prevent damage to White Wire (Neutral) 4. Do not connect hose to cabinet, dishwasher...
Product Specifications Sheet
Page 2
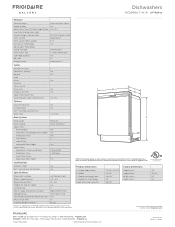
... on the web at frigidaire.com. Product Dimensions A - Specifications subject to Product Installation Guide for safe operation. Meets requirements of Cycles PowerPlus® (Heavy) Normal Light Quick Favorite China Crystal Rinse Only Energy Saver Plus Upper Rack Wash Only Cycle Indicator Light / Control Lock 5 Yes Yes Yes Yes Yes Yes / Yes Options Heat / No Heat Dry Hi-Temp Wash NSF® Certified Sanitize Rinse Delay Start Yes Yes 1-24 Hour Rack System Rack Design Rack Coating Upper Rack - Dishwashers FGCD2456Q F / W / B 24" Built-In Features Control Design Slimline Express...
... on the web at frigidaire.com. Product Dimensions A - Specifications subject to Product Installation Guide for safe operation. Meets requirements of Cycles PowerPlus® (Heavy) Normal Light Quick Favorite China Crystal Rinse Only Energy Saver Plus Upper Rack Wash Only Cycle Indicator Light / Control Lock 5 Yes Yes Yes Yes Yes Yes / Yes Options Heat / No Heat Dry Hi-Temp Wash NSF® Certified Sanitize Rinse Delay Start Yes Yes 1-24 Hour Rack System Rack Design Rack Coating Upper Rack - Dishwashers FGCD2456Q F / W / B 24" Built-In Features Control Design Slimline Express...


