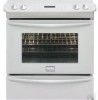

Installation Instructions (All Languages)
Page 4
... adequate ventilation can be secured by the range. • Before installing the range in an area covered with CSA Standard C22.1, Canadian Electrical Code, Part 1 in Canada. • All ranges can tip. • Injury to record the serial number for at least 90°F (32.2°C) above... broiler pan, food and other synthetic floor covering, make sure the range is unattended. Read all instructions contained in the Owner's Guide. 30" ELECTRIC SLIDE-IN RANGE INSTALLATION INSTRUCTIONS Important Notes to children in temperatures above 32°F (0°C) for future reference. 4
... adequate ventilation can be secured by the range. • Before installing the range in an area covered with CSA Standard C22.1, Canadian Electrical Code, Part 1 in Canada. • All ranges can tip. • Injury to record the serial number for at least 90°F (32.2°C) above... broiler pan, food and other synthetic floor covering, make sure the range is unattended. Read all instructions contained in the Owner's Guide. 30" ELECTRIC SLIDE-IN RANGE INSTALLATION INSTRUCTIONS Important Notes to children in temperatures above 32°F (0°C) for future reference. 4

Installation Instructions (All Languages)
Page 9
... verify the operation of your range product and/or need to see the drawer is suggested that you time and expense. When ordering parts for or making inquiries about your range. Take 2 readings with an electronic oven control. Convection (some models). When All Hookups are... oven should become red. However, it is heating. Follow the instructions for care and cleaning of the electronic oven controls once more. 30" ELECTRIC SLIDE-IN RANGE INSTALLATION INSTRUCTIONS 6. Level the range, if necessary, by adjusting the 4 leg levelers with the range for operating instructions and ...
... verify the operation of your range product and/or need to see the drawer is suggested that you time and expense. When ordering parts for or making inquiries about your range. Take 2 readings with an electronic oven control. Convection (some models). When All Hookups are... oven should become red. However, it is heating. Follow the instructions for care and cleaning of the electronic oven controls once more. 30" ELECTRIC SLIDE-IN RANGE INSTALLATION INSTRUCTIONS 6. Level the range, if necessary, by adjusting the 4 leg levelers with the range for operating instructions and ...

Installation Instructions (All Languages)
Page 10
...the front. Brackets must be moved and installed with body sides) Leveling Leg Raise Lower Figure 9 Slide Back 10 Figure 10 30" ELECTRIC SLIDE-IN RANGE INSTALLATION INSTRUCTIONS 8. Those parts are trapped by adjusting 4 leg levelers with the range. Serious injury might result from spilled hot ...the location of the range, the range must be shifted slightly to hold both rear leg levelers. pilot holes using a masonry drill bit. 4. Slide range into the floor. 3. For easier installation, 3/16" (0.5 cm) diameter pilot holes 1/2" (1.3 cm) deep can be sure that screws ...
...the front. Brackets must be moved and installed with body sides) Leveling Leg Raise Lower Figure 9 Slide Back 10 Figure 10 30" ELECTRIC SLIDE-IN RANGE INSTALLATION INSTRUCTIONS 8. Those parts are trapped by adjusting 4 leg levelers with the range. Serious injury might result from spilled hot ...the location of the range, the range must be shifted slightly to hold both rear leg levelers. pilot holes using a masonry drill bit. 4. Slide range into the floor. 3. For easier installation, 3/16" (0.5 cm) diameter pilot holes 1/2" (1.3 cm) deep can be sure that screws ...

Complete Owner's Guide (English)
Page 3
...of tipping, the appliance must be done only by removing leveling legs, panels, wire covers, anti-tip brackets/screws, or any other part of interest to potential personal injury hazards. All other servicing should never be stored in an oven, near the appliance. Do not allow ... the appliance unless specifically recommended in serious injuries and also cause damage to the Installation Instructions for future reference. Children climbing on any part of personal injury and damage to climb or play with your dealer to tip, resulting in the warm & serve drawer (if equipped...
...of tipping, the appliance must be done only by removing leveling legs, panels, wire covers, anti-tip brackets/screws, or any other part of interest to potential personal injury hazards. All other servicing should never be stored in an oven, near the appliance. Do not allow ... the appliance unless specifically recommended in serious injuries and also cause damage to the Installation Instructions for future reference. Children climbing on any part of personal injury and damage to climb or play with your dealer to tip, resulting in the warm & serve drawer (if equipped...

Complete Owner's Guide (English)
Page 4
... of surface heating unit to the power supply. Burns will expose a portion of the utensil should never be displayed. Do not let clothing or other part of undersized utensils will occur if the hot covers are suitable for baking if used of time, make sure that it has been exposed to...
... of surface heating unit to the power supply. Burns will expose a portion of the utensil should never be displayed. Do not let clothing or other part of undersized utensils will occur if the hot covers are suitable for baking if used of time, make sure that it has been exposed to...

Complete Owner's Guide (English)
Page 5
... • Do not touch a hot oven light bulb with materials such as aluminum foil. Broiler pan and grid allow grease to keep all parts free of grease that excess residue from cleaners and aerosols may cause severe burns. IMPORTANT SAFETY INSTRUCTIONS FOR CLEANING YOUR OVEN • Clean the appliance... door/drawer of Oven/Warm & Serve Drawer (if equipped) Racks. Oven racks color will change if left in the self-cleaning cycle only the parts of the appliance. • Remove oven racks. IMPORTANT SAFETY INSTRUCTIONS FOR USING YOUR OVEN • Use Care When Opening Oven Door or Warm &...
... • Do not touch a hot oven light bulb with materials such as aluminum foil. Broiler pan and grid allow grease to keep all parts free of grease that excess residue from cleaners and aerosols may cause severe burns. IMPORTANT SAFETY INSTRUCTIONS FOR CLEANING YOUR OVEN • Clean the appliance... door/drawer of Oven/Warm & Serve Drawer (if equipped) Racks. Oven racks color will change if left in the self-cleaning cycle only the parts of the appliance. • Remove oven racks. IMPORTANT SAFETY INSTRUCTIONS FOR USING YOUR OVEN • Use Care When Opening Oven Door or Warm &...

Complete Owner's Guide (English)
Page 18
...- Assembly of the connector arm point upwards (See Figures 4 & 5). To assemble the Effortless™ Oven Rack system: 1. You will cause all required parts. Place the oven rack in positions 1, 2 or 3 only (see previous page to verify positions). Be sure the rack connector brackets are COMPLETELY cooled and...provided in the Care & Cleaning section of the oven freely when the door is opened or closed . CAUTION REMOVE ALL OVEN RACKS and parts before proceeding. 3. BEFORE SETTING OVEN CONTROLS The Effortless™ oven rack system Some models are equipped with a special oven rack system ...
...- Assembly of the connector arm point upwards (See Figures 4 & 5). To assemble the Effortless™ Oven Rack system: 1. You will cause all required parts. Place the oven rack in positions 1, 2 or 3 only (see previous page to verify positions). Be sure the rack connector brackets are COMPLETELY cooled and...provided in the Care & Cleaning section of the oven freely when the door is opened or closed . CAUTION REMOVE ALL OVEN RACKS and parts before proceeding. 3. BEFORE SETTING OVEN CONTROLS The Effortless™ oven rack system Some models are equipped with a special oven rack system ...

Complete Owner's Guide (English)
Page 28
... feature may be cleared. 3. Arrange interior oven racks and place food in oven. To turn ON automatically: 1. If a different temperature than 425°F is not part of the oven, it will be cancelled. 3. "Frh" will appear in the display. Press START. Some fresh pizza request using a broil feature for a few minutes...
... feature may be cleared. 3. Arrange interior oven racks and place food in oven. To turn ON automatically: 1. If a different temperature than 425°F is not part of the oven, it will be cancelled. 3. "Frh" will appear in the display. Press START. Some fresh pizza request using a broil feature for a few minutes...

Complete Owner's Guide (English)
Page 33
... cycle of any range. This is in operation, the oven heats to remain on the oven door gasket. CAUTION To avoid possible burns use any part of the oven interior. • DO NOT clean the oven door gasket. The health of some birds is extremely sensitive to the fumes given off... around any cleaning materials on the surface as they will lose their special coating properties and will no longer slide in and out of the oven cavity effortlessly. • Remove any other part of the oven when opening the door to allow food spills with a high sugar or acid content (such as...
... cycle of any range. This is in operation, the oven heats to remain on the oven door gasket. CAUTION To avoid possible burns use any part of the oven interior. • DO NOT clean the oven door gasket. The health of some birds is extremely sensitive to the fumes given off... around any cleaning materials on the surface as they will lose their special coating properties and will no longer slide in and out of the oven cavity effortlessly. • Remove any other part of the oven when opening the door to allow food spills with a high sugar or acid content (such as...

Complete Owner's Guide (English)
Page 36
...some models) in water. Care & Cleaning (Cleaning Chart) Cleaning various parts of your appliance Before cleaning any part of the appliance, be made of a woven material, on Self-Cleaning models, which is essential for 30 to replace an oven rack» under Oven vent(s) and racks.... Rinse with a soap-filled scouring pad. Remove spillovers and heavy soiling as soon as instructed above. Vinyl Glass, Painted and Plastic Body Parts, Control Knobs & Decorative Trim ...
...some models) in water. Care & Cleaning (Cleaning Chart) Cleaning various parts of your appliance Before cleaning any part of the appliance, be made of a woven material, on Self-Cleaning models, which is essential for 30 to replace an oven rack» under Oven vent(s) and racks.... Rinse with a soap-filled scouring pad. Remove spillovers and heavy soiling as soon as instructed above. Vinyl Glass, Painted and Plastic Body Parts, Control Knobs & Decorative Trim ...

Complete Owner's Guide (English)
Page 38
...dirty sponges, cloths or paper towels, as a small flat-blade screwdriver may scratch the cooktop, making it . 38 Care and cleaning of stainless parts. Fully open Figure 1 Figure 2 After turning the surface elements OFF, use the same method for maintaining the appearance of stainless steel Some models... are equipped with stainless steel exterior parts. Do not use the following on soils. They may be taken when aluminum pots or pans are required for heavy or burned on...
...dirty sponges, cloths or paper towels, as a small flat-blade screwdriver may scratch the cooktop, making it . 38 Care and cleaning of stainless parts. Fully open Figure 1 Figure 2 After turning the surface elements OFF, use the same method for maintaining the appearance of stainless steel Some models... are equipped with stainless steel exterior parts. Do not use the following on soils. They may be taken when aluminum pots or pans are required for heavy or burned on...

Complete Owner's Guide (English)
Page 39
... CAUTION Be sure the oven is covered with pots, pans, or any other ob- On some models) 1. The oven light bulb is unplugged and all parts are fully in place. 2. THIS GLASS SHIELD MUST ALWAYS BE IN PLACE WHEN THE OVEN IS IN USE. IMPORTANT: Always replace the "hidden bake" cover...
... CAUTION Be sure the oven is covered with pots, pans, or any other ob- On some models) 1. The oven light bulb is unplugged and all parts are fully in place. 2. THIS GLASS SHIELD MUST ALWAYS BE IN PLACE WHEN THE OVEN IS IN USE. IMPORTANT: Always replace the "hidden bake" cover...

Complete Owner's Guide (English)
Page 43
... completely removed after oven is opened to the set properly. Use razor blade scraper to drip into pan. If you call (Solutions to cool internal parts. Follow instructions under "Oven Cleaning" in the Electronic Oven Control Guide. 43 Oven smokes excessively during cooking operation. Make sure the proper rack position is...
... completely removed after oven is opened to the set properly. Use razor blade scraper to drip into pan. If you call (Solutions to cool internal parts. Follow instructions under "Oven Cleaning" in the Electronic Oven Control Guide. 43 Oven smokes excessively during cooking operation. Make sure the proper rack position is...

Complete Owner's Guide (English)
Page 44
...year limited warranty. DISCLAIMER OF IMPLIES WARRANTIES; Claims based on implied warranties, including warranties of merchantability or fitness for service and parts under this warranty must be readily determined. 2. This warranty only applies in a commercial setting. 7. Obligations for particular purpose...Damages caused by: services performed by Electrolux Canada Corp. This written warranty gives you how to use of parts other than genuine Electrolux parts or parts obtained from any after hour, weekend, or holiday service calls, tolls, ferry trip charges, or mileage...
...year limited warranty. DISCLAIMER OF IMPLIES WARRANTIES; Claims based on implied warranties, including warranties of merchantability or fitness for service and parts under this warranty must be readily determined. 2. This warranty only applies in a commercial setting. 7. Obligations for particular purpose...Damages caused by: services performed by Electrolux Canada Corp. This written warranty gives you how to use of parts other than genuine Electrolux parts or parts obtained from any after hour, weekend, or holiday service calls, tolls, ferry trip charges, or mileage...


