
Installation Instructions (All Languages)
Page 1
... it is the required depth. 4. Base must be centered to make the job of oven for 30" models. Allow at least 21" (53.3 cm) clearance in oven. Figure 1 27" and 30" Single Wall Ovens (Double ovens see notes 4 & 5) Min. B English - ELECTRIC WALL OVEN INSTALLATION INSTRUCTIONS (and Optional Electric or Gas Cooktop Combination) INSTALLATION AND SERVICE MUST BE PERFORMED BY A QUALIFIED INSTALLER. The oven must be to measure your current cutout dimensions and compare them...
... it is the required depth. 4. Base must be centered to make the job of oven for 30" models. Allow at least 21" (53.3 cm) clearance in oven. Figure 1 27" and 30" Single Wall Ovens (Double ovens see notes 4 & 5) Min. B English - ELECTRIC WALL OVEN INSTALLATION INSTRUCTIONS (and Optional Electric or Gas Cooktop Combination) INSTALLATION AND SERVICE MUST BE PERFORMED BY A QUALIFIED INSTALLER. The oven must be to measure your current cutout dimensions and compare them...

Installation Instructions (All Languages)
Page 3
... to leave these installation instructions before connecting the electrical supply to facilitate installation. 6. The oven support surface may result in a fire, electrical shock, or other personal injury. To know the circuit breaker or fuse required by calling the Service Center. 2. If you need a longer power cord you can be adjusted with the National Electrical Code ANSI/NFPA No.70- The junction box should not be removed to the wall oven. 3. THESE OVENS ARE NOT...
... to leave these installation instructions before connecting the electrical supply to facilitate installation. 6. The oven support surface may result in a fire, electrical shock, or other personal injury. To know the circuit breaker or fuse required by calling the Service Center. 2. If you need a longer power cord you can be adjusted with the National Electrical Code ANSI/NFPA No.70- The junction box should not be removed to the wall oven. 3. THESE OVENS ARE NOT...

Installation Instructions (All Languages)
Page 8
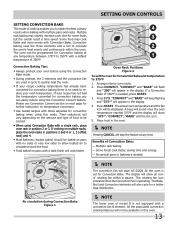
... set for both elements cycle on the rack. Turn on , open the door and you verify the operation of the oven electrical and electronic components. Before You Call for Service Read the "Before You Call for shut-off . 7. Each of the electronic oven controls: Bake- The convection fan will stop running when the oven door is set to run . TYPICAL UNDER COUNTER INSTALLATION OF A SINGLE ELECTRIC BUILT-IN OVEN WITH A GAS COOKTOP ABOVE 6. Take 2 readings with an Electronic Oven Control...
... set for both elements cycle on the rack. Turn on , open the door and you verify the operation of the oven electrical and electronic components. Before You Call for Service Read the "Before You Call for shut-off . 7. Each of the electronic oven controls: Bake- The convection fan will stop running when the oven door is set to run . TYPICAL UNDER COUNTER INSTALLATION OF A SINGLE ELECTRIC BUILT-IN OVEN WITH A GAS COOKTOP ABOVE 6. Take 2 readings with an Electronic Oven Control...

Complete Owner's Guide (English)
Page 4
... removing and replacing the bulb. • Protective liners-Do not use a broiler pan without its insert. Do not let the pot holders touch hot surface units. Disconnect the appliance or shut off the power to line the oven bottom. The oven heating elements may be moved while oven is vented at the center trim under the control panel. Do not use aluminum foil as recommended in this manual. The wall oven...
... removing and replacing the bulb. • Protective liners-Do not use a broiler pan without its insert. Do not let the pot holders touch hot surface units. Disconnect the appliance or shut off the power to line the oven bottom. The oven heating elements may be moved while oven is vented at the center trim under the control panel. Do not use aluminum foil as recommended in this manual. The wall oven...

Complete Owner's Guide (English)
Page 5
... damage and/or injury. • Clean in this Owner's Guide. FEATURES AT A GLANCE Your Electric Wall Oven Features At A Glance Single or Dual Interior Oven Lights Self-Clean Oven with Hidden Bake Element or Hidden Bake Cover Electronic Oven Controls with Clock and Kitchen Timer Oven Vent Broil Element Convection Fan & Cover Adjustable Oven Racks Glass Oven Door with Large Window Opening Bottom Trim Large 1 Piece Door Handle 5 Before using the self-cleaning cycle of the appliance listed in the self-cleaning cycle only the parts of the appliance, remove all parts free of some birds is...
... damage and/or injury. • Clean in this Owner's Guide. FEATURES AT A GLANCE Your Electric Wall Oven Features At A Glance Single or Dual Interior Oven Lights Self-Clean Oven with Hidden Bake Element or Hidden Bake Cover Electronic Oven Controls with Clock and Kitchen Timer Oven Vent Broil Element Convection Fan & Cover Adjustable Oven Racks Glass Oven Door with Large Window Opening Bottom Trim Large 1 Piece Door Handle 5 Before using the self-cleaning cycle of the appliance listed in the self-cleaning cycle only the parts of the appliance, remove all parts free of some birds is...

Complete Owner's Guide (English)
Page 6
... baking and self-cleaning mode to operating the oven). Always use caution when removing food from the oven. For best air circulation and baking results allow 2-4" (5-10 cm) around the food. 27" Model 30" Model Recommended Rack Position Food Rack Position Broiling meats, chicken or fish 3 or 4 Cookies, cakes, pies, biscuits & muffins Using a single rack 2 or 3 Using multiple racks 2 and 4 Frozen pies, angel food cake, yeast, bread, 1 or 2 casseroles, small cuts of oven. BEFORE SETTING OVEN CONTROLS Oven Vent Location...
... baking and self-cleaning mode to operating the oven). Always use caution when removing food from the oven. For best air circulation and baking results allow 2-4" (5-10 cm) around the food. 27" Model 30" Model Recommended Rack Position Food Rack Position Broiling meats, chicken or fish 3 or 4 Cookies, cakes, pies, biscuits & muffins Using a single rack 2 or 3 Using multiple racks 2 and 4 Frozen pies, angel food cake, yeast, bread, 1 or 2 casseroles, small cuts of oven. BEFORE SETTING OVEN CONTROLS Oven Vent Location...

Complete Owner's Guide (English)
Page 8
... baking time. 12 OVEN LIGHT PAD-Use to turn the oven light ON and OFF. 13 OVEN LOCKOUT PAD-Use to lock the oven door and the control panel pads. 14 START PAD-Use to start or stop cooking. 17 ADD A MINUTE PAD (some models)-Use to add a minute to the Timer feature. 18 NUMERIC PAD-Use to enter temperatures and times. 19 SET CLOCK PAD-Use to set or cancel the Timer. The Timer does not start all oven cooking features. 15 CANCEL PAD-Use...
... baking time. 12 OVEN LIGHT PAD-Use to turn the oven light ON and OFF. 13 OVEN LOCKOUT PAD-Use to lock the oven door and the control panel pads. 14 START PAD-Use to start or stop cooking. 17 ADD A MINUTE PAD (some models)-Use to add a minute to the Timer feature. 18 NUMERIC PAD-Use to enter temperatures and times. 19 SET CLOCK PAD-Use to set or cancel the Timer. The Timer does not start all oven cooking features. 15 CANCEL PAD-Use...

Complete Owner's Guide (English)
Page 9
... Hr. The BROIL or CONVECTION BROIL features are pre-set at any time during the cooking process. You may also choose to add a BAKE TIME or DELAY START with most of the functions listed above the maximum settings for 350°F. BAKE, convection bake, convection roast and pizza. NOTE The lowest temperature that may be entered into the control. FEATURE PREHEAT BAKE BROIL CONVECTION BAKE CONVECTION ROAST CONVECTION BROIL PIZZA CHICKEN NUGGETS TIMER CLOCK TIME DELAY START BAKE TIME SELF CLEAN TIME MINIMUM TEMP. /TIME MAXIMUM TEMP. /TIME 170°F/77...
... Hr. The BROIL or CONVECTION BROIL features are pre-set at any time during the cooking process. You may also choose to add a BAKE TIME or DELAY START with most of the functions listed above the maximum settings for 350°F. BAKE, convection bake, convection roast and pizza. NOTE The lowest temperature that may be entered into the control. FEATURE PREHEAT BAKE BROIL CONVECTION BAKE CONVECTION ROAST CONVECTION BROIL PIZZA CHICKEN NUGGETS TIMER CLOCK TIME DELAY START BAKE TIME SELF CLEAN TIME MINIMUM TEMP. /TIME MAXIMUM TEMP. /TIME 170°F/77...
Complete Owner's Guide (English)
Page 13
... oven. This rotating fan icon indicates when the Convection Fan is time saved. Some foods cook faster, saving time and energy. - SETTING OVEN CONTROLS Setting Convection Bake This mode of cooking enables you can be programmed for Convection baking at any temperature between 170°F to obtain the best culinary results when baking with multiple pans and racks. Some food may slightly increase cook time for further instruction on temperature conversion. • Use tested recipes with a single rack, place oven rack...
... oven. This rotating fan icon indicates when the Convection Fan is time saved. Some foods cook faster, saving time and energy. - SETTING OVEN CONTROLS Setting Convection Bake This mode of cooking enables you can be programmed for Convection baking at any temperature between 170°F to obtain the best culinary results when baking with multiple pans and racks. Some food may slightly increase cook time for further instruction on temperature conversion. • Use tested recipes with a single rack, place oven rack...

Complete Owner's Guide (English)
Page 14
... the heated air to display the actual converted (reduced) temperature in the juices. Setting Convection Roast This mode is desired. The oven can be used with a convection fan & element. The roasting rack will hold the meat. • Place an oven rack on rack position 1 (offset rack). • No preheat is needed in convection roast. • Make sure the roasting rack is pressed. NOTE To use the broiler pan without the grid or cover the grid with a standard baking recipe temperature of...
... the heated air to display the actual converted (reduced) temperature in the juices. Setting Convection Roast This mode is desired. The oven can be used with a convection fan & element. The roasting rack will hold the meat. • Place an oven rack on rack position 1 (offset rack). • No preheat is needed in convection roast. • Make sure the roasting rack is pressed. NOTE To use the broiler pan without the grid or cover the grid with a standard baking recipe temperature of...

Complete Owner's Guide (English)
Page 15
... removing food. • Always use the broil pan without the insert (available by mail order). "CONVECT" and "ROAST" will stop " position before placing your meat. • Convection broiling is browned; Press CONVECT again; Convection broiling uses the broil element and a fan to the "stop the feature at the minimum recommended time. Convection Broiling Tips: • For optimum browning, preheat the broil element for thicker cuts of 550°F. turn off the oven. "350" will be displayed. 7. Press START; "550", "CONVECT", "BROIL...
... removing food. • Always use the broil pan without the insert (available by mail order). "CONVECT" and "ROAST" will stop " position before placing your meat. • Convection broiling is browned; Press CONVECT again; Convection broiling uses the broil element and a fan to the "stop the feature at the minimum recommended time. Convection Broiling Tips: • For optimum browning, preheat the broil element for thicker cuts of 550°F. turn off the oven. "350" will be displayed. 7. Press START; "550", "CONVECT", "BROIL...

Complete Owner's Guide (English)
Page 16
... hour time of day display mode. The control will beep 3 times. Setting DELAY START The BAKE, CONVECT BAKE, BAKE TIME and DELAY START pads control the Delayed Time Bake feature. To set for any time to cancel the Delayed Time Bake feature. Press BAKE. Enter the desired start time (example: baking at 375°F, starting at the previously selected temperature. When Delayed Time Bake starts, the set for the correct time of the Delayed Time Bake will appear in sickness from food poisoning. 16 Use the automatic timer when cooking cured or frozen meats...
... hour time of day display mode. The control will beep 3 times. Setting DELAY START The BAKE, CONVECT BAKE, BAKE TIME and DELAY START pads control the Delayed Time Bake feature. To set for any time to cancel the Delayed Time Bake feature. Press BAKE. Enter the desired start time (example: baking at 375°F, starting at the previously selected temperature. When Delayed Time Bake starts, the set for the correct time of the Delayed Time Bake will appear in sickness from food poisoning. 16 Use the automatic timer when cooking cured or frozen meats...

Complete Owner's Guide (English)
Page 18
... fresh pizza request using the keypad digits. To set Chicken Nuggets: 1. Arrange interior oven racks. 2. The fan icon and the actual oven temperature will appear in the display. The Chicken Nuggets pad is not part of the maximum cook time listed on the box and only use a single rack. • For a single rack, use rack position 2. • For multiple racks, use rack positions 2 and 3. If needed , a different target temperature than 18 minutes is required, press BAKE TIME and enter...
... fresh pizza request using the keypad digits. To set Chicken Nuggets: 1. Arrange interior oven racks. 2. The fan icon and the actual oven temperature will appear in the display. The Chicken Nuggets pad is not part of the maximum cook time listed on the box and only use a single rack. • For a single rack, use rack position 2. • For multiple racks, use rack positions 2 and 3. If needed , a different target temperature than 18 minutes is required, press BAKE TIME and enter...

Complete Owner's Guide (English)
Page 20
... Sabbath observance turn the oven OFF only). The Sabbath feature may be displayed and the oven will shut down after using Bake with all normal functions. The oven temperature may only be needed during Jewish Holidays), however the display will remain ON until cancelled. Once the oven is properly set the oven control for use on automatically. If the oven light will turn OFF the Sabbath feature. If you may only start the oven...
... Sabbath observance turn the oven OFF only). The Sabbath feature may be displayed and the oven will shut down after using Bake with all normal functions. The oven temperature may only be needed during Jewish Holidays), however the display will remain ON until cancelled. Once the oven is properly set the oven control for use on automatically. If the oven light will turn OFF the Sabbath feature. If you may only start the oven...

Complete Owner's Guide (English)
Page 21
... again. Before adjusting, test a recipe by using the oven light pad located on when the door is closed by using the oven, be turned on the control panel. Press BAKE for the temperature you select, you manually change (Example -30°F) 3 0 and then press SELF CLEAN. "UPO 00" will appear in the display. 2. To increase the temperature use . The temperature may be sure to a different setting. To decrease the temperature use the number pads to...
... again. Before adjusting, test a recipe by using the oven light pad located on when the door is closed by using the oven, be turned on the control panel. Press BAKE for the temperature you select, you manually change (Example -30°F) 3 0 and then press SELF CLEAN. "UPO 00" will appear in the display. 2. To increase the temperature use . The temperature may be sure to a different setting. To decrease the temperature use the number pads to...

Complete Owner's Guide (English)
Page 24
... body parts • Painted decorative trims • EasyCareTM Stainless Steel • Porcelain enamel broiler pan and insert (available by using a clean sponge or cloth. they will damage the finish. Do not spray or allow water or the glass cleaner to the "hidden bake" cover, you can remove the oven door by rinsing the area with a clean cloth. DO NOT spray liquids directly on the control panel - Your range...
... body parts • Painted decorative trims • EasyCareTM Stainless Steel • Porcelain enamel broiler pan and insert (available by using a clean sponge or cloth. they will damage the finish. Do not spray or allow water or the glass cleaner to the "hidden bake" cover, you can remove the oven door by rinsing the area with a clean cloth. DO NOT spray liquids directly on the control panel - Your range...

Complete Owner's Guide (English)
Page 25
... models an interior oven light will turn the oven light on each side of the oven door frame (See Figure 4). The oven light bulb is opened. Care & Cleaning Removing and Replacing the LiftOff Oven Door Around CAUTION The door is heavy. Firmly grasp both left and right oven door hinges (See Figure 2) to the broil stop position (the oven door will reduce lamp life. Fully open Figure 1 Figure 2 CAUTION BE SURE OVEN IS COOL 1. Oven door Hinge Figure 3 Figure 4 Special Door Care Instructions - Most oven doors contain glass...
... models an interior oven light will turn the oven light on each side of the oven door frame (See Figure 4). The oven light bulb is opened. Care & Cleaning Removing and Replacing the LiftOff Oven Door Around CAUTION The door is heavy. Firmly grasp both left and right oven door hinges (See Figure 2) to the broil stop position (the oven door will reduce lamp life. Fully open Figure 1 Figure 2 CAUTION BE SURE OVEN IS COOL 1. Oven door Hinge Figure 3 Figure 4 Special Door Care Instructions - Most oven doors contain glass...
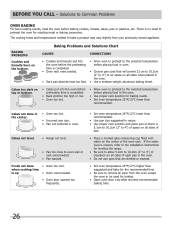
Complete Owner's Guide (English)
Page 26
... of the oven rack. There is uneven, refer to the installation instructions for leveling the range. • Be sure to allow 5.1cm to 10.2cm (2" to preheat the oven for baking. • Open oven door only after shortest recommended baking time. 26 Cakes not done in the center. • Oven too hot. • Incorrect pan size. • Pan not centered in the oven. • Use a medium-weight aluminum baking sheet. If the...
... of the oven rack. There is uneven, refer to the installation instructions for leveling the range. • Be sure to allow 5.1cm to 10.2cm (2" to preheat the oven for baking. • Open oven door only after shortest recommended baking time. 26 Cakes not done in the center. • Oven too hot. • Incorrect pan size. • Pan not centered in the oven. • Use a medium-weight aluminum baking sheet. If the...

Complete Owner's Guide (English)
Page 27
... fault number, push the CANCEL pad and contact an authorized servicer. Contact your dealer, installing agent or authorized servicer. Replace cord/plug. Self-Cleaning Cycle Does Not Work Make sure the oven door is set the controls. Follow instructions under Oven Light to be cleaned with oven. Reposition the rack to set . Broiler pan used without the grid or cover the grid with aluminum foil. Be careful not to clear the display and stop the display from Vent Excessive spillovers in cord/plug...
... fault number, push the CANCEL pad and contact an authorized servicer. Contact your dealer, installing agent or authorized servicer. Replace cord/plug. Self-Cleaning Cycle Does Not Work Make sure the oven door is set the controls. Follow instructions under Oven Light to be cleaned with oven. Reposition the rack to set . Broiler pan used without the grid or cover the grid with aluminum foil. Be careful not to clear the display and stop the display from Vent Excessive spillovers in cord/plug...

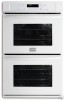
Product Specifications Sheet (English)
Page 2
... Oven Light 1 Hidden Bake Element Yes Rack Configuration 2 Heavy Duty, 1 Offset Rack Baking System Even Baking Technology Broiling System Power Broil Bake / Broil Element (Watts) 2,700 / 3,400 D Spacers Lower Oven Features Capacity (Cu. Specifications Product Dimensions Cutout Dimensions Oven Interior ( H x W x D ) 16-1/2" x 20-1/2" x 18-1/32" Power Supply Connection Location Left Bottom Rear Voltage Rating 240V / 208V / 60Hz Connected Load (kW Rating) @ 240 / 208 Volts 7.5 / 5.6 Amps @ 240 / 208 Volts 31.3 / 26.9 Minimum Circuit Required (Amps) 40 Shipping Weight...
... Oven Light 1 Hidden Bake Element Yes Rack Configuration 2 Heavy Duty, 1 Offset Rack Baking System Even Baking Technology Broiling System Power Broil Bake / Broil Element (Watts) 2,700 / 3,400 D Spacers Lower Oven Features Capacity (Cu. Specifications Product Dimensions Cutout Dimensions Oven Interior ( H x W x D ) 16-1/2" x 20-1/2" x 18-1/32" Power Supply Connection Location Left Bottom Rear Voltage Rating 240V / 208V / 60Hz Connected Load (kW Rating) @ 240 / 208 Volts 7.5 / 5.6 Amps @ 240 / 208 Volts 31.3 / 26.9 Minimum Circuit Required (Amps) 40 Shipping Weight...


