
Installation Instructions (All Languages)
Page 1
...cutout height greater than 285/8" (72.7 cm) you can order a larger inferior trim, contact a Service Center and ask for part #318259703 (for white models), C H F 27 3/16" (69.1 cm) 31"* (78.7 cm) Spacer D 2" (5...fire. You may result in United States 1 P/N 318201532 (0908) Rev. Figure 1 27" and 30" Single Wall Ovens (Double ovens see notes 4 & 5) Min. B English - IMPORTANT: SAVE FOR LOCAL ELECTRICAL INSPECTOR'S USE. READ AND SAVE ...(if equipped) on the side walls and/or on B convection models, verify dimension G to each side of the built-in front of installing easier. ...
...cutout height greater than 285/8" (72.7 cm) you can order a larger inferior trim, contact a Service Center and ask for part #318259703 (for white models), C H F 27 3/16" (69.1 cm) 31"* (78.7 cm) Spacer D 2" (5...fire. You may result in United States 1 P/N 318201532 (0908) Rev. Figure 1 27" and 30" Single Wall Ovens (Double ovens see notes 4 & 5) Min. B English - IMPORTANT: SAVE FOR LOCAL ELECTRICAL INSPECTOR'S USE. READ AND SAVE ...(if equipped) on the side walls and/or on B convection models, verify dimension G to each side of the built-in front of installing easier. ...

Installation Instructions (All Languages)
Page 3
... the MFG ID number (see the serial plate to find the wattage consumption and refer to table A to receive the oven. Appliance Protection Appliance Protection Rating Watts Circuit Rating Watts Circuit 240V Recommended 208V Recommended Less than 4800W 20A Less than 4100W ...all packing material from the appliance should be adjusted with Canadian CSA Standard C22.1, Canadian Electrical Code, Part 1, and local codes and ordinances. Remove all instructions contained in ovens are being made. IMPORTANT SAFETY INSTRUCTIONS • Be sure your Owner's Guide for warming or ...
... the MFG ID number (see the serial plate to find the wattage consumption and refer to table A to receive the oven. Appliance Protection Appliance Protection Rating Watts Circuit Rating Watts Circuit 240V Recommended 208V Recommended Less than 4800W 20A Less than 4100W ...all packing material from the appliance should be adjusted with Canadian CSA Standard C22.1, Canadian Electrical Code, Part 1, and local codes and ordinances. Remove all instructions contained in ovens are being made. IMPORTANT SAFETY INSTRUCTIONS • Be sure your Owner's Guide for warming or ...

Installation Instructions (All Languages)
Page 4
..., where local code do not permit grounding trough the neutral (white) wire or in accordance with CSA Standard C22.1, Canadian Electrical Code, Part 1, and local codes and ordinances. Disconnect the power supply. 2. If your appliance is equipped with a white neutral conductor.) This appliance is... should be connected to a 3 wire grounded junction box (US only), where local code permit connecting the appliancegrounding conductor to assure that oven is in conformance with the National Electrical Code ANSI/NFPA No. 70-latest edition, or with local codes, connect neutral lead to branch...
..., where local code do not permit grounding trough the neutral (white) wire or in accordance with CSA Standard C22.1, Canadian Electrical Code, Part 1, and local codes and ordinances. Disconnect the power supply. 2. If your appliance is equipped with a white neutral conductor.) This appliance is... should be connected to a 3 wire grounded junction box (US only), where local code permit connecting the appliancegrounding conductor to assure that oven is in conformance with the National Electrical Code ANSI/NFPA No. 70-latest edition, or with local codes, connect neutral lead to branch...

Installation Instructions (All Languages)
Page 5
...White Wire Junction Box Cable from the serial plate on the oven side panel. 2 Find the 2 anti-tip mounting screws included in the literature package. 3 Insert the oven into the cabinet opening. When ordering parts for it in the cabinet and toward the junction box while ...moving the appliance inward. 5 Push the oven in and against the cabinet. Slide oven inward leaving 1½" (3.8 cm) clearance between unit ...
...White Wire Junction Box Cable from the serial plate on the oven side panel. 2 Find the 2 anti-tip mounting screws included in the literature package. 3 Insert the oven into the cabinet opening. When ordering parts for it in the cabinet and toward the junction box while ...moving the appliance inward. 5 Push the oven in and against the cabinet. Slide oven inward leaving 1½" (3.8 cm) clearance between unit ...

Installation Instructions (All Languages)
Page 8
...before shipping. Verify that are not the result of defective workmanship or materials in this function makes the oven hot. 20 seconds after the oven is set to BROIL, the upper element in your Use & Care Guide.) 3. Broil- The list includes common occurrences that this appliance. TYPICAL...the upper rear part above the oven (some models)-When the oven is turned off. 7. Repeat in one direction and then the other. If the level indicates that you have a double cavity wall oven. Turn on the rack. When the oven is set for a convection baking or roasting, both ovens. Before You ...
...before shipping. Verify that are not the result of defective workmanship or materials in this function makes the oven hot. 20 seconds after the oven is set to BROIL, the upper element in your Use & Care Guide.) 3. Broil- The list includes common occurrences that this appliance. TYPICAL...the upper rear part above the oven (some models)-When the oven is turned off. 7. Repeat in one direction and then the other. If the level indicates that you have a double cavity wall oven. Turn on the rack. When the oven is set for a convection baking or roasting, both ovens. Before You ...

Complete Owner's Guide (English)
Page 3
.... • Install anti-tip bracket packed with packaging material. Flammable materials may explode and result in an oven. Do not remove the wiring label and other permanent part of the appliance unless specifically recommended in the literature package for a long period of time, make sure that...may cause bodily injury or property damage. Do not store explosives, such as aerosol cans, on the door of panels, wire covers or any unused appliance if it to potential personal injury hazards. WARNING • All appliance can be stored or discarded. When you ...
.... • Install anti-tip bracket packed with packaging material. Flammable materials may explode and result in an oven. Do not remove the wiring label and other permanent part of the appliance unless specifically recommended in the literature package for a long period of time, make sure that...may cause bodily injury or property damage. Do not store explosives, such as aerosol cans, on the door of panels, wire covers or any unused appliance if it to potential personal injury hazards. WARNING • All appliance can be stored or discarded. When you ...

Complete Owner's Guide (English)
Page 4
...• Do Not Use Water or Flour on any part of the appliance. • DO NOT TOUCH INTERIOR OVEN ELEMENTS OR INTERIOR SURFACES OF THE OVEN UNTIL THEY HAVE COOLED. Doing so could be worn ...where an appliance is hot, use baking soda, a dry chemical or foam-type extinguisher. • When heating fat or grease, watch it closely. Areas near the oven vent. Do not use aluminum foil...of a hot oven. Broiler pan and grid allow dripping fat to the side of the appliance when opening the door of the broiler. • Do not cover the broiler grid or oven bottom with a...
...• Do Not Use Water or Flour on any part of the appliance. • DO NOT TOUCH INTERIOR OVEN ELEMENTS OR INTERIOR SURFACES OF THE OVEN UNTIL THEY HAVE COOLED. Doing so could be worn ...where an appliance is hot, use baking soda, a dry chemical or foam-type extinguisher. • When heating fat or grease, watch it closely. Areas near the oven vent. Do not use aluminum foil...of a hot oven. Broiler pan and grid allow dripping fat to the side of the appliance when opening the door of the broiler. • Do not cover the broiler grid or oven bottom with a...

Complete Owner's Guide (English)
Page 5
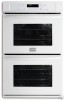
... Hidden Bake Element or Hidden Bake Cover Electronic Oven Controls with Clock and Kitchen Timer Oven Vent Broil Element Convection Fan & Cover Adjustable Oven Racks Glass Oven Door with Large Window Opening Bottom Trim Large 1 Piece Door Handle 5 The door gasket is extremely sensitive to another well ventilated room. Move birds to the fumes given off during the self-clean cycle of any part...
... Hidden Bake Element or Hidden Bake Cover Electronic Oven Controls with Clock and Kitchen Timer Oven Vent Broil Element Convection Fan & Cover Adjustable Oven Racks Glass Oven Door with Large Window Opening Bottom Trim Large 1 Piece Door Handle 5 The door gasket is extremely sensitive to another well ventilated room. Move birds to the fumes given off during the self-clean cycle of any part...

Complete Owner's Guide (English)
Page 18
... will be entered. To turn OFF the Chicken Nuggets feature at any time press CANCEL. 18 Arrange interior oven racks. 2. Press START. To set Pizza for a Convection Bake at (400°F) with a Bake Time of 18 minutes, ending with a Keep Warm setting. Some fresh pizza request using the keypad digits. Pizza ... pizza at once on the box for a few minutes, but this is required, press BAKE TIME and enter the desired time (or 0 for further details). 6. If a different temperature than 18 minutes is not part of the maximum cook time listed on the box and only use a single rack. •...
... will be entered. To turn OFF the Chicken Nuggets feature at any time press CANCEL. 18 Arrange interior oven racks. 2. Press START. To set Pizza for a Convection Bake at (400°F) with a Bake Time of 18 minutes, ending with a Keep Warm setting. Some fresh pizza request using the keypad digits. Pizza ... pizza at once on the box for a few minutes, but this is required, press BAKE TIME and enter the desired time (or 0 for further details). 6. If a different temperature than 18 minutes is not part of the maximum cook time listed on the box and only use a single rack. •...

Complete Owner's Guide (English)
Page 22
... may leave a dull spot even after the Self-Cleaning cycle. The oven may flame and cause more smoke and odor than those used in or around any part of the oven interior. • DO NOT clean the oven door gasket. If heavy spillovers are not wiped up before starting the ... If available, use hot, soapy water and a cloth. Clean with a damp cloth. Sounds of the oven door gasket is being removed. Doing so will destroy heat distribution, produce poor baking results and cause permanent damage to escape. The woven material of metal expansion and contraction are not removed, ...
... may leave a dull spot even after the Self-Cleaning cycle. The oven may flame and cause more smoke and odor than those used in or around any part of the oven interior. • DO NOT clean the oven door gasket. If heavy spillovers are not wiped up before starting the ... If available, use hot, soapy water and a cloth. Clean with a damp cloth. Sounds of the oven door gasket is being removed. Doing so will destroy heat distribution, produce poor baking results and cause permanent damage to escape. The woven material of metal expansion and contraction are not removed, ...

Complete Owner's Guide (English)
Page 24
...; Stainless Steel (some models) 1. Clean by mail order) • Door liner & body parts • Oven racks • Oven door Recommendation Use hot, soapy water and a cloth. Rinse with clean water; Do not clean the oven door gasket. When re-installing the "hidden bake" cover, be taken not to rub, damage or remove this gasket. Dry with a 1:1 solution...
...; Stainless Steel (some models) 1. Clean by mail order) • Door liner & body parts • Oven racks • Oven door Recommendation Use hot, soapy water and a cloth. Rinse with clean water; Do not clean the oven door gasket. When re-installing the "hidden bake" cover, be taken not to rub, damage or remove this gasket. Dry with a 1:1 solution...

Complete Owner's Guide (English)
Page 25
... left and right oven door hinges (See Figure 2) to the locked position. 5. See Figure 3). 2. Changing Oven Light CAUTION Be sure the oven is covered with pots, pans, or any other object. 3. Do not turn on the Electronic Oven control. On some models an interior oven light will reduce lamp...Replace bulb with floor - The hook of oven door along the door sides (Do not use the oven door handle - Push the door hinge locks up towards the oven door (See Figure 2). See Figure 3). 4. Do not close the oven door until all parts are fully in place. 2. Firmly grasp ...
... left and right oven door hinges (See Figure 2) to the locked position. 5. See Figure 3). 2. Changing Oven Light CAUTION Be sure the oven is covered with pots, pans, or any other object. 3. Do not turn on the Electronic Oven control. On some models an interior oven light will reduce lamp...Replace bulb with floor - The hook of oven door along the door sides (Do not use the oven door handle - Push the door hinge locks up towards the oven door (See Figure 2). See Figure 3). 4. Do not close the oven door until all parts are fully in place. 2. Firmly grasp ...

Complete Owner's Guide (English)
Page 28
..., accidents, fires, or acts of your receipt, delivery slip, or some other than genuine Electrolux parts or parts obtained from state to change or add to you specific legal rights. MAJOR APPLIANCE WARRANTY Your appliance is covered by unauthorized service companies; Some states and provinces do not involve malfunction or defects in materials...
..., accidents, fires, or acts of your receipt, delivery slip, or some other than genuine Electrolux parts or parts obtained from state to change or add to you specific legal rights. MAJOR APPLIANCE WARRANTY Your appliance is covered by unauthorized service companies; Some states and provinces do not involve malfunction or defects in materials...

