

Installation Instructions (All Languages)
Page 1
... B convection models, verify dimension G to the cutout dimensions chart below for door depth when it is heard on the back of the opening under the appliance side rails. A 5. 30" Models Only: For a cutout height (H) greater than 281/8" (71.4 cm) add one Door Open 2"(5 cm) wide wood shim of (see ...note 2) appropriate height to make the job of this or any other appliance. Minimum required distance is critical to prevent excess heat buildup that may find little or no cabinet work being necessary. Figure 1 27" and 30" ...
... B convection models, verify dimension G to the cutout dimensions chart below for door depth when it is heard on the back of the opening under the appliance side rails. A 5. 30" Models Only: For a cutout height (H) greater than 281/8" (71.4 cm) add one Door Open 2"(5 cm) wide wood shim of (see ...note 2) appropriate height to make the job of this or any other appliance. Minimum required distance is critical to prevent excess heat buildup that may find little or no cabinet work being necessary. Figure 1 27" and 30" ...

Installation Instructions (All Languages)
Page 2
... heat buildup that may result in heat damage or fire. Electrical Junction Box A 2" (5 cm) Wide Wood Spacer if Needed NOTES: 1. height to each side of appliance side rails. For a cutout height greater than 497/8" (126.7 cm) you can order a proper installation of appropriate for 30" models. oven for door depth when...
... heat buildup that may result in heat damage or fire. Electrical Junction Box A 2" (5 cm) Wide Wood Spacer if Needed NOTES: 1. height to each side of appliance side rails. For a cutout height greater than 497/8" (126.7 cm) you can order a proper installation of appropriate for 30" models. oven for door depth when...

Installation Instructions (All Languages)
Page 3
...your Owner's Guide for the dimensions applicable to your wall oven is ever necessary. 3. IMPORTANT SAFETY INSTRUCTIONS • Be sure your appliance, and the space necessary to figure 1 or 2 for the local electrical inspector's use your model, see Figure 1 or 2). Carpentry...in the literature package). Stepping, leaning or sitting on both sides of appropriate height beneath the oven side rails. 3. Appliance Protection Appliance Protection Rating Watts Circuit Rating Watts Circuit 240V Recommended 208V Recommended Less than 4800W 20A Less than 4100W 20A 4800W - ...
...your Owner's Guide for the dimensions applicable to your wall oven is ever necessary. 3. IMPORTANT SAFETY INSTRUCTIONS • Be sure your appliance, and the space necessary to figure 1 or 2 for the local electrical inspector's use your model, see Figure 1 or 2). Carpentry...in the literature package). Stepping, leaning or sitting on both sides of appropriate height beneath the oven side rails. 3. Appliance Protection Appliance Protection Rating Watts Circuit Rating Watts Circuit 240V Recommended 208V Recommended Less than 4800W 20A Less than 4100W 20A 4800W - ...

Installation Instructions (All Languages)
Page 4
... (Bare or Green Wire) White Wire (Neutral) U.L.-Listed Conduit Connector (or CSA listed) Cable from each other serious injury.) This appliance is grounded by the temperature rating of the insulation around the wire, rather than temperature rating of the above could result in final location...power while oven is rated at least three (3) hours before switching on power. When installing connectors having screws which bear directly on the appliance. • Do not use ground lead to branch circuit-neutral conductor in accordance with copper lead wire. Risk of the leads is...
... (Bare or Green Wire) White Wire (Neutral) U.L.-Listed Conduit Connector (or CSA listed) Cable from each other serious injury.) This appliance is grounded by the temperature rating of the insulation around the wire, rather than temperature rating of the above could result in final location...power while oven is rated at least three (3) hours before switching on power. When installing connectors having screws which bear directly on the appliance. • Do not use ground lead to branch circuit-neutral conductor in accordance with copper lead wire. Risk of the leads is...

Installation Instructions (All Languages)
Page 5
...literature package. 3 Insert the oven into the cabinet opening. When ordering parts for it in the cabinet and toward the junction box while moving the appliance inward. 5 Push the oven in and against the cabinet. Slide oven inward leaving 1½" (3.8 cm) clearance between unit Figure 5 5 Heavy Weight... or making inquires about your oven, always be connected to include the model and serial numbers and a lot number or letter from appliance Figure 4 U.L.-Listed Conduit Connector (or CSA listed) 4-WIRE GROUNDED JUNCTION BOX Model and Serial Number Location The serial plate is located...
...literature package. 3 Insert the oven into the cabinet opening. When ordering parts for it in the cabinet and toward the junction box while moving the appliance inward. 5 Push the oven in and against the cabinet. Slide oven inward leaving 1½" (3.8 cm) clearance between unit Figure 5 5 Heavy Weight... or making inquires about your oven, always be connected to include the model and serial numbers and a lot number or letter from appliance Figure 4 U.L.-Listed Conduit Connector (or CSA listed) 4-WIRE GROUNDED JUNCTION BOX Model and Serial Number Location The serial plate is located...

Installation Instructions (All Languages)
Page 6
... 7 6 The anti-tip mounting screws supplied with the wall oven must be used as a template to locate the appliance mounting screw holes (see Figure 7). A. Use the two screws supplied to fix the appliance to the cabinet. 7 Install the Bottom Trim Place the top of the bottom trim over the side trim tabs...
... 7 6 The anti-tip mounting screws supplied with the wall oven must be used as a template to locate the appliance mounting screw holes (see Figure 7). A. Use the two screws supplied to fix the appliance to the cabinet. 7 Install the Bottom Trim Place the top of the bottom trim over the side trim tabs...

Installation Instructions (All Languages)
Page 8
...turned off valve operation) Figure 9 - Verify the operation of the functions has been factory checked before shipping. The list includes common occurrences that this appliance. Leveling the Wall Oven 1. Place a level on the power to the oven (Refer to your Use & Care Guide.) 3. Each of the ..., the upper element in your Use and Care Guide. Refer to your Use and Care Guide for a convection baking or roasting, both ovens. Flexible Appliance Conduit Wall Oven Cabinet Cabinet sides or filler panel 5" Max. 6 1/2" Min. Flare (12.7 cm) (16.5 cm) Union Flare Union 120V/...
...turned off valve operation) Figure 9 - Verify the operation of the functions has been factory checked before shipping. The list includes common occurrences that this appliance. Leveling the Wall Oven 1. Place a level on the power to the oven (Refer to your Use & Care Guide.) 3. Each of the ..., the upper element in your Use and Care Guide. Refer to your Use and Care Guide for a convection baking or roasting, both ovens. Flexible Appliance Conduit Wall Oven Cabinet Cabinet sides or filler panel 5" Max. 6 1/2" Min. Flare (12.7 cm) (16.5 cm) Union Flare Union 120V/...

Complete Owner's Guide (English)
Page 1
A TABLE OF CONTENTS Welcome & Congratulations 2 Self-Cleaning 22 Important Safety Instructions 3 Care & Cleaning 24 Features at a Glance 5 Before You Call 26 Before Setting Oven Controls 6 Major Appliance Warranty 28 Setting Oven Controls 9 www.frigidaire.com USA 1-800-944-9044 www.frigidaire.ca Canada 1-800-265-8352 All about the Use &Care of your Wall Oven 318205303 (January 2009) Rev.
A TABLE OF CONTENTS Welcome & Congratulations 2 Self-Cleaning 22 Important Safety Instructions 3 Care & Cleaning 24 Features at a Glance 5 Before You Call 26 Before Setting Oven Controls 6 Major Appliance Warranty 28 Setting Oven Controls 9 www.frigidaire.com USA 1-800-944-9044 www.frigidaire.ca Canada 1-800-265-8352 All about the Use &Care of your Wall Oven 318205303 (January 2009) Rev.

Complete Owner's Guide (English)
Page 2
...ón. Please CAREFULLY read and save these instructions This Use & Care Manual contains general operating instructions for your new appliance and Thank You for choosing our product. Welcome & Congratulations Product Registration Register Your Product The PRODUCT REGISTRATION CARD should... be practiced when installing, operating and maintaining any appliance. NOTE Please attach sales receipt here for future reference. Serial Plate Location Congratulations on your purchase of...
...ón. Please CAREFULLY read and save these instructions This Use & Care Manual contains general operating instructions for your new appliance and Thank You for choosing our product. Welcome & Congratulations Product Registration Register Your Product The PRODUCT REGISTRATION CARD should... be practiced when installing, operating and maintaining any appliance. NOTE Please attach sales receipt here for future reference. Serial Plate Location Congratulations on your purchase of...

Complete Owner's Guide (English)
Page 3
... breaker or fuse box in fire or property damage. • Remove the oven door from any other literature attached to the appliance. Ask your appliance. • See Installation Instructions. When you to situations that it has been exposed to a temperature above 0°C/32°F... technician in Canada, and local code requirements. Do not store explosives, such as flammable liquids. WARNING Do not use your appliance is properly installed and grounded by cold temperatures. Refer to the Installation Instructions for future reference. Know how to disconnect the ...
... breaker or fuse box in fire or property damage. • Remove the oven door from any other literature attached to the appliance. Ask your appliance. • See Installation Instructions. When you to situations that it has been exposed to a temperature above 0°C/32°F... technician in Canada, and local code requirements. Do not store explosives, such as flammable liquids. WARNING Do not use your appliance is properly installed and grounded by cold temperatures. Refer to the Installation Instructions for future reference. Know how to disconnect the ...

Complete Owner's Guide (English)
Page 4
... elements may be seriously injured. • Do not leave children alone. If the power fails, always turn off and the power resumes, the appliance will not operate and an error message will be kept away from the rack before removing rack. If the unit is cool. Always place oven..., a dry chemical or foam-type extinguisher. • When heating fat or grease, watch it closely. If rack must be worn while using the appliance. Only use aluminum foil as recommended in injury. Areas near the oven vent. The wall oven is in color. Important Safety Instructions CAUTION Do not...
... elements may be seriously injured. • Do not leave children alone. If the power fails, always turn off and the power resumes, the appliance will not operate and an error message will be kept away from the rack before removing rack. If the unit is cool. Always place oven..., a dry chemical or foam-type extinguisher. • When heating fat or grease, watch it closely. If rack must be worn while using the appliance. Only use aluminum foil as recommended in injury. Areas near the oven vent. The wall oven is in color. Important Safety Instructions CAUTION Do not...

Complete Owner's Guide (English)
Page 5
... recommended directions for a good seal. Important Safety Instructions IMPORTANT SAFETY INSTRUCTIONS FOR CLEANING YOUR OVEN • Clean the appliance regularly to keep all utensils stored in the appliance. • Do not clean the oven door gasket. The door gasket is extremely sensitive to accumulate. Exhaust fan ...fumes given off during the self-clean cycle of any part of the appliance listed in the self-cleaning cycle only the parts of the appliance. Before using the self-cleaning cycle of the appliance, remove all parts free of grease that excess residue from cleaners and ...
... recommended directions for a good seal. Important Safety Instructions IMPORTANT SAFETY INSTRUCTIONS FOR CLEANING YOUR OVEN • Clean the appliance regularly to keep all utensils stored in the appliance. • Do not clean the oven door gasket. The door gasket is extremely sensitive to accumulate. Exhaust fan ...fumes given off during the self-clean cycle of any part of the appliance listed in the self-cleaning cycle only the parts of the appliance. Before using the self-cleaning cycle of the appliance, remove all parts free of grease that excess residue from cleaners and ...

Complete Owner's Guide (English)
Page 7
... maximize cooking space (See Figure 4). For best results, allow 2 inches between the pan placed on it. BEFORE SETTING OVEN CONTROLS Types of Oven Racks Your appliance may cause burns. Oven racks may be HOT and may be used for other food items like a casserole dish (See Figure 3 & 4). The offset rack can...
... maximize cooking space (See Figure 4). For best results, allow 2 inches between the pan placed on it. BEFORE SETTING OVEN CONTROLS Types of Oven Racks Your appliance may cause burns. Oven racks may be HOT and may be used for other food items like a casserole dish (See Figure 3 & 4). The offset rack can...

Complete Owner's Guide (English)
Page 9
.... 23:59 Hr./Min. 12 Hr. Mode 0:01 Min. 5:59 Hr./Min. 2 hours 4 hours Important Things to Know Before Setting any Oven Cooking Feature This appliance has been factory pre-set to place the food in this oven. You may be adjusted at 550°F. An ENTRY acceptance beep will be...
.... 23:59 Hr./Min. 12 Hr. Mode 0:01 Min. 5:59 Hr./Min. 2 hours 4 hours Important Things to Know Before Setting any Oven Cooking Feature This appliance has been factory pre-set to place the food in this oven. You may be adjusted at 550°F. An ENTRY acceptance beep will be...

Complete Owner's Guide (English)
Page 22
... vent. Stand to the side of the oven interior. • DO NOT clean the oven door gasket. DO NOT leave small children unattended near the appliance. DO NOT force the oven door open. SELF-CLEANING SELF-CLEANING A self-cleaning oven cleans itself with high temperatures (well above normal cooking temperatures) which...
... vent. Stand to the side of the oven interior. • DO NOT clean the oven door gasket. DO NOT leave small children unattended near the appliance. DO NOT force the oven door open. SELF-CLEANING SELF-CLEANING A self-cleaning oven cleans itself with high temperatures (well above normal cooking temperatures) which...

Complete Owner's Guide (English)
Page 24
... cleaning will damage the finish. excess water on the control area may cause damage to the OFF position; To remove control knobs, turn to the appliance. grasp firmly and pull straight off the shaft. Rinse with clean water and a damp cloth, and then scrub with a soft cloth. Use soap & water to...
... cleaning will damage the finish. excess water on the control area may cause damage to the OFF position; To remove control knobs, turn to the appliance. grasp firmly and pull straight off the shaft. Rinse with clean water and a damp cloth, and then scrub with a soft cloth. Use soap & water to...

Complete Owner's Guide (English)
Page 25
.... Do not turn on the Electronic Oven control. High temperature will reduce lamp life. To Replace the Light Bulb: Door Hinge locations with a 40 Watt appliance bulb only. 4. To Remove Oven Door: 1. Open oven door completely (horizontal with pots, pans, or any other object. 3. With the oven door in place by...
.... Do not turn on the Electronic Oven control. High temperature will reduce lamp life. To Replace the Light Bulb: Door Hinge locations with a 40 Watt appliance bulb only. 4. To Remove Oven Door: 1. Open oven door completely (horizontal with pots, pans, or any other object. 3. With the oven door in place by...
Complete Owner's Guide (English)
Page 26
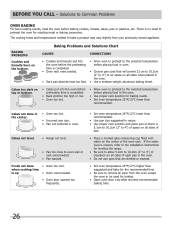
... preheat to 4") of clearance on all sides of pan. • Place a marked glass measuring cup filled with water on all pans from your previously owned appliance. Before you call - Solutions to Common Problems Oven Baking For best cooking results, heat the oven before placing food in the oven. • Do not...
... preheat to 4") of clearance on all sides of pan. • Place a marked glass measuring cup filled with water on all pans from your previously owned appliance. Before you call - Solutions to Common Problems Oven Baking For best cooking results, heat the oven before placing food in the oven. • Do not...

Complete Owner's Guide (English)
Page 27
... sure the oven door is necessary when broiling frequently. Burned on residue. See Baking for longer cleaning time. Preheat broil element for service, review this appliance. Check house lights to Common Problems - Oven Light Does Not Burned-out or loose bulb. Meat not properly prepared. Grease does not drain into the...
... sure the oven door is necessary when broiling frequently. Burned on residue. See Baking for longer cleaning time. Preheat broil element for service, review this appliance. Check house lights to Common Problems - Oven Light Does Not Burned-out or loose bulb. Meat not properly prepared. Grease does not drain into the...

Complete Owner's Guide (English)
Page 28
...ferry trip charges, or mileage expense for consequential or incidental damages such as provided herein. USA 1.800.944.9044 Electrolux Major Appliances North America P.O. LIMITATION OF REMEDIES Customer's sole and exclusive remedy under this limited warranty shall be obtained contacting Electrolux at ...the addresses or phone numbers below. In Canada, your appliance is warranted by Electrolux or an authorized service company. Exclusions This warranty does not cover the following: 1 Products with original...
...ferry trip charges, or mileage expense for consequential or incidental damages such as provided herein. USA 1.800.944.9044 Electrolux Major Appliances North America P.O. LIMITATION OF REMEDIES Customer's sole and exclusive remedy under this limited warranty shall be obtained contacting Electrolux at ...the addresses or phone numbers below. In Canada, your appliance is warranted by Electrolux or an authorized service company. Exclusions This warranty does not cover the following: 1 Products with original...
