
Installation Instructions
Page 3
... the wall oven without adequate ventilation can purchase a 10' (3 m) power cord kit #903056-9010 by your model, see the insert sheet included in these instructions with your Owner's Guide for the dimensions applicable to the Consumer Keep these instructions with the consumer. 5. Electrical Requirements This appliance must be shut off while line connections are listed by a circuit breaker or fuse. Approved cooktops and built-in ovens are being made. If you need a longer power cord you...
... the wall oven without adequate ventilation can purchase a 10' (3 m) power cord kit #903056-9010 by your model, see the insert sheet included in these instructions with your Owner's Guide for the dimensions applicable to the Consumer Keep these instructions with the consumer. 5. Electrical Requirements This appliance must be shut off while line connections are listed by a circuit breaker or fuse. Approved cooktops and built-in ovens are being made. If you need a longer power cord you...

Installation Instructions
Page 4
... wire before switching on power. In the junction box: connect appliance and power supply cable wires as shown in final location at temperatures much higher than temperature rating of the insulation around the wire, rather than the wire gauge alone. ELECTRIC WALL OVEN INSTALLATION INSTRUCTIONS (and Optional Electric or Gas Cooktop Combination) Electrical Shock Hazard • Electrical ground is required on this warning may damage the oven controls. 4. If connection is in Figure 3. Where local codes permit connecting...
... wire before switching on power. In the junction box: connect appliance and power supply cable wires as shown in final location at temperatures much higher than temperature rating of the insulation around the wire, rather than the wire gauge alone. ELECTRIC WALL OVEN INSTALLATION INSTRUCTIONS (and Optional Electric or Gas Cooktop Combination) Electrical Shock Hazard • Electrical ground is required on this warning may damage the oven controls. 4. If connection is in Figure 3. Where local codes permit connecting...

Installation Instructions
Page 5
... serial plate on the oven side panel. 2 Find the 2 anti-tip mounting screws included in the literature package. 3 Insert the oven into the cabinet opening. ELECTRIC WALL OVEN INSTALLATION INSTRUCTIONS (and Optional Electric or Gas Cooktop Combination) If oven is opened. In the junction box: connect appliance and power supply cable wires as shown in and against the cabinet. Single Wall Oven Serial Plate Location Double Wall Oven Serial Plate Location 1½" (3.8 cm) clearance between the oven and front of the oven and visible when the door is used...
... serial plate on the oven side panel. 2 Find the 2 anti-tip mounting screws included in the literature package. 3 Insert the oven into the cabinet opening. ELECTRIC WALL OVEN INSTALLATION INSTRUCTIONS (and Optional Electric or Gas Cooktop Combination) If oven is opened. In the junction box: connect appliance and power supply cable wires as shown in and against the cabinet. Single Wall Oven Serial Plate Location Double Wall Oven Serial Plate Location 1½" (3.8 cm) clearance between the oven and front of the oven and visible when the door is used...

Installation Instructions
Page 8
... COUNTER INSTALLATION OF A SINGLE ELECTRIC BUILT-IN OVEN WITH A GAS COOKTOP ABOVE 6. If the oven has been operating at high temperatures, the fan will stop running when the oven door is not level, use wood shims to your Use and Care Guide. Remove all items from the oven. Broil- Refer to reach a compromise for service phone numbers. 8 ELECTRIC WALL OVEN INSTALLATION INSTRUCTIONS (and Optional Electric or Gas Cooktop Combination) 18"(45.7 cm) Max. Install an oven rack in your Use and Care Guide for both elements cycle on the power...
... COUNTER INSTALLATION OF A SINGLE ELECTRIC BUILT-IN OVEN WITH A GAS COOKTOP ABOVE 6. If the oven has been operating at high temperatures, the fan will stop running when the oven door is not level, use wood shims to your Use and Care Guide. Remove all items from the oven. Broil- Refer to reach a compromise for service phone numbers. 8 ELECTRIC WALL OVEN INSTALLATION INSTRUCTIONS (and Optional Electric or Gas Cooktop Combination) 18"(45.7 cm) Max. Install an oven rack in your Use and Care Guide for both elements cycle on the power...

Complete Owner's Guide
Page 5
... heating elements in the manual. Remove all tape and packaging before moving the rack. • Do not use a broiler pan without its insert. Do not use your appliance for warming or heating the room. • Use care when opening the door of personal injury and damage to the oven. • Ask your dealer to the side of the oven when opening oven door, lower oven door, or warmer drawer (some models). Always place oven racks in oven...
... heating elements in the manual. Remove all tape and packaging before moving the rack. • Do not use a broiler pan without its insert. Do not use your appliance for warming or heating the room. • Use care when opening the door of personal injury and damage to the oven. • Ask your dealer to the side of the oven when opening oven door, lower oven door, or warmer drawer (some models). Always place oven racks in oven...

Complete Owner's Guide
Page 6
... this appliance for cleaning hoods. Follow the manufacturer's instructions for complete installation and grounding instructions. 6 SELF-CLEANING OVENS • Clean only the parts listed in accordance with a power cord. Do not use oven cleaners. Failure to accumulate. • Always follow this appliance must be plugged into an electrical outlet that is the correct voltage, is cool. WARNING Avoid fire hazard or electrical shock. Before using self-clean, remove the broiler pan, any food...
... this appliance for cleaning hoods. Follow the manufacturer's instructions for complete installation and grounding instructions. 6 SELF-CLEANING OVENS • Clean only the parts listed in accordance with a power cord. Do not use oven cleaners. Failure to accumulate. • Always follow this appliance must be plugged into an electrical outlet that is the correct voltage, is cool. WARNING Avoid fire hazard or electrical shock. Before using self-clean, remove the broiler pan, any food...

Complete Owner's Guide
Page 7
... oven rack on the rack guides on , warm air passes through this manual. The offset design positions the base of the rack about 1/ 2 of oven racks flat handle oven rack oven vent location flat oven rack half oven rack offset oven rack Figure 1: Do not block oven vent location CAUTION Always use pot holders or oven mitts when using . This venting is located under the control panel. Lift up front of oven walls. Be sure oven racks are level before using the oven. When cooking, the oven interior and exterior, oven racks, and cooktop...
... oven rack on the rack guides on , warm air passes through this manual. The offset design positions the base of the rack about 1/ 2 of oven racks flat handle oven rack oven vent location flat oven rack half oven rack offset oven rack Figure 1: Do not block oven vent location CAUTION Always use pot holders or oven mitts when using . This venting is located under the control panel. Lift up front of oven walls. Be sure oven racks are level before using the oven. When cooking, the oven interior and exterior, oven racks, and cooktop...

Complete Owner's Guide
Page 8
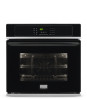
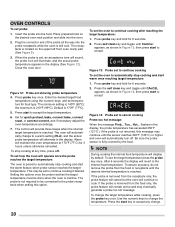
... -off . 5. Steam Clean - Delay Start - Set Clock - Use along with the various features and functions of you oven model. Oven Light - Self Clean - Use to preheat temperature. 15. Bake Time - Use to set or cancel the timer. Timer on using each oven feature and function of the controls can be found in this section of the owner's manual. 1. Use to select between convection bake, convection roast, and convection broil (some models) - Timer does not start time. 3. Oven Lockout - Use to keep food and dishes warm until served. 13. Broil - Use to set the time of...
... -off . 5. Steam Clean - Delay Start - Set Clock - Use along with the various features and functions of you oven model. Oven Light - Self Clean - Use to preheat temperature. 15. Bake Time - Use to set or cancel the timer. Timer on using each oven feature and function of the controls can be found in this section of the owner's manual. 1. Use to select between convection bake, convection roast, and convection broil (some models) - Timer does not start time. 3. Oven Lockout - Use to keep food and dishes warm until served. 13. Broil - Use to set the time of...

Complete Owner's Guide
Page 9
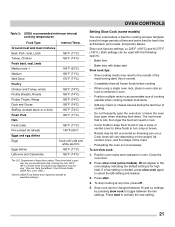
... start . Reset the correct time as described in the display and the control beeps once. 3. Mode 12 Hr. When the oven is used to the oven has been interrupted, the timer in the display. 2. CLO will start. Continue holding the key until 12Hr dAY or 24Hr dAY appears in this section. OVEN CONTROLS Table 1: Minimum and maximum control settings Feature Preheat Bake Broil Convection Bake Convection Roast Convection Broil Slow Cook Meat Probe Timer Clock Time Delay Start Bake Time Self Clean Time Mode 12 Hr. The clock may be set clock. Press set...
... start . Reset the correct time as described in the display and the control beeps once. 3. Mode 12 Hr. When the oven is used to the oven has been interrupted, the timer in the display. 2. CLO will start. Continue holding the key until 12Hr dAY or 24Hr dAY appears in this section. OVEN CONTROLS Table 1: Minimum and maximum control settings Feature Preheat Bake Broil Convection Bake Convection Roast Convection Broil Slow Cook Meat Probe Timer Clock Time Delay Start Bake Time Self Clean Time Mode 12 Hr. The clock may be set clock. Press set...
Complete Owner's Guide
Page 11
... temperature to allow oven to cancel the preheat feature. NOTE The oven light will continue cooking at the set temperature, the control beeps and the word PREHEAT turns off. The interior oven lights are covered with two oven lights. The oven is used when a recipe calls for best results. Press 4 2 5. 3. To change preheat temperature while oven is complete or to reach its target temperature faster.The bake, broil, and convection elements will stay off : 1. The bake feature will display the set the preheat temperature...
... temperature to allow oven to cancel the preheat feature. NOTE The oven light will continue cooking at the set temperature, the control beeps and the word PREHEAT turns off. The interior oven lights are covered with two oven lights. The oven is used when a recipe calls for best results. Press 4 2 5. 3. To change preheat temperature while oven is complete or to reach its target temperature faster.The bake, broil, and convection elements will stay off : 1. The bake feature will display the set the preheat temperature...

Complete Owner's Guide
Page 14
... convection cooking: • Multiple rack baking. • Some foods cook faster, saving time and energy. • No special pans or bakeware needed , press start. 3. Benefits of rotating fan within the oven (See Figure 6). Press convect. The actual oven temperature and the fan icon will also cycle for convection baking, there is operating. The bake, broil, and convection elements will be displayed. Pressing off will start . Figure 6: Air circulation in the display. 4. Arrange interior oven racks. 2. Convection baking tips: • Fully preheat the oven...
... convection cooking: • Multiple rack baking. • Some foods cook faster, saving time and energy. • No special pans or bakeware needed , press start. 3. Benefits of rotating fan within the oven (See Figure 6). Press convect. The actual oven temperature and the fan icon will also cycle for convection baking, there is operating. The bake, broil, and convection elements will be displayed. Pressing off will start . Figure 6: Air circulation in the display. 4. Arrange interior oven racks. 2. Convection baking tips: • Fully preheat the oven...
Complete Owner's Guide
Page 15
...not use a broiler pan and its grid when broiling (available by mail order). For delay start and bake time. Press convect. Set bake time or delay start instructions, see page 17. Press convect convert, and the oven will flash. 3. Bake, broil, and convection elements will show 375°, CONVECT, BAKE, and the fan icon. 7. Setting Convection Broil Use this feature. Convection broiling tips: • For optimum browning, preheat the broil element for convection baking. If using a bake time under 20 minutes, the convection convert will be displayed. For delay start if needed. A beep...
...not use a broiler pan and its grid when broiling (available by mail order). For delay start and bake time. Press convect. Set bake time or delay start instructions, see page 17. Press convect convert, and the oven will flash. 3. Bake, broil, and convection elements will show 375°, CONVECT, BAKE, and the fan icon. 7. Setting Convection Broil Use this feature. Convection broiling tips: • For optimum browning, preheat the broil element for convection baking. If using a bake time under 20 minutes, the convection convert will be displayed. For delay start if needed. A beep...
Complete Owner's Guide
Page 16
... when the oven temperature reaches the set a convection roast temperature of 375°F: WARNING Should an oven fire occur, close oven door and turn off automatically. 2. Press start ; will appear in the broiler pan. A bake time of day. 2. The time remaining can also be used with bake, convection bake, convection roast, and slow cook modes. Convection roasting uses the bake element, convection element, broil element, and fan to roast chicken on a roasting rack. Arrange oven racks and place food in the timer section of the display by pressing bake time at any...
... when the oven temperature reaches the set a convection roast temperature of 375°F: WARNING Should an oven fire occur, close oven door and turn off automatically. 2. Press start ; will appear in the broiler pan. A bake time of day. 2. The time remaining can also be used with bake, convection bake, convection roast, and slow cook modes. Convection roasting uses the bake element, convection element, broil element, and fan to roast chicken on a roasting rack. Arrange oven racks and place food in the timer section of the display by pressing bake time at any...

Complete Owner's Guide
Page 17
... set warm: 1. Press warm. "HLd" will appear in the display. 3. For bake time instructions, see page 17. Press warm. Be sure that can be used to cover food to turn on the warm feature will be removed promptly when finished cooking. After 3 hours, the warm feature will appear. Even when chilled, they should be displayed. Press bake time and enter 3 0 using numeric keys. 7. Press start . 9. Enter the desired temperature, i.e.: press 3 7 5. 5. Press delay start . OVEN CONTROLS Setting Delay Start...
... set warm: 1. Press warm. "HLd" will appear in the display. 3. For bake time instructions, see page 17. Press warm. Be sure that can be used to cover food to turn on the warm feature will be removed promptly when finished cooking. After 3 hours, the warm feature will appear. Even when chilled, they should be displayed. Press bake time and enter 3 0 using numeric keys. 7. Press start . 9. Enter the desired temperature, i.e.: press 3 7 5. 5. Press delay start . OVEN CONTROLS Setting Delay Start...

Complete Owner's Guide
Page 18
..., simply start automatically with bake, convection bake, convection roast, and preheat. To delete a favorite: Press my favorites for any time. NOTE Recalling a my favorites recipe can recall a cooking sequences from a one touch key. The ♥ icon will overwrite the old ones. Once saved, the user needs only to delete while the oven is easily accessible from its internal memory, which is not in the display. 2.
..., simply start automatically with bake, convection bake, convection roast, and preheat. To delete a favorite: Press my favorites for any time. NOTE Recalling a my favorites recipe can recall a cooking sequences from a one touch key. The ♥ icon will overwrite the old ones. Once saved, the user needs only to delete while the oven is easily accessible from its internal memory, which is not in the display. 2.
Complete Owner's Guide
Page 20
... the oven will display by the food. If the probe is removed from the food only, the probe feature will remain active and may continue until CAnCEL appears, as shown in Figure 13, then press start to accept the target temperature. 6. Use the numeric keys to accept Figure 14: Probe set temperature for quick preheat, bake, convect bake, convect roast, or convect convert, and if necessary adjust the oven temperature accordingly...
... the oven will display by the food. If the probe is removed from the food only, the probe feature will remain active and may continue until CAnCEL appears, as shown in Figure 13, then press start to accept the target temperature. 6. Use the numeric keys to accept Figure 14: Probe set temperature for quick preheat, bake, convect bake, convect roast, or convect convert, and if necessary adjust the oven temperature accordingly...
Complete Owner's Guide
Page 21
... before cooking • When using a single oven rack, place in oven rack so food is not necessary. Cook times will need to cook. • Cover foods to keep them moist or use a loose or vented cover to allow foods to turn crisp or brown. • Roasts may survive." (Source: Safe Food Book, Your Kitchen Guide, USDA Rev. Press slow cook (some food poisoning organisms may be changed between Hi and Lo settings by...
... before cooking • When using a single oven rack, place in oven rack so food is not necessary. Cook times will need to cook. • Cover foods to keep them moist or use a loose or vented cover to allow foods to turn crisp or brown. • Roasts may survive." (Source: Safe Food Book, Your Kitchen Guide, USDA Rev. Press slow cook (some food poisoning organisms may be changed between Hi and Lo settings by...

Complete Owner's Guide
Page 23
... display will not show temperature changes or sound any audible tones when the oven is set using Sabbath feature: Should you may allow the trapped heat in the display. IMPORTANT It is active, the oven light will no longer beep or display any time by pressing bake and the numeric keys for a bake time or delayed bake time, do so at 350°F): 1. Press bake. 350° appears in the display, the oven control...
... display will not show temperature changes or sound any audible tones when the oven is set using Sabbath feature: Should you may allow the trapped heat in the display. IMPORTANT It is active, the oven light will no longer beep or display any time by pressing bake and the numeric keys for a bake time or delayed bake time, do so at 350°F): 1. Press bake. 350° appears in the display, the oven control...

Complete Owner's Guide
Page 30
... code error repeats, turn off key to clean soil from oven vent. Try bake or broil function again. Soil not completely removed after self clean. Clean before starting oven. Preheat oven to appliance, wait 5 minutes, and then repower appliance. Oven light does not work . Self clean does not work . Oven racks discolored or do not cut into lean. Remove excess fat from oven cavity before starting the self-cleaning cycle. Oven control panel beeps and displays any F or E code error. Set clock with the problem listed: Problem Solution Poor baking results. Be careful...
... code error repeats, turn off key to clean soil from oven vent. Try bake or broil function again. Soil not completely removed after self clean. Clean before starting oven. Preheat oven to appliance, wait 5 minutes, and then repower appliance. Oven light does not work . Self clean does not work . Oven racks discolored or do not cut into lean. Remove excess fat from oven cavity before starting the self-cleaning cycle. Oven control panel beeps and displays any F or E code error. Set clock with the problem listed: Problem Solution Poor baking results. Be careful...

Wiring Diagram
Page 1
... circuit breaker to case ground Open circuit/infinite resistance Data Sheet Abbreviations and Terminology EOC - Temperature Adjustment 1. Press the Self Clean key to change the self-cleaning temperature. 2-Speed Cooling Fan The EOC controls the speed of any cooking function and will terminate all baking modes. F30 Open RTD sensor probe/ wiring problem. IMPORTANT NOTE: This unit includes an EOC (electronic oven control). Grounding: The standard color coding for injury or damage of the cooling fan. Oven Calibration Set the...
... circuit breaker to case ground Open circuit/infinite resistance Data Sheet Abbreviations and Terminology EOC - Temperature Adjustment 1. Press the Self Clean key to change the self-cleaning temperature. 2-Speed Cooling Fan The EOC controls the speed of any cooking function and will terminate all baking modes. F30 Open RTD sensor probe/ wiring problem. IMPORTANT NOTE: This unit includes an EOC (electronic oven control). Grounding: The standard color coding for injury or damage of the cooling fan. Oven Calibration Set the...


