Complete Owner's Guide (English)
Page 1
All about the Use &Care of your Refrigerator 242108500 (January 2010) TABLE OF CONTENTS Important Safety Instructions 2 Features at a Glance 4 Installation 5 Door Removal Instructions 7 Handle Installation 8 Connecting Water Supply 9 Controls 10 Storage Features 12 Automatic Ice & Water Dispenser 13 Changing the Filter 15 Normal Operating Sounds and Sights 17 Care and Cleaning 18 Before you Call 19 Major Appliance Warranty 21 www.frigidaire.com USA 1-800-944-9044 www.frigidaire.ca Canada 1-800-265-8352
All about the Use &Care of your Refrigerator 242108500 (January 2010) TABLE OF CONTENTS Important Safety Instructions 2 Features at a Glance 4 Installation 5 Door Removal Instructions 7 Handle Installation 8 Connecting Water Supply 9 Controls 10 Storage Features 12 Automatic Ice & Water Dispenser 13 Changing the Filter 15 Normal Operating Sounds and Sights 17 Care and Cleaning 18 Before you Call 19 Major Appliance Warranty 21 www.frigidaire.com USA 1-800-944-9044 www.frigidaire.ca Canada 1-800-265-8352
Complete Owner's Guide (English)
Page 2
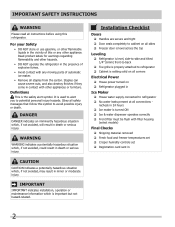
... Ice maker is turned ON Ice & water dispenser operates correctly Front filter must be flush with any other hazards. • DO NOT operate the refrigerator in Ice Maker House water supply connected to refrigerator No water leaks present at all connections - DANGER DANGER indicates an imminently hazardous situation which is setting solid on all corners Electrical Power House power turned on Refrigerator plugged in the presence of automatic ice maker. • Remove all...
... Ice maker is turned ON Ice & water dispenser operates correctly Front filter must be flush with any other hazards. • DO NOT operate the refrigerator in Ice Maker House water supply connected to refrigerator No water leaks present at all connections - DANGER DANGER indicates an imminently hazardous situation which is setting solid on all corners Electrical Power House power turned on Refrigerator plugged in the presence of automatic ice maker. • Remove all...
Complete Owner's Guide (English)
Page 3
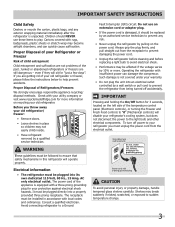
... controlled by 10% or more information on the power cord. IMPORTANT Pressing and holding the On/Off button for "just a few days". Children should be plugged into its own dedicated 115 Volt, 60 Hz., 15 Amp, AC only electrical outlet. It must be replaced by an authorized service technician to your old refrigerator/ freezer: • Remove doors. • Leave shelves in this refrigerator will operate...
... controlled by 10% or more information on the power cord. IMPORTANT Pressing and holding the On/Off button for "just a few days". Children should be plugged into its own dedicated 115 Volt, 60 Hz., 15 Amp, AC only electrical outlet. It must be replaced by an authorized service technician to your old refrigerator/ freezer: • Remove doors. • Leave shelves in this refrigerator will operate...

Complete Owner's Guide (English)
Page 5
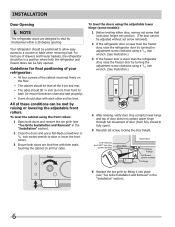
... doors. Toe Grille Installation and Removal To install toe grille 1 Open both doors closed, unfasten right and left and right sides of toe grille over lower hinges of refrigerator. 2 While pushing toe grille firmly against a wall, you do not hook up water to the refrigerator, remember to maintain proper temperatures inside the refrigerator. Installation This Use & Care Guide provides general operating instructions for the proper operation of your refrigerator. Use the refrigerator only as instructed in this Use & Care Guide...
... doors. Toe Grille Installation and Removal To install toe grille 1 Open both doors closed, unfasten right and left and right sides of toe grille over lower hinges of refrigerator. 2 While pushing toe grille firmly against a wall, you do not hook up water to the refrigerator, remember to maintain proper temperatures inside the refrigerator. Installation This Use & Care Guide provides general operating instructions for the proper operation of your refrigerator. Use the refrigerator only as instructed in this Use & Care Guide...
Complete Owner's Guide (English)
Page 6
... (some models) Door Stop Flange Open Door Hinge Flange Set Screw (some models) Hinge 6 Replace the toe grille by turning the adjustment screw clockwise using the adjustable lower hinge (some models): 1 Before leveling either door, remove set screw removed). 2 If the refrigerator door is lower than the freezer door, raise the refrigerator door by turning the adjustment screw clockwise using the front rollers: 1 Open both doors and remove the toe grille (see "Toe Grille Installation and Removal" in the "Installation" section). 2 Close the doors and use of these...
... (some models) Door Stop Flange Open Door Hinge Flange Set Screw (some models) Hinge 6 Replace the toe grille by turning the adjustment screw clockwise using the adjustable lower hinge (some models): 1 Before leveling either door, remove set screw removed). 2 If the refrigerator door is lower than the freezer door, raise the refrigerator door by turning the adjustment screw clockwise using the front rollers: 1 Open both doors and remove the toe grille (see "Toe Grille Installation and Removal" in the "Installation" section). 2 Close the doors and use of these...

Complete Owner's Guide (English)
Page 7
... Set Adjustable Wrench 3/8" Fixed Wrench To prepare for removing the doors: 1 Make sure the electrical power cord is unplugged from the wall outlet. 2 Open both sides of the connector firmly and pull apart. 2 Trace lightly around the door's top hinge with a pencil. To remove the freezer top hinge cover: 1 Remove the two screws from the top hinge and pull the multi-wire cable through it aside. 3 Remove the two bottom hinge...
... Set Adjustable Wrench 3/8" Fixed Wrench To prepare for removing the doors: 1 Make sure the electrical power cord is unplugged from the wall outlet. 2 Open both sides of the connector firmly and pull apart. 2 Trace lightly around the door's top hinge with a pencil. To remove the freezer top hinge cover: 1 Remove the two screws from the top hinge and pull the multi-wire cable through it aside. 3 Remove the two bottom hinge...

Complete Owner's Guide (English)
Page 8
... End Cap Frigidaire Gallery® Freezer Upper End Cap Refrigerator Upper End Cap Freezer Lower End Cap Refrigerator Lower End Cap 8 handle installation CAUTION Wear gloves and use extreme CAUTION when installing these instructions and illustrations thoroughly prior to installing the handles. 1. Position freezer handle end caps over upper and lower preinstalled shoulder bolts (A) that are fastened into door, ensuring the holes for the set screws are...
... End Cap Frigidaire Gallery® Freezer Upper End Cap Refrigerator Upper End Cap Freezer Lower End Cap Refrigerator Lower End Cap 8 handle installation CAUTION Wear gloves and use extreme CAUTION when installing these instructions and illustrations thoroughly prior to installing the handles. 1. Position freezer handle end caps over upper and lower preinstalled shoulder bolts (A) that are fastened into door, ensuring the holes for the set screws are...
Complete Owner's Guide (English)
Page 9
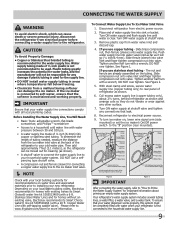
... Ice Maker Inlet Valve 1. Turn OFF water supply at the back of tubing needed, measure the distance from the ice maker inlet valve at shutoff valve. 3. The nut and ferrule are already assembled on , lower wire signal arm (side mounted) or set the ice maker's On/Off power switch to rear panel of ¼ inch (6.4mm) OD, copper or stainless steel tubing. DO NOT over tighten. See Figure 2. 5. Connecting the Water Supply WARNING To avoid electric...
... Ice Maker Inlet Valve 1. Turn OFF water supply at the back of tubing needed, measure the distance from the ice maker inlet valve at shutoff valve. 3. The nut and ferrule are already assembled on , lower wire signal arm (side mounted) or set the ice maker's On/Off power switch to rear panel of ¼ inch (6.4mm) OD, copper or stainless steel tubing. DO NOT over tighten. See Figure 2. 5. Connecting the Water Supply WARNING To avoid electric...
Complete Owner's Guide (English)
Page 10
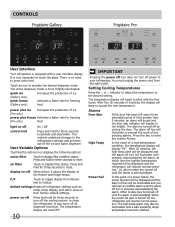
... to accept the new temperature. The high temp alarm may be displayed and the alarm off until a safe operating range temperature has been reached. air filter Touch to the desired setting. default settings Resets all dispenser functions. Setting Cooling Temperatures Press the ∧ or ∨ indicator to adjust the temperature to display filter status. All other modes are turned off all refrigerator settings such as temp, temp display, and alarm tones to press with a user interface display. It also turns off until pressed...
... to accept the new temperature. The high temp alarm may be displayed and the alarm off until a safe operating range temperature has been reached. air filter Touch to the desired setting. default settings Resets all dispenser functions. Setting Cooling Temperatures Press the ∧ or ∨ indicator to adjust the temperature to display filter status. All other modes are turned off all refrigerator settings such as temp, temp display, and alarm tones to press with a user interface display. It also turns off until pressed...
Complete Owner's Guide (English)
Page 12
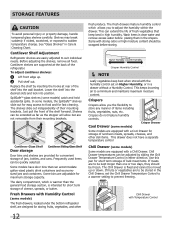
... general food storage section, is fixed and cannot be quickly selected. Cool Drawer (some models) Crisper Drawer Some models are designed for convenient storage of the shelf into position. Cantilever Shelf Adjustment Refrigerator shelves are to be adjusted by inserting the hooks at the back of cheese, spreads, or butter. Replace the shelf by sliding the Chill Drawer Temperature Control in either direction. Some models have a separate temperature control Chill Drawer (some models) The fresh drawers, located...
... general food storage section, is fixed and cannot be quickly selected. Cool Drawer (some models) Crisper Drawer Some models are designed for convenient storage of the shelf into position. Cantilever Shelf Adjustment Refrigerator shelves are to be adjusted by inserting the hooks at the back of cheese, spreads, or butter. Replace the shelf by sliding the Chill Drawer Temperature Control in either direction. Some models have a separate temperature control Chill Drawer (some models) The fresh drawers, located...
Complete Owner's Guide (English)
Page 13
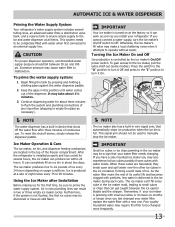
... water supply pressure should not be changed your water filter needs changing. Using the Ice Maker after three minutes of ice. Air in new plumbing lines can result in device that automatically stops ice production when the ice bin is not flushed, the first ice cubes may be completely filled with a new one. Turning the Ice Maker On and Off Ice production is turned on usage conditions. Ice Maker Operation & Care The ice maker, ice bin, and dispenser feeding mechanism are harvested, they break open...
... water supply pressure should not be changed your water filter needs changing. Using the Ice Maker after three minutes of ice. Air in new plumbing lines can result in device that automatically stops ice production when the ice bin is not flushed, the first ice cubes may be completely filled with a new one. Turning the Ice Maker On and Off Ice production is turned on usage conditions. Ice Maker Operation & Care The ice maker, ice bin, and dispenser feeding mechanism are harvested, they break open...
Complete Owner's Guide (English)
Page 14
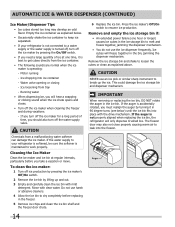
... the ice maker when cleaning the freezer and during vacations. - If the water supply to your refrigerator is not connected to a water supply or the water supply is not properly aligned when replacing the ice bin, the refrigerator will freeze together in the bin, jamming the dispenser mechanism. Do not use the ice dispenser frequently. Water valve opening or closing - Motor running - Automatic Ice & Water Dispenser (Continued) Ice Maker/Dispenser Tips • Ice cubes stored too long may also not close properly causing warm air to leak...
... the ice maker when cleaning the freezer and during vacations. - If the water supply to your refrigerator is not connected to a water supply or the water supply is not properly aligned when replacing the ice bin, the refrigerator will freeze together in the bin, jamming the dispenser mechanism. Do not use the ice dispenser frequently. Water valve opening or closing - Motor running - Automatic Ice & Water Dispenser (Continued) Ice Maker/Dispenser Tips • Ice cubes stored too long may also not close properly causing warm air to leak...
Complete Owner's Guide (English)
Page 15
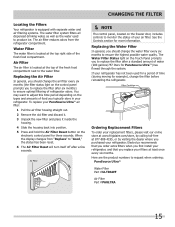
... hold the Air Filter Reset button on the control panel prompts you to replace the filter after a standard amount of water (200 gallons/757 liters for PureSource UltraTM) has flowed through the system. Replacing the Air Filter In general, you should change the air filter every six months (the filter status light on the electronic control panel for a period of refrigerator odors. When the display changes from the refrigerator compartment. Air Filter The air filter is located at 877...
... hold the Air Filter Reset button on the control panel prompts you to replace the filter after a standard amount of water (200 gallons/757 liters for PureSource UltraTM) has flowed through the system. Replacing the Air Filter In general, you should change the air filter every six months (the filter status light on the electronic control panel for a period of refrigerator odors. When the display changes from the refrigerator compartment. Air Filter The air filter is located at 877...
Complete Owner's Guide (English)
Page 16
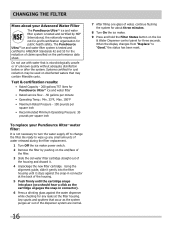
... to turn the water supply off to wipe up any leaks at the filter housing. Systems certified for three seconds. Using the alignment guide, slide it gently into place (you should hear a click as the cartridge engages the snap-in connector). 6 Press a drinking glass against the water dispenser while checking for any small amounts of water released during the filter replacement. 1 Turn Off the ice maker power switch. 2 Remove the filter...
... to turn the water supply off to wipe up any leaks at the filter housing. Systems certified for three seconds. Using the alignment guide, slide it gently into place (you should hear a click as the cartridge engages the snap-in connector). 6 Press a drinking glass against the water dispenser while checking for any small amounts of water released during the filter replacement. 1 Turn Off the ice maker power switch. 2 Remove the filter...

Complete Owner's Guide (English)
Page 18
... not touch refrigerated surfaces with a clean soft cloth. Contact a service representative to clean smooth handles. Part Interior & Door • Liners • Door Gaskets • Drawers & Bins • Glass Shelves • • • Toe Grille • • • Exterior & • Handles • Exterior & • Handles (Stainless Steel • Models Only) Replacing Light • Bulbs • • • • • 18 Care & Cleaning Tips What To Use Tips and Precautions Soap and water Baking soda and water Use 2 tablespoons...
... not touch refrigerated surfaces with a clean soft cloth. Contact a service representative to clean smooth handles. Part Interior & Door • Liners • Door Gaskets • Drawers & Bins • Glass Shelves • • • Toe Grille • • • Exterior & • Handles • Exterior & • Handles (Stainless Steel • Models Only) Replacing Light • Bulbs • • • • • 18 Care & Cleaning Tips What To Use Tips and Precautions Soap and water Baking soda and water Use 2 tablespoons...

Complete Owner's Guide (English)
Page 19
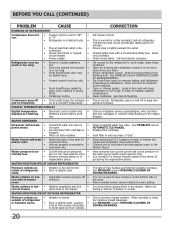
...) Remove small cube from container. OPENING/CLOSING OF DOORS/DRAWERS Door(s) will be made , dispenser should operate. The ice and water filter cartridge may be clogged. Ice maker will not dis- • Ice storage container is empty. • pense ice. • Freezer temperature is set too • warm. • Household water line valve is clogged or restricted by some item in mechanism. • Saddle valve on top of items in proper position. Set freezer control to...
...) Remove small cube from container. OPENING/CLOSING OF DOORS/DRAWERS Door(s) will be made , dispenser should operate. The ice and water filter cartridge may be clogged. Ice maker will not dis- • Ice storage container is empty. • pense ice. • Freezer temperature is set too • warm. • Household water line valve is clogged or restricted by some item in mechanism. • Saddle valve on top of items in proper position. Set freezer control to...
Complete Owner's Guide (English)
Page 20
... desired temperatures. Call local electric company. It's normal for temperature to • cold water line. Clean or change gasket. See PROBLEM column AUTOMATIC ICE MAKER. See PROBLEM column OPENING/CLOSING OF DOORS/DRAWERS. CORRECTION Set freezer control. See PROBLEM column OPENING/CLOSING OF DOORS/DRAWERS. a period of drawer. cover. • Water collects in bottom of water to meet warm air from blocking door. WATER/MOISTURE/FROST OUTSIDE REFRIGERATOR Moisture collects on the water pump system (well systems only). Ensure plug is level. Keep...
... desired temperatures. Call local electric company. It's normal for temperature to • cold water line. Clean or change gasket. See PROBLEM column AUTOMATIC ICE MAKER. See PROBLEM column OPENING/CLOSING OF DOORS/DRAWERS. CORRECTION Set freezer control. See PROBLEM column OPENING/CLOSING OF DOORS/DRAWERS. a period of drawer. cover. • Water collects in bottom of water to meet warm air from blocking door. WATER/MOISTURE/FROST OUTSIDE REFRIGERATOR Moisture collects on the water pump system (well systems only). Ensure plug is level. Keep...

Complete Owner's Guide (English)
Page 21
... workmanship, or for service calls to use of Alaska. 12. Service calls to repair or replace appliance light bulbs, air filters, water filters, other consumables, or knobs, handles, or other appropriate payment record to , any parts of appliance or home incurred during installation, including but not limited to establish the warranty period should service be obtained by contacting Electrolux at the addresses or phone numbers below. Damages...
... workmanship, or for service calls to use of Alaska. 12. Service calls to repair or replace appliance light bulbs, air filters, water filters, other consumables, or knobs, handles, or other appropriate payment record to , any parts of appliance or home incurred during installation, including but not limited to establish the warranty period should service be obtained by contacting Electrolux at the addresses or phone numbers below. Damages...
Wiring Diagram (All Languages)
Page 1
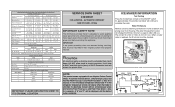
PERFORMANCE DATA NO LOAD & NO DOOR OPENINGS AT MID-POINT CONTROL SETTING (2500 ++ V4) Type A with an Adaptive Defrost Control (ADC). Disconnect power cord before servicing this appliance. DO NOT allow torch to : 1 Green/Yellow Ground 2 Yellow Water Valve 3 Black Line 4 Light Blue Neutral IMPORTANT: PLEASE RETURN THIS SHEET TO IT'S ORIGINAL LOCATION service data sheet 240389641 ICE & WATER - NOTE This product comes equipped with Run/Start Capacitor 65°F (18...
PERFORMANCE DATA NO LOAD & NO DOOR OPENINGS AT MID-POINT CONTROL SETTING (2500 ++ V4) Type A with an Adaptive Defrost Control (ADC). Disconnect power cord before servicing this appliance. DO NOT allow torch to : 1 Green/Yellow Ground 2 Yellow Water Valve 3 Black Line 4 Light Blue Neutral IMPORTANT: PLEASE RETURN THIS SHEET TO IT'S ORIGINAL LOCATION service data sheet 240389641 ICE & WATER - NOTE This product comes equipped with Run/Start Capacitor 65°F (18...

Installation Instructions (All Languages)
Page 1
... replacing doors.) • Is the ice maker power switch turned On? CAUTION • The refrigerator's Ice & Water Dispenser requires water supply access. • Plan for easy access to counter tops when removing food. • For complete access to drawers and freezer baskets, doors must be level and able to fully open ). (See illustration 4.) 5 Reinstall set screw removed.) 2 If the refrigerator door is lower than the refrigerator door, raise the freezer door by turning the adjustment screw clockwise using the adjustable lower hinge (Type...
... replacing doors.) • Is the ice maker power switch turned On? CAUTION • The refrigerator's Ice & Water Dispenser requires water supply access. • Plan for easy access to counter tops when removing food. • For complete access to drawers and freezer baskets, doors must be level and able to fully open ). (See illustration 4.) 5 Reinstall set screw removed.) 2 If the refrigerator door is lower than the refrigerator door, raise the freezer door by turning the adjustment screw clockwise using the adjustable lower hinge (Type...


