Complete Owner's Guide (English)
Page 1
All about the Use &Care of your Refrigerator 242063800 (November 2009) TABLE OF CONTENTS Important Safety Instructions 2 Installation 4 Door Removal Instructions 5 Handle Installation 6 Connecting Water Supply 8 Ice Service 9 Controls 9 Normal Operating Sounds and Sights 10 Care and Cleaning 11 Before you Call 12 Major Appliance Warranty 13 www.frigidaire.com USA 1-800-944-9044 www.frigidaire.ca Canada 1-800-265-8352
All about the Use &Care of your Refrigerator 242063800 (November 2009) TABLE OF CONTENTS Important Safety Instructions 2 Installation 4 Door Removal Instructions 5 Handle Installation 6 Connecting Water Supply 8 Ice Service 9 Controls 9 Normal Operating Sounds and Sights 10 Care and Cleaning 11 Before you Call 12 Major Appliance Warranty 13 www.frigidaire.com USA 1-800-944-9044 www.frigidaire.ca Canada 1-800-265-8352
Complete Owner's Guide (English)
Page 2
... filter housing (select models) Final Checks Shipping material removed Fresh food and freezer temperatures set Crisper humidity controls set Registration card sent in 24 hours Ice maker is turned ON Ice & water dispenser operates correctly Front filter must be flush with other appliances or furniture. Obey all safety messages that follow this refrigerator. It is the safety alert symbol. DANGER DANGER indicates...
... filter housing (select models) Final Checks Shipping material removed Fresh food and freezer temperatures set Crisper humidity controls set Registration card sent in 24 hours Ice maker is turned ON Ice & water dispenser operates correctly Front filter must be flush with other appliances or furniture. Obey all safety messages that follow this refrigerator. It is the safety alert symbol. DANGER DANGER indicates...

Complete Owner's Guide (English)
Page 3
... light bulb and other electrical components. To turn off accidentally. Junked or abandoned refrigerators or freezers are getting rid of the temperature control panel (Electronic controls), or turning the Freezer and Fresh Food controls to play. Do not use these items to "0" (Mechanical controls) will sit for three (3) seconds, located on the power cord. Always grip the plug firmly, and pull straight out from the electrical outlet. Operating the refrigerator with local codes...
... light bulb and other electrical components. To turn off accidentally. Junked or abandoned refrigerators or freezers are getting rid of the temperature control panel (Electronic controls), or turning the Freezer and Fresh Food controls to play. Do not use these items to "0" (Mechanical controls) will sit for three (3) seconds, located on the power cord. Always grip the plug firmly, and pull straight out from the electrical outlet. Operating the refrigerator with local codes...
Complete Owner's Guide (English)
Page 4
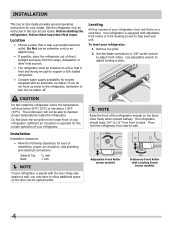
... ice maker. Use adjustable wrench to maintain proper temperatures inside the refrigerator. Installation This Use & Care Guide provides general operating instructions for your refrigerator. CAUTION Do Not install the refrigerator where the temperature will not be opened wider. NOTE Raise the front of your model. The compressor will drop below 55°F (13°C) or rise above 110°F (43°C). Sufficient air circulation is near a grounded electrical outlet. Before starting the refrigerator...
... ice maker. Use adjustable wrench to maintain proper temperatures inside the refrigerator. Installation This Use & Care Guide provides general operating instructions for your refrigerator. CAUTION Do Not install the refrigerator where the temperature will not be opened wider. NOTE Raise the front of your model. The compressor will drop below 55°F (13°C) or rise above 110°F (43°C). Sufficient air circulation is near a grounded electrical outlet. Before starting the refrigerator...

Complete Owner's Guide (English)
Page 5
... begin, turn refrigerator temperature control to center position. Have an assistant lift up on next page). 11 Move freezer and refrigerator door stops to opposite side. Door Removal Instructions Top Hinge Cover Front Screw Top Hinge Cover Rear Screw Tools Necessary: Top Hinge Screw Bottom Hinge Screw AND Phillips™ Head OR Socket Wrench Set OR Adjustable Wrench 3/8" Fixed Wrench NOTE The direction in electrical power cord and turn the refrigerator temperature control to "0" and remove the electrical power cord from...
... begin, turn refrigerator temperature control to center position. Have an assistant lift up on next page). 11 Move freezer and refrigerator door stops to opposite side. Door Removal Instructions Top Hinge Cover Front Screw Top Hinge Cover Rear Screw Tools Necessary: Top Hinge Screw Bottom Hinge Screw AND Phillips™ Head OR Socket Wrench Set OR Adjustable Wrench 3/8" Fixed Wrench NOTE The direction in electrical power cord and turn the refrigerator temperature control to "0" and remove the electrical power cord from...
Complete Owner's Guide (English)
Page 6
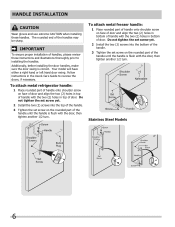
... two (2) holes in the Use & Care Guide to installing the handles. Do not tighten the set screw yet. 2 Install the two (2) screws into the top of the handle. 3 Tighten the set screw on face of door and align the two (2) holes in top of handles, please review these handles. IMPORTANT To ensure proper installation of door. To attach metal refrigerator handle: 1 Place rounded part of handle onto shoulder screw on the...
... two (2) holes in the Use & Care Guide to installing the handles. Do not tighten the set screw yet. 2 Install the two (2) screws into the top of the handle. 3 Tighten the set screw on face of door and align the two (2) holes in top of handles, please review these handles. IMPORTANT To ensure proper installation of door. To attach metal refrigerator handle: 1 Place rounded part of handle onto shoulder screw on the...
Complete Owner's Guide (English)
Page 7
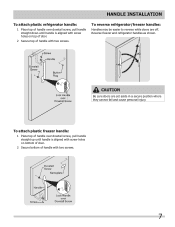
..., pull handle straight up until handle is aligned with screw holes on top of door. 2 Secure top of handle with two screws. To attach plastic freezer handle: 1 Place top of handle over dovetail screw, pull handle straight down until handle is aligned with screw holes on bottom of door. 2 Secure bottom of handle with two screws. 7 To reverse refrigerator/freezer handles: Handles may be easier to reverse while doors are set aside...
..., pull handle straight up until handle is aligned with screw holes on top of door. 2 Secure top of handle with two screws. To attach plastic freezer handle: 1 Place top of handle over dovetail screw, pull handle straight down until handle is aligned with screw holes on bottom of door. 2 Secure bottom of handle with two screws. 7 To reverse refrigerator/freezer handles: Handles may be easier to reverse while doors are set aside...
Complete Owner's Guide (English)
Page 8
... valve to connect the water supply line to the household water supply line. Reconnect refrigerator to the "I" position (rear mounted). Remove plastic cap from electric power source. 2. Tighten another half turn with a wrench; The nut and ferrule are already assembled on , lower wire signal arm (side mounted) or set the ice maker's On/Off power switch to electrical power source. 9. Slide compression nut onto valve inlet and finger tighten compression nut onto valve. Connecting the Water Supply...
... valve to connect the water supply line to the household water supply line. Reconnect refrigerator to the "I" position (rear mounted). Remove plastic cap from electric power source. 2. Tighten another half turn with a wrench; The nut and ferrule are already assembled on , lower wire signal arm (side mounted) or set the ice maker's On/Off power switch to electrical power source. 9. Slide compression nut onto valve inlet and finger tighten compression nut onto valve. Connecting the Water Supply...
Complete Owner's Guide (English)
Page 9
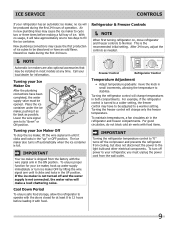
... before making a full tray of operation. Lower the wire signal arm to the light bulb and other electrical components. With no ice will be installed in most models at least 8 to operate with the wire signal arm in new plumbing lines may be produced during the first 24 hours. After 24 hours, adjust the controls as possible. Air in the ON position. IMPORTANT Your ice maker is shipped from cooling...
... before making a full tray of operation. Lower the wire signal arm to the light bulb and other electrical components. With no ice will be installed in most models at least 8 to operate with the wire signal arm in new plumbing lines may be produced during the first 24 hours. After 24 hours, adjust the controls as possible. Air in the ON position. IMPORTANT Your ice maker is shipped from cooling...

Complete Owner's Guide (English)
Page 10
... water dripping into the ice bin. D Automatic ice maker When ice has been produced, you will produce 2.5 to fill the ice maker. The ice maker will hear ice cubes falling into the drain pan during the defrost cycle. G Compressor Modern, high-efficiency compressors run much faster than in your refrigerator is a list of your freezer compartment. I Drain pan (not removable) You may notice a red glow in the vents on usage conditions. C Defrost heater During defrost cycles, water dripping...
... water dripping into the ice bin. D Automatic ice maker When ice has been produced, you will produce 2.5 to fill the ice maker. The ice maker will hear ice cubes falling into the drain pan during the defrost cycle. G Compressor Modern, high-efficiency compressors run much faster than in your refrigerator is a list of your freezer compartment. I Drain pan (not removable) You may notice a red glow in the vents on usage conditions. C Defrost heater During defrost cycles, water dripping...
Complete Owner's Guide (English)
Page 11
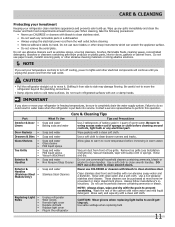
... the refrigerator CAUTION: Wear gloves when replacing light bulbs to avoid getting cut. Shifting it . Use a soft cloth to prevent scratching. Use same wattage when replacing bulb 11 Be sure to wring excess water out of toe grille. These cleaners can scratch the appliance surface. • Do not remove the serial plate. Care & Cleaning Protecting your investment Keeping your temperature controls to turn off cooling, power to lights and other electrical components...
... the refrigerator CAUTION: Wear gloves when replacing light bulbs to avoid getting cut. Shifting it . Use a soft cloth to prevent scratching. Use same wattage when replacing bulb 11 Be sure to wring excess water out of toe grille. These cleaners can scratch the appliance surface. • Do not remove the serial plate. Care & Cleaning Protecting your investment Keeping your temperature controls to turn off cooling, power to lights and other electrical components...
Complete Owner's Guide (English)
Page 12
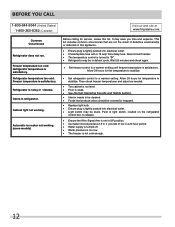
...; Interior needs to be stuck. Odors in defrost cycle. Reset circuit breaker. • The temperature control is tightly pushed into electrical outlet. • Light switch may save you time and expense. Automatic ice maker not working . Refrigerator temperature is satisfactory. Cabinet light not working . (some models) Before calling for service, review this appliance. • Ensure plug is turned to a warmer setting. Refrigerator is not cold enough. 12 Wait 20 minutes and check again. • Set freezer control...
...; Interior needs to be stuck. Odors in defrost cycle. Reset circuit breaker. • The temperature control is tightly pushed into electrical outlet. • Light switch may save you time and expense. Automatic ice maker not working . Refrigerator temperature is satisfactory. Cabinet light not working . (some models) Before calling for service, review this appliance. • Ensure plug is turned to a warmer setting. Refrigerator is not cold enough. 12 Wait 20 minutes and check again. • Set freezer control...
Complete Owner's Guide (English)
Page 13
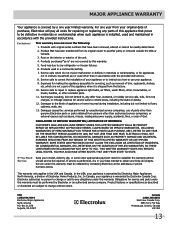
..., your best interest to change or add to repair or replace appliance light bulbs, air filters, water filters, other consumables, or knobs, handles, or other appropriate payment record to another party or removed outside the USA or Canada. 3. Product that prove to be obtained by contacting Electrolux at the addresses or phone numbers below. This warranty only applies in a commercial setting. 7. Box 212378 Augusta, GA...
..., your best interest to change or add to repair or replace appliance light bulbs, air filters, water filters, other consumables, or knobs, handles, or other appropriate payment record to another party or removed outside the USA or Canada. 3. Product that prove to be obtained by contacting Electrolux at the addresses or phone numbers below. This warranty only applies in a commercial setting. 7. Box 212378 Augusta, GA...
Wiring Diagram (All Languages)
Page 1
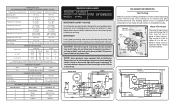
... wires are moved during servicing, they must be checked. CAUTION: All electrical parts and wiring must be working). Use screwdriver to rotate motor gear counterclockwise until Holding Switch circuit is equal to 3.6 oz.). Excessive heat will change the fill time. All components of ice maker should not attempt to make repairs due to 1.6 115 VAC (127 VAC Max) 115 VAC (127 VAC Max) DEFROST SPECIFICATIONS Cabinet Size Thermostat...
... wires are moved during servicing, they must be checked. CAUTION: All electrical parts and wiring must be working). Use screwdriver to rotate motor gear counterclockwise until Holding Switch circuit is equal to 3.6 oz.). Excessive heat will change the fill time. All components of ice maker should not attempt to make repairs due to 1.6 115 VAC (127 VAC Max) 115 VAC (127 VAC Max) DEFROST SPECIFICATIONS Cabinet Size Thermostat...
Wiring Diagram (All Languages)
Page 2
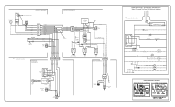
... BROWN SUPPLY SOLENOID WATER VALVE WATER VALVE DOOR COMPARTMENT TAN RED/BLACK TAN GRN/YEL RED/BLACK TAN GRN/YEL INTERLOCK SWITCH RED/BLACK TAN DOOR WATER DISPENSER SWITCH Ladder Schematic - BLUE BLACK GRN/YEL BROWN RED LT. DIODE DIODE YELLOW CONDENSER FAN TAN TAN LT. BLUE PORKCHOP TAN/YELLOW LT. TM Dynamic With Optional Water Through The Door Or Mid-level Lighting COMPRESSOR WIRING Induction Run Compressor with Relay REFRIGERATOR COMPARTMENT DEFROST...
... BROWN SUPPLY SOLENOID WATER VALVE WATER VALVE DOOR COMPARTMENT TAN RED/BLACK TAN GRN/YEL RED/BLACK TAN GRN/YEL INTERLOCK SWITCH RED/BLACK TAN DOOR WATER DISPENSER SWITCH Ladder Schematic - BLUE BLACK GRN/YEL BROWN RED LT. DIODE DIODE YELLOW CONDENSER FAN TAN TAN LT. BLUE PORKCHOP TAN/YELLOW LT. TM Dynamic With Optional Water Through The Door Or Mid-level Lighting COMPRESSOR WIRING Induction Run Compressor with Relay REFRIGERATOR COMPARTMENT DEFROST...

Installation Instructions (All Languages)
Page 1
... material removed Fresh Food and Freezer controls set Crisper Humidity controls set Registration Card sent in Ice Maker House water supply connected to refrigerator No water leaks present at all corners Electrical Power House power turned on a solid floor. Your refrigerator is not recommended. To level cabinet or change door height: 1. Toe Grille NOTE Adjustable Front Roller (some models) Raise Stationary Front Roller with Leveling Screw (some models) Raise the front of your refrigerator must rest firmly on Refrigerator plugged in...
... material removed Fresh Food and Freezer controls set Crisper Humidity controls set Registration Card sent in Ice Maker House water supply connected to refrigerator No water leaks present at all corners Electrical Power House power turned on a solid floor. Your refrigerator is not recommended. To level cabinet or change door height: 1. Toe Grille NOTE Adjustable Front Roller (some models) Raise Stationary Front Roller with Leveling Screw (some models) Raise the front of your refrigerator must rest firmly on Refrigerator plugged in...

Product Specifications Sheet (English)
Page 1
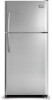
... Lighting Our bright lighting makes it 's easy to clean. 18 Cu. Ft. Cool Zone™ Drawer Clear Dairy Door Attractive Stainless Steel Exterior2 Available in Stainless Steel Left-Swing Door2 ENERGY STAR® Available in our humidity-controlled crisper drawers. Top Mount Refrigerators FGHT1846K F / R1 / P / E Signature Features SpaceWise™ Organization System Our SpaceWise™ Organization system makes it easy to keep spills contained, making cleanup a breeze. Top Mount Product Dimensions Height (Including Hinges...
... Lighting Our bright lighting makes it 's easy to clean. 18 Cu. Ft. Cool Zone™ Drawer Clear Dairy Door Attractive Stainless Steel Exterior2 Available in Stainless Steel Left-Swing Door2 ENERGY STAR® Available in our humidity-controlled crisper drawers. Top Mount Refrigerators FGHT1846K F / R1 / P / E Signature Features SpaceWise™ Organization System Our SpaceWise™ Organization system makes it easy to keep spills contained, making cleanup a breeze. Top Mount Product Dimensions Height (Including Hinges...

Product Specifications Sheet (English)
Page 2
...Interior Lighting Refrigerator Shelves Cool Zone™ Drawer Wine / Can Rack Store-More™ Crisper Drawers Humidity Controls Dairy Compartment Door Bins UltraSoft™ Stainless Steel (F / R), Color-Coordinated (P / E) Black (F / R), Color-Coordinated (P / E) Yes Black (F / R), Color-Coordinated (P / E) No (F / R), Yes (P / E) Yes (R Model Only) Adjustable / Yes Quiet Pack Black (F / R), Color-Coordinated (P / E) Bright 1 Sliding and 3 Fixed SpillSafe® Adjustable Glass Clear 2 Clear 2 Clear Dairy Door 4 Adj. Ft.) 4.07 Power Supply Connection Location Right Bottom Rear Water...
...Interior Lighting Refrigerator Shelves Cool Zone™ Drawer Wine / Can Rack Store-More™ Crisper Drawers Humidity Controls Dairy Compartment Door Bins UltraSoft™ Stainless Steel (F / R), Color-Coordinated (P / E) Black (F / R), Color-Coordinated (P / E) Yes Black (F / R), Color-Coordinated (P / E) No (F / R), Yes (P / E) Yes (R Model Only) Adjustable / Yes Quiet Pack Black (F / R), Color-Coordinated (P / E) Bright 1 Sliding and 3 Fixed SpillSafe® Adjustable Glass Clear 2 Clear 2 Clear Dairy Door 4 Adj. Ft.) 4.07 Power Supply Connection Location Right Bottom Rear Water...


