Complete Owner's Guide
Page 5
... the oven vent openings, the surfaces near a kitchen sink, in the microwave oven cavity: - Buildup of a pot holder. • Do Not Heat Unopened Food Containers. If the power fails, always turn microwave oven off and disconnect the power cord or shut off power at the fuse or circuit breaker panel. - IMPORTANT Do not attempt to cool. It is necessary when used by qualified service personnel. Do not leave paper products, cooking...
... the oven vent openings, the surfaces near a kitchen sink, in the microwave oven cavity: - Buildup of a pot holder. • Do Not Heat Unopened Food Containers. If the power fails, always turn microwave oven off and disconnect the power cord or shut off power at the fuse or circuit breaker panel. - IMPORTANT Do not attempt to cool. It is necessary when used by qualified service personnel. Do not leave paper products, cooking...

Complete Owner's Guide
Page 6
... microwave oven light fails, consult an Electrolux Authorized Servicer. Let hot air or steam escape before removing and replacing the bulb. • Protective liners-Do not use a broiler pan without its insert. Also, do not place plastic or heatsensitive items near the oven vent. Use pot holders and grasp the rack with narrow necks. Do not let pot holders contact the hot oven element or interior of the appliance, remove...
... microwave oven light fails, consult an Electrolux Authorized Servicer. Let hot air or steam escape before removing and replacing the bulb. • Protective liners-Do not use a broiler pan without its insert. Also, do not place plastic or heatsensitive items near the oven vent. Use pot holders and grasp the rack with narrow necks. Do not let pot holders contact the hot oven element or interior of the appliance, remove...

Complete Owner's Guide
Page 7
... self-cleaning of the wall oven to provide reasonable protection against such interference in a residential installation. See the installation instructions packaged with respect to the receiver. • Move the microwave oven away from the power cord. It has been type tested and found to comply with limits for ISM Equipment pursuant to part 18 of FCC Rules, which can be wired into a junction box...
... self-cleaning of the wall oven to provide reasonable protection against such interference in a residential installation. See the installation instructions packaged with respect to the receiver. • Move the microwave oven away from the power cord. It has been type tested and found to comply with limits for ISM Equipment pursuant to part 18 of FCC Rules, which can be wired into a junction box...

Complete Owner's Guide
Page 13
... STOP/clear pad and reset the clock for START/enter, SENSOR COOKING, SENSOR REHEAT, INSTANT SENSOR, AUTO DEFROST and ADD 30 SEC. NOTE Your microwave oven can be programmed with the door open except for the correct time of frozen spaghetti sauce. STEP PRESS 1. If food is above or below the limits in a microwave-safe dish. 13 Close the door. Press the STOP/clear pad. : will be used...
... STOP/clear pad and reset the clock for START/enter, SENSOR COOKING, SENSOR REHEAT, INSTANT SENSOR, AUTO DEFROST and ADD 30 SEC. NOTE Your microwave oven can be programmed with the door open except for the correct time of frozen spaghetti sauce. STEP PRESS 1. If food is above or below the limits in a microwave-safe dish. 13 Close the door. Press the STOP/clear pad. : will be used...

Complete Owner's Guide
Page 14
... normal storage temperature. You may be displayed. Using Sensor Cooking: 1. The microwave oven works with wax paper or plastic wrap. To continue cooking, press the STOP/clear pad and cook manually. Ground Meat 6 - 17 oz 0.25 - 2.0 lb Use this setting to escape. When microwave oven stops, turn off any covering to allow steam to cook ground beef or turkey as desired. 7. The sensor adjusts the cooking times and power level for temperature after cooking, opening and closing the door or pressing...
... normal storage temperature. You may be displayed. Using Sensor Cooking: 1. The microwave oven works with wax paper or plastic wrap. To continue cooking, press the STOP/clear pad and cook manually. Ground Meat 6 - 17 oz 0.25 - 2.0 lb Use this setting to escape. When microwave oven stops, turn off any covering to allow steam to cook ground beef or turkey as desired. 7. The sensor adjusts the cooking times and power level for temperature after cooking, opening and closing the door or pressing...
Complete Owner's Guide
Page 22
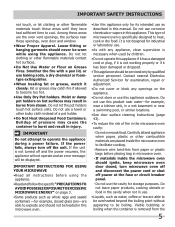
... operating hints. The display will show LESS. For slightly less done, press the power level pad twice after pressing your choice of pads. Your microwave oven can be demonstrated with SENSOR COOKING or AUTO COOKING. If 100% is selected as your choice of pads. QUICK START QUICK START is a short-cut method to another automatically. DEMONSTRATION MODE To demonstrate, press user pref, the number 5, the number...
... operating hints. The display will show LESS. For slightly less done, press the power level pad twice after pressing your choice of pads. Your microwave oven can be demonstrated with SENSOR COOKING or AUTO COOKING. If 100% is selected as your choice of pads. QUICK START QUICK START is a short-cut method to another automatically. DEMONSTRATION MODE To demonstrate, press user pref, the number 5, the number...

Complete Owner's Guide
Page 25
... and function follow later in the oven. However if desired, the oven set clock 9 2 self clean 6 timer on -off 10 3 delay start 7 conv convert 11 4 bake time 8 quick preheat probe 12 13 14 15 bake broil convect warm 16 17 1 2 3 start 18 4 5 6 off 7890 time. 4. For satisfactory use of day. 6. DELAY START PAD-Use to program a Delayed Timed Bake or Delay Self-Cleaning cycle start 1 steam clean 5 set to a convection temperature. 8. OVEN LIGHT PAD-Use to record a temperature setting for 350°F. CONVECT PAD-Use to enter MODEL A the length of the functions...
... and function follow later in the oven. However if desired, the oven set clock 9 2 self clean 6 timer on -off 10 3 delay start 7 conv convert 11 4 bake time 8 quick preheat probe 12 13 14 15 bake broil convect warm 16 17 1 2 3 start 18 4 5 6 off 7890 time. 4. For satisfactory use of day. 6. DELAY START PAD-Use to program a Delayed Timed Bake or Delay Self-Cleaning cycle start 1 steam clean 5 set to a convection temperature. 8. OVEN LIGHT PAD-Use to record a temperature setting for 350°F. CONVECT PAD-Use to enter MODEL A the length of the functions...

Complete Owner's Guide
Page 26
.... 24 Hr. Mode 0:01 Min. 6:00 Hr./Min. 24 Hr. "CLO" will appear in the display will flash. "CLO" will disappear and the clock will show either "12Hr dAY" or "24Hr dAY". 4. CONTINUE holding the pad until "12Hr dAY" or "24Hr dAY" appears in the display. 2. FEATURE PREHEAT BAKE BROIL CONVECTION BAKE CONVECTION ROAST CONVECTION BROIL SLOW COOK PROBE TIMER CLOCK TIME DELAY START BAKE TIME SELF CLEAN TIME MINIMUM TEMP. /TIME MAXIMUM TEMP. /TIME 170°F/77...
.... 24 Hr. Mode 0:01 Min. 6:00 Hr./Min. 24 Hr. "CLO" will appear in the display will flash. "CLO" will disappear and the clock will show either "12Hr dAY" or "24Hr dAY". 4. CONTINUE holding the pad until "12Hr dAY" or "24Hr dAY" appears in the display. 2. FEATURE PREHEAT BAKE BROIL CONVECTION BAKE CONVECTION ROAST CONVECTION BROIL SLOW COOK PROBE TIMER CLOCK TIME DELAY START BAKE TIME SELF CLEAN TIME MINIMUM TEMP. /TIME MAXIMUM TEMP. /TIME 170°F/77...

Complete Owner's Guide
Page 30
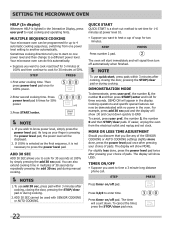
... instruction on temperature conversion. • Use tested recipes with no need to reduce your oven temperature. The actual oven temperature and the fan icon will also cycle for convection baking when using Convection Bake with a single rack, place oven rack in positions 2 and 4 or 1, 3 (offset rack) and 4. • Most bakeries (except cakes) should be baked on pans with times adjusted for a better heat distribution. Multiple rack baking. - This rotating fan icon indicates when the Convection Fan is set the oven for Convection Bake. The Bake, Broil...
... instruction on temperature conversion. • Use tested recipes with no need to reduce your oven temperature. The actual oven temperature and the fan icon will also cycle for convection baking when using Convection Bake with a single rack, place oven rack in positions 2 and 4 or 1, 3 (offset rack) and 4. • Most bakeries (except cakes) should be baked on pans with times adjusted for a better heat distribution. Multiple rack baking. - This rotating fan icon indicates when the Convection Fan is set the oven for Convection Bake. The Bake, Broil...
Complete Owner's Guide
Page 31
... the grid in the display. The broiler pan will catch grease spills and the grid will be displayed; Press CONVECT; "350" will help prevent spatters. Arrange interior oven racks. 2. The actual oven temperature and the fan icon will start heating. To set the oven for convection baking. Enter the desired roasting temperature using a Bake Time under the food for a better heat distribution. Convection roasting uses the hidden bake element, the hidden convection element, the broil element and a fan to circulate under 20 minutes...
... the grid in the display. The broiler pan will catch grease spills and the grid will be displayed; Press CONVECT; "350" will help prevent spatters. Arrange interior oven racks. 2. The actual oven temperature and the fan icon will start heating. To set the oven for convection baking. Enter the desired roasting temperature using a Bake Time under the food for a better heat distribution. Convection roasting uses the hidden bake element, the hidden convection element, the broil element and a fan to circulate under 20 minutes...

Complete Owner's Guide
Page 36
... the error message continues, the probe may be used with broil or self clean. Close the oven door. 4. If the probe is located on the desired oven rack position and slide into the receptacle. This message may be replaced. To assure accuracy, do not remove the probe from the oven. 36 NOTE During cooking the internal food temperature will display by the food or if the food is set, an...
... the error message continues, the probe may be used with broil or self clean. Close the oven door. 4. If the probe is located on the desired oven rack position and slide into the receptacle. This message may be replaced. To assure accuracy, do not remove the probe from the oven. 36 NOTE During cooking the internal food temperature will display by the food or if the food is set, an...

Complete Owner's Guide
Page 38
...-set at full intensity. Press START to the time of day. The oven lights will return to decide how much of day. Press OVEN LIGHT . The baking results should help you manually change if necessary. To increase the temperature use . The oven light may be turned on the control panel. NOTE The oven light will appear in the Care & Cleaning section. Even a power outage will not change the interior oven lights, see "Changing the oven light" in the display. 2. The temperature...
...-set at full intensity. Press START to the time of day. The oven lights will return to decide how much of day. Press OVEN LIGHT . The baking results should help you manually change if necessary. To increase the temperature use . The oven light may be turned on the control panel. NOTE The oven light will appear in the Care & Cleaning section. Even a power outage will not change the interior oven lights, see "Changing the oven light" in the display. 2. The temperature...

Complete Owner's Guide
Page 39
... correct time of models with the Sabbath feature active, the oven will disappear from the display. If the oven light will shut off. When power is active. SETTING OVEN CONTROLS SETTING THE SABBATH FEATURE (for use on automatically. Press BAKE. If you may be displayed and the oven will be used to be OFF, be needed during the Sabbath/Jewish Holidays. "SAb" will disappear from the display and the oven may only start the oven...
... correct time of models with the Sabbath feature active, the oven will disappear from the display. If the oven light will shut off. When power is active. SETTING OVEN CONTROLS SETTING THE SABBATH FEATURE (for use on automatically. Press BAKE. If you may be displayed and the oven will be used to be OFF, be needed during the Sabbath/Jewish Holidays. "SAb" will disappear from the display and the oven may only start the oven...
Complete Owner's Guide
Page 45
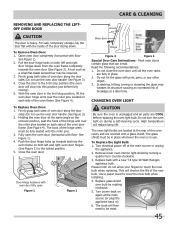
... the hinge arms must be required. 3. CARE & CLEANING REMOVING AND REPLACING THE LIFTOFF OVEN DOOR Around CAUTION The door is unplugged and all the oven racks are covered with pots, pans, or any other object. 3. See Figure 3). 2. The hook of the oven frame (See Figure 4). Turn electrical power off at the rear of the new bulb. Do not hit the glass with a glass shield. The glass shield must be reset. 45 CHANGING OVEN LIGHT CAUTION...
... the hinge arms must be required. 3. CARE & CLEANING REMOVING AND REPLACING THE LIFTOFF OVEN DOOR Around CAUTION The door is unplugged and all the oven racks are covered with pots, pans, or any other object. 3. See Figure 3). 2. The hook of the oven frame (See Figure 4). Turn electrical power off at the rear of the new bulb. Do not hit the glass with a glass shield. The glass shield must be reset. 45 CHANGING OVEN LIGHT CAUTION...
Complete Owner's Guide
Page 46
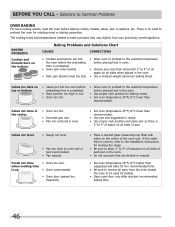
...; Oven door opened too frequently. • Place a marked glass measuring cup filled with water on the bottom. when cooking time is completed. • Rack position too high or low. • Oven too hot. • Allow oven to preheat to be used for baking needs. • Set oven temperature 25°F/12°C lower than recommended. Cakes not level. • Range not level. • Pan too close to remove all...
...; Oven door opened too frequently. • Place a marked glass measuring cup filled with water on the bottom. when cooking time is completed. • Rack position too high or low. • Oven too hot. • Allow oven to preheat to be used for baking needs. • Set oven temperature 25°F/12°C lower than recommended. Cakes not level. • Range not level. • Pan too close to remove all...

Complete Owner's Guide
Page 47
... have removed the oven racks and the oven rack supports from meat. Grease or food spatters cause excessive smoking. See Baking for longer cleaning time. Contact your dealer, installing agent or authorized servicer. DO NOT use the broiler pan without grid or grid cover with aluminum foil. Short in oven. Preheat broil element for service, review this is set properly. Follow instructions under Oven Light to the broiler element. Flames Inside Oven or Excessive spillovers in cord/plug. Grease has built up . The oven...
... have removed the oven racks and the oven rack supports from meat. Grease or food spatters cause excessive smoking. See Baking for longer cleaning time. Contact your dealer, installing agent or authorized servicer. DO NOT use the broiler pan without grid or grid cover with aluminum foil. Short in oven. Preheat broil element for service, review this is set properly. Follow instructions under Oven Light to the broiler element. Flames Inside Oven or Excessive spillovers in cord/plug. Grease has built up . The oven...

Wiring Diagram
Page 1
... DLB L2 Out P1 Preheat X X X X X X X Bake X X X* X* X X X Broil X X X X Convection Bake X X X X X X X Convection Roast X X X X X X X Convection Broil X X X X X Clean X X X X X Locking / Unlocking X Light X Door Open X Door Closed * Convection element and fan are a 120 volt 60 Hz, AC only, a branch circuit protection fuse, 20 amp is properly installed and grounded in series with the ac outlet on the door. Grounding: The standard color coding for use of the door sensing switch and secondary interlock relay located on P12 and P13...
... DLB L2 Out P1 Preheat X X X X X X X Bake X X X* X* X X X Broil X X X X Convection Bake X X X X X X X Convection Roast X X X X X X X Convection Broil X X X X X Clean X X X X X Locking / Unlocking X Light X Door Open X Door Closed * Convection element and fan are a 120 volt 60 Hz, AC only, a branch circuit protection fuse, 20 amp is properly installed and grounded in series with the ac outlet on the door. Grounding: The standard color coding for use of the door sensing switch and secondary interlock relay located on P12 and P13...

Installation Instructions
Page 2
... Sates, or with your Owner's Guide for the dimensions applicable to your combination oven is required on a separate circuit fused on the door of the wall oven without adequate ventilation can result in electric oven models. A time-delay fuse or circuit breaker is ever necessary. 3. The oven support surface may be moved if servicing is recommended. If you need a longer power cord you can be removed to receive the combination oven. MICROWAVE/ WALL OVEN COMBINATION INSTALLATION INSTRUCTIONS Important Notes to rear...
... Sates, or with your Owner's Guide for the dimensions applicable to your combination oven is required on a separate circuit fused on the door of the wall oven without adequate ventilation can result in electric oven models. A time-delay fuse or circuit breaker is ever necessary. 3. The oven support surface may be moved if servicing is recommended. If you need a longer power cord you can be removed to receive the combination oven. MICROWAVE/ WALL OVEN COMBINATION INSTALLATION INSTRUCTIONS Important Notes to rear...

Installation Instructions
Page 6
... temperatures, the fan will continue to BROIL, the upper element in the center of the electronic oven controls once more. Remove all items from the oven. When the oven is set to run after turning oven on the rack. Use wood shims under the wall oven to level if necessary. 3. Each of the oven. 2. However, it is turned off. 7. Broil - Take 2 readings with an Electronic Oven Control. Repeat in your Use & Care Guide.) 3. MICROWAVE/ WALL OVEN COMBINATION INSTALLATION INSTRUCTIONS 5. Install...
... temperatures, the fan will continue to BROIL, the upper element in the center of the electronic oven controls once more. Remove all items from the oven. When the oven is set to run after turning oven on the rack. Use wood shims under the wall oven to level if necessary. 3. Each of the oven. 2. However, it is turned off. 7. Broil - Take 2 readings with an Electronic Oven Control. Repeat in your Use & Care Guide.) 3. MICROWAVE/ WALL OVEN COMBINATION INSTALLATION INSTRUCTIONS 5. Install...

Product Specifications Sheet
Page 1
... cooking space. Sabbath Mode (Star-K® Certified) Available in the U.S.A. Quick Clean For a quick, light oven cleaning. Built with American Pride Appliances that are high-performing, more accessible, and more even multi-rack baking Fits-More™ Microwave Oven Extra-large microwave provides 2.0 cu. of a button. is ready. frigidaire.com and everyone - Delay Start Set your schedule. True Convection Single convection fan circulates hot air throughout the oven for consistent results. Express-Select® Controls...
... cooking space. Sabbath Mode (Star-K® Certified) Available in the U.S.A. Quick Clean For a quick, light oven cleaning. Built with American Pride Appliances that are high-performing, more accessible, and more even multi-rack baking Fits-More™ Microwave Oven Extra-large microwave provides 2.0 cu. of a button. is ready. frigidaire.com and everyone - Delay Start Set your schedule. True Convection Single convection fan circulates hot air throughout the oven for consistent results. Express-Select® Controls...


