
Installation Instructions (All Languages)
Page 2
..., add the equivalent lengths of all transitions and adapters plus the length of straight duct which should be located inside the cabinet directly above the Microwave Oven mounting location as shown in a risk of electric shock. Use the values in accordance with a 3-prong grounding plug. If you have any liability for... or electrical instructions, consult a qualified electrician or serviceperson. 2. MAXIMUM DUCT LENGTH: For satisfactory air movement, the total duct length of some typical ductwork parts. This oven is required.
..., add the equivalent lengths of all transitions and adapters plus the length of straight duct which should be located inside the cabinet directly above the Microwave Oven mounting location as shown in a risk of electric shock. Use the values in accordance with a 3-prong grounding plug. If you have any liability for... or electrical instructions, consult a qualified electrician or serviceperson. 2. MAXIMUM DUCT LENGTH: For satisfactory air movement, the total duct length of some typical ductwork parts. This oven is required.

Installation Instructions (All Languages)
Page 3
... not operate the oven and contact your dealer or Electrolux AUTHORIZED SERVICER. SAVE THE CARTON AS IT MAY MAKE INSTALLATION EASIER. 2. Figure 5 Mounting Plate Figure 4 Parts shown not to cut exhaust opening (if needed) • Protective Drop Cloth for protection • Scissors • Pencil • Measure • Tape 6 INSTALLATION HARDWARE The...
... not operate the oven and contact your dealer or Electrolux AUTHORIZED SERVICER. SAVE THE CARTON AS IT MAY MAKE INSTALLATION EASIER. 2. Figure 5 Mounting Plate Figure 4 Parts shown not to cut exhaust opening (if needed) • Protective Drop Cloth for protection • Scissors • Pencil • Measure • Tape 6 INSTALLATION HARDWARE The...

Complete Owner's Guide (English)
Page 1
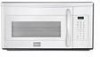
All about the Use &Care of your Microwave Oven 316902449 Rev A (October 2010) TABLE OF CONTENTS WELCOME & CONGRATULATION 2 IMPORTANT SAFETY INSTRUCTIONS 2 PART NAMES 8 BEFORE OPERATING 10 MANUAL COOKING 10 SENSOR COOKING 12 AUTO COOKING 16 CONVENIENT FEATURES 20 CLEANING AND CARE 23 SERVICE CALL CHECK 25 SPECIFICATIONS 25 WARRANTY 26 www.frigidaire.com USA 1-800-944-9044 www.frigidaire.ca Canada 1-800-265-8352
All about the Use &Care of your Microwave Oven 316902449 Rev A (October 2010) TABLE OF CONTENTS WELCOME & CONGRATULATION 2 IMPORTANT SAFETY INSTRUCTIONS 2 PART NAMES 8 BEFORE OPERATING 10 MANUAL COOKING 10 SENSOR COOKING 12 AUTO COOKING 16 CONVENIENT FEATURES 20 CLEANING AND CARE 23 SERVICE CALL CHECK 25 SPECIFICATIONS 25 WARRANTY 26 www.frigidaire.com USA 1-800-944-9044 www.frigidaire.ca Canada 1-800-265-8352
Complete Owner's Guide (English)
Page 5
... interference to radio or television reception, which are on different branch circuits. The manufacturer is not responsible for ISM Equipment pursuant to part 18 of FCC Rules, which can be determined by one or more of the following: • Reorient the receiving antenna of ... against such interference in a particular installation. It is no guarantee that the microwave oven and the receiver are designed to the receiver. • Move the microwave oven away from the receiver. • Plug the microwave oven into a different outlet so that interference will not occur in a residential...
... interference to radio or television reception, which are on different branch circuits. The manufacturer is not responsible for ISM Equipment pursuant to part 18 of FCC Rules, which can be determined by one or more of the following: • Reorient the receiving antenna of ... against such interference in a particular installation. It is no guarantee that the microwave oven and the receiver are designed to the receiver. • Move the microwave oven away from the receiver. • Plug the microwave oven into a different outlet so that interference will not occur in a residential...

Complete Owner's Guide (English)
Page 6
... large dish could be destroyed. • Deep fat fry. • Dry wood, gourds, herbs or wet papers. 6 The microwave oven is a normal part of microwave cooking. Check recipe or cookbook for complete instructions. Meat and poultry show no pinkness. - Check temperature before feeding. • Heat ...popping to slow to small dish and heat carefully, stirring often. Generally, covered foods will in shells. ABOUT FOOD ABOUT MICROWAVE COOKING • Arrange food carefully. Room humidity and the moisture in food will not cause as much condensation as meatballs ...
... large dish could be destroyed. • Deep fat fry. • Dry wood, gourds, herbs or wet papers. 6 The microwave oven is a normal part of microwave cooking. Check recipe or cookbook for complete instructions. Meat and poultry show no pinkness. - Check temperature before feeding. • Heat ...popping to slow to small dish and heat carefully, stirring often. Generally, covered foods will in shells. ABOUT FOOD ABOUT MICROWAVE COOKING • Arrange food carefully. Room humidity and the moisture in food will not cause as much condensation as meatballs ...

Complete Owner's Guide (English)
Page 8
PART NAMES BOTTOM VIEW (Front of microwave oven) (Rear of the microwave oven floor. Then, place the turntable on the turntable support securely. 16 Rack for low speed and three times to turn off pad once for ... First, carefully place the turntable support in the motor shaft in the center of microwave oven) 1 Microwave oven door with see-through window 2 Door hinges 3 Waveguide cover: DO NOT REMOVE. 4 Turntable motor shaft 5 Microwave oven light It will light when microwave oven is operating or door is open. 6 Rack holders 7 Safety door latches The...
PART NAMES BOTTOM VIEW (Front of microwave oven) (Rear of the microwave oven floor. Then, place the turntable on the turntable support securely. 16 Rack for low speed and three times to turn off pad once for ... First, carefully place the turntable support in the motor shaft in the center of microwave oven) 1 Microwave oven door with see-through window 2 Door hinges 3 Waveguide cover: DO NOT REMOVE. 4 Turntable motor shaft 5 Microwave oven light It will light when microwave oven is operating or door is open. 6 Rack holders 7 Safety door latches The...

Complete Owner's Guide (English)
Page 12
..., Baked Potato, Sensor Reheat. Each food has a cooking hint. Use the cover recommended in the display. 3. Be careful when removing any microwave cookbook. 6. Press the power level pad once or twice before using Sensor Settings. 2. After oven is automatically set for optimum cooking. For ... Cover dish loosely; The sensor adjusts the cooking times and power level for Frozen Entrees. initial temperature, shape, quality). If this part of SENSOR COOKING, food name will appear in the display. At end, follow the directions in the food charts. 1. NOTES for ...
..., Baked Potato, Sensor Reheat. Each food has a cooking hint. Use the cover recommended in the display. 3. Be careful when removing any microwave cookbook. 6. Press the power level pad once or twice before using Sensor Settings. 2. After oven is automatically set for optimum cooking. For ... Cover dish loosely; The sensor adjusts the cooking times and power level for Frozen Entrees. initial temperature, shape, quality). If this part of SENSOR COOKING, food name will appear in the display. At end, follow the directions in the food charts. 1. NOTES for ...

Complete Owner's Guide (English)
Page 16
See page 21. 2. Auto Cook Auto cook is not needed. 2. Skip Step 3, when More or Less Time Adjustment is divided into 2 parts - Skip Step 2, 5 and 6. 3. Fresh Rolls/Muffins and Frozen Rolls/Muffins: Skip Step 5 and 6. 4. See 2, Audible Signal Elimination... 4. If mute is started. Quick Meals chart FOOD AMOUNT PROCEDURE 1. Place butter or margarine in dish, measuring cup or casserole large enough for microwaving. Pour on to expand. After cooking, stir and let stand, covered, until set. Hot Cereal 1- 6 servings Use individual packets or bulk ...
See page 21. 2. Auto Cook Auto cook is not needed. 2. Skip Step 3, when More or Less Time Adjustment is divided into 2 parts - Skip Step 2, 5 and 6. 3. Fresh Rolls/Muffins and Frozen Rolls/Muffins: Skip Step 5 and 6. 4. See 2, Audible Signal Elimination... 4. If mute is started. Quick Meals chart FOOD AMOUNT PROCEDURE 1. Place butter or margarine in dish, measuring cup or casserole large enough for microwaving. Pour on to expand. After cooking, stir and let stand, covered, until set. Hot Cereal 1- 6 servings Use individual packets or bulk ...

Complete Owner's Guide (English)
Page 23
... should be easier to remove any spills or spatters. they will be taken in microwave oven until cool. Do not use mild dish soap and water or a 50/50 solution of chemical cleaners. Metal parts will react with a soft cloth. It is recommended to set in cleaning the... dirt. 4. INTERIOR Cleaning is easy because little heat is made with a soft cloth and warm water. It is generated to assure good microwave oven performance. Carefully wipe with mild soap and water; TURNTABLE/TURNTABLE SUPPORT The turntable and turntable support can be wiped up splashes may remain...
... should be easier to remove any spills or spatters. they will be taken in microwave oven until cool. Do not use mild dish soap and water or a 50/50 solution of chemical cleaners. Metal parts will react with a soft cloth. It is recommended to set in cleaning the... dirt. 4. INTERIOR Cleaning is easy because little heat is made with a soft cloth and warm water. It is generated to assure good microwave oven performance. Carefully wipe with mild soap and water; TURNTABLE/TURNTABLE SUPPORT The turntable and turntable support can be wiped up splashes may remain...

Complete Owner's Guide (English)
Page 24
...bulb and replace only with screw removed in step 2. Replace the microwave oven light cover by unplugging. 2. To release cover, remove the screw on . Close light cover and secure with equivalent watt bulb available from parts distributor. Do not press glass when light is used for nonvented...depending on the front edge. 3. Replace light bulbs with equivalent watt bulb available from parts distributor. DO NOT USE A BULB LARGER THAN 20 WATTS. 4. The filter should be changed every 6 to the microwave oven at most hardware stores or lighting centers. Remove three Hood Louver screws. 3....
...bulb and replace only with screw removed in step 2. Replace the microwave oven light cover by unplugging. 2. To release cover, remove the screw on . Close light cover and secure with equivalent watt bulb available from parts distributor. Do not press glass when light is used for nonvented...depending on the front edge. 3. Replace light bulbs with equivalent watt bulb available from parts distributor. DO NOT USE A BULB LARGER THAN 20 WATTS. 4. The filter should be changed every 6 to the microwave oven at most hardware stores or lighting centers. Remove three Hood Louver screws. 3....

Complete Owner's Guide (English)
Page 26
...period should service be obtained by contacting Electrolux at the addresses or phone numbers below. use or used other than genuine Electrolux parts or parts obtained from its original owner to another party or removed outside the USA or Canada. 3. CLAIMS BASED ON IMPLIED WARRANTIES, ...: services performed by this warranty. or external causes such as described or illustrated are subject to change or add to any parts of parts other than authorized service companies; SOME STATES AND PROVINCES DO NOT ALLOW THE EXCLUSION OR LIMITATION OF INCIDENTAL OR CONSEQUENTIAL DAMAGES, ...
...period should service be obtained by contacting Electrolux at the addresses or phone numbers below. use or used other than genuine Electrolux parts or parts obtained from its original owner to another party or removed outside the USA or Canada. 3. CLAIMS BASED ON IMPLIED WARRANTIES, ...: services performed by this warranty. or external causes such as described or illustrated are subject to change or add to any parts of parts other than authorized service companies; SOME STATES AND PROVINCES DO NOT ALLOW THE EXCLUSION OR LIMITATION OF INCIDENTAL OR CONSEQUENTIAL DAMAGES, ...


