Frigidaire FGMV17WNVD Support and Manuals
Get Help and Manuals for this Frigidaire item

View All Support Options Below
Free Frigidaire FGMV17WNVD manuals!
Problems with Frigidaire FGMV17WNVD?
Ask a Question
Free Frigidaire FGMV17WNVD manuals!
Problems with Frigidaire FGMV17WNVD?
Ask a Question
Popular Frigidaire FGMV17WNVD Manual Pages
Complete Owner s Guide - Page 1

... (October 2016)
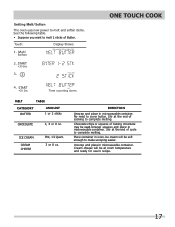
TABLE OF CONTENTS
WELCOME & CONGRATULATIONS 2 IMPORTANT SAFETY INSTRUCTIONS 2 PART NAMES 8 CONTROL PANEL 9 BEFORE OPERATING 10 MANUAL COOKING 10 SENSOR COOKING 13
ONE TOUCH COOK 15 AUTO COOKING 18 AUTO DEFROST 21 CONVENIENT FEATURES 25 CLEANING AND CARE 30 SERVICE CALL CHECK 34 SPECIFICATIONS 34 WARRANTY 36
www.frigidaire.com USA 1-800-37 4-4432...
Complete Owner s Guide - Page 2

....com
Before you can result in the back of this manual must be adjusted or repaired by anyone except properly qualified service personnel.
2
It contains instructions to help us for service, there are a few things you can do need service, you call Frigidaire Customer Services at 1-800-374-4432, 24 hours a day, 7 days a week. WELCOME...
Complete Owner s Guide - Page 3

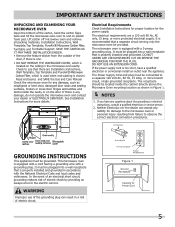
...INSTRUCTIONS
Definitions
This is specifically designed to facilitate cooking.
-
Use a wide-mouthed container.
- Grease should not be allowed to stand in operation.
• To reduce the risk of injury to persons: - Contact nearest Electrolux Authorized Servicer for examination, repair...in this manual. CAUTION
...the provided installation instructions.
&#...
Complete Owner s Guide - Page 5
...Manual. See Installation Instructions for more protected electrical supply. It is too short, have any damage, do not operate the microwave oven and contact your dealer or ELECTROLUX SERVICER...oven and remove all packing materials, Installation Instructions, Wall
Template,Top Template, PureAir® Microwave Carbon Filter ,
Turntable and Turntable Support.
The Power Supply Cord and ...
Complete Owner s Guide - Page 6

... Baby food
• Transfer baby food to finish cooking without the turntable and support nor turn the turntable over so that cooking temperatures have food in the microwave oven when...before and after heating and shake thoroughly. IMPORTANT SAFETY INSTRUCTIONS
ABOUT YOUR MICROWAVE OVEN
This Use and Care Manual is a normal part of microwave cooking. Condensation is valuable: read it ...
Complete Owner s Guide - Page 10

...
10 Cancel timer setting and the signal after...understand this Use and Care Guide completely.
• The... Press the STOP to the display. 5.
MANUAL COOKING
Time Cooking
Your Over the Range Microwave... & Settings
2. 1 0 5 9 3. Return the time of day has been set.
1.... set or a blank display if no time of day to :
Clear
1. To Set ... If you touch STOP while setting the clock, the
Clear
display ...
Complete Owner s Guide - Page 11
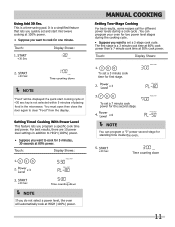
... for one minute. START
+30 Sec
2.
MANUAL COOKING
Setting Two-Stage Cooking
For best results , some recipes call for the second stage.
4. x 3
3. 7 0 0
To set a 7 minute cook power for different power ... HIGH (100%) power.
• Suppose you program a specific cook time and power. For best results, there are 10 power level settings in the microwave. Using Add 30 Sec. Touch:
Display...
Complete Owner s Guide - Page 12
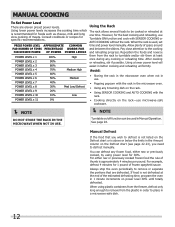
... x 2 POWER LEVEL x 3
100% 90% 80%
High
time and power level manually.
MANUAL COOKING
To Set Power Level
There are defrosted. However, for 30%. Allow plenty of thumb is used...%
• Storing the rack in the microwave oven when not in Manual Operation. Consult cookbook or recipes for specific recommendations.
Always stop the oven periodically to remove or separate the portions ...
Complete Owner s Guide - Page 13
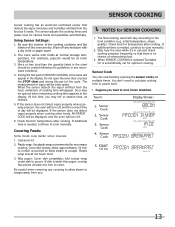
... approximately 1/2 inch to remain uncovered to allow steam to cook manually. Plastic wrap should be interrupted. If dish is needed , ...pad multiple times. Sensor Cook
3. During the first part of day will appear.
Using Sensor Settings:
1. Door may stir or season food, as it...not detect vapor properly when cooking other foods, AN ERROR CODE will be at least one inch to the food ...
Complete Owner s Guide - Page 17
... use in recipe.
17 Place container in microwavable container. Stir at the end of cycle to melt 2 sticks of cooking to cover butter.
Melt/ Soften
2.
Setting Melt/Soften
The oven uses low power to melt and soften items. See the following table. • Suppose you want to complete melting. DIRECTION
Unwrap...
Complete Owner s Guide - Page 30
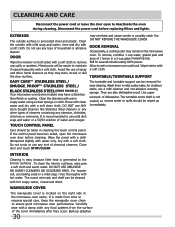
...Keep the waveguide cover clean to set in the microwave oven cavity. DOOR...SUPPORT
EASY CARE™ STAINLESS STEEL /
SMUDGE_PROOF™ STAINLESS STEEL /
BLACK STAINLESS STEEL (SOME MODELS)
Your microwave oven(some models... a soft cloth and warm water. Metal parts will be wiped up splashes
30 To remove...door open the microwave oven door before replacing filters and lights. Allow to assure ...
Complete Owner s Guide - Page 34

...SERVICER. SERVICE CALL CHECK
Please check the following before calling for service:
Place one minute at HIGH 100%. NOTES
If time appearing in the microwave oven and close the door securely. SPECIFICATIONS..., the part number is counting down very rapidly, check Demonstration Mode on ? Complies with standards set by a "do-it-yourself" repair person. Oven Light:
1*1.5W LED, the part number is...
Complete Owner s Guide - Page 36
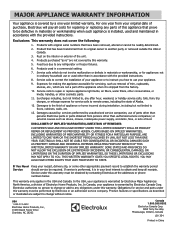
... of this warranty. Products used other than in a commercial setting.
7. THIS WRITTEN WARRANTY GIVES YOU SPECIFIC LEGAL RIGHTS.
For one year limited warranty. Exclusions This warranty does not cover the following:
1. Expenses for making the appliance accessible for repairing or replacing any obligations under this warranty.
5. LIMITATION OF REMEDIES
CUSTOMER'S SOLE...
Installation Instructions - Page 4
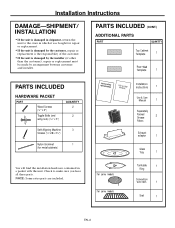
... packet with the unit.
For some models For some models
Turntable
1
Ring
Convection
wire rack
1
Shelf
1
EN-4 NOTE: Some extra parts are included.
Installation Instructions
DAMAGE-SHIPMENT/ INSTALLATION
• If the unit is damaged by the installer (if other
than the customer), repair or replacement must be made by the customer, repair or
replacement is the responsibility of the...
Installation Instructions - Page 8
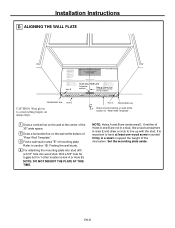
...Drill holes in a stud to support the weight of the centerline. 016'
It is important to align with a stud, drill 5/8" holes for your installation situation. Remove the template from the...THE WALL PLATE
NOTE: IT IS VERY IMPORTANT TO READ AND FOLLOW THE DIRECTIONS IN THE INSTALLATION INSTRUCTIONS BEFORE PROCEEDING WITH THIS REAR WALL TEMPLATE.
For holes that the template is
a stud, drill...
Frigidaire FGMV17WNVD Reviews
We have not received any reviews for Frigidaire yet.