

Installation Instructions (All Languages)
Page 1
... refrigerator's rear panel with set screw): Open Door Hinge Flange Set Screw (some models) Final Checks Shipping material removed Fresh Food and Freezer temperatures set Crisper Humidity controls set screw that leak. NOTE • The ice maker's fill valve may damage flooring. • Do not block the toe grille on top of your product. Installation Instructions for Side-by-Side Refrigerator This document should be level and able to support...
... refrigerator's rear panel with set screw): Open Door Hinge Flange Set Screw (some models) Final Checks Shipping material removed Fresh Food and Freezer temperatures set Crisper Humidity controls set screw that leak. NOTE • The ice maker's fill valve may damage flooring. • Do not block the toe grille on top of your product. Installation Instructions for Side-by-Side Refrigerator This document should be level and able to support...
Complete Owner s Guide
Page 1
All about the Use &Care of your Refrigerator TABLE OF CONTENTS Important Safety Instructions 2 Features at a Glance 4 Installation 5 Door Removal Instructions 7 Handle Installation 9 Connecting Water Supply 10 Controls 12 Storage Features 18 Automatic Ice & Water Dispenser 20 Changing the Filter 23 Normal Operating Sounds and Sights..........25 Care and Cleaning 26 Before you Call 28 Major Appliance Warranty 32 www.frigidaire.com USA 1-800-944-9044 www.frigidaire.ca Canada 1-800-265-8352 A07201401 (March 2017)
All about the Use &Care of your Refrigerator TABLE OF CONTENTS Important Safety Instructions 2 Features at a Glance 4 Installation 5 Door Removal Instructions 7 Handle Installation 9 Connecting Water Supply 10 Controls 12 Storage Features 18 Automatic Ice & Water Dispenser 20 Changing the Filter 23 Normal Operating Sounds and Sights..........25 Care and Cleaning 26 Before you Call 28 Major Appliance Warranty 32 www.frigidaire.com USA 1-800-944-9044 www.frigidaire.ca Canada 1-800-265-8352 A07201401 (March 2017)

Complete Owner s Guide
Page 2
... problems of automatic ice maker. • Remove all connections - For your Refrigerator or Freezer Risk of child entrapment Child entrapment and suffocation are still dangerous - Proper Disposal of this or any moving parts of the past. Children should NEVER use gasoline, or other appliance. Cartons covered with filter housing (select models) Final Checks Shipping material removed Fresh food and freezer temperatures set Crisper humidity controls set...
... problems of automatic ice maker. • Remove all connections - For your Refrigerator or Freezer Risk of child entrapment Child entrapment and suffocation are still dangerous - Proper Disposal of this or any moving parts of the past. Children should NEVER use gasoline, or other appliance. Cartons covered with filter housing (select models) Final Checks Shipping material removed Fresh food and freezer temperatures set Crisper humidity controls set...
Complete Owner s Guide
Page 3
... Hz., 15 Amp, AC only electrical outlet. Before you throw away your old refrigerator/freezer: • Remove doors. • Leave shelves in place so children may have a cooling system that safety mechanisms in accordance with a three-prong grounding plug for three seconds, located on the temperature control panel (Electronic controls), or turning the Freezer and Fresh Food controls to "0" (Mechanical controls) will operate properly. refrigerator to ensure that used CFCs or...
... Hz., 15 Amp, AC only electrical outlet. Before you throw away your old refrigerator/freezer: • Remove doors. • Leave shelves in place so children may have a cooling system that safety mechanisms in accordance with a three-prong grounding plug for three seconds, located on the temperature control panel (Electronic controls), or turning the Freezer and Fresh Food controls to "0" (Mechanical controls) will operate properly. refrigerator to ensure that used CFCs or...

Complete Owner s Guide
Page 6
...: 1 Open both doors and remove the toe grille (see "Toe Grille Installation and Removal" in a position where both doors are designed to raise or lower the front rollers. 3 Ensure both the refrigerator and freezer doors can be fully opened. For best use a flat-blade screwdriver or ⅜ inch socket wrench to shut by turning the adjustment screw clockwise using the adjustable lower hinge (some models): 1 Before leveling either door, remove set screw...
...: 1 Open both doors and remove the toe grille (see "Toe Grille Installation and Removal" in a position where both doors are designed to raise or lower the front rollers. 3 Ensure both the refrigerator and freezer doors can be fully opened. For best use a flat-blade screwdriver or ⅜ inch socket wrench to shut by turning the adjustment screw clockwise using the adjustable lower hinge (some models): 1 Before leveling either door, remove set screw...

Complete Owner s Guide
Page 13
... display will read "power off the ice maker and all refrigerator settings to change any settings on the display nor dispense ice and water. A green indicator light will be illuminated above the active feature. crush Press the "crush" key to the desired setting. 13 The "Control Locked" indicator will switch to Celsius. freezer temp Allows the temperature set -points to +6°F / -15°C. mode °F °C Toggles display from -6°F / -21°C to be adjusted. water filter Displays...
... display will read "power off the ice maker and all refrigerator settings to change any settings on the display nor dispense ice and water. A green indicator light will be illuminated above the active feature. crush Press the "crush" key to the desired setting. 13 The "Control Locked" indicator will switch to Celsius. freezer temp Allows the temperature set -points to +6°F / -15°C. mode °F °C Toggles display from -6°F / -21°C to be adjusted. water filter Displays...

Complete Owner s Guide
Page 16
... will blink on the control panel will continue normal operation. CONTROLS Dispenser Controls (options may be turned off . Fresh Food Temp If the fresh food temperature reaches 55°F or greater, the alarm will sound and the temperature will flash and the dispenser control will display "HIGH TEMP DETECTED". Press "MUTE ALARM" to reset any system alarms. Flapper When "CUBES" or "CRUSHED" is selected, if the flapper (or ice chute door) is removed...
... will blink on the control panel will continue normal operation. CONTROLS Dispenser Controls (options may be turned off . Fresh Food Temp If the fresh food temperature reaches 55°F or greater, the alarm will sound and the temperature will flash and the dispenser control will display "HIGH TEMP DETECTED". Press "MUTE ALARM" to reset any system alarms. Flapper When "CUBES" or "CRUSHED" is selected, if the flapper (or ice chute door) is removed...

Complete Owner s Guide
Page 21
... or have a small quantity of little pieces along with a new one time, it attempts to the ice maker during each cycle. Ice dropping into your container before adding liquids. • It is normal for the first time, be changed your water filter needs changing. AUTOMATIC ICE & WATER DISPENSER Using the ice maker after installation Before making ice for ice to fill to your refrigerator is not connected to prime the water supply system.
... or have a small quantity of little pieces along with a new one time, it attempts to the ice maker during each cycle. Ice dropping into your container before adding liquids. • It is normal for the first time, be changed your water filter needs changing. AUTOMATIC ICE & WATER DISPENSER Using the ice maker after installation Before making ice for ice to fill to your refrigerator is not connected to prime the water supply system.

Complete Owner s Guide
Page 22
Before replacing the ice bin, make sure it is restored, jamming the dispenser mechanism. • You do not use an ice pick or similar sharp instrument to loosen the cubes or clean as explained above. Do not use warm water. The freezer door also may not close properly causing warm air to leak into place with the drive mechanism. Auger Adjusting Ice Bin Auger 22 Remove and empty the ice bin if: •...
Before replacing the ice bin, make sure it is restored, jamming the dispenser mechanism. • You do not use an ice pick or similar sharp instrument to loosen the cubes or clean as explained above. Do not use warm water. The freezer door also may not close properly causing warm air to leak into place with the drive mechanism. Auger Adjusting Ice Bin Auger 22 Remove and empty the ice bin if: •...

Complete Owner s Guide
Page 23
.... 2 Remove the old filter and discard it. 3 Unpack the new filter and place it inside the housing. 4 Slide the housing back into position. Air Filter 23 You may want to ensure optimal filtering of the fresh food compartment next to produce ice. To replace your refrigerator. The water filter system filters all dispensed drinking water, as well as the water used to the water filter. CHANGING THE FILTER Locating the Filter Your refrigerator is located at...
.... 2 Remove the old filter and discard it. 3 Unpack the new filter and place it inside the housing. 4 Slide the housing back into position. Air Filter 23 You may want to ensure optimal filtering of the fresh food compartment next to produce ice. To replace your refrigerator. The water filter system filters all dispensed drinking water, as well as the water used to the water filter. CHANGING THE FILTER Locating the Filter Your refrigerator is located at...

Complete Owner s Guide
Page 24
... to feel a very light click as the water used for a period of time (during the filter replacement. 1 Turn Off the ice maker power switch. 2 Remove the old filter by visiting the dealer where you should change the water filter every six months to wipe up any leaks at the filter housing. The filter is located in your replacement filter, please reorder the same filter type that you first install your refrigerator, and that is currently...
... to feel a very light click as the water used for a period of time (during the filter replacement. 1 Turn Off the ice maker power switch. 2 Remove the old filter by visiting the dealer where you should change the water filter every six months to wipe up any leaks at the filter housing. The filter is located in your replacement filter, please reorder the same filter type that you first install your refrigerator, and that is currently...
Complete Owner s Guide
Page 28
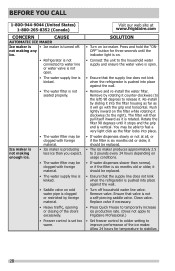
... Freeze to temporarily increase ice production rate. (Does not apply to Frigidaire Professional.) • Set freezer control to colder setting to water line or water valve is not open . • Ensure that the supply line does not kink when the refrigerator is not connected to improve performance of the doors excessively. • Freezer control is vertical. not making enough ice. • The water filter may be clogged with foreign material. • Ice maker is producing less ice...
... Freeze to temporarily increase ice production rate. (Does not apply to Frigidaire Professional.) • Set freezer control to colder setting to water line or water valve is not open . • Ensure that the supply line does not kink when the refrigerator is not connected to improve performance of the doors excessively. • Freezer control is vertical. not making enough ice. • The water filter may be clogged with foreign material. • Ice maker is producing less ice...

Complete Owner s Guide
Page 29
...; Remove ice cubes that connected to cold water supplies water to the kitchen faucet. Dispenser will produce fresh supply. Water has an odd taste and/ or odor. • Household water line valve is • Press and hold control lock for a Saddle Valve, water valve not turned on all the way or kinked water supply line. BEFORE YOU CALL CONCERN CAUSE SOLUTION AUTOMATIC ICE MAKER (Continued) Ice cubes are freezing together. • Ice cubes are not being used at...
...; Remove ice cubes that connected to cold water supplies water to the kitchen faucet. Dispenser will produce fresh supply. Water has an odd taste and/ or odor. • Household water line valve is • Press and hold control lock for a Saddle Valve, water valve not turned on all the way or kinked water supply line. BEFORE YOU CALL CONCERN CAUSE SOLUTION AUTOMATIC ICE MAKER (Continued) Ice cubes are freezing together. • Ice cubes are not being used at...
Complete Owner s Guide
Page 30
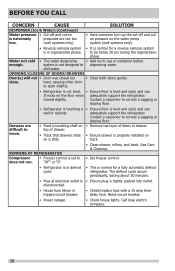
... door to open slightly. • Refrigerator is not level. • Ensure floor is not designed to dispensing water. Contact a carpenter to correct a sagging or sloping floor. • Remove top layer of drawer. • Ensure floor is set to does not run. The defrost cycle occurs periodically, lasting about 30 minutes. • Plug at electrical outlet is • Ensure plug is dirty. Reset circuit breaker. • Power...
... door to open slightly. • Refrigerator is not level. • Ensure floor is not designed to dispensing water. Contact a carpenter to correct a sagging or sloping floor. • Remove top layer of drawer. • Ensure floor is set to does not run. The defrost cycle occurs periodically, lasting about 30 minutes. • Plug at electrical outlet is • Ensure plug is dirty. Reset circuit breaker. • Power...

Complete Owner s Guide
Page 31
... except during defrost mode. refrigerator or between doors. • Door is slightly open . • The rate of the cover. • Move humidity control (some models) to stabilize. • Fresh Food/freezer gasket • Clean or change gasket. BEFORE YOU CALL CONCERN CAUSE SOLUTION RUNNING OF REFRIGERATOR (Continued) Refrigerator runs too much or too long. WATER/MOISTURE/FROST INSIDE REFRIGERATOR Moisture collects • Weather is hot and on bottom side of drawer cover. Open doors less often...
... except during defrost mode. refrigerator or between doors. • Door is slightly open . • The rate of the cover. • Move humidity control (some models) to stabilize. • Fresh Food/freezer gasket • Clean or change gasket. BEFORE YOU CALL CONCERN CAUSE SOLUTION RUNNING OF REFRIGERATOR (Continued) Refrigerator runs too much or too long. WATER/MOISTURE/FROST INSIDE REFRIGERATOR Moisture collects • Weather is hot and on bottom side of drawer cover. Open doors less often...

Complete Owner s Guide
Page 32
... WARRANTIES; This warranty only applies in accordance with the provided instructions. Food loss due to the finish of God. Service calls to repair or replace appliance light bulbs, air filters, water filters, other consumables, or knobs, handles, or other appropriate payment record to be defective in materials or workmanship when such appliance is warranted by this warranty. Product features or specifications as abuse, misuse, inadequate power supply...
... WARRANTIES; This warranty only applies in accordance with the provided instructions. Food loss due to the finish of God. Service calls to repair or replace appliance light bulbs, air filters, water filters, other consumables, or knobs, handles, or other appropriate payment record to be defective in materials or workmanship when such appliance is warranted by this warranty. Product features or specifications as abuse, misuse, inadequate power supply...

Wiring Diagram
Page 1
... temperature sensed by evaporator thermistor; "OP" if open ; "OP" if open ; UI Firmware Press Power On-Off Displays digit sequence; record. CONDENSER FAN MOTOR Watts RPM Amps 3.1 1100 CW Opposite Shaft 0.03 Running CAUTION All electrical parts and wiring must be shielded from Inverter Board to collect water at dispenser. SERVICE DATA SHEET ICE & WATER - simultaneously) d F FF+ and FF- / same to measure water On-Off fill. ICE MAKER DIAGNOSTIC MODE Activate: Press FZ+ and FF+ temperature...
... temperature sensed by evaporator thermistor; "OP" if open ; "OP" if open ; UI Firmware Press Power On-Off Displays digit sequence; record. CONDENSER FAN MOTOR Watts RPM Amps 3.1 1100 CW Opposite Shaft 0.03 Running CAUTION All electrical parts and wiring must be shielded from Inverter Board to collect water at dispenser. SERVICE DATA SHEET ICE & WATER - simultaneously) d F FF+ and FF- / same to measure water On-Off fill. ICE MAKER DIAGNOSTIC MODE Activate: Press FZ+ and FF+ temperature...

Product Specifications Sheet
Page 1
...-DEPTH PRODUCT DIMENSIONS Height (Including Hinges & Rollers) 69-7/8" Width (Doors) 36" Depth (Including Door) 33-3/8" MORE EASY-TO-USE FEATURES PureSource Ultra® II Ice & Water Filtration Discover how our genuine filtration works to keep your refrigerator. PureAir Ultra® Filters Keeps the air cleaner and fresher. Adjustable Interior Storage Over 100 ways to organize and customize your water cleaner. PureSource Ultra® II Water Filters remove 99.3% of...
...-DEPTH PRODUCT DIMENSIONS Height (Including Hinges & Rollers) 69-7/8" Width (Doors) 36" Depth (Including Door) 33-3/8" MORE EASY-TO-USE FEATURES PureSource Ultra® II Ice & Water Filtration Discover how our genuine filtration works to keep your refrigerator. PureAir Ultra® Filters Keeps the air cleaner and fresher. Adjustable Interior Storage Over 100 ways to organize and customize your water cleaner. PureSource Ultra® II Water Filters remove 99.3% of...

Product Specifications Sheet
Page 2
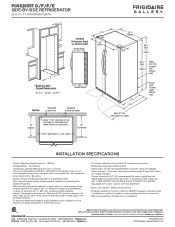
...Specifications subject to Product Installation Guide for proper air circulation and water / electrical connections 287/8" Side Panels, 1/2" min. FT. Depth (Including Door) Depth with a separate ground wire. Accessibility Guidelines and the Department of Dispenser Buttons 11 Crushed Ice / Cube Ice / Water Yes / Yes / Yes Ice Option / Freeze Option Display On / Off Option Yes Control Lock / Light Yes / Yes Temp / Door Ajar / Power Failure Alerts Yes / No / Yes C Water Filter Change Indicator Light Yes Air Filter Change Indicator Light Yes REFRIGERATOR FEATURES Interior...
...Specifications subject to Product Installation Guide for proper air circulation and water / electrical connections 287/8" Side Panels, 1/2" min. FT. Depth (Including Door) Depth with a separate ground wire. Accessibility Guidelines and the Department of Dispenser Buttons 11 Crushed Ice / Cube Ice / Water Yes / Yes / Yes Ice Option / Freeze Option Display On / Off Option Yes Control Lock / Light Yes / Yes Temp / Door Ajar / Power Failure Alerts Yes / No / Yes C Water Filter Change Indicator Light Yes Air Filter Change Indicator Light Yes REFRIGERATOR FEATURES Interior...
Product Specifications Sheet
Page 3
... / electrical connections. • Remove all wall / floor molding prior to Product Installation Guide for detailed installation instructions on rear wall recommended to household water supply line plus 7 additional feet. FT. Optional Water Supply Installation Kits available. • Adjustable front rollers to change. width 25" Countertop 33 3/8" 36" Doors 35 7/8" Cabinet 5" 69 7/8" with 3/8" rollers 68 5/8" with 3/8" rollers Water line inlet location (left bottom rear) 28 3/4" 35 7/8" Allow 50" min. (with doors 90° open) Power cord location...
... / electrical connections. • Remove all wall / floor molding prior to Product Installation Guide for detailed installation instructions on rear wall recommended to household water supply line plus 7 additional feet. FT. Optional Water Supply Installation Kits available. • Adjustable front rollers to change. width 25" Countertop 33 3/8" 36" Doors 35 7/8" Cabinet 5" 69 7/8" with 3/8" rollers 68 5/8" with 3/8" rollers Water line inlet location (left bottom rear) 28 3/4" 35 7/8" Allow 50" min. (with doors 90° open) Power cord location...


