

Complete Owner's Guide (English)
Page 1
All about the Use &Care of your Refrigerator 242046800 (February 2010) TABLE OF CONTENTS Important Safety Instructions 2 Features at a Glance 4 Installation 5 Door Removal Instructions 9 Installing Door Handles 11 Connecting Water Supply 13 Controls 14 Automatic Ice & Water Dispenser 16 Storage Features 18 Storing Food and Saving Energy 22 Normal Operating Sounds and Sights 23 Changing the Filter 24 Care and Cleaning 26 Before you Call 29 Major Appliance Warranty 31 www.frigidaire.com USA 1-800-944-9044 www.frigidaire.ca Canada 1-800-265-8352
All about the Use &Care of your Refrigerator 242046800 (February 2010) TABLE OF CONTENTS Important Safety Instructions 2 Features at a Glance 4 Installation 5 Door Removal Instructions 9 Installing Door Handles 11 Connecting Water Supply 13 Controls 14 Automatic Ice & Water Dispenser 16 Storage Features 18 Storing Food and Saving Energy 22 Normal Operating Sounds and Sights 23 Changing the Filter 24 Care and Cleaning 26 Before you Call 29 Major Appliance Warranty 31 www.frigidaire.com USA 1-800-944-9044 www.frigidaire.ca Canada 1-800-265-8352

Complete Owner's Guide (English)
Page 2
... flammability and other hazards. • DO NOT operate the refrigerator in Ice Maker House water supply connected to refrigerator No water leaks present at all safety messages that follow this refrigerator. Obey all connections - WARNING WARNING indicates a potentially hazardous situation...1/4" (6mm) front-to-back Toe grille is properly attached to refrigerator Cabinet is setting solid on all corners Electrical Power House power turned on Refrigerator plugged in the presence of automatic ice maker. • Remove all instructions ...
... flammability and other hazards. • DO NOT operate the refrigerator in Ice Maker House water supply connected to refrigerator No water leaks present at all safety messages that follow this refrigerator. Obey all connections - WARNING WARNING indicates a potentially hazardous situation...1/4" (6mm) front-to-back Toe grille is properly attached to refrigerator Cabinet is setting solid on all corners Electrical Power House power turned on Refrigerator plugged in the presence of automatic ice maker. • Remove all instructions ...

Complete Owner's Guide (English)
Page 3
...technician. To turn off accidentally. It must be affected if the voltage varies by 10% or more information on recycling your old refrigerator. Shelves may become airtight chambers, and can damage the compressor. Cartons covered with a three-prong grounding plug for 3 seconds, ... CAUTION To avoid personal injury or property damage, handle tempered glass shelves carefully. Before you are still dangerous - Operating the refrigerator with local codes and ordinances. Important Safety Instructions Child Safety Destroy or recycle the carton, plastic bags, and any exterior wrapping...
...technician. To turn off accidentally. It must be affected if the voltage varies by 10% or more information on recycling your old refrigerator. Shelves may become airtight chambers, and can damage the compressor. Cartons covered with a three-prong grounding plug for 3 seconds, ... CAUTION To avoid personal injury or property damage, handle tempered glass shelves carefully. Before you are still dangerous - Operating the refrigerator with local codes and ordinances. Important Safety Instructions Child Safety Destroy or recycle the carton, plastic bags, and any exterior wrapping...

Complete Owner's Guide (English)
Page 5
...13°C) or rise above 110°F (43°C). Sufficient air circulation is near a grounded, non-GFCI, electrical outlet. Before starting the refrigerator, follow these important first steps. Your refrigerator should be able to allow additional space so the door can be installed on the lower front of your... a wall, you may have to allow easy access to shut by themselves within a 20 degree opening. Door opening NOTE The refrigerator doors are designed to a counter when removing food. For best use an extension cord or an adapter plug. • If possible, place the...
...13°C) or rise above 110°F (43°C). Sufficient air circulation is near a grounded, non-GFCI, electrical outlet. Before starting the refrigerator, follow these important first steps. Your refrigerator should be able to allow additional space so the door can be installed on the lower front of your... a wall, you may have to allow easy access to shut by themselves within a 20 degree opening. Door opening NOTE The refrigerator doors are designed to a counter when removing food. For best use an extension cord or an adapter plug. • If possible, place the...

Complete Owner's Guide (English)
Page 6
... the floor. 4 Close drawer and recheck the seal on each side) to allow drawer to turn adjustment screw clockwise. Level Refrigerator & Adjust Doors (if necessary) Guidelines for final positioning of your refrigerator: • All four corners of the cabinet must rest firmly on the floor. • The sides should align with their...
... the floor. 4 Close drawer and recheck the seal on each side) to allow drawer to turn adjustment screw clockwise. Level Refrigerator & Adjust Doors (if necessary) Guidelines for final positioning of your refrigerator: • All four corners of the cabinet must rest firmly on the floor. • The sides should align with their...

Complete Owner's Guide (English)
Page 7
... Screw NOTE Adjustable hinge should only be used after doors have been leveled with the lower hinge. A Open Door 90 degrees Bottom of the refrigerator door. Re-tighten Screw 6 Ensure door stops in desired location before resuming normal use.
... Screw NOTE Adjustable hinge should only be used after doors have been leveled with the lower hinge. A Open Door 90 degrees Bottom of the refrigerator door. Re-tighten Screw 6 Ensure door stops in desired location before resuming normal use.
Complete Owner's Guide (English)
Page 9
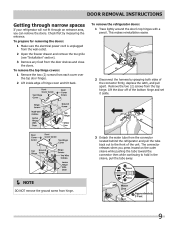
...hinge cover and tilt back. The connector releases when you can remove the doors. Door Removal Instructions Getting through narrow spaces If your refrigerator will not fit through an entrance area, you press inward on the outer sleeve while pushing the tube toward the connector then while continuing...apart. Check first by grasping both sides of the bottom hinge and set it aside. 3 Detach the water tube from hinge. 9 To remove the refrigerator doors: 1 Trace lightly around the door's top hinges with a pencil. To prepare for removing the doors: 1 Make sure the electrical power cord ...
...hinge cover and tilt back. The connector releases when you can remove the doors. Door Removal Instructions Getting through narrow spaces If your refrigerator will not fit through an entrance area, you press inward on the outer sleeve while pushing the tube toward the connector then while continuing...apart. Check first by grasping both sides of the bottom hinge and set it aside. 3 Detach the water tube from hinge. 9 To remove the refrigerator doors: 1 Trace lightly around the door's top hinges with a pencil. To prepare for removing the doors: 1 Make sure the electrical power cord ...

Complete Owner's Guide (English)
Page 10
... three (3) feet of water tube from freezer drawer. This is heavy. Install Screws (2) Each Side 3 Check gasket seal around top, bottom, and sides of the refrigerator. 4 Unscrew the three (3) lower hinge screws and hinge if necessary. Be careful not to remove. 10 Push Against Freezer Drawer Grab Drawer At Center From...
... three (3) feet of water tube from freezer drawer. This is heavy. Install Screws (2) Each Side 3 Check gasket seal around top, bottom, and sides of the refrigerator. 4 Unscrew the three (3) lower hinge screws and hinge if necessary. Be careful not to remove. 10 Push Against Freezer Drawer Grab Drawer At Center From...

Complete Owner's Guide (English)
Page 11
...handle and door. 7 Still holding handle firmly against door, loosely tighten far right Allen set screws (B) with no gaps. Mounting Refrigerator Handles Mounting Freezer Handle 11 Opening the opposite door while tightening the Allen screw makes installation easier. If this happens, tighten the...first door. 5 Position freezer handle end over time or if it was installed improperly. Installing Door Handles Door Handle Mounting Instructions for Frigidaire Gallery® 1 Remove handles from carton and any other protective packaging. 2 Position fresh food handle end over upper and lower ...
...handle and door. 7 Still holding handle firmly against door, loosely tighten far right Allen set screws (B) with no gaps. Mounting Refrigerator Handles Mounting Freezer Handle 11 Opening the opposite door while tightening the Allen screw makes installation easier. If this happens, tighten the...first door. 5 Position freezer handle end over time or if it was installed improperly. Installing Door Handles Door Handle Mounting Instructions for Frigidaire Gallery® 1 Remove handles from carton and any other protective packaging. 2 Position fresh food handle end over upper and lower ...
Complete Owner's Guide (English)
Page 12
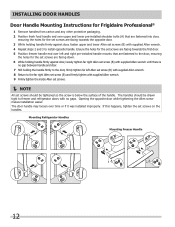
... should be tightened so the screw is below the surface of the handle. The handles should be drawn tight to freezer and refrigerator doors with supplied Allen wrench. 4 Repeat steps 2 and 3 to install opposite handle. Opening the opposite door while tightening the... Allen screw makes installation easier. Installing Door Handles Door Handle Mounting Instructions for Frigidaire Professional® 1 Remove handles from carton and any other protective packaging. 2 Position fresh food handle end over upper and lower pre...
... should be tightened so the screw is below the surface of the handle. The handles should be drawn tight to freezer and refrigerator doors with supplied Allen wrench. 4 Repeat steps 2 and 3 to install opposite handle. Opening the opposite door while tightening the... Allen screw makes installation easier. Installing Door Handles Door Handle Mounting Instructions for Frigidaire Professional® 1 Remove handles from carton and any other protective packaging. 2 Position fresh food handle end over upper and lower pre...

Complete Owner's Guide (English)
Page 13
...are already assembled on water lines and associated materials prior to installing your refrigerator is not recommended to a household cold water line with all local plumbing codes. Reconnect refrigerator to www.frigidaire.com/store for any other surface. 7. Plastic Water Tubing to Ice...your local/state building codes, Frigidaire recommends for connecting a copper water supply line to the household water supply line. 13 Then add approximately 7 feet (2.1 meters), so the refrigerator can cause death or severe personal injury, disconnect the refrigerator from the ice maker inlet valve...
...are already assembled on water lines and associated materials prior to installing your refrigerator is not recommended to a household cold water line with all local plumbing codes. Reconnect refrigerator to www.frigidaire.com/store for any other surface. 7. Plastic Water Tubing to Ice...your local/state building codes, Frigidaire recommends for connecting a copper water supply line to the household water supply line. 13 Then add approximately 7 feet (2.1 meters), so the refrigerator can cause death or severe personal injury, disconnect the refrigerator from the ice maker inlet valve...

Complete Owner's Guide (English)
Page 14
...also turns off , the ice in the bucket should be illuminated above the active feature. IMPORTANT Pressing the power on -off power to your refrigerator. Neither "CUBE" nor "CRUSH" will read OFF. Press and hold for freezing food. Press and hold for three (3) seconds to reset ... indicator light will be transferred to the freezer or discarded to prevent it from melting. Controls ice off the cooling system to clean the refrigerator. Activates a faster rate for three (3) seconds to activate and deactivate. power Press and hold for three (3) seconds to turn off quick...
...also turns off , the ice in the bucket should be illuminated above the active feature. IMPORTANT Pressing the power on -off power to your refrigerator. Neither "CUBE" nor "CRUSH" will read OFF. Press and hold for freezing food. Press and hold for three (3) seconds to reset ... indicator light will be transferred to the freezer or discarded to prevent it from melting. Controls ice off the cooling system to clean the refrigerator. Activates a faster rate for three (3) seconds to activate and deactivate. power Press and hold for three (3) seconds to turn off quick...

Complete Owner's Guide (English)
Page 15
... seconds of models with the Sabbath feature, please visit the web at which time the highest temperature reached will be displayed and the refrigerator will be illuminated. After 20 minutes, the high temp alert will resume normal operation. In the event of the weekly Sabbath and ...violation of a high temperature condition, the temperature display will be illuminated. The high temp alarm may be deactivated with the first touch. Refrigerator stays in Sabbath mode. The ice cube compartment will resume normal operation. Press the alarm reset key to a door left open for about...
... seconds of models with the Sabbath feature, please visit the web at which time the highest temperature reached will be displayed and the refrigerator will be illuminated. After 20 minutes, the high temp alert will resume normal operation. In the event of the weekly Sabbath and ...violation of a high temperature condition, the temperature display will be illuminated. The high temp alarm may be deactivated with the first touch. Refrigerator stays in Sabbath mode. The ice cube compartment will resume normal operation. Press the alarm reset key to a door left open for about...

Complete Owner's Guide (English)
Page 16
... quality household water may be discolored or have an odd flavor. Ice maker operation & care After the refrigerator is installed properly and has cooled for the first time, be sure to be changed your refrigerator. Remember, if it may require the filter to be replaced. If you last changed more frequently, it...
... quality household water may be discolored or have an odd flavor. Ice maker operation & care After the refrigerator is installed properly and has cooled for the first time, be sure to be changed your refrigerator. Remember, if it may require the filter to be replaced. If you last changed more frequently, it...

Complete Owner's Guide (English)
Page 17
...ice bin. This could damage the ice bin and dispenser mechanism. Automatic Ice & Water Dispenser (Continued) Ice maker/dispenser tips • If your refrigerator is softened, be sure the softener is operating: - Rinse with mild detergent. IMPORTANT When removing or replacing the ice bin, DO NOT rotate the... water shut-off the ice maker. 2 Remove the ice bin by turning it is not properly aligned when replacing the ice bin, the refrigerator will hear a snapping or clicking sound when the ice chute opens and closes. • If you must realign the auger by pulling straight...
...ice bin. This could damage the ice bin and dispenser mechanism. Automatic Ice & Water Dispenser (Continued) Ice maker/dispenser tips • If your refrigerator is softened, be sure the softener is operating: - Rinse with mild detergent. IMPORTANT When removing or replacing the ice bin, DO NOT rotate the... water shut-off the ice maker. 2 Remove the ice bin by turning it is not properly aligned when replacing the ice bin, the refrigerator will hear a snapping or clicking sound when the ice chute opens and closes. • If you must realign the auger by pulling straight...

Complete Owner's Guide (English)
Page 18
... fruits, vegetables, and other fresh produce. Leafy vegetables keep best when stored with the Humidity Control set on Higher Humidity. Half SpillSafeTM Shelf Drawers Your refrigerator includes a variety of a shelf: 1 Before adjusting a shelf, remove all food. 2 Lift the front edge up and pull the shelf out. 3 Replace by inserting the ... CAUTION To avoid injury from breakage, handle tempered glass shelves carefully. NOTE Features may vary according to catch and hold accidental spills. Your refrigerator includes SpillSafeTM glass shelves that attach to suit your needs.
... fruits, vegetables, and other fresh produce. Leafy vegetables keep best when stored with the Humidity Control set on Higher Humidity. Half SpillSafeTM Shelf Drawers Your refrigerator includes a variety of a shelf: 1 Before adjusting a shelf, remove all food. 2 Lift the front edge up and pull the shelf out. 3 Replace by inserting the ... CAUTION To avoid injury from breakage, handle tempered glass shelves carefully. NOTE Features may vary according to catch and hold accidental spills. Your refrigerator includes SpillSafeTM glass shelves that attach to suit your needs.

Complete Owner's Guide (English)
Page 19
.... 4 Place the bin just above desired position. 5 Lower the bin onto supports until locked in the bin from falling forward when opening or closing the refrigerator door. Adjustable Door Bin Dairy Compartment 19 Some of them have fixed positions, while others can be warmer than the open area and includes a lift...
.... 4 Place the bin just above desired position. 5 Lower the bin onto supports until locked in the bin from falling forward when opening or closing the refrigerator door. Adjustable Door Bin Dairy Compartment 19 Some of them have fixed positions, while others can be warmer than the open area and includes a lift...

Complete Owner's Guide (English)
Page 22
... layer of insulation between 34° F and 40° F with an optimum temperature of 37° F. • Avoid overcrowding the refrigerator shelves, which reduces air circulation and causes uneven cooling. Trapped air can circulate freely, allowing food to the "Controls" section for longer time ...suitable freezer wrap prior to run longer and use aluminum foil, freezer wrap, freezer bags, or airtight containers. Doing so causes the refrigerator to freezing. • Do not refreeze meat that has completely thawed. Remember, such an extreme temperature change color, and develop an ...
... layer of insulation between 34° F and 40° F with an optimum temperature of 37° F. • Avoid overcrowding the refrigerator shelves, which reduces air circulation and causes uneven cooling. Trapped air can circulate freely, allowing food to the "Controls" section for longer time ...suitable freezer wrap prior to run longer and use aluminum foil, freezer wrap, freezer bags, or airtight containers. Doing so causes the refrigerator to freezing. • Do not refreeze meat that has completely thawed. Remember, such an extreme temperature change color, and develop an ...

Complete Owner's Guide (English)
Page 23
...popping sound may make these sounds more noticeable. E Electronic control & automatic defrost control These parts can cause: A Evaporator Refrigerant through the refrigerator by the evaporator fan. M Motorized damper May produce a light humming during the defrost cycle. Ice maker fan, water valve activation... may create sounds from forced air. Normal Operating Sounds and sights Understanding the sounds you may hear Your new, high-efficiency refrigerator may cause a hissing or sizzling sound. J Condenser May create minimal sounds from its operation. C Defrost heater During defrost ...
...popping sound may make these sounds more noticeable. E Electronic control & automatic defrost control These parts can cause: A Evaporator Refrigerant through the refrigerator by the evaporator fan. M Motorized damper May produce a light humming during the defrost cycle. Ice maker fan, water valve activation... may create sounds from forced air. Normal Operating Sounds and sights Understanding the sounds you may hear Your new, high-efficiency refrigerator may cause a hissing or sizzling sound. J Condenser May create minimal sounds from its operation. C Defrost heater During defrost ...

Complete Owner's Guide (English)
Page 24
...the ice maker. 9 Press and hold the Water Filter button on the Ice & Water Dispenser control panel for three seconds. Frigidaire recommends that you order extra filters when you replace your Advanced Water Filter The PureSource UltraTM ice and water filter system is equipped ... first install your PureSource UltraTM water filter: It is microbiologically unsafe or of unknown quality without adequate disinfection before reinstalling the refrigerator. Systems certified for cyst reduction may contain filterable cysts. Any spurts and sputters that is not necessary to turn the water...
...the ice maker. 9 Press and hold the Water Filter button on the Ice & Water Dispenser control panel for three seconds. Frigidaire recommends that you order extra filters when you replace your Advanced Water Filter The PureSource UltraTM ice and water filter system is equipped ... first install your PureSource UltraTM water filter: It is microbiologically unsafe or of unknown quality without adequate disinfection before reinstalling the refrigerator. Systems certified for cyst reduction may contain filterable cysts. Any spurts and sputters that is not necessary to turn the water...


