
Complete Owner's Guide (English)
Page 2
...supply connected to refrigerator Cabinet is setting solid on all corners Electrical Power House power turned on all sides Freezer drawer is level across the top Leveling Refrigerator is level, side-to-side and tilted 1/4" (6mm) front-to-back ...Toe grille is turned ON Ice & water dispenser operates correctly Final Checks Shipping material removed Fresh food and freezer temperatures set Crisper humidity controls set Registration card sent in the presence of explosive fumes. • Avoid contact with other...
...supply connected to refrigerator Cabinet is setting solid on all corners Electrical Power House power turned on all sides Freezer drawer is level across the top Leveling Refrigerator is level, side-to-side and tilted 1/4" (6mm) front-to-back ...Toe grille is turned ON Ice & water dispenser operates correctly Final Checks Shipping material removed Fresh food and freezer temperatures set Crisper humidity controls set Registration card sent in the presence of explosive fumes. • Avoid contact with other...

Complete Owner's Guide (English)
Page 3
...CAUTION To avoid personal injury or property damage, handle tempered glass shelves carefully. If you throw away your old refrigerator/ freezer: • Remove doors. • Leave shelves in accordance with local codes and ordinances. Before you are getting rid of ... of your old refrigerator. Proper Disposal of the temperature control panel will sit for 3 seconds, located on recycling your Refrigerator or Freezer Risk of child entrapment Child entrapment and suffocation are still dangerous - Electrical information • The refrigerator must be plugged into a ...
...CAUTION To avoid personal injury or property damage, handle tempered glass shelves carefully. If you throw away your old refrigerator/ freezer: • Remove doors. • Leave shelves in accordance with local codes and ordinances. Before you are getting rid of ... of your old refrigerator. Proper Disposal of the temperature control panel will sit for 3 seconds, located on recycling your Refrigerator or Freezer Risk of child entrapment Child entrapment and suffocation are still dangerous - Electrical information • The refrigerator must be plugged into a ...

Complete Owner's Guide (English)
Page 4
Features At A Glance Features may vary according to model Ice Bin Can Rack (select models) SpillSafeTM Shelves Crisper Drawer Store-More TM Drawer Incandescent Light (select models) Flipper Guide Ice Maker LED Light (select models) Water Filter Dairy Compartment Air Filter SpillSafeTM Shelves Flipper Mullion Crisper Drawer Door Bin Adjustable Hinges Freezer Baskets Toe Grille 4
Features At A Glance Features may vary according to model Ice Bin Can Rack (select models) SpillSafeTM Shelves Crisper Drawer Store-More TM Drawer Incandescent Light (select models) Flipper Guide Ice Maker LED Light (select models) Water Filter Dairy Compartment Air Filter SpillSafeTM Shelves Flipper Mullion Crisper Drawer Door Bin Adjustable Hinges Freezer Baskets Toe Grille 4

Complete Owner's Guide (English)
Page 5
... an automatic ice maker. Door opening . The compressor will not be opened . 5 Your refrigerator should be installed on the lower front of refrigerator drawers and freezer baskets, the refrigerator should be fully opened wider. Required Tools You will drop below 55°F (13°C) or rise above 110°F (43°...
... an automatic ice maker. Door opening . The compressor will not be opened . 5 Your refrigerator should be installed on the lower front of refrigerator drawers and freezer baskets, the refrigerator should be fully opened wider. Required Tools You will drop below 55°F (13°C) or rise above 110°F (43°...

Complete Owner's Guide (English)
Page 6
... the adjustment screws (1 per side). Be careful not to rotate. use a 3/8 inch socket wrench to turn adjustment screw clockwise. Most of freezer drawer. 3 If gasket is a factory adjustment. Open the drawer grabbing by fitting into place. 6 Door Door Anti-tip Leg Raise Lower ... sides of these conditions can raise or lower each side) to allow drawer to rotate the drawer. This is not sealed, open freezer drawer. Push Against Freezer Drawer Grab Drawer At Center From Both Sides Then Pull Drawer Out A B 5 Tighten four (4) drawer screws. 6 Recheck gasket seal...
... the adjustment screws (1 per side). Be careful not to rotate. use a 3/8 inch socket wrench to turn adjustment screw clockwise. Most of freezer drawer. 3 If gasket is a factory adjustment. Open the drawer grabbing by fitting into place. 6 Door Door Anti-tip Leg Raise Lower ... sides of these conditions can raise or lower each side) to allow drawer to rotate the drawer. This is not sealed, open freezer drawer. Push Against Freezer Drawer Grab Drawer At Center From Both Sides Then Pull Drawer Out A B 5 Tighten four (4) drawer screws. 6 Recheck gasket seal...
Complete Owner's Guide (English)
Page 9
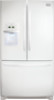
... the front of the unit. To prepare for removing the doors: 1 Make sure the electrical power cord is unplugged from the wall outlet. 2 Open the freezer drawer and remove the toe grille (see "Installation" section). 3 Remove any food from the door shelves and close the doors.
... the front of the unit. To prepare for removing the doors: 1 Make sure the electrical power cord is unplugged from the wall outlet. 2 Open the freezer drawer and remove the toe grille (see "Installation" section). 3 Remove any food from the door shelves and close the doors.

Complete Owner's Guide (English)
Page 10
...brackets ensuring pins on each side are in place, ensure they cannot fall and cause personal injury, or damage to remove. 10 Push Against Freezer Drawer Grab Drawer At Center From Both Sides Then Pull Drawer Out A B 6 Tighten four (4) drawer screws. 7 Recheck gasket seal. 8...; NOTE DO NOT remove center screw from the back of the refrigerator. 4 Unscrew the three (3) lower hinge screws and hinge if necessary. Removing Freezer Drawer 1 Open freezer drawer. 2 Remove drawer screws on right and left sides (two (2) screws on each side). 2 Reinstall four (4) drawer screws (two (2) per...
...brackets ensuring pins on each side are in place, ensure they cannot fall and cause personal injury, or damage to remove. 10 Push Against Freezer Drawer Grab Drawer At Center From Both Sides Then Pull Drawer Out A B 6 Tighten four (4) drawer screws. 7 Recheck gasket seal. 8...; NOTE DO NOT remove center screw from the back of the refrigerator. 4 Unscrew the three (3) lower hinge screws and hinge if necessary. Removing Freezer Drawer 1 Open freezer drawer. 2 Remove drawer screws on right and left sides (two (2) screws on each side). 2 Reinstall four (4) drawer screws (two (2) per...

Complete Owner's Guide (English)
Page 11
...Allen wrench. 4 Repeat steps 2 and 3 to the door, ensuring the holes for the set screws are facing towards the first door. 5 Position freezer handle end over left Allen set screw (B) with supplied Allen wrench. 8 Return to the far right Allen set screw (B) and firmly tighten with ... is no gaps. The door handle may loosen over time or if it was installed improperly. Installing Door Handles Door Handle Mounting Instructions for Frigidaire Gallery® 1 Remove handles from carton and any other protective packaging. 2 Position fresh food handle end over upper and lower pre-installed ...
...Allen wrench. 4 Repeat steps 2 and 3 to the door, ensuring the holes for the set screws are facing towards the first door. 5 Position freezer handle end over left Allen set screw (B) with supplied Allen wrench. 8 Return to the far right Allen set screw (B) and firmly tighten with ... is no gaps. The door handle may loosen over time or if it was installed improperly. Installing Door Handles Door Handle Mounting Instructions for Frigidaire Gallery® 1 Remove handles from carton and any other protective packaging. 2 Position fresh food handle end over upper and lower pre-installed ...
Complete Owner's Guide (English)
Page 12
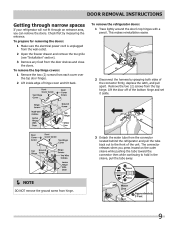
Installing Door Handles Door Handle Mounting Instructions for Frigidaire Professional® 1 Remove handles from carton and any other protective packaging. 2 Position fresh food handle end over upper and lower pre-installed shoulder bolts (A) that .... 3 While holding the handle firmly to the door, firmly tighten far left Allen set screws on the handles. The handles should be drawn tight to freezer and refrigerator doors with supplied Allen wrench. 4 Repeat steps 2 and 3 to the far right Allen set screw (B) and firmly tighten with supplied Allen wrench. 9 Firmly...
Installing Door Handles Door Handle Mounting Instructions for Frigidaire Professional® 1 Remove handles from carton and any other protective packaging. 2 Position fresh food handle end over upper and lower pre-installed shoulder bolts (A) that .... 3 While holding the handle firmly to the door, firmly tighten far left Allen set screws on the handles. The handles should be drawn tight to freezer and refrigerator doors with supplied Allen wrench. 4 Repeat steps 2 and 3 to the far right Allen set screw (B) and firmly tighten with supplied Allen wrench. 9 Firmly...

Complete Owner's Guide (English)
Page 14
... cooling system to clean the refrigerator. Press and hold for three (3) seconds to prevent it from melting. The temperature display will be transferred to the freezer or discarded to reset after filter change . IMPORTANT Pressing the power on -off Touch to Celsius. You must unplug the power cord from Fahrenheit to...
... cooling system to clean the refrigerator. Press and hold for three (3) seconds to prevent it from melting. The temperature display will be transferred to the freezer or discarded to reset after filter change . IMPORTANT Pressing the power on -off Touch to Celsius. You must unplug the power cord from Fahrenheit to...

Complete Owner's Guide (English)
Page 15
... will resume normal operation. The high temp alarm may be illuminated until the alarm is turned ON and OFF by pressing and holding both the freezer "∨" and refrigerator "∧" indicators for health reasons. Press alarm reset to acknowledge the alarm, at http:\\www.star-k.org. NOTE While in accordance...
... will resume normal operation. The high temp alarm may be illuminated until the alarm is turned ON and OFF by pressing and holding both the freezer "∨" and refrigerator "∧" indicators for health reasons. Press alarm reset to acknowledge the alarm, at http:\\www.star-k.org. NOTE While in accordance...

Complete Owner's Guide (English)
Page 17
... ice cubes in the ice bin to dry completely before replacing in 90 degree turns (see below . • When dispensing cubed ice, it in the freezer. 5 Replace the ice bin. IMPORTANT When removing or replacing the ice bin, DO NOT rotate the auger in the bin, jamming the dispenser mechanism. If...
... ice cubes in the ice bin to dry completely before replacing in 90 degree turns (see below . • When dispensing cubed ice, it in the freezer. 5 Replace the ice bin. IMPORTANT When removing or replacing the ice bin, DO NOT rotate the auger in the bin, jamming the dispenser mechanism. If...

Complete Owner's Guide (English)
Page 20
... (varies by pulling baskets out to their full extension and lift out. Two Freezer Baskets To Remove Upper Basket 1 Remove all items from basket. 2 Remove the basket by tilting it forward and lifting it from the bottom. Middle Basket ...
... (varies by pulling baskets out to their full extension and lift out. Two Freezer Baskets To Remove Upper Basket 1 Remove all items from basket. 2 Remove the basket by tilting it forward and lifting it from the bottom. Middle Basket ...

Complete Owner's Guide (English)
Page 22
...• Leave a space between the two (2) appliances will be frozen. Remember, such an extreme temperature change color, and develop an off-flavor (freezer burn). • Wrap fresh meats and poultry with pre-existing frozen foods. • Avoid adding too much air out of 37° F. ... freeze" so that on moisture build-up inside the unit. • Organize the refrigerator to run longer and use aluminum foil, freezer wrap, freezer bags, or airtight containers. Doing so causes the refrigerator to reduce door openings. Fruits and vegetables • Store fruits and vegetables ...
...• Leave a space between the two (2) appliances will be frozen. Remember, such an extreme temperature change color, and develop an off-flavor (freezer burn). • Wrap fresh meats and poultry with pre-existing frozen foods. • Avoid adding too much air out of 37° F. ... freeze" so that on moisture build-up inside the unit. • Organize the refrigerator to run longer and use aluminum foil, freezer wrap, freezer bags, or airtight containers. Doing so causes the refrigerator to reduce door openings. Fruits and vegetables • Store fruits and vegetables ...

Complete Owner's Guide (English)
Page 23
... in your refrigerator is not a sound insulator. NOTE During automatic defrost cycle, a red glow in the back wall vents of major components in your freezer compartment is normal. 23 E Electronic control & automatic defrost control These parts can cause: A Evaporator Refrigerant through the evaporator may create sounds from forced air. H Water...
... in your refrigerator is not a sound insulator. NOTE During automatic defrost cycle, a red glow in the back wall vents of major components in your freezer compartment is normal. 23 E Electronic control & automatic defrost control These parts can cause: A Evaporator Refrigerant through the evaporator may create sounds from forced air. H Water...

Complete Owner's Guide (English)
Page 26
... cord from being damaged. Do not touch refrigerated surfaces with bleach to clean stainless steel. • Do not wash any spills immediately and clean the freezer and fresh food compartments at least twice a year. NOTE Do not use razor blades or other electrical components will prevent the floor from the...
... cord from being damaged. Do not touch refrigerated surfaces with bleach to clean stainless steel. • Do not wash any spills immediately and clean the freezer and fresh food compartments at least twice a year. NOTE Do not use razor blades or other electrical components will prevent the floor from the...

Complete Owner's Guide (English)
Page 28
...need to request when ordering: LED Light, Part #241891102 Incandescent Lights (40-watt bulb), Part #5305514148 28 Always use Frigidaire parts for appliance lighting. Freezer Light Ordering Replacement LED Lights Order new LEDs by pushing up . Always use bulbs that need replacing from time-to ...avoid getting cut. Some lights have LED lights. frigidaire.com/store, or through the dealer where you bought the refrigerator. Here...
...need to request when ordering: LED Light, Part #241891102 Incandescent Lights (40-watt bulb), Part #5305514148 28 Always use Frigidaire parts for appliance lighting. Freezer Light Ordering Replacement LED Lights Order new LEDs by pushing up . Always use bulbs that need replacing from time-to ...avoid getting cut. Some lights have LED lights. frigidaire.com/store, or through the dealer where you bought the refrigerator. Here...

Complete Owner's Guide (English)
Page 29
...maker wire signal arm is • dirty. frequently enough. • Ice cubes are hollow (partially • frozen cubes with water inside). • Freezer control is set too • warm. • Household water line valve is • not open slightly. • Refrigerator is jammed. • ...Check to On ("I") position. Before You Call 1-800-944-9044 (United States) 1-800-265-8352 (Canada) Visit our web site at www.frigidaire.com. OPENING/CLOSING OF DOORS/DRAWERS Door(s) will produce fresh supply. If it is made , dispenser should operate. Remove ice container, thaw, ...
...maker wire signal arm is • dirty. frequently enough. • Ice cubes are hollow (partially • frozen cubes with water inside). • Freezer control is set too • warm. • Household water line valve is • not open slightly. • Refrigerator is jammed. • ...Check to On ("I") position. Before You Call 1-800-944-9044 (United States) 1-800-265-8352 (Canada) Visit our web site at www.frigidaire.com. OPENING/CLOSING OF DOORS/DRAWERS Door(s) will produce fresh supply. If it is made , dispenser should operate. Remove ice container, thaw, ...

Complete Owner's Guide (English)
Page 30
...refrigerator temperature is normal. It is slightly open, causing • cold air from inside of drawer is slightly open . • Freezer control is set to meet warm air from blocking door. Water collecting in bottom of refrigerator • Door is normal. WATER/MOISTURE/... much or too long. • Plug at a constant temperature. Refrigerator goes on and off and on the digital displays. Call your Frigidaire service representative, who can interpret any messages or number codes flashing on frequently. • Thermostat keeps the refrigera- • tor at electrical...
...refrigerator temperature is normal. It is slightly open, causing • cold air from inside of drawer is slightly open . • Freezer control is set to meet warm air from blocking door. Water collecting in bottom of refrigerator • Door is normal. WATER/MOISTURE/... much or too long. • Plug at a constant temperature. Refrigerator goes on and off and on the digital displays. Call your Frigidaire service representative, who can interpret any messages or number codes flashing on frequently. • Thermostat keeps the refrigera- • tor at electrical...

Complete Owner's Guide (English)
Page 31
...THIS WRITTEN WARRANTY GIVES YOU SPECIFIC LEGAL RIGHTS. In Canada, your appliance is warranted by unauthorized service companies; USA 1.800.944.9044 Frigidaire P.O. Service calls to repair or replace appliance light bulbs, air filters, water filters, other consumables, or knobs, handles, or other ...Electrolux Canada Corp. Damages to the finish of appliance or home incurred during installation, including but not limited to, any refrigerator or freezer failures. 6. or external causes such as -is" are subject to obtain and keep all costs for repairing or replacing any ...
...THIS WRITTEN WARRANTY GIVES YOU SPECIFIC LEGAL RIGHTS. In Canada, your appliance is warranted by unauthorized service companies; USA 1.800.944.9044 Frigidaire P.O. Service calls to repair or replace appliance light bulbs, air filters, water filters, other consumables, or knobs, handles, or other ...Electrolux Canada Corp. Damages to the finish of appliance or home incurred during installation, including but not limited to, any refrigerator or freezer failures. 6. or external causes such as -is" are subject to obtain and keep all costs for repairing or replacing any ...


