Complete Owner's Guide (English)
Page 1
All about the Use &Care of your Refrigerator 242063800 (November 2009) TABLE OF CONTENTS Important Safety Instructions 2 Installation 4 Door Removal Instructions 5 Handle Installation 6 Connecting Water Supply 8 Ice Service 9 Controls 9 Normal Operating Sounds and Sights 10 Care and Cleaning 11 Before you Call 12 Major Appliance Warranty 13 www.frigidaire.com USA 1-800-944-9044 www.frigidaire.ca Canada 1-800-265-8352
All about the Use &Care of your Refrigerator 242063800 (November 2009) TABLE OF CONTENTS Important Safety Instructions 2 Installation 4 Door Removal Instructions 5 Handle Installation 6 Connecting Water Supply 8 Ice Service 9 Controls 9 Normal Operating Sounds and Sights 10 Care and Cleaning 11 Before you Call 12 Major Appliance Warranty 13 www.frigidaire.com USA 1-800-944-9044 www.frigidaire.ca Canada 1-800-265-8352
Complete Owner's Guide (English)
Page 2
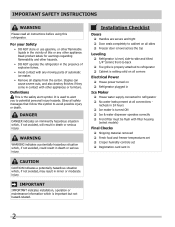
... flush with filter housing (select models) Final Checks Shipping material removed Fresh food and freezer temperatures set Crisper humidity controls set Registration card sent in the presence of automatic ice maker. • Remove all staples from the carton. Installation Checklist Doors Handles are secure and tight Door seals completely to cabinet on all connections - Obey all instructions before using this refrigerator. WARNING WARNING indicates a potentially...
... flush with filter housing (select models) Final Checks Shipping material removed Fresh food and freezer temperatures set Crisper humidity controls set Registration card sent in the presence of automatic ice maker. • Remove all staples from the carton. Installation Checklist Doors Handles are secure and tight Door seals completely to cabinet on all connections - Obey all instructions before using this refrigerator. WARNING WARNING indicates a potentially...

Complete Owner's Guide (English)
Page 3
... be installed in place so children may not easily climb inside. • Have refrigerant removed by a wall switch or pull cord to avoid electrical shock. • Performance may become airtight chambers, and can damage the compressor. It must be plugged into a properly grounded three prong receptacle. Junked or abandoned refrigerators or freezers are getting rid of the temperature control panel (Electronic controls), or turning the Freezer and...
... be installed in place so children may not easily climb inside. • Have refrigerant removed by a wall switch or pull cord to avoid electrical shock. • Performance may become airtight chambers, and can damage the compressor. It must be plugged into a properly grounded three prong receptacle. Junked or abandoned refrigerators or freezers are getting rid of the temperature control panel (Electronic controls), or turning the Freezer and...
Complete Owner's Guide (English)
Page 4
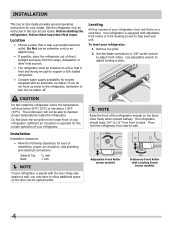
... the door can be able to adjust front rollers. Use adjustable wrench to turn the ice maker off. Adjustable Front Roller (some models) 4 Your refrigerator is level and strong enough to support a fully loaded refrigerator. • Consider water supply availability for models equipped with adjustable front rollers or front leveling screws to help level your refrigerator: 1 Remove toe grille. 2 Use flat-blade screwdriver or 3/8" socket wrench to maintain proper temperatures inside the refrigerator. The compressor will...
... the door can be able to adjust front rollers. Use adjustable wrench to turn the ice maker off. Adjustable Front Roller (some models) 4 Your refrigerator is level and strong enough to support a fully loaded refrigerator. • Consider water supply availability for models equipped with adjustable front rollers or front leveling screws to help level your refrigerator: 1 Remove toe grille. 2 Use flat-blade screwdriver or 3/8" socket wrench to maintain proper temperatures inside the refrigerator. The compressor will...

Complete Owner's Guide (English)
Page 5
... to install top hinge. 17 Flip toe grille and reinstall. 18 Plug in electrical power cord and turn the refrigerator temperature control to the other hole in hinge and tighten with a soft lead pencil. Set door aside. 3 Unscrew center hinge pin using adjustable wrench. Top Hinge Cover Top Hinge Door Stop Screw Door Stop Washer Hinge Pin Bottom Hinge Screws Toe Grille Door removal and reversal instructions: 1 Remove toe grille. 2 Remove top hinge cover. Trace around the hinge with adjustable wrench. 10 Reverse door handles (see instruction on...
... to install top hinge. 17 Flip toe grille and reinstall. 18 Plug in electrical power cord and turn the refrigerator temperature control to the other hole in hinge and tighten with a soft lead pencil. Set door aside. 3 Unscrew center hinge pin using adjustable wrench. Top Hinge Cover Top Hinge Door Stop Screw Door Stop Washer Hinge Pin Bottom Hinge Screws Toe Grille Door removal and reversal instructions: 1 Remove toe grille. 2 Remove top hinge cover. Trace around the hinge with adjustable wrench. 10 Reverse door handles (see instruction on...
Complete Owner's Guide (English)
Page 6
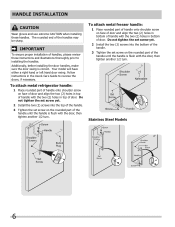
... door. Follow instructions in the Use & Care Guide to installing the handles. Stainless Steel Models 6 Your model will have either a right hand or left hand door swing. Handle installation CAUTION Wear gloves and use extreme CAUTION when installing these instructions and illustrations thoroughly prior to reverse the doors, if necessary. Additionally, before installing the door handles, make sure the door swing is flush with the door, then tighten another 1/2 turn . Do not tighten the set screw yet. 2 Install...
... door. Follow instructions in the Use & Care Guide to installing the handles. Stainless Steel Models 6 Your model will have either a right hand or left hand door swing. Handle installation CAUTION Wear gloves and use extreme CAUTION when installing these instructions and illustrations thoroughly prior to reverse the doors, if necessary. Additionally, before installing the door handles, make sure the door swing is flush with the door, then tighten another 1/2 turn . Do not tighten the set screw yet. 2 Install...
Complete Owner's Guide (English)
Page 7
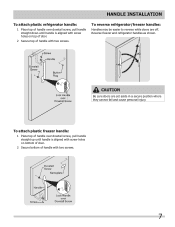
... sure doors are off. Handle installation To attach plastic refrigerator handle: 1 Place top of handle over dovetail screw, pull handle straight up until handle is aligned with screw holes on top of door. 2 Secure top of handle with two screws. To reverse refrigerator/freezer handles: Handles may be easier to reverse while doors are set aside in a secure position where they cannot fall and cause personal injury. Reverse freezer and refrigerator handles...
... sure doors are off. Handle installation To attach plastic refrigerator handle: 1 Place top of handle over dovetail screw, pull handle straight up until handle is aligned with screw holes on top of door. 2 Secure top of handle with two screws. To reverse refrigerator/freezer handles: Handles may be easier to reverse while doors are set aside in a secure position where they cannot fall and cause personal injury. Reverse freezer and refrigerator handles...
Complete Owner's Guide (English)
Page 8
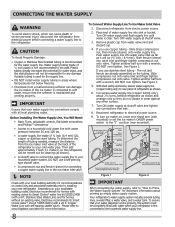
... mounted) or set the ice maker's On/Off power switch to the refrigerator. Disconnect refrigerator from water valve inlet and discard cap. 4. Tighten another half turn ice maker on your new refrigerator. DO NOT over tighten. To ensure that your water dispenser works properly, this system must be responsible for the supply line. • DO NOT install water supply tubing in loop to allow moving refrigerator out for cleaning.) Figure 1 Figure 2 IMPORTANT After connecting the water supply, refer...
... mounted) or set the ice maker's On/Off power switch to the refrigerator. Disconnect refrigerator from water valve inlet and discard cap. 4. Tighten another half turn ice maker on your new refrigerator. DO NOT over tighten. To ensure that your water dispenser works properly, this system must be responsible for the supply line. • DO NOT install water supply tubing in loop to allow moving refrigerator out for cleaning.) Figure 1 Figure 2 IMPORTANT After connecting the water supply, refer...
Complete Owner's Guide (English)
Page 9
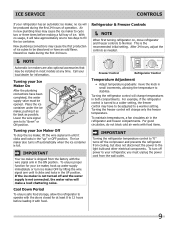
... it with the wire signal arm in the "up water supply immediately or turn off and the water supply is not connected, the water valve will change temperatures in most models at least 8 to stabilize. The ice maker also turns off the compressor and prevents the refrigerator from cooling, but does not disconnect the power to your refrigerator, you must be adjusted to a warmer setting. Turning the refrigerator control will change only the freezer temperature. Discard ice made during...
... it with the wire signal arm in the "up water supply immediately or turn off and the water supply is not connected, the water valve will change temperatures in most models at least 8 to stabilize. The ice maker also turns off the compressor and prevents the refrigerator from cooling, but does not disconnect the power to your refrigerator, you must be adjusted to a warmer setting. Turning the refrigerator control will change only the freezer temperature. Discard ice made during...

Complete Owner's Guide (English)
Page 10
... the defrost cycle. I Drain pan (not removable) You may introduce unfamiliar sounds. G Compressor Modern, high-efficiency compressors run much faster than in the vents on and off. Normal Operating Sounds and sights Understanding the Sounds you may Hear Your new, high-efficiency refrigerator may hear water dripping into the ice bin. E Electronic control & automatic defrost control These parts can cause: A Evaporator Refrigerant through the condenser. H Water valve Makes a buzzing sound each time it opens...
... the defrost cycle. I Drain pan (not removable) You may introduce unfamiliar sounds. G Compressor Modern, high-efficiency compressors run much faster than in the vents on and off. Normal Operating Sounds and sights Understanding the Sounds you may Hear Your new, high-efficiency refrigerator may hear water dripping into the ice bin. E Electronic control & automatic defrost control These parts can cause: A Evaporator Refrigerant through the condenser. H Water valve Makes a buzzing sound each time it opens...
Complete Owner's Guide (English)
Page 11
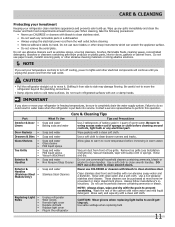
... sprays Allow glass to warm to cold metal surfaces. Rinse with a clean soft cloth. Always follow manufacturer's instructions. Wash the rest of warm water. Wipe up . Part Interior & Door • Liners • Door Gaskets • Drawers & Bins • Glass Shelves • • • Toe Grille • • • Exterior & • Handles • Exterior & • Handles (Stainless Steel • Models Only) Replacing Light • Bulbs • • • • • Care & Cleaning Tips What To Use Tips...
... sprays Allow glass to warm to cold metal surfaces. Rinse with a clean soft cloth. Always follow manufacturer's instructions. Wash the rest of warm water. Wipe up . Part Interior & Door • Liners • Door Gaskets • Drawers & Bins • Glass Shelves • • • Toe Grille • • • Exterior & • Handles • Exterior & • Handles (Stainless Steel • Models Only) Replacing Light • Bulbs • • • • • Care & Cleaning Tips What To Use Tips...
Complete Owner's Guide (English)
Page 12
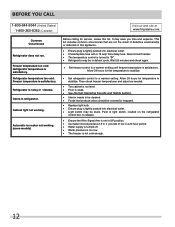
...; Interior needs to a warmer setting. Push in light switch, located on the refrigerator control box, to "O". • Refrigerator may save you time and expense. Refrigerator is turned to release. • Ensure the Wire Signal Arm is not in UP position. • Ice maker should be in refrigerator. Reset circuit breaker. • The temperature control is noisy or vibrates. Cabinet light not working . (some models) Before calling for service, review this appliance. • Ensure plug...
...; Interior needs to a warmer setting. Push in light switch, located on the refrigerator control box, to "O". • Refrigerator may save you time and expense. Refrigerator is turned to release. • Ensure the Wire Signal Arm is not in UP position. • Ice maker should be in refrigerator. Reset circuit breaker. • The temperature control is noisy or vibrates. Cabinet light not working . (some models) Before calling for service, review this appliance. • Ensure plug...
Complete Owner's Guide (English)
Page 13
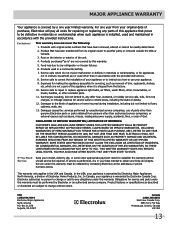
... TO YOU. If service is performed, it is " are not covered by this warranty. 5. Exclusions This warranty does not cover the following: 1. If you how to repair or replace appliance light bulbs, air filters, water filters, other consumables, or knobs, handles, or other than genuine Electrolux parts or parts obtained from its original owner to obtain and keep all costs for repairing or replacing any parts of this appliance that...
... TO YOU. If service is performed, it is " are not covered by this warranty. 5. Exclusions This warranty does not cover the following: 1. If you how to repair or replace appliance light bulbs, air filters, water filters, other consumables, or knobs, handles, or other than genuine Electrolux parts or parts obtained from its original owner to obtain and keep all costs for repairing or replacing any parts of this appliance that...
Wiring Diagram (All Languages)
Page 1
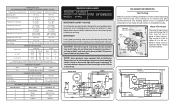
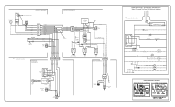
... Compressor Run Time Electronic Timer (ADC) Defrost Up To 24 Minutes Every 6 - 72 Hours of Compressor Run Time CONDENSER FAN MOTOR Watts RPM Amps 2.3 1100 CW Opposite Shaft .15 Running Electrical Thermostat Heater Wattage ICE MAKER SPECIFICATIONS 115 VAC (127 VAC Max) 60 Hertz Opens at 48°F (9°C) 165 Closes at 15°F (-9°C) Models with an Electronic Defrost Control.To initiate defrost, depress the fresh food light switch 5 times in 6 seconds (light bulb...
... Compressor Run Time Electronic Timer (ADC) Defrost Up To 24 Minutes Every 6 - 72 Hours of Compressor Run Time CONDENSER FAN MOTOR Watts RPM Amps 2.3 1100 CW Opposite Shaft .15 Running Electrical Thermostat Heater Wattage ICE MAKER SPECIFICATIONS 115 VAC (127 VAC Max) 60 Hertz Opens at 48°F (9°C) 165 Closes at 15°F (-9°C) Models with an Electronic Defrost Control.To initiate defrost, depress the fresh food light switch 5 times in 6 seconds (light bulb...
Wiring Diagram (All Languages)
Page 2
... RED/BLACK BROWN SUPPLY SOLENOID WATER VALVE WATER VALVE DOOR COMPARTMENT TAN RED/BLACK TAN GRN/YEL RED/BLACK TAN GRN/YEL INTERLOCK SWITCH RED/BLACK TAN DOOR WATER DISPENSER SWITCH Ladder Schematic - BLUE REFRIGERATOR LIGHT LT. BLUE BLACK BLACK GRN/YEL BLUE MACHINE COMPARTMENT LT. BLUE LT. BLUE LT. BLUE LT. BLUE BLACK GRN/YEL BROWN RED LT. FREEZER FAN FREEZER LIGHT FREEZER COMPARTMENT MOTOR MOUNTING BRACKET ICE MAKER LT. BLUE...
... RED/BLACK BROWN SUPPLY SOLENOID WATER VALVE WATER VALVE DOOR COMPARTMENT TAN RED/BLACK TAN GRN/YEL RED/BLACK TAN GRN/YEL INTERLOCK SWITCH RED/BLACK TAN DOOR WATER DISPENSER SWITCH Ladder Schematic - BLUE REFRIGERATOR LIGHT LT. BLUE BLACK BLACK GRN/YEL BLUE MACHINE COMPARTMENT LT. BLUE LT. BLUE LT. BLUE LT. BLUE BLACK GRN/YEL BROWN RED LT. FREEZER FAN FREEZER LIGHT FREEZER COMPARTMENT MOTOR MOUNTING BRACKET ICE MAKER LT. BLUE...

Installation Instructions (All Languages)
Page 1
... Freezer controls set Crisper Humidity controls set Registration Card sent in Refer to your Owner's Use and Care Manual for additional information about your refrigerator. 5 LEVELING AND ADJUSTING All four corners of your refrigerator must rest firmly on Refrigerator plugged in Ice Maker House water supply connected to help level your new refrigerator. Your refrigerator is equipped with adjustable front rollers or front leveling screws to refrigerator No water leaks present at all corners Electrical Power House power turned on a solid floor. Then level the refrigerator...
... Freezer controls set Crisper Humidity controls set Registration Card sent in Refer to your Owner's Use and Care Manual for additional information about your refrigerator. 5 LEVELING AND ADJUSTING All four corners of your refrigerator must rest firmly on Refrigerator plugged in Ice Maker House water supply connected to help level your new refrigerator. Your refrigerator is equipped with adjustable front rollers or front leveling screws to refrigerator No water leaks present at all corners Electrical Power House power turned on a solid floor. Then level the refrigerator...


