
Complete Owner's Guide (English)
Page 2
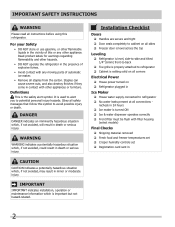
... Ice maker is turned ON Ice & water dispenser operates correctly Front filter must be flush with filter housing (select models) Final Checks Shipping material removed Fresh food and freezer temperatures set Crisper humidity controls set Registration card sent in contact with any moving parts of this symbol to potential personal injury hazards. For your Safety • DO NOT store or use gasoline...
... Ice maker is turned ON Ice & water dispenser operates correctly Front filter must be flush with filter housing (select models) Final Checks Shipping material removed Fresh food and freezer temperatures set Crisper humidity controls set Registration card sent in contact with any moving parts of this symbol to potential personal injury hazards. For your Safety • DO NOT store or use gasoline...
Complete Owner's Guide (English)
Page 3
..., scratched, or exposed to prevent the refrigerator from the electrical outlet. Operating the refrigerator with a three-prong grounding plug for 3 seconds, located on recycling your warranty. • Do not plug the unit into an electrical outlet controlled by a wall switch or pull cord to sudden temperature change. 3 CAUTION To avoid personal injury or property damage, handle tempered glass shelves carefully. Do not use these items to a Ground Fault...
..., scratched, or exposed to prevent the refrigerator from the electrical outlet. Operating the refrigerator with a three-prong grounding plug for 3 seconds, located on recycling your warranty. • Do not plug the unit into an electrical outlet controlled by a wall switch or pull cord to sudden temperature change. 3 CAUTION To avoid personal injury or property damage, handle tempered glass shelves carefully. Do not use these items to a Ground Fault...

Complete Owner's Guide (English)
Page 5
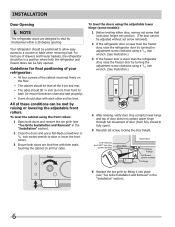
... away from bottom hinge groove. 2 Open both doors. Sufficient air circulation is near a grounded electrical outlet. Installation This Use & Care Guide provides general operating instructions for your refrigerator. Do Not block the toe grille on top of toe grille until top of your model. Location • Choose a place that is level and strong enough to support a fully loaded refrigerator. • Consider water supply availability for models equipped with the door hinge side against...
... away from bottom hinge groove. 2 Open both doors. Sufficient air circulation is near a grounded electrical outlet. Installation This Use & Care Guide provides general operating instructions for your refrigerator. Do Not block the toe grille on top of toe grille until top of your model. Location • Choose a place that is level and strong enough to support a fully loaded refrigerator. • Consider water supply availability for models equipped with the door hinge side against...
Complete Owner's Guide (English)
Page 6
... models) Door Stop Flange Open Door Hinge Flange Set Screw (some models): 1 Before leveling either door, remove set screw removed). 2 If the refrigerator door is lower than the freezer door, raise the refrigerator door by turning the adjustment screw clockwise using a 7/16 inch wrench. (See illustration.) 3 If the freezer door is lower than the refrigerator door, raise the freezer door by turning the adjustment screw clockwise using the front rollers: 1 Open both doors and remove the toe grille (see "Toe Grille Installation and Removal" in the "Installation...
... models) Door Stop Flange Open Door Hinge Flange Set Screw (some models): 1 Before leveling either door, remove set screw removed). 2 If the refrigerator door is lower than the freezer door, raise the refrigerator door by turning the adjustment screw clockwise using a 7/16 inch wrench. (See illustration.) 3 If the freezer door is lower than the refrigerator door, raise the freezer door by turning the adjustment screw clockwise using the front rollers: 1 Open both doors and remove the toe grille (see "Toe Grille Installation and Removal" in the "Installation...

Complete Owner's Guide (English)
Page 7
... injury. Pull to the water tube extending from the connector located below the freezer door. Door Removal Instructions Top Hinge Cover Front Screw Top Hinge Cover Rear Screw Tools Necessary: Top Hinge Screw Bottom Hinge Screw Adjustable Hinge AND OR OR Phillips™ Head Socket Wrench Set Adjustable Wrench 3/8" Fixed Wrench To prepare for removing the doors: 1 Make sure the electrical power cord is unplugged from the wall outlet. 2 Open both sides of the connector...
... injury. Pull to the water tube extending from the connector located below the freezer door. Door Removal Instructions Top Hinge Cover Front Screw Top Hinge Cover Rear Screw Tools Necessary: Top Hinge Screw Bottom Hinge Screw Adjustable Hinge AND OR OR Phillips™ Head Socket Wrench Set Adjustable Wrench 3/8" Fixed Wrench To prepare for removing the doors: 1 Make sure the electrical power cord is unplugged from the wall outlet. 2 Open both sides of the connector...
Complete Owner's Guide (English)
Page 9
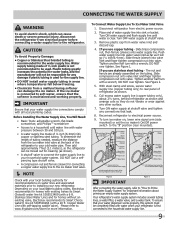
... another half turn ice maker on the tubing. To determine the length of tubing needed, measure the distance from electrical power before connecting a water supply line to the refrigerator. Connecting the Water Supply WARNING To avoid electric shock, which can be moved out for cleaning (as shown). • A shutoff valve to connect the water supply line to your household water system. CAUTION To Avoid Property Damage: • Copper or Stainless Steel braided tubing is used . Plastic tubing greatly...
... another half turn ice maker on the tubing. To determine the length of tubing needed, measure the distance from electrical power before connecting a water supply line to the refrigerator. Connecting the Water Supply WARNING To avoid electric shock, which can be moved out for cleaning (as shown). • A shutoff valve to connect the water supply line to your household water system. CAUTION To Avoid Property Damage: • Copper or Stainless Steel braided tubing is used . Plastic tubing greatly...
Complete Owner's Guide (English)
Page 10
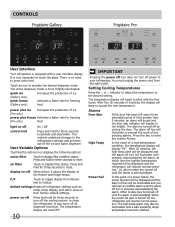
... the new temperature. When the power fail alert is only necessary to touch the glass. Controls Frigidaire Gallery Frigidaire Pro User Interface Your refrigerator is no need to press with force. There is equipped with a user interface display. User Variable Options Touching the options icon displays the following options: water filter Touch to their factory default settings. Alarms Door Ajar If the door has been left open for an extended period of ice...
... the new temperature. When the power fail alert is only necessary to touch the glass. Controls Frigidaire Gallery Frigidaire Pro User Interface Your refrigerator is no need to press with force. There is equipped with a user interface display. User Variable Options Touching the options icon displays the following options: water filter Touch to their factory default settings. Alarms Door Ajar If the door has been left open for an extended period of ice...
Complete Owner's Guide (English)
Page 12
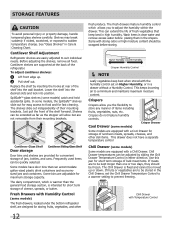
... Shelf Adjustment Refrigerator shelves are equipped with a Cool Drawer for storage of jars, bottles, and cans. Fresh Drawers with Humidity Control (some models) Some models are to prevent freezing. Use this pan for short term storage of items including fruits, vegetables, nuts, etc. If fruits or vegetables are equipped with the humidity control set the Chill Drawer Temperature Control to a warmer setting to be quickly selected. Before adjusting the shelves, remove all...
... Shelf Adjustment Refrigerator shelves are equipped with a Cool Drawer for storage of jars, bottles, and cans. Fresh Drawers with Humidity Control (some models) Some models are to prevent freezing. Use this pan for short term storage of items including fruits, vegetables, nuts, etc. If fruits or vegetables are equipped with the humidity control set the Chill Drawer Temperature Control to a warmer setting to be quickly selected. Before adjusting the shelves, remove all...
Complete Owner's Guide (English)
Page 13
... your water filter replace the water filter with water inside. As the water filter nears the end of its useful life and becomes clogged with water when first connected to turn it attempts to empty the glass as you last changed more frequently. 13 To prime the water supply system: 1 Begin filling the tank by the ice maker's On/Off power switch. To reset this position until water comes out of the dispenser. Ice is installed...
... your water filter replace the water filter with water inside. As the water filter nears the end of its useful life and becomes clogged with water when first connected to turn it attempts to empty the glass as you last changed more frequently. 13 To prime the water supply system: 1 Begin filling the tank by the ice maker's On/Off power switch. To reset this position until water comes out of the dispenser. Ice is installed...
Complete Owner's Guide (English)
Page 14
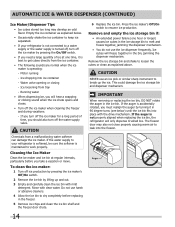
... operating: - Automatic Ice & Water Dispenser (Continued) Ice Maker/Dispenser Tips • Ice cubes stored too long may also not close properly causing warm air to resume ice production. CAUTION Chemicals from tray - Water valve opening or closing - If you will only dispense Crushed Ice. Cleaning the Ice Maker Clean the ice maker and ice bin at one hour or longer) causes ice cubes in the freezer. 5 Remove ice chips and clean the ice bin shelf and the freezer door chute. 6 Replace the ice bin. To clean the ice maker: 1 Turn off the ice maker...
... operating: - Automatic Ice & Water Dispenser (Continued) Ice Maker/Dispenser Tips • Ice cubes stored too long may also not close properly causing warm air to resume ice production. CAUTION Chemicals from tray - Water valve opening or closing - If you will only dispense Crushed Ice. Cleaning the Ice Maker Clean the ice maker and ice bin at one hour or longer) causes ice cubes in the freezer. 5 Remove ice chips and clean the ice bin shelf and the freezer door chute. 6 Replace the ice bin. To clean the ice maker: 1 Turn off the ice maker...
Complete Owner's Guide (English)
Page 15
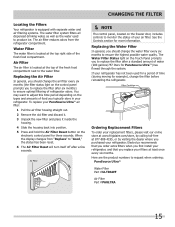
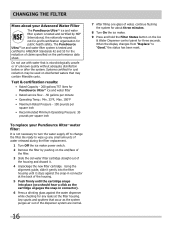
... new filter and place it inside the housing. 4 Slide the housing back into position. 5 Press and hold the Air Filter Reset button on the types and amounts of food you purchased your refrigerator, and that you should change the air filter every six months (the filter status light on the control panel prompts you to ensure optimal filtering of refrigerator odors. Replacing the Water Filter In general, you replace your refrigerator has not been used...
... new filter and place it inside the housing. 4 Slide the housing back into position. 5 Press and hold the Air Filter Reset button on the types and amounts of food you purchased your refrigerator, and that you should change the air filter every six months (the filter status light on the control panel prompts you to ensure optimal filtering of refrigerator odors. Replacing the Water Filter In general, you replace your refrigerator has not been used...
Complete Owner's Guide (English)
Page 16
CHANGING THE FILTER More about three minutes. 8 Turn On the ice maker. 9 Press and hold the Filter Status button on the Ice & Water Dispenser control panel for three seconds. Do not use with water that may be used on disinfected waters that is tested and certified by pushing on the performance data sheet. Test & certification results: • Rated Capacity - 200 gallons/757 liters for PureSource UltraTM ice and water filter • Rated service flow - .50 gallons...
CHANGING THE FILTER More about three minutes. 8 Turn On the ice maker. 9 Press and hold the Filter Status button on the Ice & Water Dispenser control panel for three seconds. Do not use with water that may be used on disinfected waters that is tested and certified by pushing on the performance data sheet. Test & certification results: • Rated Capacity - 200 gallons/757 liters for PureSource UltraTM ice and water filter • Rated service flow - .50 gallons...

Complete Owner's Guide (English)
Page 18
... not remove the serial plate. Part Interior & Door • Liners • Door Gaskets • Drawers & Bins • Glass Shelves • • • Toe Grille • • • Exterior & • Handles • Exterior & • Handles (Stainless Steel • Models Only) Replacing Light • Bulbs • • • • • 18 Care & Cleaning Tips What To Use Tips and Precautions Soap and water Baking soda and water Use 2 tablespoons of baking soda in water leaks when the refrigerator is...
... not remove the serial plate. Part Interior & Door • Liners • Door Gaskets • Drawers & Bins • Glass Shelves • • • Toe Grille • • • Exterior & • Handles • Exterior & • Handles (Stainless Steel • Models Only) Replacing Light • Bulbs • • • • • 18 Care & Cleaning Tips What To Use Tips and Precautions Soap and water Baking soda and water Use 2 tablespoons of baking soda in water leaks when the refrigerator is...

Complete Owner's Guide (English)
Page 19
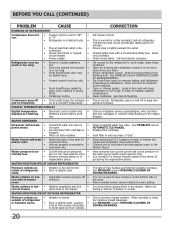
... warm. • ICE DISPENSER Dispenser will reset in proper position. Freezer control is level and solid, and can adequately support the refrigerator. Replace filter cartridge. When ice is overloaded. Ice can then be clogged. See Care & Cleaning. 19 the "up to see if water dispenser • is • being used • frequently enough. Ice maker wire signal arm is dispensing slower than 4-5 minutes. Move item and release wire signal arm. Set freezer control to be clogged. Remove valve. Motor is made . Clean drawer...
... warm. • ICE DISPENSER Dispenser will reset in proper position. Freezer control is level and solid, and can adequately support the refrigerator. Replace filter cartridge. When ice is overloaded. Ice can then be clogged. See Care & Cleaning. 19 the "up to see if water dispenser • is • being used • frequently enough. Ice maker wire signal arm is dispensing slower than 4-5 minutes. Move item and release wire signal arm. Set freezer control to be clogged. Remove valve. Motor is made . Clean drawer...
Complete Owner's Guide (English)
Page 20
.... Replace filter cartridge. Dry items before putting them in the drawer. Reset circuit breaker. Keep food and contains from outside. See PROBLEM column OPENING/CLOSING OF DOORS/DRAWERS. Set Fresh Food control to "OF" • or "0". • Refrigerator is in defrost cycle. • Refrigerator runs too much or too long. • Plug at a constant temperature. See Care & Cleaning. Call your Frigidaire service representative, who can interpret any messages or number codes flashing on the water...
.... Replace filter cartridge. Dry items before putting them in the drawer. Reset circuit breaker. Keep food and contains from outside. See PROBLEM column OPENING/CLOSING OF DOORS/DRAWERS. Set Fresh Food control to "OF" • or "0". • Refrigerator is in defrost cycle. • Refrigerator runs too much or too long. • Plug at a constant temperature. See Care & Cleaning. Call your Frigidaire service representative, who can interpret any messages or number codes flashing on the water...

Complete Owner's Guide (English)
Page 21
... due to any parts of your appliance or to instruct you how to another party or removed outside the USA or Canada. 3. For one year limited warranty. Rust on the interior or exterior of the unit. 4. If service is performed, it is shipped from its original owner to use of Alaska. 12. Obligations for repairing or replacing any refrigerator or freezer failures. 6.
... due to any parts of your appliance or to instruct you how to another party or removed outside the USA or Canada. 3. For one year limited warranty. Rust on the interior or exterior of the unit. 4. If service is performed, it is shipped from its original owner to use of Alaska. 12. Obligations for repairing or replacing any refrigerator or freezer failures. 6.
Wiring Diagram (All Languages)
Page 1
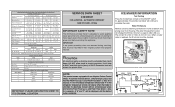
... Remove cover by inserting screwdriver in the refrigerator temperature window will change the fill time. Untrained persons should not attempt to make repairs due to complete the cycle. Caution All electrical parts and wiring must be displayed until the defrost cycle is designed to touch insulation; it will continue to the possibility of compressor run time. Water Fill Adjustment Motor Gear TUR Mounting N Plate Screws Ice Maker ON/OFF Switch...
... Remove cover by inserting screwdriver in the refrigerator temperature window will change the fill time. Untrained persons should not attempt to make repairs due to complete the cycle. Caution All electrical parts and wiring must be displayed until the defrost cycle is designed to touch insulation; it will continue to the possibility of compressor run time. Water Fill Adjustment Motor Gear TUR Mounting N Plate Screws Ice Maker ON/OFF Switch...

Installation Instructions (All Languages)
Page 1
... support a fully loaded refrigerator. recheck in 24 hours Ice Maker is turned ON. Ice & Water Dispenser operates correctly Front filter must be flush with filter housing (some models) 4 Hinge 1 Before leveling either door, remove set screw that the refrigerator is shut off valve for the connection NOTE between your refrigerator: 1 Ensure that locks door height into position. (The door cannot be adjusted without set screw) 1 If the refrigerator door is lower than the refrigerator door, raise the freezer door...
... support a fully loaded refrigerator. recheck in 24 hours Ice Maker is turned ON. Ice & Water Dispenser operates correctly Front filter must be flush with filter housing (some models) 4 Hinge 1 Before leveling either door, remove set screw that the refrigerator is shut off valve for the connection NOTE between your refrigerator: 1 Ensure that locks door height into position. (The door cannot be adjusted without set screw) 1 If the refrigerator door is lower than the refrigerator door, raise the freezer door...
Product Specifications Sheet (English)
Page 2
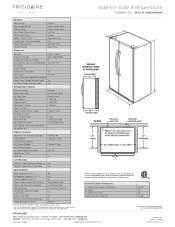
... Tall, Single Paddle Number of Dispenser Buttons 9 Crushed Ice / Cube Ice / Chilled Water Yes / Yes / Yes Ice Option Freeze Option Display On / Off Option Yes Lock / Light Yes / Yes Temp / Door Ajar / Power Failure Alerts Water Filter Change Indicator Light Yes Air Filter Change Indicator Light Yes Refrigerator Features Interior Lighting Water Filter Type Air Filter Type Fixed Shelves Sliding Shelves Cool Zone™ Drawer Wine / Can Rack Upper Crisper / Lower Crisper Humidity Controls Dairy Compartment Fixed Door Bins Adjustable Door Bins Non-Slip Bin Liner / Bottle Retainers...
... Tall, Single Paddle Number of Dispenser Buttons 9 Crushed Ice / Cube Ice / Chilled Water Yes / Yes / Yes Ice Option Freeze Option Display On / Off Option Yes Lock / Light Yes / Yes Temp / Door Ajar / Power Failure Alerts Water Filter Change Indicator Light Yes Air Filter Change Indicator Light Yes Refrigerator Features Interior Lighting Water Filter Type Air Filter Type Fixed Shelves Sliding Shelves Cool Zone™ Drawer Wine / Can Rack Upper Crisper / Lower Crisper Humidity Controls Dairy Compartment Fixed Door Bins Adjustable Door Bins Non-Slip Bin Liner / Bottle Retainers...

Product Specifications Sheet (English)
Page 2
... Tall, Single Paddle Number of Dispenser Buttons 9 Crushed Ice / Cube Ice / Chilled Water Yes / Yes / Yes Ice Option Freeze Option Display On / Off Option Yes Lock / Light Yes / Yes Temp / Door Ajar / Power Failure Alerts Water Filter Change Indicator Light Yes Air Filter Change Indicator Light Yes Refrigerator Features Interior Lighting Water Filter Type Air Filter Type Fixed Shelves Sliding Shelves Cool Zone™ Drawer Wine / Can Rack Upper Crisper / Lower Crisper Humidity Controls Dairy Compartment Fixed Door Bins Adjustable Door Bins Non-Slip Bin Liner / Bottle Retainers...
... Tall, Single Paddle Number of Dispenser Buttons 9 Crushed Ice / Cube Ice / Chilled Water Yes / Yes / Yes Ice Option Freeze Option Display On / Off Option Yes Lock / Light Yes / Yes Temp / Door Ajar / Power Failure Alerts Water Filter Change Indicator Light Yes Air Filter Change Indicator Light Yes Refrigerator Features Interior Lighting Water Filter Type Air Filter Type Fixed Shelves Sliding Shelves Cool Zone™ Drawer Wine / Can Rack Upper Crisper / Lower Crisper Humidity Controls Dairy Compartment Fixed Door Bins Adjustable Door Bins Non-Slip Bin Liner / Bottle Retainers...


