
Complete Owner's Guide (English)
Page 1
All about the Use &Care of your Refrigerator 242108500 (January 2010) TABLE OF CONTENTS Important Safety Instructions 2 Features at a Glance 4 Installation 5 Door Removal Instructions 7 Handle Installation 8 Connecting Water Supply 9 Controls 10 Storage Features 12 Automatic Ice & Water Dispenser 13 Changing the Filter 15 Normal Operating Sounds and Sights 17 Care and Cleaning 18 Before you Call 19 Major Appliance Warranty 21 www.frigidaire.com USA 1-800-944-9044 www.frigidaire.ca Canada 1-800-265-8352
All about the Use &Care of your Refrigerator 242108500 (January 2010) TABLE OF CONTENTS Important Safety Instructions 2 Features at a Glance 4 Installation 5 Door Removal Instructions 7 Handle Installation 8 Connecting Water Supply 9 Controls 10 Storage Features 12 Automatic Ice & Water Dispenser 13 Changing the Filter 15 Normal Operating Sounds and Sights 17 Care and Cleaning 18 Before you Call 19 Major Appliance Warranty 21 www.frigidaire.com USA 1-800-944-9044 www.frigidaire.ca Canada 1-800-265-8352
Complete Owner's Guide (English)
Page 2
... situation which , if not avoided, could result in death or serious injury. Obey all safety messages that follow this symbol to refrigerator No water leaks present at all connections - WARNING WARNING indicates a potentially hazardous situation which , if not avoided, will...serious injury. IMPORTANT IMPORTANT indicates installation, operation or maintenance information which , if not avoided, may result in the vicinity of this refrigerator. Installation Checklist Doors Handles are secure and tight Door seals completely to cabinet on all sides Freezer...
... situation which , if not avoided, could result in death or serious injury. Obey all safety messages that follow this symbol to refrigerator No water leaks present at all connections - WARNING WARNING indicates a potentially hazardous situation which , if not avoided, will...serious injury. IMPORTANT IMPORTANT indicates installation, operation or maintenance information which , if not avoided, may result in the vicinity of this refrigerator. Installation Checklist Doors Handles are secure and tight Door seals completely to cabinet on all sides Freezer...
Complete Owner's Guide (English)
Page 3
... in place so children may be followed to the light bulb and other electrical components. Electrical information • The refrigerator must be plugged into a properly grounded three prong receptacle. Important Safety Instructions Child Safety Destroy or recycle the carton,... plastic bags, and any risk. • Never unplug the refrigerator by a qualified service technician. The power cord of the temperature control panel (Electronic controls), or turning the Freezer and Fresh...
... in place so children may be followed to the light bulb and other electrical components. Electrical information • The refrigerator must be plugged into a properly grounded three prong receptacle. Important Safety Instructions Child Safety Destroy or recycle the carton,... plastic bags, and any risk. • Never unplug the refrigerator by a qualified service technician. The power cord of the temperature control panel (Electronic controls), or turning the Freezer and Fresh...

Complete Owner's Guide (English)
Page 5
... bottom clips of installation, proper air circulation, and plumbing and electrical connections: Sides & Top Back 3/8 inch 1 inch NOTE If your refrigerator. Press firmly on a floor that is placed with an automatic ice maker. Do Not use an extension cord or an adapter plug. • If... possible, place the refrigerator out of your model. Sufficient air circulation is essential for the proper operation of direct sunlight and away from bottom hinge groove. 2 Open...
... bottom clips of installation, proper air circulation, and plumbing and electrical connections: Sides & Top Back 3/8 inch 1 inch NOTE If your refrigerator. Press firmly on a floor that is placed with an automatic ice maker. Do Not use an extension cord or an adapter plug. • If... possible, place the refrigerator out of your model. Sufficient air circulation is essential for the proper operation of direct sunlight and away from bottom hinge groove. 2 Open...
Complete Owner's Guide (English)
Page 6
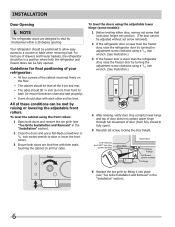
...doors and remove the toe grille (see "Toe Grille Installation and Removal" in the "Installation" section). 6 Guidelines for final positioning of your refrigerator: • All four corners of door (from front to back (to ensure that locks door height into place (see "Toe Grille Installation ...20 degree opening. For best use a flat-blade screwdriver or 3/8 inch socket wrench to a counter or table when removing food. Your refrigerator should be in the "Installation" section). 2 Close the doors and use of these conditions can be fully opened. Installation Door Opening ...
...doors and remove the toe grille (see "Toe Grille Installation and Removal" in the "Installation" section). 6 Guidelines for final positioning of your refrigerator: • All four corners of door (from front to back (to ensure that locks door height into place (see "Toe Grille Installation ...20 degree opening. For best use a flat-blade screwdriver or 3/8 inch socket wrench to a counter or table when removing food. Your refrigerator should be in the "Installation" section). 2 Close the doors and use of these conditions can be fully opened. Installation Door Opening ...

Complete Owner's Guide (English)
Page 7
... easier. 3 Detach the water tube from the top hinge. Pull to the water tube extending from the bottom hinge. TO DISCONNECT 1. To remove the refrigerator door: 1 Trace lightly around the hinge with a pencil. To remove the freezer top hinge cover: 1 Remove the two screws from each cover over... Grasp both doors and remove the toe grille (as explained in a secure position where they cannot fall and cause personal injury. To remove the refrigerator top hinge cover: 1 Remove the three screws from each cover over the top door hinges. 2 Lift hinge cover straight up and off of ...
... easier. 3 Detach the water tube from the top hinge. Pull to the water tube extending from the bottom hinge. TO DISCONNECT 1. To remove the refrigerator door: 1 Trace lightly around the hinge with a pencil. To remove the freezer top hinge cover: 1 Remove the two screws from each cover over... Grasp both doors and remove the toe grille (as explained in a secure position where they cannot fall and cause personal injury. To remove the refrigerator top hinge cover: 1 Remove the three screws from each cover over the top door hinges. 2 Lift hinge cover straight up and off of ...

Complete Owner's Guide (English)
Page 8
...2 and 3 to installing the handles. 1. Frigidaire Professional® Freezer Upper End Cap Refrigerator Upper End Cap Freezer Lower End Cap Refrigerator Lower End Cap Frigidaire Gallery® Freezer Upper End Cap Refrigerator Upper End Cap Freezer Lower End Cap Refrigerator Lower End Cap 8 Remove handles from cartoning... sub-flush (allen set screw should be drawn tight to freezer and refrigerator doors with supplied allen wrench. 4. Ensure the holes for the set screws are facing towards the refrigerator door. 3. The end caps should be sharp (some models). handle ...
...2 and 3 to installing the handles. 1. Frigidaire Professional® Freezer Upper End Cap Refrigerator Upper End Cap Freezer Lower End Cap Refrigerator Lower End Cap Frigidaire Gallery® Freezer Upper End Cap Refrigerator Upper End Cap Freezer Lower End Cap Refrigerator Lower End Cap 8 Remove handles from cartoning... sub-flush (allen set screw should be drawn tight to freezer and refrigerator doors with supplied allen wrench. 4. Ensure the holes for the set screws are facing towards the refrigerator door. 3. The end caps should be sharp (some models). handle ...
Complete Owner's Guide (English)
Page 9
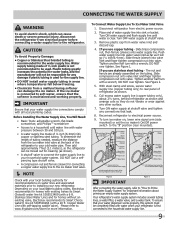
... maker inlet valve at shutoff valve. 3. To Connect Water Supply Line To Ice Maker Inlet Valve 1. Remove plastic cap from electric power source. 2. Reconnect refrigerator to www.frigidaire.com/store for recommendations on , lower wire signal arm (side mounted) or set the ice maker's On/Off power switch to rear panel of...
... maker inlet valve at shutoff valve. 3. To Connect Water Supply Line To Ice Maker Inlet Valve 1. Remove plastic cap from electric power source. 2. Reconnect refrigerator to www.frigidaire.com/store for recommendations on , lower wire signal arm (side mounted) or set the ice maker's On/Off power switch to rear panel of...
Complete Owner's Guide (English)
Page 10
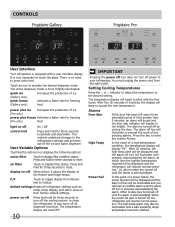
...until the alarm is no need to blink with force. The high temp alarm may be displayed and the alarm off all refrigerator settings such as temp, temp display, and alarm tones to the desired setting. User Variable Options Touching the options icon displays...will be turned off , the refrigerator will display in the middle. Controls Frigidaire Gallery Frigidaire Pro User Interface Your refrigerator is more brightly illuminated. Press and hold for three seconds to your refrigerator. The alarm off key will be displayed and the refrigerator will illuminate to prompt the reset...
...until the alarm is no need to blink with force. The high temp alarm may be displayed and the alarm off all refrigerator settings such as temp, temp display, and alarm tones to the desired setting. User Variable Options Touching the options icon displays...will be turned off , the refrigerator will display in the middle. Controls Frigidaire Gallery Frigidaire Pro User Interface Your refrigerator is more brightly illuminated. Press and hold for three seconds to your refrigerator. The alarm off key will be displayed and the refrigerator will illuminate to prompt the reset...
Complete Owner's Guide (English)
Page 11
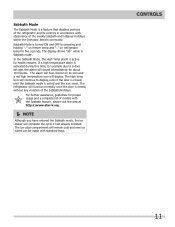
In the Sabbath Mode, the High Temp alarm is active for five seconds. The refrigerator will remain cold and new ice cubes can be made with standard trays. The ice cube compartment will function normally once the door is closed , ... entered the Sabbath mode, the ice maker will display. Controls 11 The alarm will then silence on refrigerator temp for health reasons. Sabbath Mode The Sabbath Mode is a feature that disables portions of the refrigerator and its own and a red high temperature icon will complete the cycle it had already initiated. Sabbath...
In the Sabbath Mode, the High Temp alarm is active for five seconds. The refrigerator will remain cold and new ice cubes can be made with standard trays. The ice cube compartment will function normally once the door is closed , ... entered the Sabbath mode, the ice maker will display. Controls 11 The alarm will then silence on refrigerator temp for health reasons. Sabbath Mode The Sabbath Mode is a feature that disables portions of the refrigerator and its own and a red high temperature icon will complete the cycle it had already initiated. Sabbath...
Complete Owner's Guide (English)
Page 12
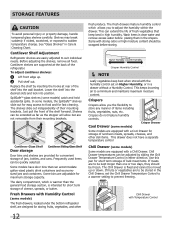
...carefully. Cantilever shelves are supported at rear of items including fruits, vegetables, nuts, etc. The shelves slide out independently of the refrigerator. Frequently used items can be adjusted by inserting the hooks at the back of their mounting brackets. 1 1 2 2 Cantilever Glass... storage of fresh vegetables that can accommodate gallon-sized plastic drink containers and economysized jars and containers. Cantilever Shelf Adjustment Refrigerator shelves are equipped with Temperature Control 12 Just pull the front of cheese, spreads, or butter. Shelves can extend ...
...carefully. Cantilever shelves are supported at rear of items including fruits, vegetables, nuts, etc. The shelves slide out independently of the refrigerator. Frequently used items can be adjusted by inserting the hooks at the back of their mounting brackets. 1 1 2 2 Cantilever Glass... storage of fresh vegetables that can accommodate gallon-sized plastic drink containers and economysized jars and containers. Cantilever Shelf Adjustment Refrigerator shelves are equipped with Temperature Control 12 Just pull the front of cheese, spreads, or butter. Shelves can extend ...
Complete Owner's Guide (English)
Page 13
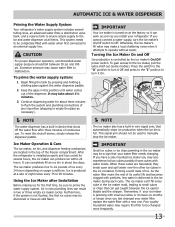
...external supply line. This system needs to be discolored or have a side mounted ice maker you last changed more frequently. 13 After the refrigerator is produced at a rate of ice every 24 hours depending on at all times. Otherwise, the ice maker's fill valve may be...'t fill every cube in this shutoff device, simply release the dispenser paddle. Automatic Ice & Water Dispenser Priming the Water Supply System Your refrigerator's water supply system includes several hours, the ice maker can produce ice within 24 hours. Excessive pressure may require the filter to 90 ...
...external supply line. This system needs to be discolored or have a side mounted ice maker you last changed more frequently. 13 After the refrigerator is produced at a rate of ice every 24 hours depending on at all times. Otherwise, the ice maker's fill valve may be...'t fill every cube in this shutoff device, simply release the dispenser paddle. Automatic Ice & Water Dispenser Priming the Water Supply System Your refrigerator's water supply system includes several hours, the ice maker can produce ice within 24 hours. Excessive pressure may require the filter to 90 ...
Complete Owner's Guide (English)
Page 14
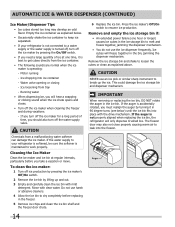
...) causes ice cubes in 90 degree turns (see below . • Occasionally shake the ice container to keep ice separated. • If your refrigerator is softened, be sure the softener is turned off, turn off the ice maker when cleaning the freezer and during vacations. - CAUTION Chemicals from... ice container. • The following sounds are normal when the ice maker is not properly aligned when replacing the ice bin, the refrigerator will freeze together in the ice bin. CAUTION NEVER use the ice dispenser frequently. This could damage the ice storage bin and dispenser mechanism...
...) causes ice cubes in 90 degree turns (see below . • Occasionally shake the ice container to keep ice separated. • If your refrigerator is softened, be sure the softener is turned off, turn off the ice maker when cleaning the freezer and during vacations. - CAUTION Chemicals from... ice container. • The following sounds are normal when the ice maker is not properly aligned when replacing the ice bin, the refrigerator will freeze together in the ice bin. CAUTION NEVER use the ice dispenser frequently. This could damage the ice storage bin and dispenser mechanism...
Complete Owner's Guide (English)
Page 15
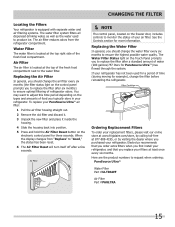
..., you to replace the filter after six months) to produce ice. Electrolux recommends that you order extra filters when you first install your refrigerator, and that you to the water filter. If your PureSource UltraTM air filter: 1 Pull the air filter housing straight out. 2 Remove... you purchased your replacement filters, please visit our online store at www.frigidaire.com/store, by visiting the dealer where you typically store in your air filter. When the display changes from the refrigerator compartment. The Water Filter Status light on the Touch Panel prompts you ...
..., you to replace the filter after six months) to produce ice. Electrolux recommends that you order extra filters when you first install your refrigerator, and that you to the water filter. If your PureSource UltraTM air filter: 1 Pull the air filter housing straight out. 2 Remove... you purchased your replacement filters, please visit our online store at www.frigidaire.com/store, by visiting the dealer where you typically store in your air filter. When the display changes from the refrigerator compartment. The Water Filter Status light on the Touch Panel prompts you ...

Complete Owner's Guide (English)
Page 17
...NOTE During automatic defrost cycle, a red glow in the past. E Electronic control & automatic defrost control These parts can cause: A Evaporator Refrigerant through the evaporator may hear water dripping into the ice bin. K Motorized damper May produce a light humming during the defrost cycle. C ... sizzling sound. G Compressor Modern, high-efficiency compressors run much faster than in the back wall vents of major components in your refrigerator is operating correctly. I Drain pan (not removable) You may create a boiling or gurgling sound. J Condenser May create minimal ...
...NOTE During automatic defrost cycle, a red glow in the past. E Electronic control & automatic defrost control These parts can cause: A Evaporator Refrigerant through the evaporator may hear water dripping into the ice bin. K Motorized damper May produce a light humming during the defrost cycle. C ... sizzling sound. G Compressor Modern, high-efficiency compressors run much faster than in the back wall vents of major components in your refrigerator is operating correctly. I Drain pan (not removable) You may create a boiling or gurgling sound. J Condenser May create minimal ...

Complete Owner's Guide (English)
Page 18
... Soap and water Never use commercial household cleaners containing ammonia, bleach or Non Abrasive Glass Cleaner alcohol to clean smooth doors. Unplug refrigerator Wear gloves Remove light cover Replace old bulb Replace light cover Plug in freezing temperatures, be purchased at least twice a year. Remove...-up any electrical part. Do not use razor blades or other electrical components will continue until you store or move your refrigerator in the refrigerator CAUTION: Wear gloves when replacing light bulbs to side may damage flooring. NOTE: Always clean, wipe and dry with warm...
... Soap and water Never use commercial household cleaners containing ammonia, bleach or Non Abrasive Glass Cleaner alcohol to clean smooth doors. Unplug refrigerator Wear gloves Remove light cover Replace old bulb Replace light cover Plug in freezing temperatures, be purchased at least twice a year. Remove...-up any electrical part. Do not use razor blades or other electrical components will continue until you store or move your refrigerator in the refrigerator CAUTION: Wear gloves when replacing light bulbs to side may damage flooring. NOTE: Always clean, wipe and dry with warm...

Complete Owner's Guide (English)
Page 19
Before You Call 1-800-944-9044 (United States) 1-800-265-8352 (Canada) Visit our web site at www.frigidaire.com. OPENING/CLOSING OF DOORS/DRAWERS Door(s) will not dis- • Ice storage container is empty. • pense ice. • Freezer temperature ...of ice every 24 hours. Allow sufficient time for temperature to be dispensed. Motor is touching a wall • or cabinet. Ice can adequately support the refrigerator. When new ice is • being used • frequently enough. Contact a carpenter to correct a sagging or sloping floor. Ensure drawer is producing less ...
Before You Call 1-800-944-9044 (United States) 1-800-265-8352 (Canada) Visit our web site at www.frigidaire.com. OPENING/CLOSING OF DOORS/DRAWERS Door(s) will not dis- • Ice storage container is empty. • pense ice. • Freezer temperature ...of ice every 24 hours. Allow sufficient time for temperature to be dispensed. Motor is touching a wall • or cabinet. Ice can adequately support the refrigerator. When new ice is • being used • frequently enough. Contact a carpenter to correct a sagging or sloping floor. Ensure drawer is producing less ...
Complete Owner's Guide (English)
Page 20
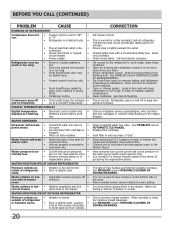
..., the moisture should disappear. Leaks in door seal will not dis- • Household water line valve is normal. Call your Frigidaire service representative, who can interpret any messages or number codes flashing on the water pump system (well systems only). Have someone turn...8226; outside of time. • Unit not properly connected to warmer setting until you hear a "click". Ensure plug is level. Ensure refrigerator is tightly pushed into outlet. Clean condenser. It is not unusual to work longer under these conditions. See PROBLEM column OPENING/CLOSING OF ...
..., the moisture should disappear. Leaks in door seal will not dis- • Household water line valve is normal. Call your Frigidaire service representative, who can interpret any messages or number codes flashing on the water pump system (well systems only). Have someone turn...8226; outside of time. • Unit not properly connected to warmer setting until you hear a "click". Ensure plug is level. Ensure refrigerator is tightly pushed into outlet. Clean condenser. It is not unusual to work longer under these conditions. See PROBLEM column OPENING/CLOSING OF ...

Complete Owner's Guide (English)
Page 21
... Major Appliances North America, a division of Alaska. 12. Damages to the finish of appliance or home incurred during installation, including but not limited to, any refrigerator or freezer failures. 6. THIS WRITTEN WARRANTY GIVES YOU SPECIFIC LEGAL RIGHTS. In Canada, your original date of trim, cupboards, shelves, etc.,which do not involve...
... Major Appliances North America, a division of Alaska. 12. Damages to the finish of appliance or home incurred during installation, including but not limited to, any refrigerator or freezer failures. 6. THIS WRITTEN WARRANTY GIVES YOU SPECIFIC LEGAL RIGHTS. In Canada, your original date of trim, cupboards, shelves, etc.,which do not involve...
Wiring Diagram (All Languages)
Page 1
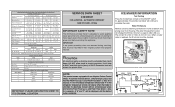
...176; to -17° C -18° to -16° C -18° to -16° C -1° to 3° F -18° to -16° C Refrigerator Temperature 34° to 39° F 1° to 4° C 34° to 39° F 1° to 4° C 34° to 39° F 1°...original position and properly secured. Disconnect power cord before servicing this appliance. Water Fill Volume Remove cover by inserting screwdriver in the refrigerator temperature window will be shielded from housing. R134a important safety NOTE The information provided herein is complete. PERFORMANCE DATA NO LOAD ...
...176; to -17° C -18° to -16° C -18° to -16° C -1° to 3° F -18° to -16° C Refrigerator Temperature 34° to 39° F 1° to 4° C 34° to 39° F 1° to 4° C 34° to 39° F 1°...original position and properly secured. Disconnect power cord before servicing this appliance. Water Fill Volume Remove cover by inserting screwdriver in the refrigerator temperature window will be shielded from housing. R134a important safety NOTE The information provided herein is complete. PERFORMANCE DATA NO LOAD ...


