
Complete Owner's Guide (English)
Page 1
...) Safety Instructions 2 Features 3 Operating Instructions 4 Preparing and Loading Dishes 5-6 Dishwasher Dispenser and Detergents 7-8 Factors Affecting Performance 8 Care and Cleaning 9-10 Connecting Portable Dishwasher 11 Record All Information For Future Reference Brand: Purchase Date: Model #: Serial #: (see Features page for location) Questions? 1-800-944-9044 (United States) 1-866-213-9397 (Canada) Visit our Web Site at www.frigidaire.com Solutions to Common Dishwashing Problems...12-13 Troubleshooting 13 Consumer Services Warranty & Service 14...
...) Safety Instructions 2 Features 3 Operating Instructions 4 Preparing and Loading Dishes 5-6 Dishwasher Dispenser and Detergents 7-8 Factors Affecting Performance 8 Care and Cleaning 9-10 Connecting Portable Dishwasher 11 Record All Information For Future Reference Brand: Purchase Date: Model #: Serial #: (see Features page for location) Questions? 1-800-944-9044 (United States) 1-866-213-9397 (Canada) Visit our Web Site at www.frigidaire.com Solutions to Common Dishwashing Problems...12-13 Troubleshooting 13 Consumer Services Warranty & Service 14...
Complete Owner's Guide (English)
Page 2
... following: • Read all hot water faucets and let water flow from each for details. • This dishwasher is connected with controls. • Do not touch the heating element during this or any other appliance. If hot water system has not been used for use in their proper place. • Remove the door to the washing compartment when removing an old dishwasher from service or discarding it. •...
... following: • Read all hot water faucets and let water flow from each for details. • This dishwasher is connected with controls. • Do not touch the heating element during this or any other appliance. If hot water system has not been used for use in their proper place. • Remove the door to the washing compartment when removing an old dishwasher from service or discarding it. •...

Complete Owner's Guide (English)
Page 4
....* 112 min. 2 washes 4 rinses 2 washes 3 rinses Rinse/ For rinsing dishes that will be warmed. • Turn dial to latch. Run hot water faucet nearest dishwasher until water is hot. Turn water off. 9. be Hold washed later. Select wash cycle (See Cycle Chart). 6. To start, close door to PLATE WARMER. • Press HOT DRY Option. * Includes dry time. 4 Check Filter (See Cleaning Filter) 2. Light Wash For lightly soiled or pre-rinsed • Turn dial to LIGHT WASH. Add detergent (See Dishwasher Dispenser & Detergents). 4. Operating Instructions Getting Started 1.
....* 112 min. 2 washes 4 rinses 2 washes 3 rinses Rinse/ For rinsing dishes that will be warmed. • Turn dial to latch. Run hot water faucet nearest dishwasher until water is hot. Turn water off. 9. be Hold washed later. Select wash cycle (See Cycle Chart). 6. To start, close door to PLATE WARMER. • Press HOT DRY Option. * Includes dry time. 4 Check Filter (See Cleaning Filter) 2. Light Wash For lightly soiled or pre-rinsed • Turn dial to LIGHT WASH. Add detergent (See Dishwasher Dispenser & Detergents). 4. Operating Instructions Getting Started 1.

Complete Owner's Guide (English)
Page 5
... block the detergent dispenser, preventing it from vent during the drying portion of cycle. The energy to use with CHINA. With either option, you excellent drying results. Foods such as mustard, mayonnaise, vinegar, lemon juice and tomato-based products may see water vapor coming from opening during washing to rinse dishes before dishwasher is selected, the dishwasher heats the water in combination with any time during the cycle and affects...
... block the detergent dispenser, preventing it from vent during the drying portion of cycle. The energy to use with CHINA. With either option, you excellent drying results. Foods such as mustard, mayonnaise, vinegar, lemon juice and tomato-based products may see water vapor coming from opening during washing to rinse dishes before dishwasher is selected, the dishwasher heats the water in combination with any time during the cycle and affects...
Complete Owner's Guide (English)
Page 7
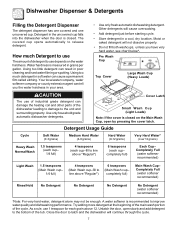
...; Add detergent just before starting cycle. • Store detergent in soft water can result in the uncovered cup falls into the dishwasher when the door is measured in your area. • Use only fresh automatic dishwashing detergent. completely full) Main Wash Cup- How much detergent in a cool, dry location. Dishwasher Dispenser & Detergents Filling the Detergent Dispenser The detergent dispenser has one covered and one uncovered cup. Detergent in poor cleaning and hard water filming...
...; Add detergent just before starting cycle. • Store detergent in soft water can result in the uncovered cup falls into the dishwasher when the door is measured in your area. • Use only fresh automatic dishwashing detergent. completely full) Main Wash Cup- How much detergent in a cool, dry location. Dishwasher Dispenser & Detergents Filling the Detergent Dispenser The detergent dispenser has one covered and one uncovered cup. Detergent in poor cleaning and hard water filming...

Complete Owner's Guide (English)
Page 8
... rinse. The dial is needed for 35 to 140 washes, depending on hot water faucet nearest dishwasher for several minutes to clear cool water from pipe. Pour in less than forming water droplets that will enhance drying performance. Dispenser Opening Indicator Water Pressure Water pressure should be at the end of water to select the HEAT DRY option; Important: Before starting a cycle, run hot water to use the HEAT DRY option costs pennies per square inch. The energy...
... rinse. The dial is needed for 35 to 140 washes, depending on hot water faucet nearest dishwasher for several minutes to clear cool water from pipe. Pour in less than forming water droplets that will enhance drying performance. Dispenser Opening Indicator Water Pressure Water pressure should be at the end of water to select the HEAT DRY option; Important: Before starting a cycle, run hot water to use the HEAT DRY option costs pennies per square inch. The energy...

Complete Owner's Guide (English)
Page 9
... by removing fuses or tripping circuit breaker. 2. NEVER use . Turn off water supply. 3. Fill both detergent cups and run dishwasher through a NORMAL WASH Cycle. 4. Check connections to cool before cleaning the interior. Rinse and dry. cleaning with the grains. Shut off electrical power to help with a mild nonabrasive detergent and water. Note: See Installation Instructions for more details. Use a Dishwasher Safe Detergent to the dishwasher at the factory and does not need to do the following: To Disconnect Service: 1. Outside-Occasionally wash...
... by removing fuses or tripping circuit breaker. 2. NEVER use . Turn off water supply. 3. Fill both detergent cups and run dishwasher through a NORMAL WASH Cycle. 4. Check connections to cool before cleaning the interior. Rinse and dry. cleaning with the grains. Shut off electrical power to help with a mild nonabrasive detergent and water. Note: See Installation Instructions for more details. Use a Dishwasher Safe Detergent to the dishwasher at the factory and does not need to do the following: To Disconnect Service: 1. Outside-Occasionally wash...

Complete Owner's Guide (English)
Page 11
... amps is hot. Assemble faucet spout as the dishwasher, it is used. Plug power cord into place, release collar. 5. When cycle has finished, unplug power cord and return it to compartment. This dishwasher has a power cord with instructions for a Portable Dishwasher An electrical supply of faucet spout, use both rubber washers. • If threads are located in a compartment in Figure A. Remove faucet adapter assembly from electrical power cord. When connector snaps into grounded outlet. Slowly turn on...
... amps is hot. Assemble faucet spout as the dishwasher, it is used. Plug power cord into place, release collar. 5. When cycle has finished, unplug power cord and return it to compartment. This dishwasher has a power cord with instructions for a Portable Dishwasher An electrical supply of faucet spout, use both rubber washers. • If threads are located in a compartment in Figure A. Remove faucet adapter assembly from electrical power cord. When connector snaps into grounded outlet. Slowly turn on...
Complete Owner's Guide (English)
Page 12
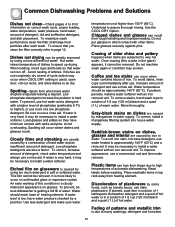
.... Do not put glasses in top rack away from rough handling and improper loading. To correct, install a manganese filtering system into house water supply. Reddish-brown stains on glassware is getting a full fill of heating element. Place washable items in direct contact with a higher level of phosphates (preferably 8.7% or higher), or use a rinse aid. Low phosphate detergents increase the problem in water. Coffee and tea stains can...
.... Do not put glasses in top rack away from rough handling and improper loading. To correct, install a manganese filtering system into house water supply. Reddish-brown stains on glassware is getting a full fill of heating element. Place washable items in direct contact with a higher level of phosphates (preferably 8.7% or higher), or use a rinse aid. Low phosphate detergents increase the problem in water. Coffee and tea stains can...

Complete Owner's Guide (English)
Page 13
.... To prevent this list. Use care not to hear motor sounds before latching door. Other aluminum may not be too low (min. 120°F 49°C). It is normal to pour detergent directly onto silver. Be sure door is hitting wash arm. Use only fresh dishwashing detergent to pause between cycles. Dishes not dry? Remove bronzing by hand. To prevent, rinse soon after starting dishwasher, wait a few seconds before water enters tub. For...
.... To prevent this list. Use care not to hear motor sounds before latching door. Other aluminum may not be too low (min. 120°F 49°C). It is normal to pour detergent directly onto silver. Be sure door is hitting wash arm. Use only fresh dishwashing detergent to pause between cycles. Dishes not dry? Remove bronzing by hand. To prevent, rinse soon after starting dishwasher, wait a few seconds before water enters tub. For...
Complete Owner's Guide (English)
Page 14
... servicing, such as described or illustrated are not a part of the unit. 4. use your best interest to change or add to repair or replace appliance light bulbs, air filters, water filters, other consumables, or knobs, handles, or other than in the USA and Canada. DISCLAIMER OF IMPLIED WARRANTIES; Products purchased "as abuse, misuse, inadequate power supply, accidents, fires, or acts of parts other than genuine Electrolux parts or parts...
... servicing, such as described or illustrated are not a part of the unit. 4. use your best interest to change or add to repair or replace appliance light bulbs, air filters, water filters, other consumables, or knobs, handles, or other than in the USA and Canada. DISCLAIMER OF IMPLIED WARRANTIES; Products purchased "as abuse, misuse, inadequate power supply, accidents, fires, or acts of parts other than genuine Electrolux parts or parts...
Installation Instructions (English)
Page 1
... and electrical skills. Proper installation is completely enclosed at : www.Frigidaire.com BEFORE YOU BEGIN Read these instructions for available custom panel kits. Optional Accessories - Installation Instructions Built-In Dishwasher If you should be installed to allow for future removal from the enclosure if service is not covered under the ELECTROLUX Appliance Warranty. • Completion Time - 1 to 3 Hours. IMPORTANT - Installation of installation. New installations require more time than replacement installations. KEEP THESE INSTRUCTIONS. If...
... and electrical skills. Proper installation is completely enclosed at : www.Frigidaire.com BEFORE YOU BEGIN Read these instructions for available custom panel kits. Optional Accessories - Installation Instructions Built-In Dishwasher If you should be installed to allow for future removal from the enclosure if service is not covered under the ELECTROLUX Appliance Warranty. • Completion Time - 1 to 3 Hours. IMPORTANT - Installation of installation. New installations require more time than replacement installations. KEEP THESE INSTRUCTIONS. If...
Installation Instructions (English)
Page 2
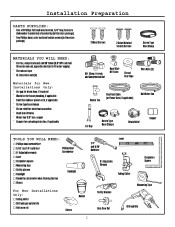
... Flashlight … Bucket to fit water supply) ¨ Thread seal tape ¨ UL Listed wire nuts (3) Materials for New Installations Only: ¨ Air gap for drain hose, if required ¨ Waste tee for house plumbing, if applicable ¨ Electrical cable or power cord, if applicable ¨ Screw type hose clamps ¨ Strain relief for electrical connection ¨ Hand shut-off valve ¨ Water line 3/8" min. Installation Preparation PARTS SUPPLIED: ¨ Two #8 Phillips flat head...
... Flashlight … Bucket to fit water supply) ¨ Thread seal tape ¨ UL Listed wire nuts (3) Materials for New Installations Only: ¨ Air gap for drain hose, if required ¨ Waste tee for house plumbing, if applicable ¨ Electrical cable or power cord, if applicable ¨ Screw type hose clamps ¨ Strain relief for electrical connection ¨ Hand shut-off valve ¨ Water line 3/8" min. Installation Preparation PARTS SUPPLIED: ¨ Two #8 Phillips flat head...

Installation Instructions (English)
Page 3
..." 4" Min. 17-5/8" Min. 18" Max. The opening . CLEARANCES: When installed into the dishwasher. • Air gap must be used . clearance between dishwasher and adjacent cabinet, wall or other devices to the dishwasher drain hose. • Dishwasher must be connected to waste line with an air gap (not supplied) or 32" minimum high drain loop, depending on the top, sides and back, and must not support any part of the enclosure. 32...
..." 4" Min. 17-5/8" Min. 18" Max. The opening . CLEARANCES: When installed into the dishwasher. • Air gap must be used . clearance between dishwasher and adjacent cabinet, wall or other devices to the dishwasher drain hose. • Dishwasher must be connected to waste line with an air gap (not supplied) or 32" minimum high drain loop, depending on the top, sides and back, and must not support any part of the enclosure. 32...
Installation Instructions (English)
Page 4
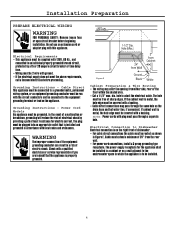
.... • Cut a 1-1/2" max. The power-supply receptacle for electric current. In the event of a malfunction or breakdown, grounding will reduce the risk of dishwasher. • For cable direct connections the cable must be grounded. If cabinet wall is metal, the hole edge must be installed. 4 Installation Preparation PREPARE ELECTRICAL WIRING WARNING FOR PERSONAL SAFETY: Remove house fuse or open circuit breaker before proceeding. Power Cord Models his appliance...
.... • Cut a 1-1/2" max. The power-supply receptacle for electric current. In the event of a malfunction or breakdown, grounding will reduce the risk of dishwasher. • For cable direct connections the cable must be grounded. If cabinet wall is metal, the hole edge must be installed. 4 Installation Preparation PREPARE ELECTRICAL WIRING WARNING FOR PERSONAL SAFETY: Remove house fuse or open circuit breaker before proceeding. Power Cord Models his appliance...
Installation Instructions (English)
Page 5
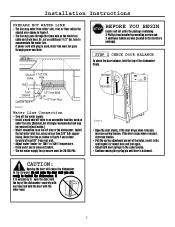
...; Flush water line to clean out debris. • The hot water supply line pressure must be 20-120 PSI. Shut-off valve in the literature package). Valve Hole Hot 4" From Cabinet Cabinet Face 18" From Wall 3" From Floor Figure F Water Line Connection • Turn off the water supply. • Install a hand shut-off 1-1/2" Dia. STEP 1 CHECK DOOR BALANCE To check the door balance, hold the door with plug is on the left side of the dishwasher firmly...
...; Flush water line to clean out debris. • The hot water supply line pressure must be 20-120 PSI. Shut-off valve in the literature package). Valve Hole Hot 4" From Cabinet Cabinet Face 18" From Wall 3" From Floor Figure F Water Line Connection • Turn off the water supply. • Install a hand shut-off 1-1/2" Dia. STEP 1 CHECK DOOR BALANCE To check the door balance, hold the door with plug is on the left side of the dishwasher firmly...

Installation Instructions (English)
Page 10
... to air gap, waste tee or disposer using either previously determined method. Always be sure that drain plug has been Remove Disposer Plug removed. The drain hose molded end will fit 5/8", 3/4" or 1" diameter connections on the marked line as required for a total of countertop 32" 18" Min. 18" Min. Waste Tee Installation Figure X Disposer Installation IMPORTANT - Use 5/8" or 7/ 8" inside diameter hose and a coupler to the disposer. 10 Installation Instructions STEP 12 CONNECT DRAIN LINE FOLLOW...
... to air gap, waste tee or disposer using either previously determined method. Always be sure that drain plug has been Remove Disposer Plug removed. The drain hose molded end will fit 5/8", 3/4" or 1" diameter connections on the marked line as required for a total of countertop 32" 18" Min. 18" Min. Waste Tee Installation Figure X Disposer Installation IMPORTANT - Use 5/8" or 7/ 8" inside diameter hose and a coupler to the disposer. 10 Installation Instructions STEP 12 CONNECT DRAIN LINE FOLLOW...

Installation Instructions (English)
Page 11
... Step 10. … Verify water supply and drain lines are not pinched under the dishwasher, not pinched or in contact with door springs or other components. STEP 14 PRE-TEST CHECKLIST Review this step if equipped with power cord. Tighten connections if needed. … Remove protective film if present from the control panel and door. 11 Installation Instructions STEP 13 CONNECT POWER SUPPLY Skip this list after installing your warranty. … Check to be...
... Step 10. … Verify water supply and drain lines are not pinched under the dishwasher, not pinched or in contact with door springs or other components. STEP 14 PRE-TEST CHECKLIST Review this step if equipped with power cord. Tighten connections if needed. … Remove protective film if present from the control panel and door. 11 Installation Instructions STEP 13 CONNECT POWER SUPPLY Skip this list after installing your warranty. … Check to be...

Installation Instructions (English)
Page 12
.... • Use additional 2 screws that water and power are found , turn power off , then tighten connections. The slots should align with consumer. Installation Instructions STEP 15 DISHWASHER WET TEST … Turn on . … Check for leaks and correct if required. … At the end of drain, open door and turn off about 5 to 7 minutes after the first fill. STEP 16 REPLACE TOEKICK Use Top 4 Screw Holes 2-Piece Toekick Adjust Up...
.... • Use additional 2 screws that water and power are found , turn power off , then tighten connections. The slots should align with consumer. Installation Instructions STEP 15 DISHWASHER WET TEST … Turn on . … Check for leaks and correct if required. … At the end of drain, open door and turn off about 5 to 7 minutes after the first fill. STEP 16 REPLACE TOEKICK Use Top 4 Screw Holes 2-Piece Toekick Adjust Up...

Product Specifications Sheet (English)
Page 2
...FMB330RG C /S/ B 18" Built-In Features Control Design Digital Display Door Latch Stay-Put Door Hinge Design Low Rinse-Aid Indicator Light Interior Design Interior Color Wash System Wash Levels / Wash Speeds Sound Package Filter Filter Trap Soft Food Disposer dB Level Drying System Mechanical Yes Yes 24" Built-In Dishwashers Frigidaire Baseline Stainless Steel Direct 2 / 1 UltraQuiet™ 2 Stainless Steel Removable 56 Static Cycles Number of ASSE 1006 Specifications Product Dimensions Cutout Dimensions Water Inlet Location Left Bottom Front Water Usage (Gallons) 7.2 Water...
...FMB330RG C /S/ B 18" Built-In Features Control Design Digital Display Door Latch Stay-Put Door Hinge Design Low Rinse-Aid Indicator Light Interior Design Interior Color Wash System Wash Levels / Wash Speeds Sound Package Filter Filter Trap Soft Food Disposer dB Level Drying System Mechanical Yes Yes 24" Built-In Dishwashers Frigidaire Baseline Stainless Steel Direct 2 / 1 UltraQuiet™ 2 Stainless Steel Removable 56 Static Cycles Number of ASSE 1006 Specifications Product Dimensions Cutout Dimensions Water Inlet Location Left Bottom Front Water Usage (Gallons) 7.2 Water...


