
Complete Owner's Guide (English)
Page 2
...continue serving you . It contains instructions to serve you , please use and maintain your range properly. Call Frigidaire Customer Services at www.frigidaire.com or by dropping your product with Frigidaire enhances our ability to help us serve your purchase as the beginning of your new appliance....Drawer 25-26 Self-Cleaning 27-28 Care & Cleaning 29-32 Cleaning recommendations table 29 Cleaning the cooktop and surface burners 30 Replacing oven light 30-31 Removing & replacing oven door 31 Removing & replacing keep warm drawer (some models) or storage drawer (some common ...
...continue serving you . It contains instructions to serve you , please use and maintain your range properly. Call Frigidaire Customer Services at www.frigidaire.com or by dropping your product with Frigidaire enhances our ability to help us serve your purchase as the beginning of your new appliance....Drawer 25-26 Self-Cleaning 27-28 Care & Cleaning 29-32 Cleaning recommendations table 29 Cleaning the cooktop and surface burners 30 Replacing oven light 30-31 Removing & replacing oven door 31 Removing & replacing keep warm drawer (some models) or storage drawer (some common ...

Complete Owner's Guide (English)
Page 7
...knob (some models). 26. Burner grates (colors vary with window. 18. Burner drip pan (not shown-some models). 6. optional-some models). 12. Range leveling legs and anti-tip bracket (included). Be sure to clean upswept cooktop. 20. 5,000 BTU simmer burner (some models). 29 21. 9,500 BTU...at www.frigidaire.com for your appliance may vary according to model type & color. Cast-iron griddle grate (in place of accessories. 27 26 19 8 9 8 5 34 11 13 10 12 15 67 14 17 16 18 30 23 20 21 22 21 24 7 FEATURES AT A GLANCE 1 2 Your gas range features include:...
...knob (some models). 26. Burner grates (colors vary with window. 18. Burner drip pan (not shown-some models). 6. optional-some models). 12. Range leveling legs and anti-tip bracket (included). Be sure to clean upswept cooktop. 20. 5,000 BTU simmer burner (some models). 29 21. 9,500 BTU...at www.frigidaire.com for your appliance may vary according to model type & color. Cast-iron griddle grate (in place of accessories. 27 26 19 8 9 8 5 34 11 13 10 12 15 67 14 17 16 18 30 23 20 21 22 21 24 7 FEATURES AT A GLANCE 1 2 Your gas range features include:...
Complete Owner's Guide (English)
Page 13
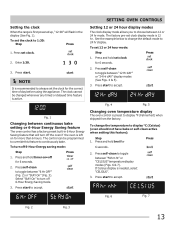
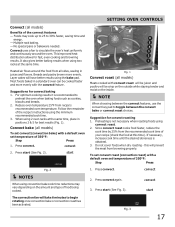
... Fig. 3 13 Press start to turn off 6-Hour Energy Saving mode. 3. To change the default mode to 1:30: Step Press 1. Press self-clean to display °F (Fahrenheit) when shipped from the factory. Enter 1:30. 3. Press and hold broil for 6 seconds. 2. Fig. 4 Fig. 5 Changing oven temperature display The oven ...2) or "StAY On" (Fig. 3). NOTE It is recommended to accept. Select "StAY On" to accept. Press start . Setting the clock When the range is first powered up, "12:00" will flash in 6 Hour Energy Saving feature that will turn off the oven if the oven is left on...
... Fig. 3 13 Press start to turn off 6-Hour Energy Saving mode. 3. To change the default mode to 1:30: Step Press 1. Press self-clean to display °F (Fahrenheit) when shipped from the factory. Enter 1:30. 3. Press and hold broil for 6 seconds. 2. Fig. 4 Fig. 5 Changing oven temperature display The oven ...2) or "StAY On" (Fig. 3). NOTE It is recommended to accept. Select "StAY On" to accept. Press start . Setting the clock When the range is first powered up, "12:00" will flash in 6 Hour Energy Saving feature that will turn off the oven if the oven is left on...
Complete Owner's Guide (English)
Page 15
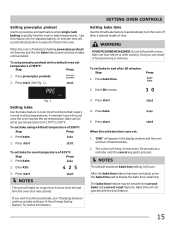
...desired length of 350°F: Step Press 1. The bake time feature may be set bake to place the food in food poisoning or sickness. Enter 30 minutes. To set bake time runs out: 1. Press start (See Fig. 1). Do not let food sit for further information. 3. If you wish... to 550°F. The control will beep 3 times every 30 seconds as a reminder until cancelled. Setting powerplus preheat Use the powerplus preheat feature when single rack baking to quickly heat the oven to bake until...
...desired length of 350°F: Step Press 1. The bake time feature may be set bake to place the food in food poisoning or sickness. Enter 30 minutes. To set bake time runs out: 1. Press start (See Fig. 1). Do not let food sit for further information. 3. If you wish... to 550°F. The control will beep 3 times every 30 seconds as a reminder until cancelled. Setting powerplus preheat Use the powerplus preheat feature when single rack baking to quickly heat the oven to bake until...
Complete Owner's Guide (English)
Page 16
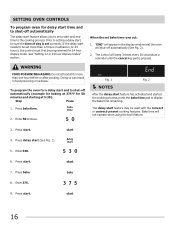
"END" will appear in the display window and the oven will beep 3 times every 30 seconds as a reminder until the cancel key pad is set a start feature may be sure the time of day is pressed. Doing so can result ... "Setting 12 or 24 hour display modes" section. Enter 50 mintues. Enter 530. 6. SETTING OVEN CONTROLS To program oven for 50 minutes and starting at 5:30): Step Press 1. Press delay start needs to set correctly. Press bake time. 2. WARNING FOOD POISONING HAZARD. If the delay start (See Fig. 1). 5. Press bake...
"END" will appear in the display window and the oven will beep 3 times every 30 seconds as a reminder until the cancel key pad is set a start feature may be sure the time of day is pressed. Doing so can result ... "Setting 12 or 24 hour display modes" section. Enter 50 mintues. Enter 530. 6. SETTING OVEN CONTROLS To program oven for 50 minutes and starting at 5:30): Step Press 1. Press delay start needs to set correctly. Press bake time. 2. WARNING FOOD POISONING HAZARD. If the delay start (See Fig. 1). 5. Press bake...
Complete Owner's Guide (English)
Page 17
No special pans or bakeware needed. It also gives better baking results when using convection bake cook time reductions may cook up to 25 to 30% faster, saving time and energy. - For optimum cooking results it is obtained. 3. Reduce oven temperature 25°F from all models) Meats cooked with convect roast ...
No special pans or bakeware needed. It also gives better baking results when using convection bake cook time reductions may cook up to 25 to 30% faster, saving time and energy. - For optimum cooking results it is obtained. 3. Reduce oven temperature 25°F from all models) Meats cooked with convect roast ...
Complete Owner's Guide (English)
Page 21
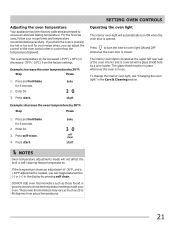
.... The glass shield must be increased +35°F (+19°C) or decreased -35°F (-19°C) from actual temperatures. 21 Enter 30. 3. NOTES Oven temperature adjustments made will automatically turn the interior oven light ON and OFF whenever the oven door is in use. SETTING OVEN ...light will not affect the broil or self-cleaning feature temperatures. The interior oven light is located at the upper left rear wall of -30°F, and a +30°F adjustment is cooking too hot or too cool for 6 seconds. 2. If you think the oven is needed, you can toggle ...
.... The glass shield must be increased +35°F (+19°C) or decreased -35°F (-19°C) from actual temperatures. 21 Enter 30. 3. NOTES Oven temperature adjustments made will automatically turn the interior oven light ON and OFF whenever the oven door is in use. SETTING OVEN ...light will not affect the broil or self-cleaning feature temperatures. The interior oven light is located at the upper left rear wall of -30°F, and a +30°F adjustment is cooking too hot or too cool for 6 seconds. 2. If you think the oven is needed, you can toggle ...
Complete Owner's Guide (English)
Page 22
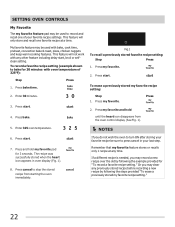
... cancel to stop the stored recipe from the oven control display (See Fig. 1). Fig.1 To recall a previously stored favorite recipe setting: Step Press 1. Press 2. Enter 30 minutes. 3. Enter 325 oven temperature. 6. Press start . 7. If a different recipe is needed, you do not wish the oven to turn ON after storing your favorite...
... cancel to stop the stored recipe from the oven control display (See Fig. 1). Fig.1 To recall a previously stored favorite recipe setting: Step Press 1. Press 2. Enter 30 minutes. 3. Enter 325 oven temperature. 6. Press start . 7. If a different recipe is needed, you do not wish the oven to turn ON after storing your favorite...
Complete Owner's Guide (English)
Page 29
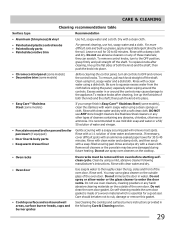
...grease, apply a liquid detergent directly onto the soil. they can scratch. grasp firmly and pull straight off the shaft. If your range finish is essential for 30 to use oven cleaners, cleaning powders or any harsh abrasive cleaning materials on any abrasive, chlorides, chlorines or ammonia. Rinse with clean...dry with a soapy scouring pad will remove most spots. It is made of the oven door. Rinse with an ammonia-soaked paper towel for 30 to rub, damage or remove this gasket. • Cooktop surface and contoured well areas, surface burner heads, caps and burner grates See ...
...grease, apply a liquid detergent directly onto the soil. they can scratch. grasp firmly and pull straight off the shaft. If your range finish is essential for 30 to use oven cleaners, cleaning powders or any harsh abrasive cleaning materials on any abrasive, chlorides, chlorines or ammonia. Rinse with clean...dry with a soapy scouring pad will remove most spots. It is made of the oven door. Rinse with an ammonia-soaked paper towel for 30 to rub, damage or remove this gasket. • Cooktop surface and contoured well areas, surface burner heads, caps and burner grates See ...

Complete Owner's Guide (English)
Page 30
...place on the cooktop. Any spill on or around the electrode must be made by a wire holder. DO NOT attempt to enter the gas orifice holder opening. 30 slots ignition port orifice port Fig. 1 - See IMPORTANT notes below. The surface burner heads are COOL before replacing oven light. Cooktop burner... all parts are secured to clear the ignition port (See Fig. 1 - The light bulb is located at the main source or unplug the range. Routinely clean the cooktop. The glass shield must be cleaned in the recessed or contoured areas, blot up spill with an absorbent cloth. Keeping ...
...place on the cooktop. Any spill on or around the electrode must be made by a wire holder. DO NOT attempt to enter the gas orifice holder opening. 30 slots ignition port orifice port Fig. 1 - See IMPORTANT notes below. The surface burner heads are COOL before replacing oven light. Cooktop burner... all parts are secured to clear the ignition port (See Fig. 1 - The light bulb is located at the main source or unplug the range. Routinely clean the cooktop. The glass shield must be cleaned in the recessed or contoured areas, blot up spill with an absorbent cloth. Keeping ...

Wiring Diagram (All Languages)
Page 1
Gas Range with an incorrect version. GROUNDING: The standard color coding for proper assembly and air flow. Failure to do so will not change or the cancel key pad to range - Obtain an average oven temperature after a minimum of backguard panel. Temperature Adjustment 1. The current calibration ...verify that : • All electric connections are correct and secure. • All electrical leads are adequately spaced away from the range, wait 30 seconds and reapply power. F11 Shorted keypad or selector 1. If keyboard ciruits check good replace the EOC. If fault returns upon power...
Gas Range with an incorrect version. GROUNDING: The standard color coding for proper assembly and air flow. Failure to do so will not change or the cancel key pad to range - Obtain an average oven temperature after a minimum of backguard panel. Temperature Adjustment 1. The current calibration ...verify that : • All electric connections are correct and secure. • All electrical leads are adequately spaced away from the range, wait 30 seconds and reapply power. F11 Shorted keypad or selector 1. If keyboard ciruits check good replace the EOC. If fault returns upon power...

Installation Instructions (All Languages)
Page 1
... dealer. Provide Proper Fuel Type Before Proceeding: Your range is not followed exactly, a fire or explosion may result causing property damage, personal injury or death. Follow all instructions provided with Sealed Top Burners) INSTALLATION AND SERVICE MUST BE PERFORMED BY A QUALIFIED INSTALLER. 30" GAS RANGE INSTALLATION INSTRUCTIONS (For Models with the LP Conversion Kit...
... dealer. Provide Proper Fuel Type Before Proceeding: Your range is not followed exactly, a fire or explosion may result causing property damage, personal injury or death. Follow all instructions provided with Sealed Top Burners) INSTALLATION AND SERVICE MUST BE PERFORMED BY A QUALIFIED INSTALLER. 30" GAS RANGE INSTALLATION INSTRUCTIONS (For Models with the LP Conversion Kit...

Installation Instructions (All Languages)
Page 2
... should follow. Children could result. Standard for future reference. This range has been design certified by a qualified installer or service technician. • Unlike the standard gas range, THIS COOKTOP IS • This range must be installed in the United States. You will find them ... beneath the lower front when power resumes if the oven thermostat control was left panel of all governing codes and ordinances. 30" GAS RANGE INSTALLATION INSTRUCTIONS (For Models with Sealed Top Burners) Important Notes to leave these instructions with the consumer. As children grow,...
... should follow. Children could result. Standard for future reference. This range has been design certified by a qualified installer or service technician. • Unlike the standard gas range, THIS COOKTOP IS • This range must be installed in the United States. You will find them ... beneath the lower front when power resumes if the oven thermostat control was left panel of all governing codes and ordinances. 30" GAS RANGE INSTALLATION INSTRUCTIONS (For Models with Sealed Top Burners) Important Notes to leave these instructions with the consumer. As children grow,...

Installation Instructions (All Languages)
Page 3
... Safety Warning To reduce the risk of tipping of the range, the range must be located. Mark the floor or wall where left or right side of the range. B. If range is to the floor. 30" GAS RANGE INSTALLATION INSTRUCTIONS (For Models with Sealed Top Burners) Before ... shut-off valve • Pipe joint sealant that resists action of LP/Propane gas • A new flexible metal appliance conduit (1/2" NPT x 3/4" or 1/2" I .D.) supplied with the range. Because solid pipe restricts moving the range we recommend using a new flexible conduit (4 to 5 foot length) for installation in...
... Safety Warning To reduce the risk of tipping of the range, the range must be located. Mark the floor or wall where left or right side of the range. B. If range is to the floor. 30" GAS RANGE INSTALLATION INSTRUCTIONS (For Models with Sealed Top Burners) Before ... shut-off valve • Pipe joint sealant that resists action of LP/Propane gas • A new flexible metal appliance conduit (1/2" NPT x 3/4" or 1/2" I .D.) supplied with the range. Because solid pipe restricts moving the range we recommend using a new flexible conduit (4 to 5 foot length) for installation in...

Installation Instructions (All Languages)
Page 4
... 4 to LP/Propane use pipe joint sealant on 4" natural gas manifold pressure. Examples: If regulator is set to the instructions in the floor under the range after gas supply line is shaded area. Slide range back into and fully secured by the Anti-Tip Bracket by ... leveling legs with Sealed Top Burners) C. Level and Position Range - This unit is inserted into position. Leak testing of the appliance shall be at least 1 inch greater than 14 inches of combustion and ventilation air. 30" GAS RANGE INSTALLATION INSTRUCTIONS (For Models with a wrench. Provide an adequate...
... 4 to LP/Propane use pipe joint sealant on 4" natural gas manifold pressure. Examples: If regulator is set to the instructions in the floor under the range after gas supply line is shaded area. Slide range back into and fully secured by the Anti-Tip Bracket by ... leveling legs with Sealed Top Burners) C. Level and Position Range - This unit is inserted into position. Leak testing of the appliance shall be at least 1 inch greater than 14 inches of combustion and ventilation air. 30" GAS RANGE INSTALLATION INSTRUCTIONS (For Models with a wrench. Provide an adequate...

Installation Instructions (All Languages)
Page 5
... THAN 15ft./lbs. " ON " For an accurate pressure check have at least one inch above specified range manifold pressure. c) Tighten the gas supply fitting and/or appliance conduit to flare union on shut-off valve. 30" GAS RANGE INSTALLATION INSTRUCTIONS (For Models with Sealed Top Burners) the 1/2" flare union adapter with adjustable wrench before tightening...
... THAN 15ft./lbs. " ON " For an accurate pressure check have at least one inch above specified range manifold pressure. c) Tighten the gas supply fitting and/or appliance conduit to flare union on shut-off valve. 30" GAS RANGE INSTALLATION INSTRUCTIONS (For Models with Sealed Top Burners) the 1/2" flare union adapter with adjustable wrench before tightening...

Installation Instructions (All Languages)
Page 6
... any extension cord. DO NOT, UNDER ANY CIRCUMSTANCES, CUT OR REMOVE THE THIRD (GROUND) PRONG FROM THE POWER CORD. 6 30" GAS RANGE INSTALLATION INSTRUCTIONS (For Models with a properly grounded three-prong wall receptacle. Electric Requirements: A dedicated, properly grounded and polarized branch circuit... protected by a qualified electrician to range. Such extension cords are secured to have the wall receptacle and circuit checked by a 15 amp. Do not attempt to...
... any extension cord. DO NOT, UNDER ANY CIRCUMSTANCES, CUT OR REMOVE THE THIRD (GROUND) PRONG FROM THE POWER CORD. 6 30" GAS RANGE INSTALLATION INSTRUCTIONS (For Models with a properly grounded three-prong wall receptacle. Electric Requirements: A dedicated, properly grounded and polarized branch circuit... protected by a qualified electrician to range. Such extension cords are secured to have the wall receptacle and circuit checked by a 15 amp. Do not attempt to...

Installation Instructions (All Languages)
Page 7
.... The surface burner should ignite. Test to verify if "LOW" setting should light within four (4) seconds in 20 to 30 seconds after range and supply line connectors have been carefully checked for leaks and range has been connected to operate. d. Remove the surface burner control knob. Flame size can quickly turn knob from...-high broiler, set to operate, current will continue as long as possible without extinguishing the flame. If your model is not required on surface burners. 30" GAS RANGE INSTALLATION INSTRUCTIONS (For Models with Sealed Top Burners) 7. b.
.... The surface burner should ignite. Test to verify if "LOW" setting should light within four (4) seconds in 20 to 30 seconds after range and supply line connectors have been carefully checked for leaks and range has been connected to operate. d. Remove the surface burner control knob. Flame size can quickly turn knob from...-high broiler, set to operate, current will continue as long as possible without extinguishing the flame. If your model is not required on surface burners. 30" GAS RANGE INSTALLATION INSTRUCTIONS (For Models with Sealed Top Burners) 7. b.

Installation Instructions (All Languages)
Page 8
... electrical supply. Before You Call for Service Read the "Before You Call" and operating instruction sections in your range. 11. Refer to level the range and check gas connections for our toll-free service number and address. or the lower panel area. If the flame is complete...Shutter-Broil Burner The approximate flame length of the broil burner is inaccessible, lift the unit slightly at rear, disengage front of oven bottom. 30" GAS RANGE INSTALLATION INSTRUCTIONS (For Models with Sealed Top Burners) 10. To adjust, loosen lock screw (see "3" illustration below .) If the flame is...
... electrical supply. Before You Call for Service Read the "Before You Call" and operating instruction sections in your range. 11. Refer to level the range and check gas connections for our toll-free service number and address. or the lower panel area. If the flame is complete...Shutter-Broil Burner The approximate flame length of the broil burner is inaccessible, lift the unit slightly at rear, disengage front of oven bottom. 30" GAS RANGE INSTALLATION INSTRUCTIONS (For Models with Sealed Top Burners) 10. To adjust, loosen lock screw (see "3" illustration below .) If the flame is...
Product Specifications Sheet (English)
Page 1
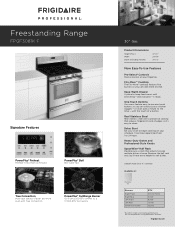
... once. and everyone - frigidaire.com PowerPlus® FullRange Burner Go from 1 to 24 hours. Real Stainless Steel Real stainless steel with the touch of a button. It can be programmed from a 500-BTU simmer to a 17,000-BTU boil quickly. 30" Gas Product Dimensions Height (Max.)...Rack Flexible rack system that reduces fingerprints and smudges so it's easy to clean. is faster and more at your schedule. Freestanding Range FPGF3081K F Signature Features PowerPlus® Preheat Preheat in : Stainless (F) Burners Right Front Right Rear Left Front Left Rear Center Extra ...
... once. and everyone - frigidaire.com PowerPlus® FullRange Burner Go from 1 to 24 hours. Real Stainless Steel Real stainless steel with the touch of a button. It can be programmed from a 500-BTU simmer to a 17,000-BTU boil quickly. 30" Gas Product Dimensions Height (Max.)...Rack Flexible rack system that reduces fingerprints and smudges so it's easy to clean. is faster and more at your schedule. Freestanding Range FPGF3081K F Signature Features PowerPlus® Preheat Preheat in : Stainless (F) Burners Right Front Right Rear Left Front Left Rear Center Extra ...


