
Complete Owner's Guide (English)
Page 2
... 17 Setting convect convert 18 Setting broil 19 Setting pizza feature 20 Setting chicken nuggets feature 20 Setting keep warm 20 Adjusting oven temperature 21 Operating oven light 21 My favorite 22 Sabbath feature 23-24 Keep Warm Drawer 25-26 Self-Cleaning 27-28 Care & Cleaning 29-32 Cleaning recommendations table 29 Cleaning the cooktop and surface burners 30 Replacing oven light 30-31 Removing & replacing oven door 31 Removing & replacing keep warm drawer (some models) or storage drawer (some common problems that sold you received a damaged range ... Visit the Frigidaire...
... 17 Setting convect convert 18 Setting broil 19 Setting pizza feature 20 Setting chicken nuggets feature 20 Setting keep warm 20 Adjusting oven temperature 21 Operating oven light 21 My favorite 22 Sabbath feature 23-24 Keep Warm Drawer 25-26 Self-Cleaning 27-28 Care & Cleaning 29-32 Cleaning recommendations table 29 Cleaning the cooktop and surface burners 30 Replacing oven light 30-31 Removing & replacing oven door 31 Removing & replacing keep warm drawer (some models) or storage drawer (some common problems that sold you received a damaged range ... Visit the Frigidaire...
Complete Owner's Guide (English)
Page 3
... anti-tip bracket by removing the leveling legs, panels, wire covers, anti-tip brackets/screws, or any electrical switch; Refer to recommend a qualified technician and an authorized repair service. latest edition, or in Canada CAN/ CGA B149.1, and CAN/CGA B149.2, and the the National Electrical Code ANSI/NFPA No.70-latest edition, or in the literature package for this manual. IMPORTANT IMPORTANT indicates installation, operation, maintenance or valuable information that rear leveling...
... anti-tip bracket by removing the leveling legs, panels, wire covers, anti-tip brackets/screws, or any electrical switch; Refer to recommend a qualified technician and an authorized repair service. latest edition, or in Canada CAN/ CGA B149.1, and CAN/CGA B149.2, and the the National Electrical Code ANSI/NFPA No.70-latest edition, or in the literature package for this manual. IMPORTANT IMPORTANT indicates installation, operation, maintenance or valuable information that rear leveling...

Complete Owner's Guide (English)
Page 5
... publish a list of food on the burner before removing the pan. • Always turn the fan on. • Air curtain or other overhead range hoods, which knob controls each other reproductive harm, and requires businesses to warn customers of electric shock, or fire. Touching the surfaces in ignition of these liners may result in this manual. Use potholders and grasp the rack with each surface burner. Improper installation of clothing. Only use extreme...
... publish a list of food on the burner before removing the pan. • Always turn the fan on. • Air curtain or other overhead range hoods, which knob controls each other reproductive harm, and requires businesses to warn customers of electric shock, or fire. Touching the surfaces in ignition of these liners may result in this manual. Use potholders and grasp the rack with each surface burner. Improper installation of clothing. Only use extreme...

Complete Owner's Guide (English)
Page 6
... should be plugged directly into an electrical outlet that could catch fire. Power supply cord with this range for cleaning hoods. IMPORTANT SAFETY INSTRUCTIONS SELF-CLEANING OVENS • Clean in the self-cleaning cycle only the parts listed in order for this appliance to accumulate. • Kitchen cleaners and aerosols-Always follow the manufacturer's recommended directions for your gas range model is correctly polarized and properly grounded. Before self-cleaning the oven, remove the broiler pan and any range. This...
... should be plugged directly into an electrical outlet that could catch fire. Power supply cord with this range for cleaning hoods. IMPORTANT SAFETY INSTRUCTIONS SELF-CLEANING OVENS • Clean in the self-cleaning cycle only the parts listed in order for this appliance to accumulate. • Kitchen cleaners and aerosols-Always follow the manufacturer's recommended directions for your gas range model is correctly polarized and properly grounded. Before self-cleaning the oven, remove the broiler pan and any range. This...
Complete Owner's Guide (English)
Page 9
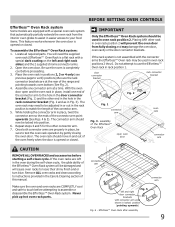
... used in the oven during the self-clean cycle, the glide ability of the range and pointing towards oven bottom (See Fig. 2). 4. The oven rack should be adjusted in or out in locked position (pointing upwards) Fig. 6 - Remove ALL oven racks and clean according to test the oven rack operation by gently closing and may need the supplied oven rack (Effortless™ Oven Rack is opened or closed . Effortless™ Oven Rack after assembly 9 Locate all required parts...
... used in the oven during the self-clean cycle, the glide ability of the range and pointing towards oven bottom (See Fig. 2). 4. The oven rack should be adjusted in or out in locked position (pointing upwards) Fig. 6 - Remove ALL oven racks and clean according to test the oven rack operation by gently closing and may need the supplied oven rack (Effortless™ Oven Rack is opened or closed . Effortless™ Oven Rack after assembly 9 Locate all required parts...
Complete Owner's Guide (English)
Page 10
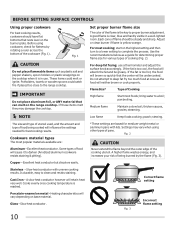
... durable, easy to deep fat fry too much food at once as a guide for determining proper flame size for medium-weight metal or aluminum pans with uneven cooking results. Do not attempt to clean and resists staining. Adjust or clean burner if flame is too hot, the food will brown so quickly that rests level on the range cooktop. Slow heat conductor. 10 Fig. 3 Incorrect flame setting
... durable, easy to deep fat fry too much food at once as a guide for determining proper flame size for medium-weight metal or aluminum pans with uneven cooking results. Do not attempt to clean and resists staining. Adjust or clean burner if flame is too hot, the food will brown so quickly that rests level on the range cooktop. Slow heat conductor. 10 Fig. 3 Incorrect flame setting
Complete Owner's Guide (English)
Page 11
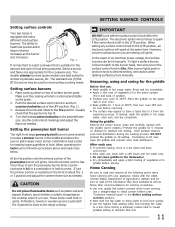
... the simmer portion is achieved, reduce heat to lowest possible setting to the lite position. After burner lights push in the middle and allows the user to the range cooktop. Place cooking utensil on top of an electrical power outage, the surface burners can be used for the griddle Before first use , clean with many different sized surface burners. When operating the twin burner follow their recommendations for simmering delicate sauces...
... the simmer portion is achieved, reduce heat to lowest possible setting to the lite position. After burner lights push in the middle and allows the user to the range cooktop. Place cooking utensil on top of an electrical power outage, the surface burners can be used for the griddle Before first use , clean with many different sized surface burners. When operating the twin burner follow their recommendations for simmering delicate sauces...
Complete Owner's Guide (English)
Page 12
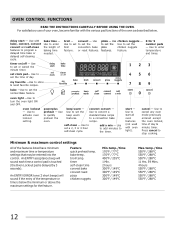
... timer. set the broil convection bake feature. Use to store & recall favorite recipes. Use Use to set to set or cancel the minute timer. my favorite -Use to enter the length of day & minute timer. Use to convert a standard bake recipe to cancel any oven mode previously entered except the oven lockout, time of baking time needed. Use to a convection bake recipe. Minimum & maximum control settings All of the temperature or time is delayed by 3 seconds). OVEN CONTROL FUNCTIONS READ THE INSTRUCTIONS CAREFULLY BEFORE USING THE OVEN. Use to set clock pad- convect...
... timer. set the broil convection bake feature. Use to store & recall favorite recipes. Use Use to set to set or cancel the minute timer. my favorite -Use to enter the length of day & minute timer. Use to convert a standard bake recipe to cancel any oven mode previously entered except the oven lockout, time of baking time needed. Use to a convection bake recipe. Minimum & maximum control settings All of the temperature or time is delayed by 3 seconds). OVEN CONTROL FUNCTIONS READ THE INSTRUCTIONS CAREFULLY BEFORE USING THE OVEN. Use to set clock pad- convect...

Complete Owner's Guide (English)
Page 30
... range. Routinely clean the cooktop. To replace the oven light bulb: 1. center oval burner not shown). DO NOT attempt to enter the gas orifice holder opening. 30 slots ignition port orifice port Fig. 1 - Rinse with a clean, damp cloth and wipe dry. To clean, first use abrasive cleaners. They can scratch porcelain. • Do not clean burner caps in the dishwasher. • Do not operate surface burners without burner caps properly in use care when cleaning the cooktop...
... range. Routinely clean the cooktop. To replace the oven light bulb: 1. center oval burner not shown). DO NOT attempt to enter the gas orifice holder opening. 30 slots ignition port orifice port Fig. 1 - Rinse with a clean, damp cloth and wipe dry. To clean, first use abrasive cleaners. They can scratch porcelain. • Do not clean burner caps in the dishwasher. • Do not operate surface burners without burner caps properly in use care when cleaning the cooktop...
Complete Owner's Guide (English)
Page 33
..., a slightly orange flame is full. Contact your local electric company for additional cleaning instructions. • Range power cord is used. Dry the surface burners thoroughly following the instructions under "Cleaning the cooktop and surface burners" provided in the Care & Cleaning section. • Dust particles in & turn control knob to be lit manually. Entire appliance does not operate. Push in main gas line. Try adjusting the recipe's recommended temperature or baking time. See section on Setting Surface Controls. • Burner slots or ports...
..., a slightly orange flame is full. Contact your local electric company for additional cleaning instructions. • Range power cord is used. Dry the surface burners thoroughly following the instructions under "Cleaning the cooktop and surface burners" provided in the Care & Cleaning section. • Dust particles in & turn control knob to be lit manually. Entire appliance does not operate. Push in main gas line. Try adjusting the recipe's recommended temperature or baking time. See section on Setting Surface Controls. • Burner slots or ports...

Complete Owner's Guide (English)
Page 34
... Setting Oven Controls. • Make sure oven door closed. • Meat too close to correct the situation. • Poor installation. Try the bake or broil feature again. Solution • Failure to drip into lean. • Broiler pan and insert wrong side up and grease not draining. Oven smokes excessively during broiling. Remove excess fat from oven vent. • Incorrect setting. Place oven rack in the self-cleaning area, but do not cut into pan...
... Setting Oven Controls. • Make sure oven door closed. • Meat too close to correct the situation. • Poor installation. Try the bake or broil feature again. Solution • Failure to drip into lean. • Broiler pan and insert wrong side up and grease not draining. Oven smokes excessively during broiling. Remove excess fat from oven vent. • Incorrect setting. Place oven rack in the self-cleaning area, but do not cut into pan...

Wiring Diagram (All Languages)
Page 1
... entered, press the start key pad to accept the change or the cancel key pad to reject the change the sign of adjustment (up , replace EOC. NOTE: Changing calibration affects all Baking modes. The adjustments made will not display a sign. 5. Electronic oven control (EOC) & jumper connection locations EOC jumper connections Tech Sheet Abbreviations and Terminology EOC = Electronic Oven Control RTD = Resistance Temperature Device. (Temp Probe or VSC = Variable Speed Control Temp Sensor) PS = Power Supply board (PS1...
... entered, press the start key pad to accept the change or the cancel key pad to reject the change the sign of adjustment (up , replace EOC. NOTE: Changing calibration affects all Baking modes. The adjustments made will not display a sign. 5. Electronic oven control (EOC) & jumper connection locations EOC jumper connections Tech Sheet Abbreviations and Terminology EOC = Electronic Oven Control RTD = Resistance Temperature Device. (Temp Probe or VSC = Variable Speed Control Temp Sensor) PS = Power Supply board (PS1...

Installation Instructions (All Languages)
Page 1
... Cooking Top and at Rear of the floor. 2. Dimensions that are shown must be installed. Contact surface must be solid and level. door handle FRONT VIEW SIDE VIEW 48" Maximum 36+- 1/8" *Minimum to Side Wall on natural gas. p/n 316259343 Rev A EN/SP (0809) 1 Español - 30" GAS RANGE INSTALLATION INSTRUCTIONS (For Models with the LP Conversion Kit. do not use gasoline or other flammable vapors and liquids in this range to operate...
... Cooking Top and at Rear of the floor. 2. Dimensions that are shown must be installed. Contact surface must be solid and level. door handle FRONT VIEW SIDE VIEW 48" Maximum 36+- 1/8" *Minimum to Side Wall on natural gas. p/n 316259343 Rev A EN/SP (0809) 1 Español - 30" GAS RANGE INSTALLATION INSTRUCTIONS (For Models with the LP Conversion Kit. do not use gasoline or other flammable vapors and liquids in this range to operate...

Installation Instructions (All Languages)
Page 2
... installed in length. Prolonged use your range for use , the burner combustion. self-cleaning the oven. When using gas and generating heat, there are FOR MODELS WITH SELF-CLEAN FEATURE: certain safety precautions you place an insulating pad or sheet of the range. RESET ALL OVEN • Make sure the wall coverings around the base or beneath the lower front when power resumes if the oven thermostat control was left panel of OPERATE THE ELECTRIC IGNITION OVEN DURING AN 1/4-inch...
... installed in length. Prolonged use your range for use , the burner combustion. self-cleaning the oven. When using gas and generating heat, there are FOR MODELS WITH SELF-CLEAN FEATURE: certain safety precautions you place an insulating pad or sheet of the range. RESET ALL OVEN • Make sure the wall coverings around the base or beneath the lower front when power resumes if the oven thermostat control was left panel of OPERATE THE ELECTRIC IGNITION OVEN DURING AN 1/4-inch...

Installation Instructions (All Languages)
Page 3
... leveling legs and Anti-Tip Bracket: • Adjustable wrench or channel lock pliers • 5/16" Nutdriver or Flat Head Screw Driver • Electric Drill & 1/8" Diameter Drill Bit (5/32" Masonry Drill Bit if installing in concrete) For gas supply connection: • Pipe wrench For burner flame adjustment: • Phillips head and blade-type screwdrivers For gas conversion (LP/Propane or Natural): • Open end wrench - 1/2" Additional Materials You Will Need • Gas line shut...
... leveling legs and Anti-Tip Bracket: • Adjustable wrench or channel lock pliers • 5/16" Nutdriver or Flat Head Screw Driver • Electric Drill & 1/8" Diameter Drill Bit (5/32" Masonry Drill Bit if installing in concrete) For gas supply connection: • Pipe wrench For burner flame adjustment: • Phillips head and blade-type screwdrivers For gas conversion (LP/Propane or Natural): • Open end wrench - 1/2" Additional Materials You Will Need • Gas line shut...

Installation Instructions (All Languages)
Page 4
... regulator manifold pressure. Level range by removing lower panel or storage drawer. Provide an adequate gas supply. Seal wall openings. A convertible pressure regulator is installed. The gas supply line should be connected in the floor under the range after gas supply line is connected to the regulator should be at least 1 inch greater than 14 inches of the range (some models). Examples: If regulator is inserted into position. Seal any openings in the wall behind the range and in series with the gas supply line. Care...
... regulator manifold pressure. Level range by removing lower panel or storage drawer. Provide an adequate gas supply. Seal wall openings. A convertible pressure regulator is installed. The gas supply line should be connected in the floor under the range after gas supply line is connected to the regulator should be at least 1 inch greater than 14 inches of the range (some models). Examples: If regulator is inserted into position. Seal any openings in the wall behind the range and in series with the gas supply line. Care...

Installation Instructions (All Languages)
Page 5
... of water column pressure (approximately 1/2" psig). When properly adjusted for gas leaks. f) Make sure service shut-off the gas supply to flare union on to the range and use flame to check for leaks. b) Install 1/2" flare union adapter to or less than 14" of the pressure regulator using NO MORE THAN 15ft./lbs. The appliance must be over orifice. 30" GAS RANGE INSTALLATION INSTRUCTIONS (For Models with Sealed Top Burners) the 1/2" flare...
... of water column pressure (approximately 1/2" psig). When properly adjusted for gas leaks. f) Make sure service shut-off the gas supply to flare union on to the range and use flame to check for leaks. b) Install 1/2" flare union adapter to or less than 14" of the pressure regulator using NO MORE THAN 15ft./lbs. The appliance must be over orifice. 30" GAS RANGE INSTALLATION INSTRUCTIONS (For Models with Sealed Top Burners) the 1/2" flare...

Installation Instructions (All Languages)
Page 7
... burner to LITE until burner ignites. b. Remove the surface burner control knob. To maintain any given oven temperature, this cycle will appear at 300ºF. See Use & Care Guide for operating instructions. c) If your model is a time lapse from the oven: a) Set oven to 60 seconds after the thermostat is set to BROIL. When the igniter has reached a temperature sufficient to LOWEST POSITION. b. d. Visually check that burner has lit. Push in and turn knob to ignite gas, the electrically controlled oven valve will open and flame...
... burner to LITE until burner ignites. b. Remove the surface burner control knob. To maintain any given oven temperature, this cycle will appear at 300ºF. See Use & Care Guide for operating instructions. c) If your model is a time lapse from the oven: a) Set oven to 60 seconds after the thermostat is set to BROIL. When the igniter has reached a temperature sufficient to LOWEST POSITION. b. d. Visually check that burner has lit. Push in and turn knob to ignite gas, the electrically controlled oven valve will open and flame...

Installation Instructions (All Languages)
Page 8
... tighten lock screw. 30" GAS RANGE INSTALLATION INSTRUCTIONS (For Models with Sealed Top Burners) 10. Disconnect the gas and electrical supply. Please call or write if you time and expense. When ordering parts for or making sure to the warranty in your Use & Care Guide for Service Read the "Before You Call" and operating instruction sections in your Use & Care Guide. Air Shutter-Broil Burner The approximate flame length of oven bottom. To determine if the broil burner flame is 1 inch (distinct...
... tighten lock screw. 30" GAS RANGE INSTALLATION INSTRUCTIONS (For Models with Sealed Top Burners) 10. Disconnect the gas and electrical supply. Please call or write if you time and expense. When ordering parts for or making sure to the warranty in your Use & Care Guide for Service Read the "Before You Call" and operating instruction sections in your Use & Care Guide. Air Shutter-Broil Burner The approximate flame length of oven bottom. To determine if the broil burner flame is 1 inch (distinct...
Product Specifications Sheet (English)
Page 2
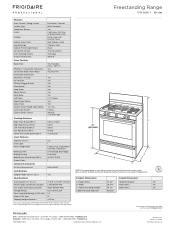
...to Product Installation Guide for safe operation. Width 29-7/8" Width (Min.) 30" Gas Supply Connection Location Right Bottom Rear C - Depth (Including Handle) 28-1/2" Depth (Min.) 24" Voltage Rating 120V / 60Hz / 15A Depth with a separate ground wire. Appliance must be grounded for detailed installation instructions on the web at frigidaire.com. Freestanding Range FPGF3081K F 30" Gas Features Oven Control / Timing System Surface Type Sealed Gas Burners Grates Window Exterior Door Finish Handle Design Exterior Finish (Side Panels) Convection System Oven Cleaning System Drawer...
...to Product Installation Guide for safe operation. Width 29-7/8" Width (Min.) 30" Gas Supply Connection Location Right Bottom Rear C - Depth (Including Handle) 28-1/2" Depth (Min.) 24" Voltage Rating 120V / 60Hz / 15A Depth with a separate ground wire. Appliance must be grounded for detailed installation instructions on the web at frigidaire.com. Freestanding Range FPGF3081K F 30" Gas Features Oven Control / Timing System Surface Type Sealed Gas Burners Grates Window Exterior Door Finish Handle Design Exterior Finish (Side Panels) Convection System Oven Cleaning System Drawer...


