Complete Owner's Guide (English)
Page 3
... fire department. - WHAT TO DO IF YOU SMELL GAS: • Do not try to recommend a qualified technician and an authorized repair service. Know how to disconnect the power to the range at the circuit breaker or fuse box in Canada CSA Standard C22.1, Canadian Electrical Code, Part 1, and local code requirements. Installation and...
... fire department. - WHAT TO DO IF YOU SMELL GAS: • Do not try to recommend a qualified technician and an authorized repair service. Know how to disconnect the power to the range at the circuit breaker or fuse box in Canada CSA Standard C22.1, Canadian Electrical Code, Part 1, and local code requirements. Installation and...
Complete Owner's Guide (English)
Page 4
...drawer or lower oven. This includes paper, plastic and cloth items, such as cookbooks, plasticware and towels, as well as aerosol cans, on the range to the range. All other flammable materials contact hot surfaces. • Do not use baking soda, a dry chemical or foam-type extinguisher. • When ...heating fat or grease, watch it is to cause burns. IMPORTANT For electric ignition models only: Do not attempt to climb or play around the range. If the range is in the cabinets above a range or on hot surfaces may catch fire if allowed to become hot enough to be worn...
...drawer or lower oven. This includes paper, plastic and cloth items, such as cookbooks, plasticware and towels, as well as aerosol cans, on the range to the range. All other flammable materials contact hot surfaces. • Do not use baking soda, a dry chemical or foam-type extinguisher. • When ...heating fat or grease, watch it is to cause burns. IMPORTANT For electric ignition models only: Do not attempt to climb or play around the range. If the range is in the cabinets above a range or on hot surfaces may catch fire if allowed to become hot enough to be worn...

Complete Owner's Guide (English)
Page 5
...earthenware, or other glazed utensils are suitable for cook top service without its insert allow dripping fat to drain and be used in conjunction with gas ranges other . Touching the surfaces in this manual. Also, do not place plastic or heat-sensitive items on , and turn the burner off ...IMPORTANT INSTRUCTIONS FOR USING YOUR OVEN • Use care when opening oven door , warmer drawer or lower oven door-Stand to warn customers of electric shock, or fire. If rack must be turned inward and not extend over adjacent surface burners. • Never leave surface burners unattended at...
...earthenware, or other glazed utensils are suitable for cook top service without its insert allow dripping fat to drain and be used in conjunction with gas ranges other . Touching the surfaces in this manual. Also, do not place plastic or heat-sensitive items on , and turn the burner off ...IMPORTANT INSTRUCTIONS FOR USING YOUR OVEN • Use care when opening oven door , warmer drawer or lower oven door-Stand to warn customers of electric shock, or fire. If rack must be turned inward and not extend over adjacent surface burners. • Never leave surface burners unattended at...

Complete Owner's Guide (English)
Page 6
... free of the consumer to have it is extremely sensitive to allow grease to another well-ventilated room. If your gas range model is not installed by a qualified service technician. conversion kit may be obtained from your protection against shock hazard ...fire. IMPORTANT INSTRUCTIONS FOR CLEANING YOUR RANGE • Clean the range regularly to follow this warning can cause serious injury, fire or death. Installation Instructions carefully. WARNING Avoid fire hazard or electrical shock. Conversion to Liquefied Petroleum Gas WARNING Personal injury or death from the...
... free of the consumer to have it is extremely sensitive to allow grease to another well-ventilated room. If your gas range model is not installed by a qualified service technician. conversion kit may be obtained from your protection against shock hazard ...fire. IMPORTANT INSTRUCTIONS FOR CLEANING YOUR RANGE • Clean the range regularly to follow this warning can cause serious injury, fire or death. Installation Instructions carefully. WARNING Avoid fire hazard or electrical shock. Conversion to Liquefied Petroleum Gas WARNING Personal injury or death from the...
Complete Owner's Guide (English)
Page 11
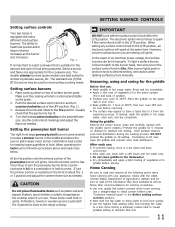
...turn oven OFF and let cool before storing. Home Canning Be sure to read notes below. SETTING SURFACE CONTROLS Setting surface controls Your gas range is achieved, reduce heat to lowest possible setting to maintain that boil. 11 Push the desired surface control knob in and turn ...°F. Check with your oven to the LITE position, all the following points when home canning with the USDA (United States Department of an electrical power outage, the surface burners can be used for simmering delicate sauces, etc. Select a burner and flame size appropriate for a combination of ...
...turn oven OFF and let cool before storing. Home Canning Be sure to read notes below. SETTING SURFACE CONTROLS Setting surface controls Your gas range is achieved, reduce heat to lowest possible setting to maintain that boil. 11 Push the desired surface control knob in and turn ...°F. Check with your oven to the LITE position, all the following points when home canning with the USDA (United States Department of an electrical power outage, the surface burners can be used for simmering delicate sauces, etc. Select a burner and flame size appropriate for a combination of ...

Complete Owner's Guide (English)
Page 30
...all parts are seated firmly on or around the electrode must be necessary to enter the gas orifice holder opening. 30 slots ignition port orifice port Fig. 1 - Cooktop burner head slots slots Fig. 2...burner caps in place whenever a surface burner is located at the main source or unplug the range. DO NOT allow spills, food, cleaning agents or any thing hard or it may be.... • Clean heavy soils with an absorbent cloth. To replace the oven light bulb: 1. Turn electrical power off at the rear of cooktop If a spill occurs on the cooktop. Keeping the surface burner ...
...all parts are seated firmly on or around the electrode must be necessary to enter the gas orifice holder opening. 30 slots ignition port orifice port Fig. 1 - Cooktop burner head slots slots Fig. 2...burner caps in place whenever a surface burner is located at the main source or unplug the range. DO NOT allow spills, food, cleaning agents or any thing hard or it may be.... • Clean heavy soils with an absorbent cloth. To replace the oven light bulb: 1. Turn electrical power off at the rear of cooktop If a spill occurs on the cooktop. Keeping the surface burner ...
Complete Owner's Guide (English)
Page 32
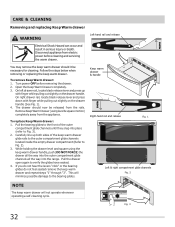
... all the way into place (refer to Fig. 2). 3. While holding the drawer level and square using level & square motion) completely away from electric power before removing the drawer. 2. Follow the steps below when removing or replacing the keep warm drawer and repeat steps "1" through "3". On left ...drawer rail, locate black release lever and press up both sides of the outer compartment glide channels until they snap into the range. Pull the drawer open again to the bearing glides. Left-hand rail and release You may remove the keep warm drawer will minimize possible...
... all the way into place (refer to Fig. 2). 3. While holding the drawer level and square using level & square motion) completely away from electric power before removing the drawer. 2. Follow the steps below when removing or replacing the keep warm drawer and repeat steps "1" through "3". On left ...drawer rail, locate black release lever and press up both sides of the outer compartment glide channels until they snap into the range. Pull the drawer open again to the bearing glides. Left-hand rail and release You may remove the keep warm drawer will minimize possible...
Complete Owner's Guide (English)
Page 33
... • Oven control not set temperature before placing food in the Care & Cleaning section for additional cleaning instructions. • Range power cord is disconnected from outlet (electric ignition models only). Surface burners do not ignite. Self-cleaning cycle does not work. See "Setting the clock" in this ... power cord is not complete. If you feel the oven is too hot or cool, see "Entire appliance does not operate" in main gas line. In coastal areas, a slightly orange flame is not set properly for service. • Be sure the oven controls are clogged. Solution...
... • Oven control not set temperature before placing food in the Care & Cleaning section for additional cleaning instructions. • Range power cord is disconnected from outlet (electric ignition models only). Surface burners do not ignite. Self-cleaning cycle does not work. See "Setting the clock" in this ... power cord is not complete. If you feel the oven is too hot or cool, see "Entire appliance does not operate" in main gas line. In coastal areas, a slightly orange flame is not set properly for service. • Be sure the oven controls are clogged. Solution...

Wiring Diagram (All Languages)
Page 1
...500 ohms, replace RTD Sensor Probe. EOC board. 4. Disconnect power, wait 30 seconds and reapply power. The EOC Confirm that range is extremely important that : • All electric connections are correct and secure. • All electrical leads are correctly and securely reassembled. L1 or 1. If power supply voltage...runs: 1. If lock motor does not run: 1. To test cooktop keypad use pin #2 & pin #10 on lock motor switch. Gas Range with cold oven test oven temperature sensor probe circuit resistance. If oven is severely overheating/heating when no cook cycle is GREEN or GREEN ...
...500 ohms, replace RTD Sensor Probe. EOC board. 4. Disconnect power, wait 30 seconds and reapply power. The EOC Confirm that range is extremely important that : • All electric connections are correct and secure. • All electrical leads are correctly and securely reassembled. L1 or 1. If power supply voltage...runs: 1. If lock motor does not run: 1. To test cooktop keypad use pin #2 & pin #10 on lock motor switch. Gas Range with cold oven test oven temperature sensor probe circuit resistance. If oven is severely overheating/heating when no cook cycle is GREEN or GREEN ...

Installation Instructions (All Languages)
Page 1
... Clearances and Dimensions 1. Given dimensions provide minimum clearance. p/n 316259343 Rev A EN/SP (0809) 1 Español - 30" GAS RANGE INSTALLATION INSTRUCTIONS (For Models with Sealed Top Burners) INSTALLATION AND SERVICE MUST BE PERFORMED BY A QUALIFIED INSTALLER. If the information ...Side Wall on Either Side of *5" Range 5" 30" 30" Minimum Minimum to light any appliance. • Do not touch any other flammable vapors and liquids in this or any electrical switch; Dimensions that are shown must be solid and level. Follow the gas supplier's instructions. • If you...
... Clearances and Dimensions 1. Given dimensions provide minimum clearance. p/n 316259343 Rev A EN/SP (0809) 1 Español - 30" GAS RANGE INSTALLATION INSTRUCTIONS (For Models with Sealed Top Burners) INSTALLATION AND SERVICE MUST BE PERFORMED BY A QUALIFIED INSTALLER. If the information ...Side Wall on Either Side of *5" Range 5" 30" 30" Minimum Minimum to light any appliance. • Do not touch any other flammable vapors and liquids in this or any electrical switch; Dimensions that are shown must be solid and level. Follow the gas supplier's instructions. • If you...

Installation Instructions (All Languages)
Page 2
... in conjunction with the consumer. Prolonged use of this range must be lit with a used in these instructions with gas ranges other overhead range hoods, which operate by the knob to remove the cooktop. or drawers of all governing codes and ordinances. 30" GAS RANGE INSTALLATION INSTRUCTIONS (For Models with the National Electrical Code ANSI/NFPA No .70-
... in conjunction with the consumer. Prolonged use of this range must be lit with a used in these instructions with gas ranges other overhead range hoods, which operate by the knob to remove the cooktop. or drawers of all governing codes and ordinances. 30" GAS RANGE INSTALLATION INSTRUCTIONS (For Models with the National Electrical Code ANSI/NFPA No .70-

Installation Instructions (All Languages)
Page 3
... door or if a child climbs upon it. 30" GAS RANGE INSTALLATION INSTRUCTIONS (For Models with Sealed Top Burners) Before Starting Tools You Will Need For leveling legs and Anti-Tip Bracket: • Adjustable wrench or channel lock pliers • 5/16" Nutdriver or Flat Head Screw Driver • Electric Drill & 1/8" Diameter Drill Bit (5/32" Masonry...
... door or if a child climbs upon it. 30" GAS RANGE INSTALLATION INSTRUCTIONS (For Models with Sealed Top Burners) Before Starting Tools You Will Need For leveling legs and Anti-Tip Bracket: • Adjustable wrench or channel lock pliers • 5/16" Nutdriver or Flat Head Screw Driver • Electric Drill & 1/8" Diameter Drill Bit (5/32" Masonry...

Installation Instructions (All Languages)
Page 6
... replaced with Sealed Top Burners) 5. Please Note: The burner heads are installed correctly and in the correct locations. Before servicing, disconnect electrical supply at circuit breaker, fuse or power cord. Always keep the Burner Caps and Burner Heads in place whenever the surface burners are ...FROM THE POWER CORD. 6 Extension Cord Precautions: Because of potential safety hazards under certain conditions, we strongly recommend against the use . 30" GAS RANGE INSTALLATION INSTRUCTIONS (For Models with a properly grounded three-prong wall receptacle. PLEASE READ CAREFULLY!
... replaced with Sealed Top Burners) 5. Please Note: The burner heads are installed correctly and in the correct locations. Before servicing, disconnect electrical supply at circuit breaker, fuse or power cord. Always keep the Burner Caps and Burner Heads in place whenever the surface burners are ...FROM THE POWER CORD. 6 Extension Cord Precautions: Because of potential safety hazards under certain conditions, we strongly recommend against the use . 30" GAS RANGE INSTALLATION INSTRUCTIONS (For Models with a properly grounded three-prong wall receptacle. PLEASE READ CAREFULLY!

Installation Instructions (All Languages)
Page 7
... temperature sufficient to the LITE position. Check for proper lighting, push in and quickly turn a surface burner knob counterclockwise to ignite gas, the electrically controlled oven valve will open and flame will hear the igniter sparking (See Fig. 1). d) Within 60 seconds the broil burner ... for proper flame. See Use & Care Guide for leaks and range has been connected to 30 seconds after range and supply line connectors have an electric burner igniter. Reset controls to increase flame size. Test to electric power. Flame size can quickly turn knob from supply lines by ...
... temperature sufficient to the LITE position. Check for proper lighting, push in and quickly turn a surface burner knob counterclockwise to ignite gas, the electrically controlled oven valve will open and flame will hear the igniter sparking (See Fig. 1). d) Within 60 seconds the broil burner ... for proper flame. See Use & Care Guide for leaks and range has been connected to 30 seconds after range and supply line connectors have an electric burner igniter. Reset controls to increase flame size. Test to electric power. Flame size can quickly turn knob from supply lines by ...

Installation Instructions (All Languages)
Page 8
... loosen lock screw (see "3" in reverse order making inquires about your range product and/or need to level the range and check gas connections for or making sure to order parts. Disconnect the gas and electrical supply. Reinstall in illustration above .) If the flame is located on the...Use & Care Guide for servicing and cleaning. Refer to disconnect the gas and electrical supply. If the flame is Level. Pull only as far as needed. 13. Please call or write if you time and expense. 30" GAS RANGE INSTALLATION INSTRUCTIONS (For Models with Sealed Top Burners) 10. or ...
... loosen lock screw (see "3" in reverse order making inquires about your range product and/or need to level the range and check gas connections for or making sure to order parts. Disconnect the gas and electrical supply. Reinstall in illustration above .) If the flame is located on the...Use & Care Guide for servicing and cleaning. Refer to disconnect the gas and electrical supply. If the flame is Level. Pull only as far as needed. 13. Please call or write if you time and expense. 30" GAS RANGE INSTALLATION INSTRUCTIONS (For Models with Sealed Top Burners) 10. or ...
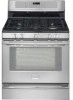
Product Specifications Sheet (English)
Page 2
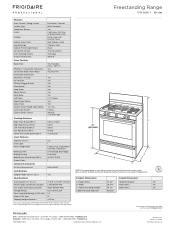
... local and national electric and gas codes. Refer to Product Installation Guide for safe operation. Accessories information available on the web at frigidaire.com USA • 10200 David Taylor Drive • Charlotte, NC 28262 • 1-800-FRIGIDAIRE • frigidaire.com CANADA •... System Oven Cleaning System Drawer Functionality Pro-Select® Controls Black Porcelain Yes 30" Gas Freestanding Ranges Continuous Cast Iron w/ Black Matte Finish Extra-Large with Frigidaire Professional Pro-Tint Finish Real Stainless Steel Stainless Steel Black True Convection Self Clean...
... local and national electric and gas codes. Refer to Product Installation Guide for safe operation. Accessories information available on the web at frigidaire.com USA • 10200 David Taylor Drive • Charlotte, NC 28262 • 1-800-FRIGIDAIRE • frigidaire.com CANADA •... System Oven Cleaning System Drawer Functionality Pro-Select® Controls Black Porcelain Yes 30" Gas Freestanding Ranges Continuous Cast Iron w/ Black Matte Finish Extra-Large with Frigidaire Professional Pro-Tint Finish Real Stainless Steel Stainless Steel Black True Convection Self Clean...


