Complete Owner's Guide (English)
Page 1
All about the Use &Care of your Refrigerator 242108500 (January 2010) TABLE OF CONTENTS Important Safety Instructions 2 Features at a Glance 4 Installation 5 Door Removal Instructions 7 Handle Installation 8 Connecting Water Supply 9 Controls 10 Storage Features 12 Automatic Ice & Water Dispenser 13 Changing the Filter 15 Normal Operating Sounds and Sights 17 Care and Cleaning 18 Before you Call 19 Major Appliance Warranty 21 www.frigidaire.com USA 1-800-944-9044 www.frigidaire.ca Canada 1-800-265-8352
All about the Use &Care of your Refrigerator 242108500 (January 2010) TABLE OF CONTENTS Important Safety Instructions 2 Features at a Glance 4 Installation 5 Door Removal Instructions 7 Handle Installation 8 Connecting Water Supply 9 Controls 10 Storage Features 12 Automatic Ice & Water Dispenser 13 Changing the Filter 15 Normal Operating Sounds and Sights 17 Care and Cleaning 18 Before you Call 19 Major Appliance Warranty 21 www.frigidaire.com USA 1-800-944-9044 www.frigidaire.ca Canada 1-800-265-8352
Complete Owner's Guide (English)
Page 2
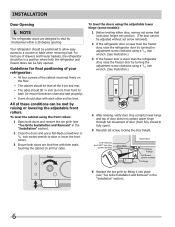
...; Freezer door is level across the top Leveling Refrigerator is level, side-to-side and tilted 1/4" (6mm) front-to-back Toe grille is turned ON Ice & water dispenser operates correctly Front filter must be flush with filter housing (select models) Final Checks Shipping material removed Fresh food and freezer temperatures set Crisper humidity controls set Registration card sent in contact with any moving parts...
...; Freezer door is level across the top Leveling Refrigerator is level, side-to-side and tilted 1/4" (6mm) front-to-back Toe grille is turned ON Ice & water dispenser operates correctly Front filter must be flush with filter housing (select models) Final Checks Shipping material removed Fresh food and freezer temperatures set Crisper humidity controls set Registration card sent in contact with any moving parts...
Complete Owner's Guide (English)
Page 3
... are getting rid of the temperature control panel (Electronic controls), or turning the Freezer and Fresh Food controls to "0" (Mechanical controls) will operate properly. Such damage is equipped with local codes and ordinances. CAUTION To avoid personal injury or property damage, handle tempered glass shelves carefully. Do not use these items to play. To turn off accidentally. If you throw away your old refrigerator/ freezer: • Remove doors. • Leave shelves in...
... are getting rid of the temperature control panel (Electronic controls), or turning the Freezer and Fresh Food controls to "0" (Mechanical controls) will operate properly. Such damage is equipped with local codes and ordinances. CAUTION To avoid personal injury or property damage, handle tempered glass shelves carefully. Do not use these items to play. To turn off accidentally. If you throw away your old refrigerator/ freezer: • Remove doors. • Leave shelves in...

Complete Owner's Guide (English)
Page 5
... toe grille over lower hinges of refrigerator. 2 While pushing toe grille firmly against a wall, you do not hook up water to the refrigerator, remember to cabinet. 4 Close the doors. Toe Grille Installation and Removal To install toe grille 1 Open both doors closed, unfasten right and left side clips into groove of bottom hinge. Use the refrigerator only as instructed in this Use & Care Guide. Do Not use an extension cord...
... toe grille over lower hinges of refrigerator. 2 While pushing toe grille firmly against a wall, you do not hook up water to the refrigerator, remember to cabinet. 4 Close the doors. Toe Grille Installation and Removal To install toe grille 1 Open both doors closed, unfasten right and left side clips into groove of bottom hinge. Use the refrigerator only as instructed in this Use & Care Guide. Do Not use an extension cord...
Complete Owner's Guide (English)
Page 6
... (to ensure that locks door height into position. (The door cannot be adjusted without set screw, locking the door height. 7/16" Wrench and 3/32" Hex Key (some models) Door Stop Flange Open Door Hinge Flange Set Screw (some models) Hinge 6 Replace the toe grille by fitting it into place (see "Toe Grille Installation and Removal" in the "Installation" section). 2 Close the doors and use of drawers and freezer baskets, the refrigerator should be in the...
... (to ensure that locks door height into position. (The door cannot be adjusted without set screw, locking the door height. 7/16" Wrench and 3/32" Hex Key (some models) Door Stop Flange Open Door Hinge Flange Set Screw (some models) Hinge 6 Replace the toe grille by fitting it into place (see "Toe Grille Installation and Removal" in the "Installation" section). 2 Close the doors and use of drawers and freezer baskets, the refrigerator should be in the...

Complete Owner's Guide (English)
Page 7
... cover over the top door hinges. 2 Lift hinge cover straight up and off of the bottom hinge and set aside in the Installation Instructions that came with your appliance). 3 Remove any food from the door shelves. 4 Close the doors. This makes reinstallation easier. 3 Detach the water tube from the top hinge. Lift the door off . Press outer ring against face of fitting Adjustable Hinge (some models) Non-Adjusting Hinge (some models) 7 To reinstall the refrigerator door, reverse...
... cover over the top door hinges. 2 Lift hinge cover straight up and off of the bottom hinge and set aside in the Installation Instructions that came with your appliance). 3 Remove any food from the door shelves. 4 Close the doors. This makes reinstallation easier. 3 Detach the water tube from the top hinge. Lift the door off . Press outer ring against face of fitting Adjustable Hinge (some models) Non-Adjusting Hinge (some models) 7 To reinstall the refrigerator door, reverse...
Complete Owner's Guide (English)
Page 9
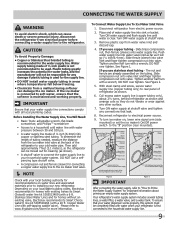
... water supply line. If you use copper tubing - Reconnect refrigerator to the household water supply line. 9 Before Installing The Water Supply Line, You Will Need: • Basic Tools: adjustable wrench, flat-blade screwdriver, and PhillipsTM screwdriver • Access to the "I" position (rear mounted). To Connect Water Supply Line To Ice Maker Inlet Valve 1. The nut and ferrule are already assembled on , lower wire signal arm (side mounted) or set the ice maker's On/Off power switch to a household cold water line with...
... water supply line. If you use copper tubing - Reconnect refrigerator to the household water supply line. 9 Before Installing The Water Supply Line, You Will Need: • Basic Tools: adjustable wrench, flat-blade screwdriver, and PhillipsTM screwdriver • Access to the "I" position (rear mounted). To Connect Water Supply Line To Ice Maker Inlet Valve 1. The nut and ferrule are already assembled on , lower wire signal arm (side mounted) or set the ice maker's On/Off power switch to a household cold water line with...
Complete Owner's Guide (English)
Page 10
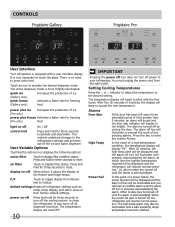
... be displayed and the alarm off until a safe operating range temperature has been reached. User Variable Options Touching the options icon displays the following options: water filter Touch to display filter status. Alarms Door Ajar If the door has been left open for three seconds to Celsius. default settings Resets all dispenser functions. heit to activate and deactivate. There is more brightly illuminated. Controls Frigidaire Gallery Frigidaire Pro User Interface Your refrigerator is...
... be displayed and the alarm off until a safe operating range temperature has been reached. User Variable Options Touching the options icon displays the following options: water filter Touch to display filter status. Alarms Door Ajar If the door has been left open for three seconds to Celsius. default settings Resets all dispenser functions. heit to activate and deactivate. There is more brightly illuminated. Controls Frigidaire Gallery Frigidaire Pro User Interface Your refrigerator is...
Complete Owner's Guide (English)
Page 12
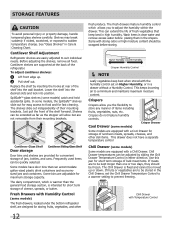
... the drawer. To adjust cantilever shelves: 1 Lift front edge up or down. This keeps incoming air to sudden temperature change. Replace the shelf by sliding the Chill Drawer Temperature Control in a drawer without a Humidity Control. Some models have a separate temperature control Chill Drawer (some models) The fresh drawers, located under the bottom refrigerator shelf, are to prevent freezing. Cool Drawer (some models) catch and hold accidental spills. Wash items in clear water and remove excess water before storing. Use this pan...
... the drawer. To adjust cantilever shelves: 1 Lift front edge up or down. This keeps incoming air to sudden temperature change. Replace the shelf by sliding the Chill Drawer Temperature Control in a drawer without a Humidity Control. Some models have a separate temperature control Chill Drawer (some models) The fresh drawers, located under the bottom refrigerator shelf, are to prevent freezing. Cool Drawer (some models) catch and hold accidental spills. Wash items in clear water and remove excess water before storing. Use this pan...
Complete Owner's Guide (English)
Page 13
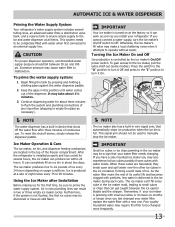
... the tank by the ice maker's On/Off power switch. Furthermore, if the system is installed properly and has cooled for several tubing lines, an advanced water filter, a distribution valve bank, and a reserve tank to ensure ample supply to the ice and water dispenser at a rate of its useful life and becomes clogged with a new one. Press the switch to the "O" position to turn it can work as soon as necessary...
... the tank by the ice maker's On/Off power switch. Furthermore, if the system is installed properly and has cooled for several tubing lines, an advanced water filter, a distribution valve bank, and a reserve tank to ensure ample supply to the ice and water dispenser at a rate of its useful life and becomes clogged with a new one. Press the switch to the "O" position to turn it can work as soon as necessary...
Complete Owner's Guide (English)
Page 14
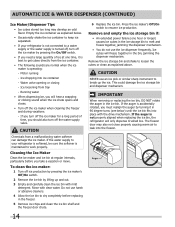
... and carefully clean the ice bin with clear water. CAUTION NEVER use the ice dispenser frequently. Empty the ice container as explained above. Running water • When dispensing ice, you should also turn off the water supply valve. If the auger is operating: - Motor running - If the water supply to your refrigerator is not connected to work properly. Ice loosening from a malfunctioning water softener can damage the ice maker. If the auger is maintained to a water supply or the water supply is turned off, turn...
... and carefully clean the ice bin with clear water. CAUTION NEVER use the ice dispenser frequently. Empty the ice container as explained above. Running water • When dispensing ice, you should also turn off the water supply valve. If the auger is operating: - Motor running - If the water supply to your refrigerator is not connected to work properly. Ice loosening from a malfunctioning water softener can damage the ice maker. If the auger is maintained to a water supply or the water supply is turned off, turn...
Complete Owner's Guide (English)
Page 15
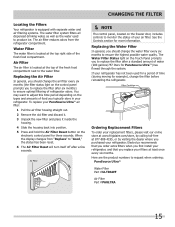
... the new filter and place it inside the housing. 4 Slide the housing back into position. 5 Press and hold the Air Filter Reset button on the freezer door, includes controls to request when ordering: PureSource UltraTM Water Filter Part #ULTRAWF Air Filter Part #PAULTRA 15 You may want to produce ice. See the Controls section for more information. Water Filter The water filter is located at least once every six months. CHANGING THE FILTER Locating the Filters Your refrigerator...
... the new filter and place it inside the housing. 4 Slide the housing back into position. 5 Press and hold the Air Filter Reset button on the freezer door, includes controls to request when ordering: PureSource UltraTM Water Filter Part #ULTRAWF Air Filter Part #PAULTRA 15 You may want to produce ice. See the Controls section for more information. Water Filter The water filter is located at least once every six months. CHANGING THE FILTER Locating the Filters Your refrigerator...
Complete Owner's Guide (English)
Page 16
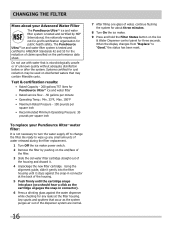
... until the cartridge snaps into the filter housing until it stops against the snap-in connector). 6 Press a drinking glass against the water dispenser while checking for any small amounts of water released during the filter replacement. 1 Turn Off the ice maker power switch. 2 Remove the filter by NSF International, the nationally respected, not-for-profit certification organization for about your PureSource UltraTM water filter: It is tested and certified...
... until the cartridge snaps into the filter housing until it stops against the snap-in connector). 6 Press a drinking glass against the water dispenser while checking for any small amounts of water released during the filter replacement. 1 Turn Off the ice maker power switch. 2 Remove the filter by NSF International, the nationally respected, not-for-profit certification organization for about your PureSource UltraTM water filter: It is tested and certified...

Complete Owner's Guide (English)
Page 18
...; Drawers & Bins • Glass Shelves • • • Toe Grille • • • Exterior & • Handles • Exterior & • Handles (Stainless Steel • Models Only) Replacing Light • Bulbs • • • • • 18 Care & Cleaning Tips What To Use Tips and Precautions Soap and water Baking soda and water Use 2 tablespoons of the cabinet with wet or damp hands. IMPORTANT If you set your temperature controls to turn off cooling, power...
...; Drawers & Bins • Glass Shelves • • • Toe Grille • • • Exterior & • Handles • Exterior & • Handles (Stainless Steel • Models Only) Replacing Light • Bulbs • • • • • 18 Care & Cleaning Tips What To Use Tips and Precautions Soap and water Baking soda and water Use 2 tablespoons of the cabinet with wet or damp hands. IMPORTANT If you set your temperature controls to turn off cooling, power...

Complete Owner's Guide (English)
Page 19
... dispenser should operate. Clean drawer, rollers, and track. Freezer control is set too • warm. • Household water line valve is • not open slightly. • Refrigerator is • being used • frequently enough. Remove valve. Clean valve. Remove any ice. Remove ice container and discard ice from ice maker. Close both doors gently. Remove top layer of ice container. Ice maker wire signal arm is not level. Quick Ice option should produce up " or OFF position. • Ice maker power switch is Off. • • Ice maker has...
... dispenser should operate. Clean drawer, rollers, and track. Freezer control is set too • warm. • Household water line valve is • not open slightly. • Refrigerator is • being used • frequently enough. Remove valve. Clean valve. Remove any ice. Remove ice container and discard ice from ice maker. Close both doors gently. Remove top layer of ice container. Ice maker wire signal arm is not level. Quick Ice option should produce up " or OFF position. • Ice maker power switch is Off. • • Ice maker has...
Complete Owner's Guide (English)
Page 20
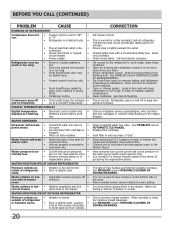
.... Clean or change gasket. See Care & Cleaning. Open household water line valve. The rate of water to be slightly open . • walls. It is not unusual to run more. Move humidity control (some models) to meet warm air from outside. See PROBLEM column OPENING/CLOSING OF DOORS/DRAWERS. 20 not open , causing • cold air from blocking door. WATER/MOISTURE/FROST INSIDE REFRIGERATOR Moisture collects on • Weather is humid. • outside of refrigerator • Door is slightly open . • Freezer control is set...
.... Clean or change gasket. See Care & Cleaning. Open household water line valve. The rate of water to be slightly open . • walls. It is not unusual to run more. Move humidity control (some models) to meet warm air from outside. See PROBLEM column OPENING/CLOSING OF DOORS/DRAWERS. 20 not open , causing • cold air from blocking door. WATER/MOISTURE/FROST INSIDE REFRIGERATOR Moisture collects on • Weather is humid. • outside of refrigerator • Door is slightly open . • Freezer control is set...

Complete Owner's Guide (English)
Page 21
... to repair or replace appliance light bulbs, air filters, water filters, other consumables, or knobs, handles, or other than in your best interest to obtain and keep all costs for service and parts under this warranty must be defective in materials or workmanship when such appliance is installed, used and maintained in accordance with the provided instructions. or external causes such as removal of trim, cupboards, shelves...
... to repair or replace appliance light bulbs, air filters, water filters, other consumables, or knobs, handles, or other than in your best interest to obtain and keep all costs for service and parts under this warranty must be defective in materials or workmanship when such appliance is installed, used and maintained in accordance with the provided instructions. or external causes such as removal of trim, cupboards, shelves...

Installation Instructions (All Languages)
Page 1
... refrigerator. Be careful not to move it to a water supply, make sure the ice maker's power switch is shut off valve for more about setting up and operating the Ice & Water Dispensing system. 4 Place In Permanent Position If possible, use a hand truck to your household water supply line plus 7 feet (2.1 meters). • A shut-off . • After ensuring no water leaks exist at the front and rear. • The sides should align with local plumbing codes. Plug...
... refrigerator. Be careful not to move it to a water supply, make sure the ice maker's power switch is shut off valve for more about setting up and operating the Ice & Water Dispensing system. 4 Place In Permanent Position If possible, use a hand truck to your household water supply line plus 7 feet (2.1 meters). • A shut-off . • After ensuring no water leaks exist at the front and rear. • The sides should align with local plumbing codes. Plug...
Product Specifications Sheet (English)
Page 2
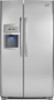
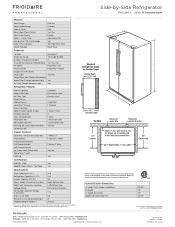
... Number of Dispenser Buttons 11 Crushed Ice / Cube Ice / Chilled Water Yes / Yes / Yes Ice Option PowerPlus™ Ice Freeze Option PowerPlus™ Freeze Display On / Off Option Lock / Light Yes / Yes Temp / Door Ajar / Power Failure Alerts Water Filter Change Indicator Light Yes Air Filter Change Indicator Light Yes Refrigerator Features Interior Lighting Water Filter Type Air Filter Type Fixed Shelves Sliding Shelves Cool Zone™ Drawer Wine / Can Rack Upper Crisper / Lower Crisper Humidity Controls Dairy Compartment Fixed Door Bins Adjustable Door Bins Non-Slip Bin...
... Number of Dispenser Buttons 11 Crushed Ice / Cube Ice / Chilled Water Yes / Yes / Yes Ice Option PowerPlus™ Ice Freeze Option PowerPlus™ Freeze Display On / Off Option Lock / Light Yes / Yes Temp / Door Ajar / Power Failure Alerts Water Filter Change Indicator Light Yes Air Filter Change Indicator Light Yes Refrigerator Features Interior Lighting Water Filter Type Air Filter Type Fixed Shelves Sliding Shelves Cool Zone™ Drawer Wine / Can Rack Upper Crisper / Lower Crisper Humidity Controls Dairy Compartment Fixed Door Bins Adjustable Door Bins Non-Slip Bin...
Product Specifications Sheet (English)
Page 2
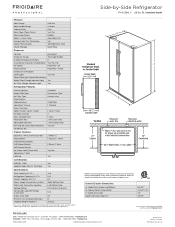
... Number of Dispenser Buttons 11 Crushed Ice / Cube Ice / Chilled Water Yes / Yes / Yes Ice Option PowerPlus® Ice Freeze Option PowerPlus® Freeze Display On / Off Option Lock / Light Yes / Yes Temp / Door Ajar / Power Failure Alerts Water Filter Change Indicator Light Yes Air Filter Change Indicator Light Yes Refrigerator Features Interior Lighting Water Filter Type Air Filter Type Fixed Shelves Sliding Shelves Cool Zone™ Drawer Wine / Can Rack Upper Crisper / Lower Crisper Humidity Controls Dairy Compartment Fixed Door Bins Adjustable Door Bins Non-Slip Bin...
... Number of Dispenser Buttons 11 Crushed Ice / Cube Ice / Chilled Water Yes / Yes / Yes Ice Option PowerPlus® Ice Freeze Option PowerPlus® Freeze Display On / Off Option Lock / Light Yes / Yes Temp / Door Ajar / Power Failure Alerts Water Filter Change Indicator Light Yes Air Filter Change Indicator Light Yes Refrigerator Features Interior Lighting Water Filter Type Air Filter Type Fixed Shelves Sliding Shelves Cool Zone™ Drawer Wine / Can Rack Upper Crisper / Lower Crisper Humidity Controls Dairy Compartment Fixed Door Bins Adjustable Door Bins Non-Slip Bin...


