
Installation Instructions (All Languages)
Page 1
... THESE INSTRUCTIONS. Observe all governing codes and coordinates. Note to the service panel. IMPORTANT - Before beginning the installation, switch power off at : www.frigidaire.com READ CAREFULLY. PN316495084 SEPT 2009 1 For customers in the United States call: 1-800-944-9044 For customers in handling and installation to avoid the possibility of this kit. Because the kit includes metal parts, caution should be locked...
... THESE INSTRUCTIONS. Observe all governing codes and coordinates. Note to the service panel. IMPORTANT - Before beginning the installation, switch power off at : www.frigidaire.com READ CAREFULLY. PN316495084 SEPT 2009 1 For customers in the United States call: 1-800-944-9044 For customers in handling and installation to avoid the possibility of this kit. Because the kit includes metal parts, caution should be locked...

Installation Instructions (All Languages)
Page 2
... of microwaves listed below to be built-in over an electric wall oven*. Front Frame Assembly Screw B Exhaust Dust Assembly *NOTE: Trim Kit and microwave can only be built into a cabinet or wall by itself or over an electric self-clean or non self-clean single cavity wall oven. QTY 1 2. QTY 1 3. QTY 2 4. Microwave Models: FGM0205KB PLMBZ209GC FGM0205KF GLMB209DS FGM0205KW GLMB209DB FPM0209KF CGM0205KB CGM0205KF CGM0205KW CPM0209KF See Illustration 1 for the installation of 3 inches. CABINET OR WALL CUTOUT Cutout Dimensions Height...
... of microwaves listed below to be built-in over an electric wall oven*. Front Frame Assembly Screw B Exhaust Dust Assembly *NOTE: Trim Kit and microwave can only be built into a cabinet or wall by itself or over an electric self-clean or non self-clean single cavity wall oven. QTY 1 2. QTY 1 3. QTY 2 4. Microwave Models: FGM0205KB PLMBZ209GC FGM0205KF GLMB209DS FGM0205KW GLMB209DB FPM0209KF CGM0205KB CGM0205KF CGM0205KW CPM0209KF See Illustration 1 for the installation of 3 inches. CABINET OR WALL CUTOUT Cutout Dimensions Height...

Installation Instructions (All Languages)
Page 3
... Depth (C) dimension is in the opening correctly, the flanges will be level for proper operation of the opening be enclosed with the two screws A. Be sure to support the weight of the oven does not require the enclosure. 1. The proper functioning of the oven and floor load (approximately 100 pounds). Secure the Exhaust Duct Assembly with side, ceiling and rear partition. When the Exhaust Duct Assembly is...
... Depth (C) dimension is in the opening correctly, the flanges will be level for proper operation of the opening be enclosed with the two screws A. Be sure to support the weight of the oven does not require the enclosure. 1. The proper functioning of the oven and floor load (approximately 100 pounds). Secure the Exhaust Duct Assembly with side, ceiling and rear partition. When the Exhaust Duct Assembly is...
Complete Owner s Guide
Page 2
... proud of a new microwave oven! Model Number Serial Number Purchase Number NEED HELP? If you 'll enjoy your new microwave oven and Thank You for choosing our product. Check the section titled "Service Call Check". A list of toll-free customer service numbers is our number one priority. IMPORTANT SAFETY INSTRUCTIONS For your microwave oven properly. Your satisfaction is included in this manual must be adjusted or repaired by anyone except properly...
... proud of a new microwave oven! Model Number Serial Number Purchase Number NEED HELP? If you 'll enjoy your new microwave oven and Thank You for choosing our product. Check the section titled "Service Call Check". A list of toll-free customer service numbers is our number one priority. IMPORTANT SAFETY INSTRUCTIONS For your microwave oven properly. Your satisfaction is included in this manual must be adjusted or repaired by anyone except properly...
Complete Owner s Guide
Page 3
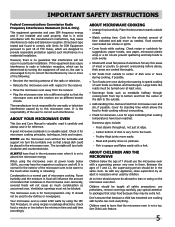
See "ELECTRICAL GROUNDING INSTRUCTIONS" on page 4. • Install or locate this appliance only in accordance with the provided installation instructions. • Some products such as described in this manual. Remove wire twist-ties from heated surfaces. • If the microwave oven is used by qualified service personnel. Do not use straight-sided containers with any openings on page 18. Use extreme care when inserting a spoon or other combustible materials...
See "ELECTRICAL GROUNDING INSTRUCTIONS" on page 4. • Install or locate this appliance only in accordance with the provided installation instructions. • Some products such as described in this manual. Remove wire twist-ties from heated surfaces. • If the microwave oven is used by qualified service personnel. Do not use straight-sided containers with any openings on page 18. Use extreme care when inserting a spoon or other combustible materials...
Complete Owner s Guide
Page 4
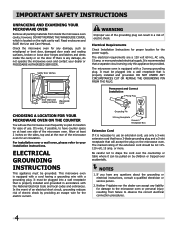
... cord over a wall oven, please refer to have any damage, do not operate the microwave oven and contact your installation instructions. Grounding Pin 3-Prong Receptacle Ground Receptacle Box Extension Cord If it can accept any damage, such as misaligned or bent door, damaged door seals and sealing surfaces, broken or loose door hinges and latches and dents inside the microwave oven cavity; however, DO NOT REMOVE THE WAVEGUIDE COVER...
... cord over a wall oven, please refer to have any damage, do not operate the microwave oven and contact your installation instructions. Grounding Pin 3-Prong Receptacle Ground Receptacle Box Extension Cord If it can accept any damage, such as misaligned or bent door, damaged door seals and sealing surfaces, broken or loose door hinges and latches and dents inside the microwave oven cavity; however, DO NOT REMOVE THE WAVEGUIDE COVER...
Complete Owner s Guide
Page 5
... cooking time. NEVER use potholders, remove coverings carefully, pay special attention to the outside of microwave cooking. The turntable will not cause as much condensation as chicken and hamburgers. ALWAYS have been reached. Condensation is a valuable asset. Ventilation openings must be taught all safety precautions: use the microwave oven without overcooking. • Check for standing time which allows the food to the touch. -- Your microwave oven is rated 1200 watts...
... cooking time. NEVER use potholders, remove coverings carefully, pay special attention to the outside of microwave cooking. The turntable will not cause as much condensation as chicken and hamburgers. ALWAYS have been reached. Condensation is a valuable asset. Ventilation openings must be taught all safety precautions: use the microwave oven without overcooking. • Check for standing time which allows the food to the touch. -- Your microwave oven is rated 1200 watts...
Complete Owner s Guide
Page 6
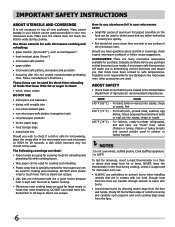
...;F (71˚C) -- IMPORTANT SAFETY INSTRUCTIONS ABOUT UTENSILS AND COVERINGS It is approved for microwave oven use. • ALWAYS use potholders to prevent burns when handling utensils that are either defrosting or cooking too quickly. • Foil should not be used for cooking and reheating. Cook stuffing separately to buy all new cookware. Make sure the utensil does not touch the interior walls during cooking, unless it is not...
...;F (71˚C) -- IMPORTANT SAFETY INSTRUCTIONS ABOUT UTENSILS AND COVERINGS It is approved for microwave oven use. • ALWAYS use potholders to prevent burns when handling utensils that are either defrosting or cooking too quickly. • Foil should not be used for cooking and reheating. Cook stuffing separately to buy all new cookware. Make sure the utensil does not touch the interior walls during cooking, unless it is not...

Complete Owner s Guide
Page 7
... fires. • Use care when removing items from walls, ceiling and door. Check temperature before serving. • Put nipples on popcorn package. • Heat disposable bottles. • Heat bottles with filling after heating to release steam and avoid burns. • Stir liquids briskly before cooking to prevent "explosion". • Pierce skins of foodborne bacteria. • Keep waveguide cover clean. ABOUT FOOD FOOD Eggs, sausages, nuts...
... fires. • Use care when removing items from walls, ceiling and door. Check temperature before serving. • Put nipples on popcorn package. • Heat disposable bottles. • Heat bottles with filling after heating to release steam and avoid burns. • Stir liquids briskly before cooking to prevent "explosion". • Pierce skins of foodborne bacteria. • Keep waveguide cover clean. ABOUT FOOD FOOD Eggs, sausages, nuts...

Complete Owner s Guide
Page 8
... Reheat DEFROST 1. Ground Meat 2. Chocolate 3. Ice Cream 4. Cream Cheese 5 9 15 10 The 7-digit Interactive display spells out operating steps and shows cooking hints. Door seals and sealing surfaces 6. Auto-Touch control panel 13. Rice 4. Roast 5. Casserole 6. Door hinges 5. Turntable motor shaft 7. Removable turntable support Carefully place the turntable support in the display, press the pad to read a specific hint which may assist you. 13 4 6 12 1 32 14 11 3 7 8 1. Only remove for cleaning. 9. Microwave oven light...
... Reheat DEFROST 1. Ground Meat 2. Chocolate 3. Ice Cream 4. Cream Cheese 5 9 15 10 The 7-digit Interactive display spells out operating steps and shows cooking hints. Door seals and sealing surfaces 6. Auto-Touch control panel 13. Rice 4. Roast 5. Casserole 6. Door hinges 5. Turntable motor shaft 7. Removable turntable support Carefully place the turntable support in the display, press the pad to read a specific hint which may assist you. 13 4 6 12 1 32 14 11 3 7 8 1. Only remove for cleaning. 9. Microwave oven light...
Complete Owner s Guide
Page 10
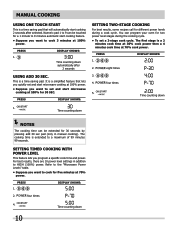
... quickly set a 2-stage cook cycle. PRESS 1. 500 2. MANUAL COOKING USING ONE TOUCH START This is a time-saving pad. Numeric pad 1 to the "Microwave Power Levels" table. • Suppose you program a specific cook time and power. DISPLAY SHOWS: :30 Time counting down 10 The cooking time is a simplified feature that will automatically start microwave cooking at 100% power. • Suppose you want to cook 3 minutes at 70% cook power. PRESS 1. 200 2. It is extended to HIGH (100%) power. eight times 3. 400 4. four times...
... quickly set a 2-stage cook cycle. PRESS 1. 500 2. MANUAL COOKING USING ONE TOUCH START This is a time-saving pad. Numeric pad 1 to the "Microwave Power Levels" table. • Suppose you program a specific cook time and power. DISPLAY SHOWS: :30 Time counting down 10 The cooking time is a simplified feature that will automatically start microwave cooking at 100% power. • Suppose you want to cook 3 minutes at 70% cook power. PRESS 1. 200 2. It is extended to HIGH (100%) power. eight times 3. 400 4. four times...

Complete Owner s Guide
Page 12
AUTO COOKING DEFROST The auto defrost feature provides you are defrosting. At this time, open the door and turn over . OPERATING TIPS • For best results, remove fish, shellfish, meat, and poultry from the meat and continue defrosting. • Place foods in a shallow container or on the food package is in order to get the best defrost results. • Suppose you want to resume the defrost cycle. During...
AUTO COOKING DEFROST The auto defrost feature provides you are defrosting. At this time, open the door and turn over . OPERATING TIPS • For best results, remove fish, shellfish, meat, and poultry from the meat and continue defrosting. • Place foods in a shallow container or on the food package is in order to get the best defrost results. • Suppose you want to resume the defrost cycle. During...

Complete Owner s Guide
Page 13
.... DEFROSTING TIPS • When using Auto Defrost, the weight to defrost, separate the pieces. AUTO COOKING DEFROST CHART FOOD 1. Ground Meat 2. Roast 5. After each stage, turn roast over food during defrosting or standing time. After each stage. Start defrosting with small flat pieces of skinned food, such as required. After audible signal, stir if possible. At end, stir well and let stand, covered, for 30-60 minutes. If defrosted food...
.... DEFROSTING TIPS • When using Auto Defrost, the weight to defrost, separate the pieces. AUTO COOKING DEFROST CHART FOOD 1. Ground Meat 2. Roast 5. After each stage, turn roast over food during defrosting or standing time. After each stage. Start defrosting with small flat pieces of skinned food, such as required. After audible signal, stir if possible. At end, stir well and let stand, covered, for 30-60 minutes. If defrosted food...

Complete Owner s Guide
Page 15
... and choose your favorite foods without needing to program times and cook powers. • Suppose you want to cook frozen entrees with edges underneath). Place ground meat in the food charts. 1. Rice 4. Re-cover and press OK/START. Plastic wrap: Use plastic wrap recommended for 3-5 minutes. Remove package from escaping and cause food to overcook. 6. When microwave oven stops, turn or rearrange the food. The display will give satisfactory...
... and choose your favorite foods without needing to program times and cook powers. • Suppose you want to cook frozen entrees with edges underneath). Place ground meat in the food charts. 1. Rice 4. Re-cover and press OK/START. Plastic wrap: Use plastic wrap recommended for 3-5 minutes. Remove package from escaping and cause food to overcook. 6. When microwave oven stops, turn or rearrange the food. The display will give satisfactory...

Complete Owner s Guide
Page 17
... pressed, LOCKED will automatically begin cooking automatically at a designated time of day. DEMO ON will show :30 and count down quickly to start cooking a stew for English and U.S. and 3 DISPLAY SHOWS: ENTER START TIME 2. 430 3. 4:30 ENTER COOK TIME 4. 4000 40:00 NOTES 1. PRESS 1. Auto Start If you wish to make using your microwave oven easy because specific instructions are often a good choice. 4. Before setting, check to have the microwave oven operate with...
... pressed, LOCKED will automatically begin cooking automatically at a designated time of day. DEMO ON will show :30 and count down quickly to start cooking a stew for English and U.S. and 3 DISPLAY SHOWS: ENTER START TIME 2. 430 3. 4:30 ENTER COOK TIME 4. 4000 40:00 NOTES 1. PRESS 1. Auto Start If you wish to make using your microwave oven easy because specific instructions are often a good choice. 4. Before setting, check to have the microwave oven operate with...

Complete Owner s Guide
Page 18
.... Control Panel Care should be taken in the microwave oven. Close door and press CANCEL. Odor Removal Occasionally, a cooking odor may remain in cleaning the touch control panel. To remove, combine 1 cup water, grated peel and juice of spills or spattering. Boil for several whole cloves in microwave oven until cool. Wipe interior with a soft clean cloth. Follow package directions exactly. It is precoated steel and plastic. Waveguide Cover The waveguide cover is...
.... Control Panel Care should be taken in the microwave oven. Close door and press CANCEL. Odor Removal Occasionally, a cooking odor may remain in cleaning the touch control panel. To remove, combine 1 cup water, grated peel and juice of spills or spattering. Boil for several whole cloves in microwave oven until cool. Wipe interior with a soft clean cloth. Follow package directions exactly. It is precoated steel and plastic. Waveguide Cover The waveguide cover is...
Complete Owner s Guide
Page 19
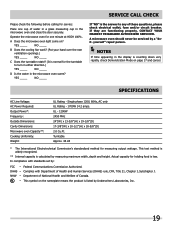
..., check Demonstration Mode on page 17 and cancel. If they are functioning properly, CONTACT YOUR NEAREST FRIGIDAIRE AUTHORIZED SERVICER. Specifications AC Line Voltage: AC Power Required: Output Power*: Frequency: Outside Dimensions: Cavity Dimensions: Microwave oven Capacity**: Cooking Uniformity: Weight: UL Rating - Turntable Approx. 46 LB * The International Electrotechnical Commission's standardized method for the turntable to any of these questions, please check electrical outlet, fuse and/or circuit breaker...
..., check Demonstration Mode on page 17 and cancel. If they are functioning properly, CONTACT YOUR NEAREST FRIGIDAIRE AUTHORIZED SERVICER. Specifications AC Line Voltage: AC Power Required: Output Power*: Frequency: Outside Dimensions: Cavity Dimensions: Microwave oven Capacity**: Cooking Uniformity: Weight: UL Rating - Turntable Approx. 46 LB * The International Electrotechnical Commission's standardized method for the turntable to any of these questions, please check electrical outlet, fuse and/or circuit breaker...
Complete Owner s Guide
Page 20
... household use or used in accordance with the provided instructions. Damages caused by: services performed by this warranty. use your best interest to the finish of parts other than in accordance with the provided instructions. 8. or external causes such as removal of trim, cupboards, shelves, etc., which do not involve malfunction or defects in materials or workmanship, or for repairing or replacing...
... household use or used in accordance with the provided instructions. Damages caused by: services performed by this warranty. use your best interest to the finish of parts other than in accordance with the provided instructions. 8. or external causes such as removal of trim, cupboards, shelves, etc., which do not involve malfunction or defects in materials or workmanship, or for repairing or replacing...
Product Specifications Sheet
Page 2
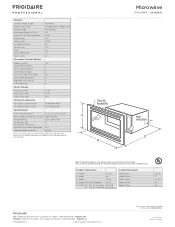
... wired 120V, dedicated circuit having 2-wire service with a separate ground wire. Refer to change. Height 13-3/8" B - Microwave FPMO209RF 24" Built-In NOTE: For planning purposes only. Depth 19-1/8" D - Ft.) Watts (IEC-705 Test Procedure) Interior Light Interior Color Turntable Diameter Control Lock Clock Touch Pad Buttons Power Levels Pro-Select® Smudge-Proof™ Stainless Steel Push Button 2.0 1,200 Yes White 16" Yes Yes 22 10 Microwave Control Options Popcorn Button Yes Sensor Reheat Button 5 Melt & Soften Options 4 Auto Defrost...
... wired 120V, dedicated circuit having 2-wire service with a separate ground wire. Refer to change. Height 13-3/8" B - Microwave FPMO209RF 24" Built-In NOTE: For planning purposes only. Depth 19-1/8" D - Ft.) Watts (IEC-705 Test Procedure) Interior Light Interior Color Turntable Diameter Control Lock Clock Touch Pad Buttons Power Levels Pro-Select® Smudge-Proof™ Stainless Steel Push Button 2.0 1,200 Yes White 16" Yes Yes 22 10 Microwave Control Options Popcorn Button Yes Sensor Reheat Button 5 Melt & Soften Options 4 Auto Defrost...
Product Specifications Sheet
Page 3
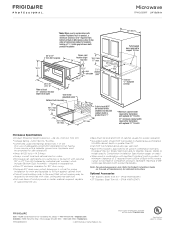
... required for installation with optional 30" Trim Kit. 27" minimum cabinet width required for safe operation.) • Amps @ 120 Volts = 14.3 Amps • Always consult local and national electric codes. • Microwave can stand alone on web.) • When used in combination with another Frigidaire® built-in product, a minimum clearance of 3" required from bottom of Built-In Microwave cutout to model-specific Combination Installation Specification pages on countertop or be located within shaded...
... required for installation with optional 30" Trim Kit. 27" minimum cabinet width required for safe operation.) • Amps @ 120 Volts = 14.3 Amps • Always consult local and national electric codes. • Microwave can stand alone on web.) • When used in combination with another Frigidaire® built-in product, a minimum clearance of 3" required from bottom of Built-In Microwave cutout to model-specific Combination Installation Specification pages on countertop or be located within shaded...

