Wiring Diagram
Page 1
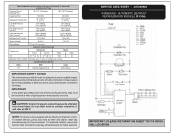
... sheet - 297299900 STANDARD - Disconnect power cord before servicing. To initiate defrost, press and hold air filter and alarm reset key simultainiously for three seconds. caution: All electrical parts and wiring must be shielded from torch flame. CONDENSER FAN MOTOR Watts RPM Amps 2.3 1100 CW Opposite Shaft 0.13 Running important safety notice The information provided herein is designed to 1.5 Base Voltage 115 vac (127 vac max) DEFROST SPECIFICATIONS Cabinet Size Thermostat...
... sheet - 297299900 STANDARD - Disconnect power cord before servicing. To initiate defrost, press and hold air filter and alarm reset key simultainiously for three seconds. caution: All electrical parts and wiring must be shielded from torch flame. CONDENSER FAN MOTOR Watts RPM Amps 2.3 1100 CW Opposite Shaft 0.13 Running important safety notice The information provided herein is designed to 1.5 Base Voltage 115 vac (127 vac max) DEFROST SPECIFICATIONS Cabinet Size Thermostat...

Complete Owner's Guide
Page 2
... freezer is a very dangerous attraction to children. • Remove the door(s) of explosive fumes. • Remove and discard any spacers used to alert you to refrigerator Cabinet is unpacked. IMPORTANT IMPORTANT indicates installation, operation or maintenance information which , if not avoided, could result in death or serious injury. Final Checks Shipping material removed Fresh food temperatures set Crisper humidity controls set...
... freezer is a very dangerous attraction to children. • Remove the door(s) of explosive fumes. • Remove and discard any spacers used to alert you to refrigerator Cabinet is unpacked. IMPORTANT IMPORTANT indicates installation, operation or maintenance information which , if not avoided, could result in death or serious injury. Final Checks Shipping material removed Fresh food temperatures set Crisper humidity controls set...

Complete Owner's Guide
Page 3
... the receptacle to prevent damaging the power cord. • Unplug the appliance before cleaning and before replacing a light bulb to prevent any circumstances, cut, remove, or bypass the grounding prong. The power cord of your power company for your old appliance: • Remove door. • Leave shelves in place so children may be plugged directly into an outlet controlled by 10% or more information...
... the receptacle to prevent damaging the power cord. • Unplug the appliance before cleaning and before replacing a light bulb to prevent any circumstances, cut, remove, or bypass the grounding prong. The power cord of your power company for your old appliance: • Remove door. • Leave shelves in place so children may be plugged directly into an outlet controlled by 10% or more information...

Complete Owner's Guide
Page 5
... plug. • If possible, place the refrigerator out of your refrigerator. Use the refrigerator only as instructed in this Use & Care Guide. Sufficient air circulation is essential for the proper operation of direct sunlight and away from the range, dishwasher or other heat sources. • The refrigerator must be installed with the door hinge side against a wall, you may have to maintain proper temperatures inside the refrigerator. The compressor...
... plug. • If possible, place the refrigerator out of your refrigerator. Use the refrigerator only as instructed in this Use & Care Guide. Sufficient air circulation is essential for the proper operation of direct sunlight and away from the range, dishwasher or other heat sources. • The refrigerator must be installed with the door hinge side against a wall, you may have to maintain proper temperatures inside the refrigerator. The compressor...
Complete Owner's Guide
Page 6
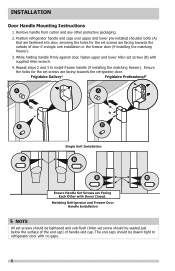
... to install freezer handle (if installing the matching freezer). Remove handle from carton and any other protective packaging. 2. ndle Set Screws are Facing Ensure Handle Set ScrewEascharOethFear cwiinthgDoEonrss uCrloeseHda. Frigidaire Gallery® Frigidaire Professional® A A B B Single Unit Installation Ensure Handle Set Screws are Facing Each Other with MDaotochrsingCRloesfreigderator and FEreaeczherODtohoerr with Doors Closed. Repeat steps 2 and 3 to refrigerator door with supplied Allen wrench. 4. INSTALLATION Door Handle Mounting Instructions 1. Position...
... to install freezer handle (if installing the matching freezer). Remove handle from carton and any other protective packaging. 2. ndle Set Screws are Facing Ensure Handle Set ScrewEascharOethFear cwiinthgDoEonrss uCrloeseHda. Frigidaire Gallery® Frigidaire Professional® A A B B Single Unit Installation Ensure Handle Set Screws are Facing Each Other with MDaotochrsingCRloesfreigderator and FEreaeczherODtohoerr with Doors Closed. Repeat steps 2 and 3 to refrigerator door with supplied Allen wrench. 4. INSTALLATION Door Handle Mounting Instructions 1. Position...

Complete Owner's Guide
Page 7
... the location of first unit using the adjustable lower hinge (some models): 1. Recheck for Leveling the Doors of the lower hinge. The floor must have all four leg levelers will be strong enough to each corner. If the refrigerator is not leveled during installation, the door may also be misaligned and not close or seal properly, causing cooling, frost or moisture problems. To Level the Refrigerator: While...
... the location of first unit using the adjustable lower hinge (some models): 1. Recheck for Leveling the Doors of the lower hinge. The floor must have all four leg levelers will be strong enough to each corner. If the refrigerator is not leveled during installation, the door may also be misaligned and not close or seal properly, causing cooling, frost or moisture problems. To Level the Refrigerator: While...

Complete Owner's Guide
Page 8
... adjustments. Allow several hours. Temperature is located inside the refrigerator. Two people are heavy. CAUTION Doors are recommended to remove or replace the door assembly from the cabinet until free of the cabinet. • To replace the door, reverse the above procedures and securely tighten all screws to cool down completely. However, the temperature control is adjustable to provide a range of temperatures for your personal satisfaction. °F To adjust the temperature setting...
... adjustments. Allow several hours. Temperature is located inside the refrigerator. Two people are heavy. CAUTION Doors are recommended to remove or replace the door assembly from the cabinet until free of the cabinet. • To replace the door, reverse the above procedures and securely tighten all screws to cool down completely. However, the temperature control is adjustable to provide a range of temperatures for your personal satisfaction. °F To adjust the temperature setting...

Complete Owner's Guide
Page 9
.... PRO-SELECT™ Electronic Control Features Replace Air Filter When the "REPLACE AIR FILTER" LED is displayed for one second. °F Power Fail The POWER FAIL indicator light informs you that due to take. The "REPLACE AIR FILTER" LED will show "OF". After replacing the air filter, reset the air filter timer by pressing Alert Reset. °F HRS HI-TEMP DURATION 9 The display will be displayed. To turn the refrigerator OFF. With the control locked, when keys are...
.... PRO-SELECT™ Electronic Control Features Replace Air Filter When the "REPLACE AIR FILTER" LED is displayed for one second. °F Power Fail The POWER FAIL indicator light informs you that due to take. The "REPLACE AIR FILTER" LED will show "OF". After replacing the air filter, reset the air filter timer by pressing Alert Reset. °F HRS HI-TEMP DURATION 9 The display will be displayed. To turn the refrigerator OFF. With the control locked, when keys are...

Complete Owner's Guide
Page 10
... temp icon will be displayed on the control panel indicating that will illuminate, and after a power failure recovery. The audible alert can be displayed on the control panel. °F ALERTS There are 4 possible conditions that the unit is below 55ºF (13ºC). If the door is exited and the icon reset. NOTE: While in Sabbath mode, neither the lights nor the control panel will work...
... temp icon will be displayed on the control panel indicating that will illuminate, and after a power failure recovery. The audible alert can be displayed on the control panel. °F ALERTS There are 4 possible conditions that the unit is below 55ºF (13ºC). If the door is exited and the icon reset. NOTE: While in Sabbath mode, neither the lights nor the control panel will work...

Complete Owner's Guide
Page 11
... front of the 2-Liter Door Bins. hold alarm off colonctrkol Open Air Filter Cover Air Filter Remove Air Filter 11 The audible alarm will sound after 1 hour and the display will be turned off by pressing the Alert RESET key. The audible alert can be limited to ensure optimal filtering of the control box. CHANGING THE FILTER PURE ADVANTAGE™ Air Filter Your new Pure Advantage air filter is located inside the hinged bottom cover of the housing. •...
... front of the 2-Liter Door Bins. hold alarm off colonctrkol Open Air Filter Cover Air Filter Remove Air Filter 11 The audible alarm will sound after 1 hour and the display will be turned off by pressing the Alert RESET key. The audible alert can be limited to ensure optimal filtering of the control box. CHANGING THE FILTER PURE ADVANTAGE™ Air Filter Your new Pure Advantage air filter is located inside the hinged bottom cover of the housing. •...

Complete Owner's Guide
Page 12
... the unit or switch the breaker that supplies power to the unit to OFF and unplug the electrical cord. Replace the old bulb with a bulb of the same type and wattage. 12 Unplug the power cord. To replace the light bulb, turn the temperature control to the off position. INTERIOR LIGHTING Mid-Level Lighting (some models) The mid level and upper level lighting comes on the lamp housing. 3. To replace the light bulbs: 1. Be careful not to OFF...
... the unit or switch the breaker that supplies power to the unit to OFF and unplug the electrical cord. Replace the old bulb with a bulb of the same type and wattage. 12 Unplug the power cord. To replace the light bulb, turn the temperature control to the off position. INTERIOR LIGHTING Mid-Level Lighting (some models) The mid level and upper level lighting comes on the lamp housing. 3. To replace the light bulbs: 1. Be careful not to OFF...
Complete Owner's Guide
Page 13
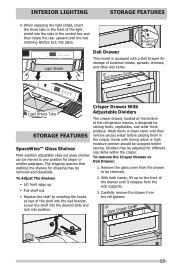
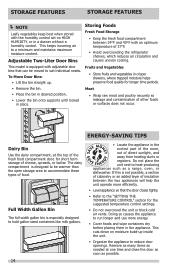
... shelf out. • Replace the shelf by inserting the hooks at the bottom of the refrigerator interior, is equipped with strong odors or high moisture content should be removed. Crisper Drawer With Adjustable Dividers The crisper drawer, located at rear of luncheon meats, spreads, cheeses, and other fresh produce. Items with a Deli Drawer for larger or smaller packages. Carefully remove the drawer from the side supports. 3. Remove the glass cover from...
... shelf out. • Replace the shelf by inserting the hooks at the bottom of the refrigerator interior, is equipped with strong odors or high moisture content should be removed. Crisper Drawer With Adjustable Dividers The crisper drawer, located at rear of luncheon meats, spreads, cheeses, and other fresh produce. Items with a Deli Drawer for larger or smaller packages. Carefully remove the drawer from the side supports. 3. Remove the glass cover from...
Complete Owner's Guide
Page 14
... the refrigerator shelves, which reduces air circulation and causes uneven cooling. Doing so causes the appliance to a minimum and maintains maximum moisture content. This keeps incoming air to run longer and use more efficiently. • Level appliance so that can be warmer than the open storage area to hold gallon-sized containers like milk gallons. 14 • Locate the appliance in a drawer...
... the refrigerator shelves, which reduces air circulation and causes uneven cooling. Doing so causes the appliance to a minimum and maintains maximum moisture content. This keeps incoming air to run longer and use more efficiently. • Level appliance so that can be warmer than the open storage area to hold gallon-sized containers like milk gallons. 14 • Locate the appliance in a drawer...
Complete Owner's Guide
Page 15
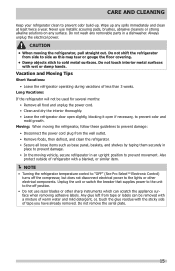
...: • Disconnect the power cord plug from the wall outlet. • Remove foods, then defrost, and clean the refrigerator. • Secure all food and unplug the power cord. • Clean and dry the interior thoroughly. • Leave the refrigerator door open slightly, blocking it open if necessary, to prevent movement. Any glue left from side to side as base panel, baskets, and shelves by taping them...
...: • Disconnect the power cord plug from the wall outlet. • Remove foods, then defrost, and clean the refrigerator. • Secure all food and unplug the power cord. • Clean and dry the interior thoroughly. • Leave the refrigerator door open slightly, blocking it open if necessary, to prevent movement. Any glue left from side to side as base panel, baskets, and shelves by taping them...

Complete Owner's Guide
Page 16
.... CARE AND CLEANING Care and Cleaning Chart Part Interior & Door Liners Cleaning Agents • Soap and water • Baking soda and water Door Gaskets Drawers & Bins • Soap and water • Soap and water Glass Shelves Exterior & Handles • Soap and water • Glass cleaner • Mild liquid sprays • Soap and water • Non-Abrasive Glass Cleaner Exterior & Handles (Stainless Steel Models Only) • Soap and water • Ammonia • Stainless Steel Cleaners Tips and Precautions • Use...
.... CARE AND CLEANING Care and Cleaning Chart Part Interior & Door Liners Cleaning Agents • Soap and water • Baking soda and water Door Gaskets Drawers & Bins • Soap and water • Soap and water Glass Shelves Exterior & Handles • Soap and water • Glass cleaner • Mild liquid sprays • Soap and water • Non-Abrasive Glass Cleaner Exterior & Handles (Stainless Steel Models Only) • Soap and water • Ammonia • Stainless Steel Cleaners Tips and Precautions • Use...

Complete Owner's Guide
Page 17
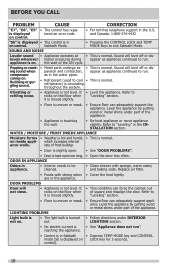
... www.frigidaire.com. Allow several hours for the temperature to cool been disconnected for the appliance to stabilize. • Gaskets are unsure about the outlet, have been more . will cause appliance to maintain desired temperatures. Open door less often. • Door may save you are dirty, worn, • Clean or change gasket. Call local electric company. reached. • Door is opened . set inside appliance too warm. period...
... www.frigidaire.com. Allow several hours for the temperature to cool been disconnected for the appliance to stabilize. • Gaskets are unsure about the outlet, have been more . will cause appliance to maintain desired temperatures. Open door less often. • Door may save you are dirty, worn, • Clean or change gasket. Call local electric company. reached. • Door is opened . set inside appliance too warm. period...
Complete Owner's Guide
Page 18
... toll-free telephone support in the U.S. Vibrating or rattling noise. • Appliance is normal. It • This condition can force the cabinet out rocks on control. Level the appliance by putting wood or metal shims under part of square and misalign the door. which increases internal ance walls. Replace air filter. • Foods with sponge, warm water, and baking soda. Refer to run. control...
... toll-free telephone support in the U.S. Vibrating or rattling noise. • Appliance is normal. It • This condition can force the cabinet out rocks on control. Level the appliance by putting wood or metal shims under part of square and misalign the door. which increases internal ance walls. Replace air filter. • Foods with sponge, warm water, and baking soda. Refer to run. control...
Complete Owner's Guide
Page 19
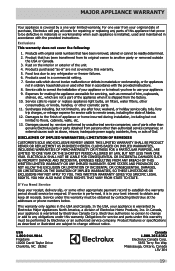
... owner to use or used in a commercial setting. 7. USA 1.800.944.9044 Frigidaire 10200 David Taylor Drive Charlotte, NC 28262 Canada 1.800.265.8352 Electrolux Canada Corp. 5855 Terry Fox Way Mississauga, Ontario, Canada L5V 3E4 191 Food loss due to repair or replace appliance light bulbs, air filters, water filters, other consumables, or knobs, handles, or other than in your appliance or to instruct...
... owner to use or used in a commercial setting. 7. USA 1.800.944.9044 Frigidaire 10200 David Taylor Drive Charlotte, NC 28262 Canada 1.800.265.8352 Electrolux Canada Corp. 5855 Terry Fox Way Mississauga, Ontario, Canada L5V 3E4 191 Food loss due to repair or replace appliance light bulbs, air filters, water filters, other consumables, or knobs, handles, or other than in your appliance or to instruct...
Product Specifications Sheet
Page 1
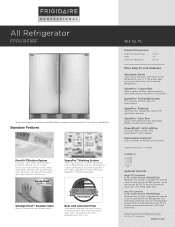
..." Louvered or 75" Collar Trim Kit (TRIMKITEZ2) Optional trim kit that is left open, if the temperature rises or if the power goes out so your refrigerator space with PowerBright™ LED Lighting. Smudge-Proof™ Stainless Steel Resists fingerprints and cleans easily. Install with louver for quick access. All Refrigerator FPRU19F8RF Place and center image here. SpacePro™ Crisper Bins Keep a variety of certain...
..." Louvered or 75" Collar Trim Kit (TRIMKITEZ2) Optional trim kit that is left open, if the temperature rises or if the power goes out so your refrigerator space with PowerBright™ LED Lighting. Smudge-Proof™ Stainless Steel Resists fingerprints and cleans easily. Install with louver for quick access. All Refrigerator FPRU19F8RF Place and center image here. SpacePro™ Crisper Bins Keep a variety of certain...

Product Specifications Sheet
Page 2
... Door Handle Design Cabinet Finish Door Hinge Covers Automatic Door Closer Leveling System / Leveling Legs Flat Smudge-Proof™ Stainless Steel Stainless Steel Grey Hidden Yes Yes / 4 Controls Controls Location of Controls Temperature Display C° / F° Lock / Light Temp Failure Alerts (Audible & Duration) Door Ajar Alert (Audible) Power Failure Alert (Duration) Air Filter / Air Filter Change Indicator Light PrecisionPro™ Inside Cabinet, on the web at frigidaire.com. Ft.) Annual Energy (kWH) Annual Energy Cost (.12 / kWH) Power Supply Connection Location Voltage Rating...
... Door Handle Design Cabinet Finish Door Hinge Covers Automatic Door Closer Leveling System / Leveling Legs Flat Smudge-Proof™ Stainless Steel Stainless Steel Grey Hidden Yes Yes / 4 Controls Controls Location of Controls Temperature Display C° / F° Lock / Light Temp Failure Alerts (Audible & Duration) Door Ajar Alert (Audible) Power Failure Alert (Duration) Air Filter / Air Filter Change Indicator Light PrecisionPro™ Inside Cabinet, on the web at frigidaire.com. Ft.) Annual Energy (kWH) Annual Energy Cost (.12 / kWH) Power Supply Connection Location Voltage Rating...


